Large flowers made of colored paper. How to make a flower out of paper. Photos of flowers made from paper with your own hands
Svetlana Simonova
Purpose: manufacturing flowers to decorate the group.
A very simple and quick decoration idea. Just roll up colored paper into sharp-angled tubes and secure them on a round base in layers. It is important to note that this decoration looks good at long distances, but is not very impressive to the viewer up close. Therefore, choose a suitable place for it, and it will become a bright spot in your interior!
Such flowers can be used to decorate walls for a holiday, and can also be used as "beanies" for a masquerade - to do this, attach an elastic band to the base on both sides. If you take smaller pieces, you can make a very beautiful hair decoration.
Work progress:
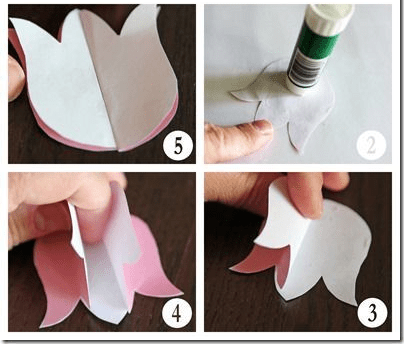
1. Let's prepare the materials necessary for work
Cardboard (warp)
- note paper.
Scissors
Cut out a circle with a diameter of 13 cm from cardboard - we will stick it on it flower. Let's take it paper squares. The number of squares depends on the diameter of the circle. For a circle D=13 cm you will need 24 squares for the first layer, 22 squares for the second, 17 squares for the third layer and 12 for the fourth. 15 squares for the middle flower.


Using glue to make squares "little bags". Apply glue to one side of the square. Take the square by the corners and fold it into "bag".

Thus, we turn all the squares into "little bags" and get petals flower.

When "little bags"- when the petals are dry, glue them with their backs onto the base, in a circle, leaving a little space in the center for the second and third rows.


The flower is ready.
Publications on the topic:
Applique made from twisted corrugated paper is a form of creativity accessible to any age that promotes the development of children’s fine motor skills.
Rain flower made of corrugated paper (master class) Dear colleagues and friends, good day. Today I present to your attention.
Lotus flower made of paper using origami technique (master class) Dear friends, good day. Today I suggest you make it completely.
I would like to present to you a master class on making a flower from colored paper, which you can do with your preparatory children.
PAPER FLOWER To decorate the central wall of the music room, I try to use inexpensive materials at hand. I use it often.
Dear colleagues, I offer you a master class on a flower made from corrugated paper. I made these flowers for our girls. At a matinee dedicated to...
Goal: to develop the ability to create gifts with your own hands. Objectives: develop the ability to fold paper; develop fine motor skills of the hands; bring up.
Undoubtedly, flowers are one of the best gifts for women! And if they are made with your own hands, then the gift will become more meaningful for the person to whom you gave it. How to make paper flowers? It's quite simple. You just have to be patient and have some paper to make flowers. Well, shall we get started?
How to make flowers from paper - simple options
If you doubt your abilities and want to try easier master classes, so to speak, to get better, then try one of the options offered below.
Paper dahlia
You will need:
- 4-5 rectangular sheets of paper;
- threads;
- a small piece of thin tape;
- scissors;
- Place the sheets of paper on top of each other so that their edges match.
- Start folding the layers of paper exactly 1 cm, moving along the longer side.
- It should look like an accordion.
- Tie the accordion with threads exactly in the middle, forming something like a “bow”.
- Using scissors, trim the edges of the “bow”: cut off the corners on both sides. The edge should be sharp as an arrow.
- Hook a piece of thin ribbon under the thread - it will serve as the base of the flower.
- Now comes the most crucial moment: carefully straighten all the layers of the “bow”, arranging them in such a way that you end up with a voluminous dahlia.
- This paper flower can be used to decorate a gift or decorate an interior. As an option, create an ikebana by decorating the tree branches with several flowers.
Cute rose
You will need:
- glue;
- scissors;
- thick paper (preferably red and always green);
- vase;

How to make flowers from corrugated paper
Flowers made from corrugated paper are very delicate and touching.
Big rose bud
You will need:
- corrugated paper in two colors: green and pink;
- stick or wire;
- scissors;
- pencil;
- glue or special green floral tape;
- First you need to decide on the size of the flower - whether it will be large or medium in size. Based on these parameters, draw a stencil of the future blank (from soft paper) - rose petals. They will look like elongated hearts. Cut sheets of pink crepe paper into equal rectangles. To make it easier to cut out the petals, you can secure the stencil and sheets of paper to each other with a stapler. This way the sheets will not fall out and the petals will turn out even.

- Cut out the petals according to the outline of the stencil.

- You should get something like this stack of heart petals.

- Now you need to give the hearts the correct shape. Bend each petal in half so that the top is perpendicular to the floor.

- Using a wire or pen, twist each of the bifurcated parts of the heart.

- Assemble the bottom part of the heart and secure it to the wire base (this will be the stem) using glue or floral tape.

- Repeat this over and over again, placing the next petal on top of the previous one and securing it with tape or glue.

- Prepare the stem: wrap green corrugated paper around a wire of the required size and secure it with glue. You can wrap it with the same floral ribbon. Also make stems with leaves: also wrap green corrugation on the wire, and fasten a leaf at the upper end.

- Cut out the green leaves at the base and secure them under the flower.

- The finishing touch will be fixing the leaves.

- This is the flower you will end up with, very similar to the real one.

Pink peony
You will need:
- 2 pieces of corrugated paper in two colors - dark and light pink;
- a small square of thick paper;
- stapler;
- scissors;

How to make holiday flowers from paper saofettes
Rose from a napkin
You will need:
- one napkin;

As you can see, how to make flowers from paper is a question for which there is a whole sea of answers. There are many techniques, methods and material options from which these lovely paper “masterpieces” are created. A little imagination - and forward to a fairy tale!
Although paper flowers will never replace the charm of real flowers, they can still be an excellent decoration for parties or as an addition to a gift. They're relatively easy to make, but you're always surprised by how subtle and graceful the results can be.
In this lesson I will show you several ways to make paper flowers with your own hands with unique step-by-step photographs using a variety of techniques. Paper flowers have become quite a trend over the past few years.
It’s incredible how “alive” some paper flowers can seem, and how beautiful “fantasy” flowers can be. However, what they will be like depends on the craftsman creating his own paper flower. Some may be large, others small. They can shine and sparkle and look almost natural...


How to make paper flowers with your own hands
Aster is a beautiful lush flower
To decorate any holiday, appropriate decorations may be required. Often these are flowers used to decorate a room. The easiest way to make such decorative elements is from paper. This master class shows how to create a lush flower, which can be of different sizes.

To make such a paper flower you need to take:
- several sheets of colored paper (depending on the expected size of the finished craft);
- scissors;
- ruler;
- pencil;
- glue.

We cut out several squares of different sizes from paper. In our case, the largest is a square with a side of 13 cm, and the smallest is 6 cm.

Each of the cut out squares will be a subsequent layer of petals. We start making the flower with the largest square, fold it in half.

Then we make another fold in the transverse direction.

Now fold the resulting square diagonally.

Finally, we make another fold, folding the workpiece in half.

Using scissors, cut the edge into a semicircle.

We unfold our workpiece.

We cut with scissors between the petals, not reaching the center.

Use your fingers to make folds on each petal. This will add volume to our paper flower.

We do the same with the rest of the petal blanks.

We begin to connect them together using glue. To do this, we place a circle of smaller petals on top of the largest one.

In this way we connect all the petals.

For the center of the flower, you need to cut a strip of paper (about 2.5 cm wide) and fold it in half lengthwise. Then use scissors to make cuts along one edge with scissors, not reaching the other edge.

After this, we begin to twist the strip, periodically fixing it with glue.

This is how we formed the middle of the flower.

Glue it in the center of the flower.

Our lush paper flower is ready.


Paper water lily
Very cute and delicate craft.
Moderately complex, requiring accuracy and patience rather than special skills. A real find for those who like to use scissors.

For the craft we will need:
- green cardboard;
- blue single-sided paper;
- yellow double-sided paper (just a little bit);
- white sheet A4;
- checkered notebook sheet;
- green felt-tip pen;
- pencil and eraser;
- ruler;
- scissors;
- glue.
Shall we begin? We take a notebook piece of paper and draw on it a leaf of a water lily measuring approximately 14x12.5 cm. If you know how to draw, then you can skip this “intermediate” stage and draw directly on the cardboard. If not, no problem. We select a picture of a suitable size on the Internet (query: “water lily leaf coloring, drawing or picture”), place the notebook paper on the screen and carefully redraw it.

Cut out the workpiece.

We put it on the back side of the green cardboard and trace it.

Cut it out.

Take blue paper and cut off the corners, turning the rectangular sheet into an oval (the perfect shape is not required, so you can cut by eye). Glue the lily leaf as shown in the photo.

We cut stripes-waves, stopping a couple of millimeters from the sheet. You shouldn’t make them too thin - you’ll get tired of curling them and they’ll easily come off due to a bad move. The width shown in the photo is the minimum. You can make the strips much thicker, the craft will not suffer from this.

We curl the waves using scissors - the blade of the scissors is on the white side, the thumb is on the blue side.

Now let's decorate our leaf with a natural pattern. Draw a drawing with a pencil and color it. For coloring, I chose a felt-tip pen. Its main disadvantage is that it smudges a lot (this also depends on the cardboard) until it dries. When coloring, try not to touch the areas that have already been “traversed” with your hands. If you are left-handed, paint from right to left; if you are right-handed, do the opposite.

While our beautiful leaf is drying, let’s take care of the main “decoration” - the lily. To do this, take a white A4 sheet, fold it in half twice and tear/cut it. We will get four identical rectangles.

Take one of them and fold it 2 times. Using a ruler and pencil, draw a petal 5 cm long (along the fold line).

We cut out, erase the pencil marks, lay out and bend the petals (more precisely, 2 of them) so that they are all “opened” in one direction.

We make another 5 cm and two 4 cm flowers.

Glue paper flowers.

Now you need to make the core of the lily. For this we need a small piece of yellow double-sided paper. We tear it into small pieces and crush them into balls (in the end I only needed 3).

Glue them to the center of the flower.

We've reached the finish line! All that's left to do is take the lily and glue it onto the leaf. Try to press it only in the center so as not to damage the volume of the petals and waves. Ready!


DIY large decorative flowers made from office paper
In this master class we will make such bright and beautiful poppies from crepe paper.

Materials and tools:
- corrugated or crepe paper in green and red;
- black threads;
- wire;
- scissors;
- glue gun with glue stick.

Cut a wide strip from a roll of red crepe paper.

Then draw a poppy petal template on a piece of cardboard and cut it out.

We apply it to the crepe strip and cut out the petals along the contour.

Without unfolding the petals, stretch their central part to form a depression.


We create poppy stamens from black threads. We wind 20-25 turns of thread around the index and middle fingers. We tie the turns in the center or clamp them with thin wire. Remove the resulting bow from your fingers and cut the ends of the loops.

Roll out the center of the poppy from a piece of green paper. Then we wrap a piece of black thread around the paper ball. We fix the intersection of the turns with a drop of hot glue.


Now glue the ball to the bunch of stamens and evenly straighten the tips around the pistil. The poppy core is ready.

Glue six petals to its bottom.

The first flower bud made from crepe paper is ready!

We form stems from the wire and wrap them tightly with a green crepe strip. We make leaves from the same paper.

Tulips are an unconditional symbol of spring and the favorite flowers of many women. Fortunately, nowadays you can buy tulips all year round. And some men are ready to present their loved ones with freshly cut flowers every day. But why throw so much money down the drain?
To have tulips in your home all year round, make them from paper. Very beautiful flowers are made using the origami technique.

For work you need the following materials:
- a set of bright colored double-sided paper;
- long wooden skewer;
- scissors;
- tube with PVA glue.

Take a sheet of bright colored paper, always double-sided. For example, a lilac shade.

We turn the corner to the opposite side and cut off the excess paper.


The result is a square (rhombus).

Fold it into a triangle again.

We unfold it to its original position.

Fold in half to form a rectangle.

We hide the corners inside.

It turns out to be such a small triangle. Place it with the top up.

Fold the bottom corners towards the top. First left, then right.


Then we turn our workpiece over to the other side and repeat the manipulations again.


We open the resulting figure so that the folds are in the middle.


At the bottom we place a corner that does not open, and at the top is one that has many corners. Bend the right and left corners towards the center so that they overlap.


We do the same process on the reverse side of the workpiece.

We insert these corners one into the other on both sides.

Cut off the bottom corner.

Holding the connections on both sides with your fingers, we inflate air into our paper flower.

It is now voluminous.

All that remains is to bend the top corners.

Here is a tulip bud.

Cut out an oval leaf from green paper.

We form a flower stem from a thin green strip of paper and a wooden skewer.

Use PVA glue to glue a leaf onto it.

And we fix the flower on top.

The tulip is ready!


Other options on our website - how to do it with step-by-step photographs.

3D origami flower


Iris using origami technique

Lotus using origam technique

Banknote flower

In this master class we will make a very simple, but lush and beautiful carnation from paper. It can be used to make holiday cards.

To make cloves you will need:
- colored paper in red and green;
- scissors;
- glue;
- ruler;
- simple pencil.
This flower is made very simply and quickly, so you can make a lot of carnations in a short time. It is advisable to use red or pink paper.
First we need to add 12 identical modules. To do this, cut out 12 identical squares. In this case, their size is 5 by 5 cm, but you can cut out absolutely any squares. The larger the square, the larger the finished carnation will be.
We cut out 12 squares of red color and 1 square exactly the same, only green. It is needed to form the sepals at the bottom of the flower.
Take 1 square. We begin to fold the module. The main thing is to remember only once, all subsequent parts are added in the same way.

We will need to bend the square 3 times. First, bend it diagonally, forming a triangle.

Then bend it one more time. We will get a smaller triangle.

Now it is important to position the part correctly. Turn it so that the opening sides face left. Take the top right side and bend it back.

This completes 1 piece! It is very important that the last fold is on the right side. Otherwise, later we simply will not be able to collect the flower. So you need to make 11 more exactly the same red parts and 1 green one.

Now let's start collecting paper flowers. Take 1 piece and open it, bending the right side slightly back. This is the side that we folded at the end of each piece.

Now we need to insert the back part into the left side of the other module. A pocket is formed there from the first fold.

You can lightly coat the side with glue to help the parts stick better. And bend the right side of the first part back.


We will only have 2 red modules left. We assemble them and glue them on top of the part from the 4 modules below.

Now we take the green modules and glue its sides so that they do not puff up. Glue the parts on the bottom. This is a sepal.

The paper carnation flower is ready!


The blooming cactus is extremely beautiful! But because of the prickly needles, not many people grow cacti and you can only see them blooming in pictures. Let's make a cactus that will be both safe and very beautiful!

We will need:
- Scissors;
- PVA glue and stick glue;
- A small round jar or container (for a flower pot);
- Paper napkins (green, yellow/orange/red for the flower, burgundy or brown for the soil);
- Stapler;
- Decorative tape;
- A small long box (for perfume or medicine).

Let's start "growing" the cactus! First, let's decorate the flower pot - attach a decorative ribbon to the jar. You can wrap it once or twice as you see fit.

Now take the green napkins and cut them into 4 parts. You can cut several napkins at once.


Let's start “growing” greenery on the trunk. Take the box and apply glue to it using a glue stick.

And then we glue the resulting “leaves” on all sides. You need to glue it tightly so that there is no gap. We leave free space at the top - this is where the paper flower will be located. This is what a “cactus” looks like!

The flowers of the cactus are very bright and lush. Take 2-3 brightly colored napkins and connect them in the center using a stapler, crosswise. Let's draw a circle and cut it out.

Now we begin to crease the edges of the napkins towards the center, starting from the topmost circle. You should get such a lush flower!

We glue the flower to the place that we left empty on the trunk.

We use dark-colored napkins to make preparations for the soil, just as we did the greens.

Apply glue to the bottom of the pot, especially in the middle. First glue the cactus and then the soil around it.


Using a thin brush and white paint, you can mark the needles. This is such a beautiful cactus! Bright and not at all prickly!

Every day we come across different, at first glance, completely unnecessary things. But, if you think carefully and imagine that this is not just garbage, but a future work of art. So are cardboard egg cartons.
We buy eggs all the time, but the cartons seem unnecessary and go in the trash. But it is from them that many interesting things come out.
From these we will now try to make a wonderful picture with beautiful daffodil flowers.

To make a painting you will need:
- one cardboard egg tray;
- acrylic or other paints;
- brush;
- scissors;
- glue in a pencil and silicone glue;
- pencil;
- green colored paper.


So let's begin. Take an egg tray and cut it crosswise into two cells.

Now we cut out petals from each cell. As shown in the photo.

From one such mold you will get four petals. Out of the entire box, there will be eight colors for ten eggs. But you can not cut everything out, but make five colors.

In addition to the petals, you need to cut out as many small circles as there will be flowers. The petals will be glued to them. Also cut out five small petals. You can easily cut them out from the remains of the box.

Also, flowers need stamens. They can also be cut from any scraps. And cut with scissors into small strips. And also, the core. For it, you can cut off the top of the cell. And bend the edges with your hands so that the paper flower looks more like the original.

When all the parts are cut out, they need to be glued together. Glue six petals in a circle onto a small circle. There are just as many of them in a real narcissist.

The finished flowers are painted with acrylic paints. You can paint them with any shade, but so that they look like flowers.

While the painted flowers are drying, you need to cut out green leaves and grass from colored paper. Approximately as shown in the photo.


So the spring picture with paper daffodils is ready.

In this master class we will make daisy flowers from corrugated paper.

Let's start from the middle of the flower - cut out a 7cm by 7cm square. We make a blank from cotton wool and wrap it in paper, giving it the shape of a pyramid. Let's tie it up.

Apply bright yellow flock powder to the flat part.

For the chamomile petals, cut out a rectangle - 8cm by 18cm.

We wrap the middle in it, as shown in the photo.


Fold down the edges of the paper.

And we begin to cut out neat petals with small scissors.


Our delicate paper daisy is ready.


Sunflowers are made from corrugated paper in the same way.

The only difference is the middle. We made it from dome-shaped sweets.

And for decoration they used not flock powder, but a silver mesh.


This is how you can quickly and easily make a bright sunflower from corrugated paper.


Flowers made from corrugated paper are very realistic and beautiful.


Bells

Thistle flower


Ranunculus
See step-by-step master classes here -.
Paper flowers will greatly decorate your interior and add aesthetics and comfort to your living space. We will show everyone who wanted to learn how to make paper flowers with their own hands a few simple master classes. A step-by-step photo for beginners will demonstrate the entire process in detail, and our tips will help you get the job done quickly and without unnecessary fuss. From our article you will learn how to make a tulip from paper, how make voluminous flowers for interior decoration, how to cut a rose from colored paper and much more.
To cut out all this floral and paper variety, we have selected for you beautiful diagrams and templates so that you can cope with this task easily and quickly.
Paper flowers have a number of advantages that you will not find in living plants. Firstly, they do not fade, do not require special care and do not cause allergies. With the help of multi-colored paper flowers you can profitable to decorate the interior or clothing, voluminous flowers are attached to the wall or on the door, they are placed in large vases and solemnly presented for the holidays. , you can find out in one of our previous articles.
But to make your first paper flowers with your own hands, diagrams and templates can be printed on a printer. And then - glue the petals according to the suggested instructions.  Do you dream of being given a scarlet flower? Make it yourself! Cut out several templates of different sizes and glue the petals onto a special sponge located in the middle of the flower.
 And for this purple flower you will need:
- white piece of paper;
- watercolor paints;
- scissors or stationery knife;
- aluminum wire;
- balsa wood;
- paper tape;
- green electrical tape or floral tape.
- Cut a sheet of paper into even strips, not reaching the edge of the sheet.
- Fold the cut leaf into a flower shape.
- Make paper leaves and roll them as in the photo.
- Connect the flower with the leaves and secure with tape.
- Attach a small piece of cork to a wire and twist it in half.
- Insert the wire into the middle of the flower instead of the stem.
- Wrap the stem with tape and then with electrical tape.
- The delicate purple flower is ready.


 For a promotion, for example, to March 8th or May 9th, you can make several origami tulips according to the pattern shown in the photo.
 If you have a special stencil, you can make a whole bouquet of scarlet roses and give them to a loved one. Detailed instructions for creating flowers just present in the photo. If there is no stencil, draw the flowers yourself on a sheet of A4 paper yourself.
For other decorative experiments we offer a selection of videos for children and adults with detailed instructions on how to make flower crafts.
Flower templates for paper cutting
And in this part of our conversation we will introduce you flower templates for paper cutting. Shapes and sizes of flowers for every taste - from the most delicate color of an apple tree to bright blue cornflower and fiery red poppy.

 A few more templates will diversify your flower gallery.


 Large paper flowers for decorating a room with your own hands: templates and diagrams
Paper flowers are a win-win option when decorating any room.
 Please note the short but very detailed master class for making voluminous paper flowers.
  Application from such a “pink heart” decorate gift wrapping or a greeting card.
 Crepe paper flowers are the most beautiful trend this season. Such giant paper roses You can form them into a chic bouquet, or you can decorate the hall of a restaurant, cafe or your own apartment with them.
It’s not difficult to make a flower with your own hands from paper, especially if you have instructions and manufacturing diagram. Beautiful roses can be made from simple paper templates.
Popular flowers such as carnations can be easy to make from a regular napkin. These delicate flowers will certainly not wither soon.
 Scrapbooking is another popular form of creativity for both children and adults. From special colored paper you need cut out simple flowers for cute bouquets or decor.
 Easy ideas for scrapbooking - try cutting roses, leaves and petals from special sheets of paper. And then glue everything onto the card along with bows and decorative embellishments.
Making flowers can captivate you so much that you won’t notice how you transfer your hobbies to other materials, such as fabric. Such cute flowers can make an unusual garland or a delicate flower basket.
Paper is an amazing tool for creating crafts, cards and even layouts. You can make airplanes and even weapons from it. And today, on the eve of Women's Day, I wanted to please you with ideas for paper flowers. I specially selected options with different levels of preparedness, so that small children could create and adults would be inspired to create them.
By the way, such crafts look very interesting as interior decor if they are made in the general color scheme of the apartment design. I had the pleasure of making several bouquets with my daughter to give to grandmothers. The time spent with the child is reflected in his exclamations, “And mom and I did this!” and eyes burning with inspiration.
I invite you to master classes in different techniques. In addition to paper, we will use wire, candy and yarn.
- DIY paper flowers
- Origami flower
- How to make a bouquet with sweets
DIY paper flowers
I was really excited about the mimosas. They look very realistic, and are made very quickly, because the buds themselves are pom-poms made of yarn, which are quickly made with a fork.
We will need:
- Colored or corrugated paper
- yellow yarn or threads. But it’s better to look for yarn, because the buds from it look much more realistic and fluffier.
- Wire
- fork or scissors
- Long sticks

The photo shows how to make a pompom using scissors, but you can also use a fork, also tying the middle between the second and third teeth.
You need to wind the thread often to avoid bald spots in the flower.

To prevent the buds from falling under their own weight, we need wire. We screw it to the middle of one flower.

Now you need to wrap the wire with green paper to get a stem. To do this, we glue the base of the flower with glue or using a glue gun, so we fix the edges.

After one or two turns, attach the second bud.

So we do five or six flowers on a branch.

Now you need to make leaves.
A long strip of green paper will need to be wrapped around a kebab stick. But first you need to make many cuts along the entire length, not reaching the edge 1 centimeter.
Take a total width of 4 centimeters.

Wrap the prepared fringe around the stick, pulling it tightly.

This is what we get in the end. I congratulate you, the bouquet is ready for International Women's Day!

I also came across master classes made from egg trays. They are also made entirely of paper, only they have a recessed shape.

These same trays will make a wonderful flower wreath that can decorate your apartment or cottage.

This cute panel of daffodils looks like the real thing. See how easy it is to repeat all the steps.

The first spring messengers made of paper turned out to be very tender.

The needlewomen have already come up with all the steps for creating such paper beauty for us. We can only repeat.
Schemes and templates of paper flowers for cutting
To go through the preparatory stage of preparing for the craft, I will give several popular and most often used templates.
You can use them and cut out, rather than draw, the leaves yourself, this will save time for busy parents, and also reduce the waiting time for an excited child.

These diagrams are suitable for such gerberas.
Each petal bends lengthwise. The templates are overlapped and glued to the center.
And the three middle levels need to be bent with the petals towards you to achieve volume.

Another template for creating a fantasy flower.

Popular patterns are daffodil, bluebell and chamomile. 
With these templates you can create a whole bouquet using paper of different textures and colors.
Master class on how to make voluminous flowers
Making voluminous flowers is not at all difficult, the main thing is to choose the right colors and carefully cut out all the contours. Otherwise, you may end up with painstaking but sloppy work.
You can get extraordinary hyacinths with a little imagination.

Take a strip of paper, 5 centimeters wide and 10 centimeters long.
Before reaching the edge, we retreat 1 centimeter and begin to make a fringe 1 centimeter wide.
If you are not sure that you can immediately cut straight, then first draw lines with a pencil along the ruler.

We bend each strip to the edge. We bend in one direction only.

Roll up a tube from a green strip measuring 4*10 centimeters. Fix the edges and the middle of the product with glue.

Now you need to tightly wrap the flower blank around the tube, placing the base on top of each other.

Prepare the leaves and attach them to the base with glue.

Using different shades, you will create a bright rainbow bouquet.

I present to your attention an interesting craft in the form of a ball, which consists of gerberas.

You will need:
- Yellow paper
- coin
- scissors
The picture shows that a saucer was used to create the circle, but you can also take an ordinary compass or any other round object.
We need to make 8 circles of different sizes.
2 circles with a diameter of 10 centimeters, 2 circles with a diameter of 9 centimeters, 2 circles with a diameter of 7 centimeters and 2 circles with a diagonal of 6 centimeters.

Fold the circles in half to determine the middle. Then, using a coin, we form the petals. We connect their edges to the middle. Determine the center of the flower.

We cut the lines of the petals to the center and bend them along vertically. Glue all the levels and decorate the center of the flower.
Bouquet in a pot - idea for children
There are unusual ideas for children where they can not only show their imagination, but also decorate the house.
I suggest making an interesting bouquet in a real flowerpot. You can use any store-bought pot, or maybe you have an already used one lying around somewhere.

You can use the bottom of a plastic bottle as a pot and paint it.
A sheet of green paper needs to be drawn in strips 1 centimeter wide and 8 centimeters long.

We cut them to the line and glue the edges.

We place the finished grass in a flowerpot, having previously wrapped it with double-sided tape so that the leaves do not come out.

We cut out the buds and cores ourselves.

Glue the cores in place and go to complete the craft.

I was also impressed by the daffodils that stood on my grandmother’s table during my childhood, only they were made of plastic, but they looked exactly like in the photograph.

Let's start making them. For one flower we will need three levels of petals.
For them, take squares with a side of 6 centimeters.

Fold them in half twice and cut out the petals, not reaching the center 1 centimeter. There should be four petals.

We lay out the flowers and see if all the buds have received petals.

We make a fringe from a strip of corrugated paper, 2.5 centimeters wide and 16 centimeters long. The paper stretches easily, be careful.

We roll up our core and glue it to the bud.

You can stick the finished flowers directly onto the leaves or form a stem from the wire, wrapping it with green paper or ribbon.
Origami flower
Origami greatly develops logic and motor skills. Of course, little children won’t be able to fold a piece of paper evenly, but it’s also a great activity for a schoolchild.
Today we will try to make a tulip. Are you ready? Then make a square out of a piece of paper and let’s start creating.

The diagram shows detailed instructions for folding the sides.

This lotus also looks incredibly beautiful. And it is also made using origami technique. Of course, before everything works out, you will have to puff, this is not a self-sufficient tulip. There are more petals here.

To create this craft, you need thick paper, such as landscape sheets.

First we make blanks. We will need four white stripes, and also take 4 green stripes.

According to this principle, you need to fold all the white and green stripes.

Place white blanks inside each other

Find the middle and sew it on the machine, this way you will fix all the blanks in the center.

Now you need to open the petals.

I think that any girl and even woman will like this decoration.
How to make a bouquet with sweets
Very original ideas are made from candies and corrugated paper. I made it from one that is sold everywhere in office supply stores. But somehow, while watching another master class, I realized that their paper was different! More dense, it holds its shape better.
So, you can use the most affordable paper, but it will be better if you take the trouble and buy the one that florists use. Believe me, the difference is very noticeable.

We will stick candies onto the kebab sticks using tape.

Now you need to prepare the blanks for the rose.

Each top must be bent using a stick or thin rod. It is optimal to use a lollipop handle.

Wrap each candy with the prepared petals.
You will achieve greater similarity if you stretch the paper a little at the place where the candy will be located.

The ends can be tied with thread or secured with tape.
The simplest crafts made from colored paper
There are always simple and easy product options. So, on my topic, I found just basic steps for making a paper rose. Absolutely any paper is suitable for its creation; you can even use newspaper, thus obtaining a very stylish accessory.

So, we cut an uneven line to the center.

And we begin to roll the entire workpiece into a spiral.

Fix the edges and press the center inward so that the petals straighten.

Everything is ready, adjust the flower a little and run to decorate the room.

I also bring to your attention some interesting tulips.

Each bud is glued together from 4 templates, which were slightly bent in the middle in advance.

Glue the edges, connecting each next template to the middle.
For the rod, you can use terry wire or twist the rod out of paper.

Now the seedlings are ready for planting in pots.

This craft will be much more interesting if you use velvet cardboard or paper of different backgrounds and textures.
Corrugated paper carnations
These flowers look royal and can be made in five minutes. Of course, if you collect them in a bouquet, you get a whole gift!

Corrugated paper stretches very easily, so often its top edge is slightly pulled in width. This makes it easier for it to wrap itself inside and form a bud itself.


My dears, these are not all the ideas for paper flowers, but the article turned out to be quite long. If there is something not clear to you in the master classes, then ask questions in the comments, we will understand in more detail.
Protoss: register the production facility with Rostekhnadzor. What documents are evidence that the apartment is a service apartment?
 Space donut hole
 Types of discounts on Russian Railways tickets and rules for obtaining them Train tickets for students
 Lecture on syndromic pathology
 Organizational aspects of the activities of pharmacy organizations
 Water Pressure in the Deep Ocean Practice Reports
 What is inductance, its definition and unit of measurement