DIY playground in a private house. Do you need a DIY playground using improvised materials? Look at the photos of the options equipped at the dacha. Pergolas made of climbing plants
In the summer, most parents try to take their children out of dusty, polluted cities into nature. If you spend the summer months at the dacha with your children, then you need to make sure that their summer vacation is not only beneficial for them, but also enjoyable. To prevent your child from getting bored at the dacha, make a playground for him with your own hands. This will require very small financial investments plus your time and imagination. Be sure to involve the children themselves in creating the playground. Firstly, joint work helps to unite the family and strengthen the relationship between parents and children, and, secondly, designing a playground is a creative activity that will be useful for the overall development of the child.
Any child will prefer natural materials (for example, wood) to artificial plastic when playing. Therefore, we will focus on creating crafts for the playground from natural materials.
The required components of any children's playground are as follows:
Sandbox
- water
- green spaces
- children's playhouse (tent, awning)
- swing
- natural materials for play (gravel, stones, tree cuts, cones, twigs, plants, etc.)
1. DIY playground. DIY sandbox
All children get a lot of joy and pleasure when playing with sand. Playing with sand provides unlimited opportunities for a child's development. You can make Easter cakes from sand, build castles and tunnels, cook “soup” for dolls, and it can be transported in cars. Another fun thing to do is bury various objects in the sand and then dig them up. You can sprinkle dry sand on the beetle, and then watch how it gets out of it. It is interesting to draw pictures and write letters on damp sand.
Making a children's sandbox with your own hands is not at all difficult. First of all, you need to choose a suitable place for it. The sandbox should not be in the sun, but at the same time, a too dark, damp place is not suitable for it. If the child is still small, the sandbox should be near the house so that the baby is always in your sight.
You can fence off the sandbox using logs, stumps, and boards. If the sandbox is large enough, you can divide it into several play areas (see photo below).

To protect from the sun, you can make a canopy.

2. Children's playgrounds for the dacha. Swimming pools
Just like with sand, children only like to play with water. The best option is to combine games with water and sand. Make sure that your child always has a source of water near the sandbox. Even a small bowl of water will be enough.

Of course, any child will be delighted to have a pool at their dacha.

Another good fun is to spray each other with water from a hose on a hot summer day. Or you can ask your dad or grandfather to make an outdoor shower from PVC pipes.


3. Children's playgrounds. Children's playgrounds photo
When creating a playground with your own hands, you cannot do without all kinds of logs, stumps, tree cuts, and boards. You can make tables and chairs from stumps and surround the sandbox with them. Stumps and logs can be used as sports equipment: it is useful for children to learn to walk on them while maintaining balance. The tree cuts will make a nice path.
A child's imagination can turn a simple log into a bridge spanning an abyss, into an airplane, a car, a horse, etc. Such games with object replacement are very useful for developing children's creative thinking.


4. Decoration of the playground. DIY playground photo
A prerequisite for a good playground is the presence of greenery: trees, shrubs, grass, flowers.
Large trees provide protection from the sun on a hot summer day. They are fun to climb.

Sometimes trees have to be removed for various reasons. However, you should not cut down the tree at the very root - turn it into an interesting decorative element - a fairy-tale “house”. See link >>>>

The base of large trees is the best place to create fairy houses. Making such a fairy-tale house from any available material will be interesting for every little girl.


Read about how to make furniture for dolls from twigs in the article “Crafts from tree branches with your own hands” >>>>

Be sure to help your child make his own flowerbed, which he will take care of on his own.


Even if you yourself prefer not to plant anything in your dacha, make sure that your child has his own small garden. Just a couple of beds where he can grow unpretentious and tasty plants, for example, green peas.

5. Crafts for the playground. Decorating a playground with your own hands
Decorating children's playgrounds is an interesting and creative activity. Handmade crafts made from wood, tires and plastic bottles are suitable for decorating a children's playground. Here are some ideas for decorating a playground with your own hands. Be sure to involve children in the process of creating crafts for the playground.


6. How to make a playground. Playground ideas
When creating a playground with your own hands, be sure to give your child a secluded corner where he can be alone or in the company of his friends, dream, play, read, and finally take a break from you, the adults. This could be a purchased children's playhouse or tent. Or you can make a children's house (tent, pavilion) with your own hands. Here are some interesting ideas.
DIY children's house made of wood.

Children's houses for dachas. Children's houses tents.
The easiest way to make a children's house with your own hands is to stretch a rope between two trees, pillars, between a tree and a fence (see photo below) and throw a thin blanket over it. The ends of the blanket must be tied with ropes to pegs driven into the ground, or pressed with stones.


DIY children's house.

Using the same principle, you can “grow” a children’s house from sunflowers. Sunflowers are a good plant to grow with children. They have large seeds, grow quickly and are very unpretentious. Plant sunflowers around the perimeter of the circle at a distance of 10 cm from each other. When they grow to 1.5 meters, collect their tops and tie them together - your sunflower house is ready! Yes, don’t forget to leave room for entry when planting!

7. DIY playground. Children's playground made of wood
As we already mentioned at the beginning of the article, be sure to make sure that the child has natural materials available for play: sand, water, large stones, small stones, twigs, pine cones, plants. Games with natural materials are of great importance for the development of sensory perception, motor skills, creative thinking of the child, and have a beneficial effect on the physical and mental health of children.


Material prepared by: Anna Ponomarenko
Other publications on the topic of this article:
If there are small children in the family, it is simply necessary to arrange a playground for them in the country. Here they will play in the fresh air, allowing their parents to relax or go about their business. And when you are free, you can always join them. The play area in the garden will become much more positive, brighter and more interesting if you use crafts for the playground. There are many ways to make them yourself, which we will discuss in this article.
To decorate a children's playground, it is not at all necessary to buy expensive garden decor. Crafts made by yourself will allow the site to look very original. This will be a unique children's corner that only you and your children have.
Making crafts yourself is pleasant in all respects - materials for such creativity are available in abundance, and completely free of charge; it is enough to use your imagination, creative imagination, and soon you will be able to please your kids. Work must begin by choosing the location where the site will be located. A spacious place not far from the house, where there is both sun and shade, is suitable.
A good covering for the area where the crafts will be placed is a sand mound or lawn. It is necessary to keep the lawn clean so that there are no glasses, sharp pebbles and sticks among the grass, so that children can play barefoot, as well as inedible berries. As you know, in childhood we want to taste everything, especially what looks bright and attractive.
What can be used as raw materials?
First of all, these are old tires. Nowadays, used tires are literally taking on a new life - they are used to make flower beds, swings and a wide variety of crafts for the playground.
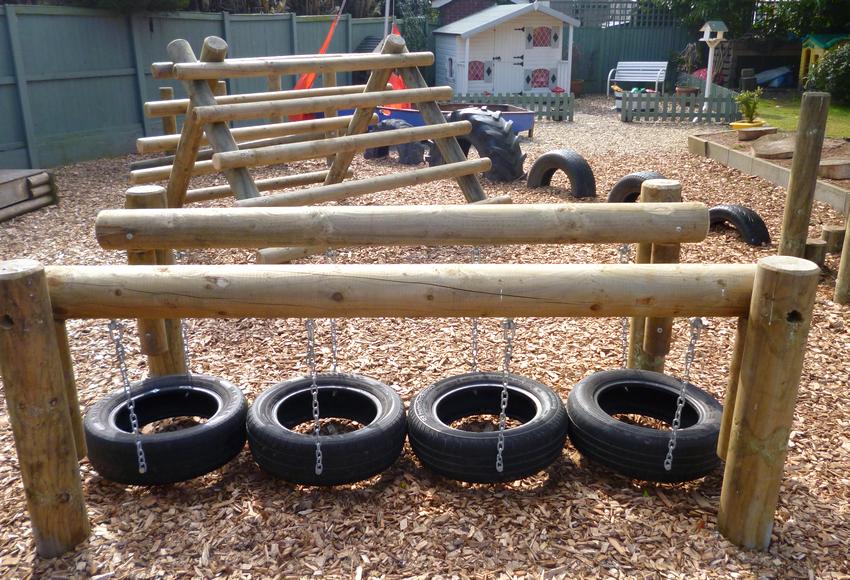
Tires are good because they can be used to create sports equipment. For example, such a tunnel, make a swing, dig it into the ground at a distance so that you can jump and walk on it
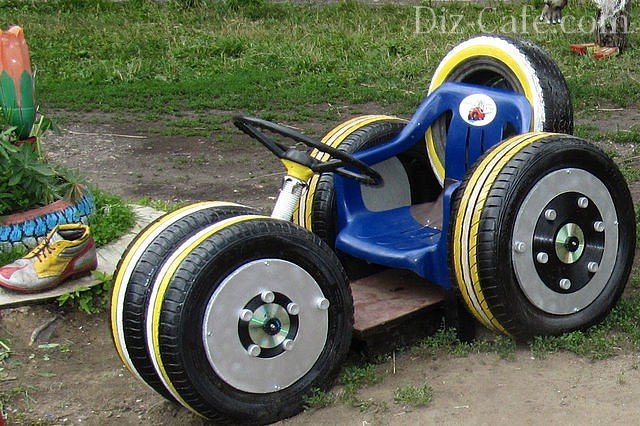
Today, not only boys, but also girls are delighted with cars. Such a luxurious car can be made from tires and a plastic chair. An easier option is to dig 4 tires into the ground and make a wooden seat
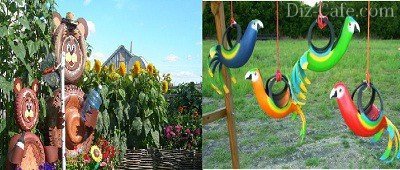
You can create amazing crafts from tires - funny bears (tires of different sizes, cardboard, an old basin are used), bright tropical parrots. When painted, they seem to come to life and turn the playground into a corner of joy and positivity.
The tire must be washed and dried before starting the creative process. You can walk and jump on the tires that are dug in while standing; you can attach boards on top, paint them, and make such “climbing walls” even more interesting. You can make a sandbox out of a large tire, and there are simply countless options for creating different figures.
More ideas for arranging a children's playground in the country:
Bottle palms and plastic zoo
Plastic bottles are also a very common material for crafts. The variety of their shapes and sizes allows you to create very interesting things - palm trees, flowers, figures of insects and animals.

Exotic palm trees will enliven any landscape, and making them is not at all difficult. There is plenty of material such as bottles everywhere. You don’t have to follow strict instructions; experiment by creating a tropical corner for yourself.

Making such a pig is very simple - use a five-liter bottle for the body, two-liter bottles for the legs. The ears from the tail are also cut out of plastic.

This flower garden will not wither throughout the summer. Flowers are the necks of bottles, cut in the shape of lilies and bells, leaves are bottles without a base, cut into 4-6 pieces. Paint them with paint from the remote control and install them in the right place
Such crafts are practical - they are not afraid of either rain or scorching sun. To make a palm tree, cut off the bottom of the bottles and string them on top of each other, insert a metal rod inside - this is the base of the palm tree. To create a “crown”, use one or more bottles and cut them from the base to the neck into several strips - these will be the leaves. Then trim the cut pieces at an angle so that they resemble the shape of the hard leaves of a palm tree. Insert the neck of this bottle into the “trunk”. To create a classic palm tree, brown bottles (trunk) and green bottles (crown) are used, but it is not at all necessary to adhere to classical standards.
Useful: how to make garden figures for your dacha with your own hands:
Parade of plywood figures
Plywood is a great material for making flat, brightly colored figurines that will lift anyone's spirits. You can depict anything on plywood - your favorite cartoon characters, movie and book heroes, and then cut out the figures and place them in the garden. The composition can be used as a delimiter fence for garden areas.

Figurines in the form of your favorite cartoon characters are always a delight. A five-liter bottle is also used to create Winnie the Pooh

Plywood cat and mouse surrounded by flowerpots, located on a soft lawn - an excellent place for relaxation and active games for kids
Foam figures
Polyurethane foam is not a very common, but interesting material for creating crafts. The figures made from it look like toys, look great and are very popular with children.

Figures made from polyurethane foam look ready-made. The website has a master class on how to make them, if you are interested, you can master the technique of making them
Hedgehogs and ladybugs made from pebbles and boulders
Large pebbles are also a suitable material. If you paint round stones with bright colors, you will get funny bugs, hedgehogs or other animals, depending on what your imagination tells you. It is better to paint them with acrylic paints, and then cover them with colorless varnish. Drawings with a clear outline look good. First it is drawn with a pencil, then with black or white paint. Colored paints are applied between the contour lines.
Such a family of ladybugs will add positivity to a children's corner. The easiest way to paint stones to look like bugs is to apply a simple outline drawing, and then use bright contrasting paints and varnish
Combinations of materials - room for creativity
You can create interesting crafts from logs by combining pieces of wood of different sizes and different lengths. Combinations of various materials - tires and logs, tires and plastic bottles will not let you get bored at all; you can make a playground that will be the envy of those who purchased a ready-made one for their garden.
You can create interesting lawns or flower beds in the shape of animals and insects using bottles as a fence. Work with your children; they usually come up with completely out-of-the-box, interesting ideas.

A funny crocodile flowerbed - a suitable decor for a children's playground, made of plastic bottles (outline), eyes - plywood and plastic

If there was an old tree on the property that you cut down, do not rush to get rid of the stump. You can make this great house out of it with a door, roof and windows. It will not only delight children, but will also be a wonderful decor for the site

Zebras are made from logs and tires, and their manes are made of plastic. This is both sports equipment and homemade garden decor at the same time

Plastic bottles and an old tire were used to create the sun. The composition is very bright, positive, and easy to make. Bottle caps are nailed to the tire, then screwed to the bottle - the beams are ready
If you still have unused materials after building a house or arranging a garden, do not rush to throw them away. For example, you can use pieces of bright ceramic tiles to lay out paths, the space around the figures, or use pieces of broken tiles to lay out mosaics and images of various characters. Draw the outline of the figure on the path, and then lay it out with tiles. If laid out on the ground or on sand, such a mosaic will be short-lived, but laid out on a cement mixture will create an image that will last for years. Rub the seams after drying, and the result will please you.
Every child needs movement during the period of active exploration of the world. He needs to play, run, have fun. Children usually spend their time outside on playgrounds. This place should be as safe and functional as possible. Such requirements apply to all sites, no matter where they are built.
If a vacation spot is being set up on a suburban area, you should become familiar with the technology of work and prepare the necessary materials and tools. It is better if someone who has basic carpentry and plumbing skills builds a playground in the yard with their own hands.
Primary requirements
Each playground is created to develop the child's skills and increase his level of physical fitness. The main feature of such complexes is that the child can play and move independently. Adults here act only as observers. For this reason, all playgrounds are decorated very brightly. In addition, each building in the complex can be used differently. As can be seen from the numerous photos of playgrounds, various structures can be positioned differently depending on the design idea.

The requirements according to which playgrounds must be built can be found in the relevant SNIP. The most relevant established standards are the following:
- The site should be fenced off from passages. At the same time, a distance of at least 10 m should be made from it to the parking lots.
- The playground area should be made impassable. It should be separate from footpaths.
- The site is landscaped around the perimeter. In addition, it is necessary that the territory have both darkened and sunny areas.
- The site should be located 20 m from other large open areas and waste receptacles.
- Every three months, all equipment installed on the playground must be inspected. It must be functional and undamaged.
- The sand in the sandbox should be changed every year. At the same time, the safety of sand on the playground is confirmed by certain sanitary and hygienic standards.
For children of different ages, it is necessary to divide the playground into certain zones. They are performed for children under three years of age, preschool children, and primary schoolchildren. However, often a playground for children includes attractions for several age groups at once.
The sandbox must be equipped with a lid. Therefore, it is better to make it simple. Such an element of the playground should not only be beautiful, but also functional. With a complex sandbox configuration, it will be difficult to make a lid. It is better to make it in the form of a hexagon or square. Photos of sandboxes will help you choose the appropriate option.

Advice! If there are two roof flaps for the sandbox, children will be able to open it independently. Adults will only need to supervise the process.
Ideas for creating playgrounds
The design of playgrounds for children involves the use of various equipment. If you don’t have the necessary equipment, you can use the advice of experienced professionals. You can also experiment with structures installed on the territory of the playground. For example, you can install a basketball backboard at the entrance to the slide house. If you have large tires, it is easy to set up an obstacle course on the playground (as in the photo).
The sandbox in the playground is made not only from boards. It is often surrounded by stumps. If you are using tires from a passenger car, you will need to prepare five pieces. The sandbox is fenced off with tires, laying them two on top of each other. The main thing is to securely fix the tires in place. This is usually done using metal pins. Then the tires are covered with sand. Then such a fence is painted.
In addition to the slide-house, you can equip a small house on the site in the standard version. If you know how to work with wood, you can install various models of airplanes and ships on the territory. Children will happily climb on them. You should not chase exact forms - children often complete various devices and designs in their imagination.

Children's playground with ready-made kits
A children's playground can also be made from purchased exercise equipment. In various stores you can find many designs that are made for installation on playgrounds. Here you can find houses and slides, swings and rope ladders. Installing a children's playground in the courtyard of a private house is not difficult if you have ready-made kits.
The main thing is to read the instructions that are issued along with the design. Exercise equipment for playgrounds must be installed on a rigid base. This requirement is specified in SNIP. Most often, purchased designs have a more attractive appearance than homemade ones. This is confirmed by numerous photographs of such products.

Making a platform with your own hands
No children's playground is complete without a slide. This simulator should be comfortable and functional. The design can be made of different materials:
- steel corners - they must be at least 3 m thick;
- Sheet steel;
- pipes - will be needed to create a frame;
- plywood;
- boards.
When choosing such materials, you can equip a durable and functional slide.

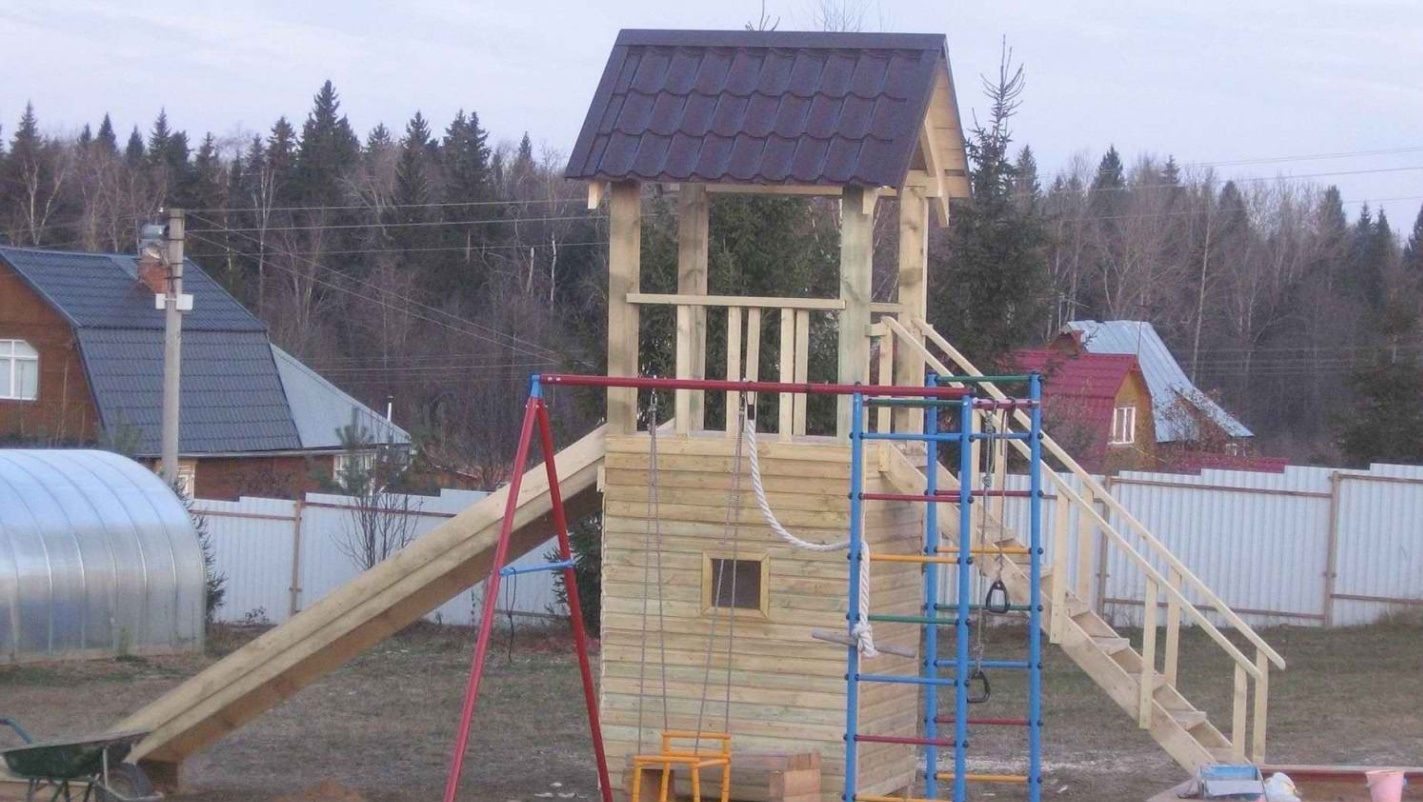
Creating a slide house
The slide-house is mounted on racks, which are usually made of timber. There should be 4 supports. This frame allows you to creatively approach the creation of the main children's simulator. In this case, you can make several ascents - ordinary steps, a ladder and a rope ladder. In this case, one stingray is enough.
The angle that is made when creating the slope should not exceed 30 degrees. This avoids overclocking and injuring children. With such a design, children's leisure time can be very well diversified.

Advice! If there are plastic panels, it is better to make a ramp from them. In addition, plastic slides for playgrounds are often sold in stores. You can purchase curved slides. Children get more joy from going down such a structure than from going down a straight wooden slide. The playground must be comfortable for the child, so all elements must be created in accordance with certain requirements.
Materials
To build a slide house on the site, you should select certain materials. To create such a design you will need to prepare:
- 5 bars.
- boards from 50 to 100 mm;
- boards with a thickness of 25 and a width of 100 mm;
- plywood sheets 15 mm;
- mounting angles;
- nuts and bolts;
- self-tapping screws;
- a pipe equal in diameter to the cross-section of the beam.
After preparing the materials, you can begin to create the base of the slide-house for the site.
Preparing the base
It is necessary to find a place to install the slide, and also prepare a hole that will be needed for the foundation. It is worth making a square frame. There should be a distance of 1 m between the posts. Each side of the pit should be 1.5 m long. In addition, the pits should have a minimum depth of 20 cm.
The bottom of the pits must be compacted, and then crushed stone must be poured. This layer should be 10 cm thick. It also needs to be compacted. You can dig a small hole under each block. The depth of each of them should be at least half a meter. The lower edges of the beams are impregnated with bitumen.

A crushed stone cushion must be placed at the bottom of the pit. Crushed stone must be selected in fractions of 15-25 mm. After filling the gravel at the bottom of the holes, pillars are inserted into them. They are leveled and correctly oriented. Then the concrete solution is poured.
Advice! Concrete is strong if it contains the optimal amount of water. The mixture should be thick when kneading. In order for concrete to move, it is necessary to add plasticizers to it. They are easy to purchase at a hardware store.

Ramp and bottom harness
The strapping of the bars must also be done using 50 mm boards. They are mounted at the floor level of the structure. In addition, to increase the reliability of the house, it is worth making a jumper. The boards should be screwed to the beams using self-tapping screws. Fastening elements must have a minimum length of 100 mm. In addition, it is necessary to make a tray for the stingray.
For this purpose, you should follow simple steps. First, cut 2 boards that are slightly longer than the slope. Then the angles of contact of the slope with the ground and the harness are marked. The board is cut to the required size using a jigsaw. Then the jumpers are cut. Long boards must be laid on the ground, and then the jumpers must be secured to them with self-tapping screws.

There should be a distance of about 30 cm between the jumpers. However, the first and last of them are mounted 5 cm from the edge. A cutout is made on top of the board. This is necessary to create full support for the ramp on the harness.
Then the slope is attached to the harness with corners. They are fixed with screws and nuts. The corners must be installed in such a way that children do not get scratched while playing. In addition, it is necessary to ensure that no fasteners or sharp parts protrude from the side of the slope. The slope is sewn up with plywood, which is installed on self-tapping screws. The fasteners are recessed into the material by 1 mm. Then the attachment points are puttied and sanded.

Ladder
It is necessary to cut 2 pieces of board 50 mm thick. Their length should be slightly longer than the length of the stairs. The corners of the connection with the ground and the harness are cut off. Then you need to cut grooves for the steps in the boards. Afterwards the steps are cut to the required width. All that remains is to assemble the ladder. The steps are fixed to the side boards with self-tapping screws.
The ladder must be securely fixed. It is attached to the strapping beam. Railings and supports are installed on each side of the stairs. They are processed with a plane to remove irregularities and sharp edges. Then the structural parts must be carefully sanded. The upper edge of the railing is attached to the posts.
Entrances and roof
Each slide on the playground features an extreme climb. To do this, you should make a tray of the same size as for the ramp. The part of the harness, which is located on the side of the extreme entrance, must be reinforced with steel corners.

Then cut pieces of plywood are laid on the floor of the house on the site. The ceiling is also lined with the same material. The house must be sheathed on the outside with plywood sheets. Its entrances are designed in the form of circles or ovals. Their size should be such as to provide maximum comfort for children playing on the playground. To create a roof, you need to cut 4 rafters. They are made from 25 mm boards. The angles of the rafters can be determined based on the height of the roof. They are attached to the corners of the frame, and then connected to each other on top with metal corners. The roof is covered with plywood of the required size.
Final work
When the work is completed, it is necessary to sand all the places where children can get a splinter. A rope is attached to the top harness on the side of the extreme climb. It should have nodes located every 20 cm. The house is painted in such a way that it looks attractive. You can apply various images to it, as in the photo.

conclusions
It is not always possible to buy a ready-made play structure for a playground. In this regard, a children's playground in the yard is often done with one's own hands. The main condition is that the materials used must be durable and of high quality. Wood is often chosen to construct various structures for playgrounds in the yard.
It is important to control the quality of processing of elements. Some areas should not be allowed to remain uncleaned or structural parts to have sharp edges. This can cause injury to children playing on the playground.

A small house is installed on each playground. It is usually made from scrap materials. You can build a house with your own hands with the participation of the children themselves. This will not only please the kids, but also make the designs more convenient.
A playground made by yourself will become a favorite place for children in the garden, where they will feel like full owners, a place of games and real adventures. For parents, this is a chance to show their skills and earn popularity not only among their children, but also among their friends. By showing a little imagination and courage, you will get a favorite place for children to play - create a reliable base for them, and the rest of the splendor will be added by the bright children's imagination.
There are many great playground ideas that you can make yourself, but don't miss the opportunity to involve the children themselves in the design of the playground. 
Children's playground with sandbox.
A children's playground with a sandbox is a favorite place for little ones to play. To keep the sand clean, you can make a closing lid for the sandbox, which when open turns into a bench. 
Just a little imagination and by adding a triangular box for storing toys to the sandbox, you get almost a ship. 
All that’s left to do is install a strong staircase mast and decorative sides.

Another option for a children's playground with a sandbox. Isn't it fun to have a chalkboard next to the sandbox for kids to draw on? On the other hand, an additional wall will shield the playground from both the wind and the sun.

DIY playground made from stumps and branches.
Climbing trees is a favorite activity for children; such a playground made from old wood will be a real adventure for your child and his friends.

Children's playground with swings.
How great it is to run and jump, and then relax on your favorite swing. A beautiful garden, the aromas of summer, the chirping of birds - it’s so nice to enjoy all this while swinging on a swing on a wonderful summer day.

DIY playground made from old pallets.
All children love houses in the garden, especially if they themselves helped build this house from pallets, and for the first time held a serious tool in their hands.

DIY children's house.
For those who want to make a children's house at their dacha, our drawing with exact dimensions will help. By installing this house in a cozy corner of the garden and painting it beautifully with your children, you will bring pleasure to your little ones.

Children's playground with slide near the terrace.
An ordinary terrace can become a beach-style children's playground if you install a slide on it and make a sandbox below. Kids can play in the sand for days, and if you can't spend the summer with them at the seaside, you can bring the beach home. In hot summers, you can install an inflatable pool nearby for the little ones.

On a hot day, real adventurers will find life-saving coolness in a small tunnel equipped with a small door and similar to the famous hobbit house.

DIY playgrounds in the shape of a ship.
Such playgrounds will not only bring pleasure to children, but can also become an interesting element of the landscape design of your dacha.

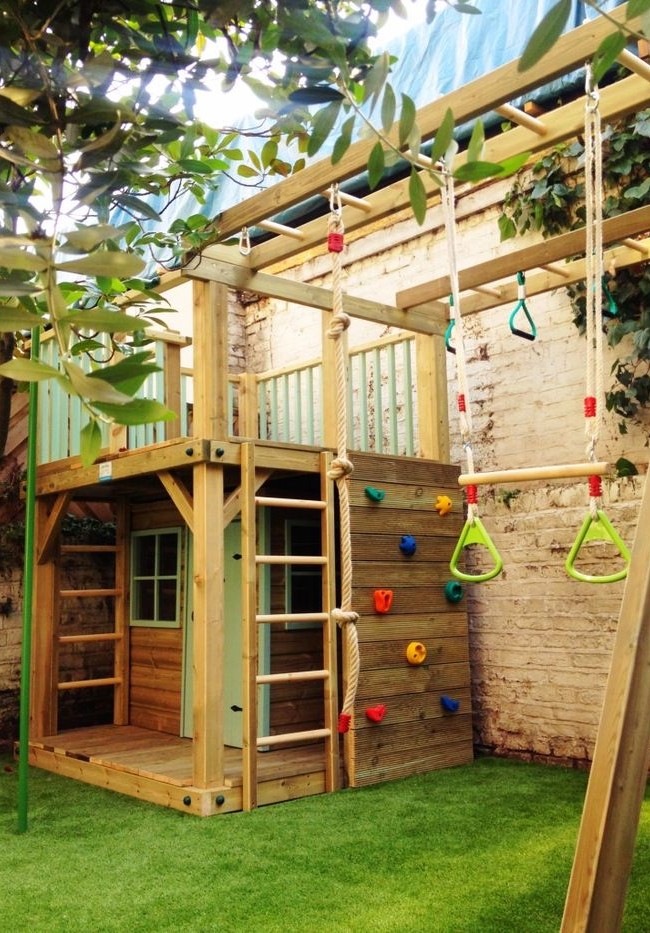
Children's playground and gym under the high terrace.
The place under the high terrace can be equipped as a sports ground for older children, so they will have the opportunity to engage in regular training every day.

Children's house under the terrace.
For the little ones, you can make a playhouse under the terrace, where they will feel like complete masters, because... No one else can enter there except them.

How to make a playground next to your house with your own hands.
Previously, the space under the terrace was not used and was a spontaneous warehouse for all sorts of “useful things”. Because There are two exits from the terrace, and the terrace is quite high. It was decided to make a children's playground. In addition to the slide and sandbox, under the terrace there is a cozy place with a children's playhouse, and on the wall of the house there is an additional drawing board and a shower with a tap for washing hands and feet.

The space under the terrace will later be partitioned into two parts - in one there is a children's playground, in the other there is a place for storing garden tools. First, taking into account waterproofing, a wooden frame was made for the platform.

Then the soil for the sandbox and the area near the slide was removed. This is the hardest part of the job.

In the area under the sandbox and next to the slide, ebbs were made and sand and crumb rubber were poured for children's playgrounds.

Children's playground under a canopy.
A cozy playground can be made from a regular canopy by adding a small raised platform for a slide.

Bright do-it-yourself playground.
No matter how simple your playground design is, you can always add some cheer to it with bright, bold colors.

A simple wooden playground.
Even if you have no construction skills at all, you can always find a simple and interesting option for a playground that you can do.

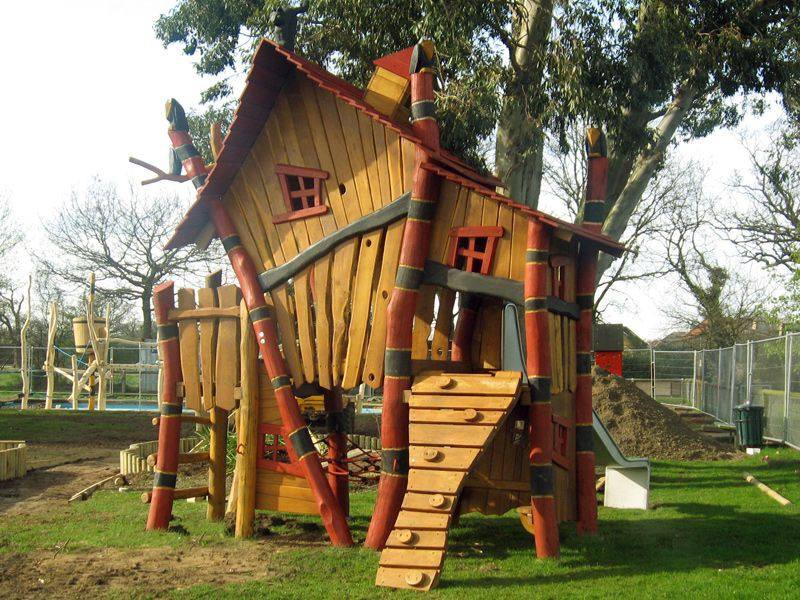
Dream playground - treehouse.
A children's tree house is a wonderful idea that not only children, but also adults fall in love with. Such sites are not made on fruit trees - because the fasteners go straight into the tree, but if your site is located next to a forest, this is the best idea for a playground.

How to make a tree house with your own hands.
Usually, fairly large trees are taken for a tree house; if there are no such trees in your garden, you can make a platform for the site, which will be mounted both on the tree and on wooden posts in the corners.

Instead of driving several small bolts into the wood, it is better to use one larger one.

The order of work is as follows: first, two beams are attached to the tree, then a frame under the platform is installed on them, which in our case is reinforced with posts at the corners of the platform.

And no matter how complicated the site plan may look for a young dad, in reality it is a small square platform on which a children’s house is being built.

Such a platform is a simple and attractive design that looks good in any corner of the garden.

DIY children's playground in a rustic style.
This children's playground is made according to the same principle, but instead of a children's house, a beautifully decorated gazebo is made on supporting posts, which also serves as a canopy for the sandbox on a hot day.

Children love summer most of all because they can spend almost the whole day outside. Children's playground projects can be completely different - from the simplest to the fantastically beautiful. But in any case, a do-it-yourself playground will allow you to truly fulfill one important dream of your baby.
Any country house will have an additional advantage if, in the yard next to it, you build a quality playground with your own hands. For every person, time spent on the playground is one of the most important stages of his life. After all, we all remember how in childhood we built sand castles, jumped rope, ran races, played hide and seek and other outdoor games. Life in the yard, as they say, was in full swing.
Times have, of course, changed, but despite this, it is important to continue to understand that every child must go through this. A children's playground at the dacha is a kind of school where children receive their first communication skills with peers, learn relationships and mutual understanding, learn the rules of behavior in society, and develop their imagination, dexterity and endurance.
Playground safety
The adjacent area should be associated, first of all, with a safe playground where you can play various games. After all, kids have such a fantasy that they can frolic anywhere for hours. In this case, the safety of the structure must be carefully monitored. This applies primarily to sports structures on which small children play.
Important! To create the safest playground possible with your own hands, it is necessary to analyze the main reasons why injuries occur in such areas. Not all injuries are inevitable, as leading experts confirm.

Safe covering for playgrounds
Falls is the leading cause of injuries to children on playgrounds. Many people believe that falls cannot be avoided, because every person often fell and got bruises in childhood. But a child can fall not only, for example, by tripping over a stone, but also from some high structure, which is much more dangerous.
The severity of injuries is determined mainly by how hard the playground surface was.

The hardest and, accordingly, the most traumatic material is concrete. Playgrounds for children, equipped on the basis of this material, oddly enough, are found in many courtyards of private houses. The second highest level of injury risk is asphalt, followed by tightly compacted soil.
Interesting to know! Until recently, sand was considered the safest surface for playgrounds. But with the development of technology, even safer materials began to appear on the market, for example, crumb rubber.
A layer of crumb rubber only two or three centimeters thick can effectively soften impacts without any consequences for the child’s insufficiently strong body. The most dangerous areas can be covered with a thicker layer of crumb rubber (up to 10 cm).


Wooden chips are a natural material that is perfect as a shock-absorbing bedding

Bruises and injuries from falling
Children, as a rule, are not afraid of swings, trying to fly as high as possible on them each time. But when a person grows up and has his own children, he develops a certain fear regarding these structures.
And for good reason, since swings and falls are common causes of injury in children. In some cases, it leads to serious consequences, so it is very important to make them as safe as possible.

Important! The greatest threat is posed by beam and rod type swings with seats made of wood or metal. For safety reasons, it is better to avoid using swings of this type altogether.
Seats in the form of rubber or leather belts, suspended using polypropylene ropes or metal chains, are much less dangerous. These are very light and practically devoid of sharp corners structures.
And even if it happens that a child accidentally hits such a seat, then this will be limited only to his fall, and onto a soft and safe surface. In this way, injury to the baby can be avoided.


Important! To make the playground as safe as possible, you can install a fence around the swing. The distance at which it is placed should not only prevent the baby from being injured if he suddenly falls, but also prevent children playing on the playground from being too close to the swing.
Smooth surfaces and no sharp corners
Rough surfaces, sharp corners and various moving elements are no less dangerous on the playground. That is why, without exception, all wooden and especially metal parts of structures must have rounded edges.
The parts themselves must have a well-polished surface and high-quality painting, using only environmentally friendly compounds.
Important! If you are planning to build a playground at your dacha with your own hands, you need to remember that all moving mechanisms must be “put on” protective covers, which completely eliminate any possibility of pinching, for example, a child’s clothes.


Do-it-yourself playgrounds in the country
A multifunctional summer cottage allows you to create comfortable areas designed both for relaxation for adults and for organizing useful activities for children.
At the planning stage, it is important to consider the basic equipment of the playground, taking into account the age characteristics and individual preferences of younger family members.

Planning a playground is an important stage of construction, which should contain a set of measures for improving the local area


Projects and drawings
To make the final decision on where to equip a playground and how to arrange it, you should calculate the optimal area of the future structure. A drawing is being developed that will make it easy to mark the site.
This parameter per child depends on age:
- under 7 years old - 8-9 m2;
- 7-12 years - 13-15 m2.
Important! Given this dependence, additional space should be provided if the playground is initially created for the younger age category. For example, you can temporarily lay out a lawn there.


Ideas for a playground (photo)
Fairy town for kids located close to home in order to constantly monitor their activities. Children of early adolescence should be provided with athletic facilities, for which a site is selected near the blank wall of the house. This will prevent the ball from hitting the windows.
Advice! A good option when constructing a playground is to preserve existing trees that provide shade. In open areas, they are considering installing canopies.

- When choosing a decorative solution for a playground, you do not need to strive to maintain the same style with the surrounding landscape and home.
- When choosing a color scheme, take into account the wishes of children; they are known to prefer bright colors and fabulous accents.
- On rented plots, you can install ready-made houses in the form of tents, around which you can place plastic tables, chairs, inflatable pool, collapsible trampoline.
- Stationary structures - slide, sandbox, cozy house, swing should be planned on an area that is constantly used.


A children's playground, subject to careful calculations at the design stage, allows for rational and convenient placement of structures that are attractive to children of all ages.
This approach provides not only the opportunity to organize a variety of gaming activities, but also the development of their sports skills.


Slide
The construction of a slide begins with the development of a diagram in compliance with the exact scale. This will allow you to select the necessary building material.

Important! The main criterion when determining the height of a structure is the safety of children of different ages: 1-5 years ≤ 1 m, over 5 years - 1-2.5 m.
- The angle of inclination of the stairs leading to the slide should be approximately 25-30 degrees.
- The width of the steps varies from 20 to 25 cm. It is advisable to make their surface less slippery by using a rubber coating.
- Balusters and reliable railings are fixed on the sides.
- The handrails should extend above the top step so that the child has the necessary support when climbing the slide.

Children's slide - diagram indicating exact dimensions

Ready-made ones are considered the safest plastic ramps- screw, straight, wavy, which are selected in accordance with the calculated dimensions.
If you decide to install plywood or wooden slopes yourself, you need to pay special attention to sanding their surface, which is then varnished.

Plastic slide is the ideal solution for a modern children's slide in the country


Swing
Swing– probably the most vivid and memorable event from our distant childhood, which gave us an incomparable feeling of freedom, a feeling of flight and weightlessness. That is why garden swings have become an invariable attribute of a holiday in the country for the whole family.
Sufficient space is allocated for the swing, taking into account the maximum range of motion. It is advisable to restrict children's free access to this structure at the rear to prevent injuries.

Many people wonder how to make a swing at the dacha with their own hands. The answer is very simple. All that matters is the availability of suitable material and tools. The classic version of the swing is done as follows:
- If the area is open, beams are dug into the ground - wooden or metal with a crossbar at the top. For reliability, their bases are concreted.
- Reliable ropes are tied to the cross-sections or chains are fixed on which a comfortable seat is attached below. It can be used as scraps of boards, old chairs, or car tires.

The swing is built on wooden supports: 1,2 - top crossbar, vertical supports concreted into the ground, 4 - fastening element of the eye-bolt system, 5 - edged board 600x150 mm.
To make the swing more stable, and its base does not have to be concreted, you can use a support design reminiscent of the Russian letter “A”.
To make them you will need the same tools. The only difference between such swings is the presence of two supports, fastened together with a transverse tie.


A beautiful swing at the dacha is the pride of its owners
Strong tree branches, canopy beams and other strong horizontal structures can serve as supports for children's swings in the country.
For example, you can make an original swing from an old tire by hanging it with a rope on 3-4 anchor bolts fixed in the side wall of the tire.


Tire swings are an excellent budget option without losing comfort

A good option is a swing in the form of a wicker or linen hammock. For kids, a design that has the configuration of a boat, plane, or car will be attractive. They are equipped with backrests and seat belts.
Children over six years old will be happy to master a simple rocking chair that can be made with your own hands without much difficulty.


Sandbox
Even the most simple sandbox, built on a summer cottage, becomes a favorite place for children to play. This element is a mandatory component of the playground, so during design it is given a safe place.
Games in the sandbox develop fine motor skills and help children relax, so it is very important that such a structure appears on your site as early as possible.

The material for the sandbox can be logs, lumps, saw cuts, cuttings of planks and beams. You can even use uprooted and trimmed stumps.
Advice! If there are objects on the territory of the children's playground that provide diffuse shade, they try to place the sandbox in such a way as to provide children with protection from the sun's rays on a hot afternoon.

Important! The sandbox should not be placed in low-lying, humid places so that the sand does not become too damp. In open areas, a canopy serves as an escape from heat and ultraviolet exposure.
The most common sandbox design is an open box, which has a square, rectangular or diamond-shaped configuration.
With good woodworking skills, home craftsmen create from wooden parts ships, boats, cars, flowers, animal figurines.


DIY wooden sandbox
Building a sandbox at your dacha with your own hands is a simple matter and consists of several stages:
- Marking the site and removing the fertile soil layer;
- Organization of a drainage system for water removal;
- Assembling a wooden frame;
- Knocking down a shield protecting the sand.
Materials required for construction

If desired, it is possible to obtain a combined structure by digging cuttings of logs at different heights around the perimeter of the sandbox, creating a sports track.
The fastest way is to install a ready-made plastic sandbox. This accessory is portable. It is recommended to cover the sand from animals at night with covers or specially made lids.


Obstacle course
Children benefit from combining gaming and sports activities. To fulfill the need for movement, an obstacle course is installed on the playground.
It is most often created from available waste materials. A common attribute is car tires. They are dug in on the edge, creating various configurations. It is convenient to run along such safe steps, jumping over without the risk of injury.

There are many options for setting up an obstacle course. Children enjoy mastering the ascents and descents of ladders, and move while maintaining balance along the gymnastic beam.
An interesting obstacle course can be created from benches of different heights, securely fixed in the ground. You can install gymnastic hoops in a row and go through them at speed.


Often, with the help of twine or a garden hose, various figures are laid out on the ground for children, along which they can move while performing simple tasks.

DIY tree house
Surely every child dreamed of having his own house on the branches of a tall tree - his own personal space with its own laws and traditions. We will talk about the construction of such a house.
For children, a small house located on the playground quickly becomes the most attractive place to play. Here they retire, arrange hiding places, and communicate with friends.
The most mysterious and exotic option is to place the house on a reliable scaffold attached to a tree. Children, hiding among the branches, feel like heroes of adventure films. They enjoy climbing stairs, training their own dexterity.

Sequence and stages of construction work
Let's start with what the tree should be like on which we will place our tree house. First of all, strong and stable. The trunk should be thick, and the root system should be quite developed. And the branches themselves should not be fragile. They must be able to withstand the children's playhouse, taking into account various weather conditions, wind and snow.
Advice! Deciduous wood species (birch, alder, linden, maple) are perfect for supporting the structure. However, in order to protect the children and the house itself, it is better to immediately cut off fragile old branches.

It is necessary that the house be located at a height of no more than two meters, despite the fact that in American films such structures are located much higher. This impression is deceptive, and the very fact of such an arrangement is by no means plausible.
Important! A structure located at a high altitude will be unstable and pose a danger to children.

After a suitable tree has been selected, we prepare the tools and building material. In this case, for construction you will need:
- Lumber (timbers, boards, plywood);
- Chainsaw;
- Long tape measure;
- Level;
- Hammer and nails.
Advice! You can build the roof and walls of the house using artificial materials, such as plastic. This will make the structure easier as a whole.

In order for the structure to have good stability, the structure must be attached not only to the tree, but also to the ground. First, we build the floor and install reinforcing supports under it. Additionally, vertical pillars (racks) can support the structure.
Building a children's treehouse with your own hands is no different from building any other object. Therefore, the order of actions does not change - first of all, large elements are installed and fastened, then smaller ones are connected.

After the floor is ready, we move on to building the walls and then the roof. Parts can be assembled on the ground and only then attached to the overall structure.
The staircase leading to the house can be wooden or rope. You can also install a slide and a pole for descent and other game elements that children will be incredibly happy about.

- Tree building It will look nice if the reliable climb up a wooden ladder is duplicated with a net woven from a strong cord, and thick twine is placed nearby, along which the children will climb to the platform next to the house.
All these sports equipment are quickly mastered by children, training strength and endurance, and at their age they simply need this.

So, we built our fabulous Peter Pan house. You can leave it like this, or if you wish, you can continue to improve it, for example, insulate it, glaze the windows.
Such a picturesque building in your garden or dacha will not only delight little family members and their friends and become their favorite vacation spot, but will also decorate the landscape and impress your neighbors and guests.
Advice! It is better to leave the design and decoration of the house to the children. After all, this place rightfully belongs to them. With their help, the tree house will acquire a bright, unique individual look.


A tree house is the best way to brighten up your child's leisure time


A children's playground at the dacha made from scrap materials is one of the most important components of landscaping the area near the house. It not only keeps children busy with useful activities, but also contributes to the formation of their personality.


At the same time, you should always remember that such structures should be provided with the necessary safety, and only harmless materials should be used for play structures.
 How a pine tree blooms: description, planting options, properties and ideas for use in landscape design (90 photos) How a Scots pine tree blooms
 Plant passport balsam poplar populus balsamifera white poplar
 Choosing grout for clinker tiles Joining clinker
 The most common mistakes when building foundations How to cover a foundation trench from rain
 How to cheaply heat a house without gas?
 Homemade devices for a hand router
 Let's understand the features of gas boilers Hephaestus (GPR) What does the name of the boiler Hephaestus mean?