Homemade chandeliers and lamps made of wood. How to make your own wooden lamp How to make a lampshade from branches with your own hands
Nature creates beautiful forms, we just have to see and preserve this perfection. Surely you have at least once noticed the unusual shape of a branch or snag. Their beauty can be used in interior decoration not only as decoration, but also as a completely functional element.
Many ideas for the home using wood have been implemented by designers and craftsmen in order to make stylish lamps from branches with their own hands.
Almost any lamp from a branch can be made with your own hands; you will need some simple tools and skill. But working with wood will bring you pleasure; it is a responsive and warm material. You can easily find strange tree branches that have already dried up in a forest or park. Use this branch as a base for a lamp. You should not take completely rotten wood; the base must withstand the weight of the lampshades and last a long time.

Depending on the length, diameter and shape of the branch, you can make a ceiling, floor or table lamp. For floor lamps, you need to make a reliable leg from branches, for example, pour cement mortar into some kind of container or formwork, where you insert a tree branch. Then remove the formwork and leave the bare cement or leave it in a container (large ceramic pot, bucket, flowerpot).
 When the base of the lamp is ready, attach a cord with a socket and a light bulb to the branch. The cord can either be simply wound around a branch or passed through metal corners attached to the tree. Vintage lampshades, old lampshades or just bare light bulbs will look equally interesting and stylish with a branch.


Ecological lamps made from branches will harmoniously fit into almost any interior; the main thing to remember is that moderation is needed in everything. You should not literally clutter up the space with decorative twigs, snags and branches.
And here's another interesting way to make a lamp:
And this is absolutely lovely:
DIY PICTURE LAMP FROM FRAME AND BRANCHES
- 2 frames with a side of about 50 cm and a thickness of 4-5 cm,
- LED cord, power supply for LED,
- electrical cable with plug and switch,
- drill, paint, double-sided tape, wooden rods.
A DIY lamp with the effect of illuminating a painting will decorate any room
1. First of all, carefully remove the glass and the back surface of the frame. Put it all aside, we will need it later. We still have the frame of the frame together with the passe-partout in our work.
2. In the upper part of the frame, retreating 10 cm from the left and right, carefully drill 12 holes in the central part with a drill. The distance between the holes is the same; the size of the holes should allow you to insert the rods you have chosen for the lamp.
Drill holes for the rods in the top of the frame for the lamp
3. On the opposite side of the frame, opposite the one where you drilled the holes, glue two strips of double-sided tape. Attach an LED cord with 3-4 light-emitting elements to them. Connect them to an electrical cord with a switch and plug.
Attach LED elements to the lamp with tape.
4. The back surface of our frame, which will be visible behind the bars, can be decorated in the most in different ways, for example, paint it brown, or apply gypsum putty to it to add texture. Before finally assembling the painting lamp, make sure that the painted surface is completely dry.
A painting lamp that you made with your own hands will add style to your interior.
5. Insert the rods into the holes at the top of the frame. If necessary, trim them so that they form a beautiful composition. Insert the back of the frame with the painted side facing the bars. Your unusual painting lamp is ready!
6. When your first lamp is ready, follow the same steps for the second lamp. By making such an amazing lamp with your own hands in a couple of hours, you will create a bright, interesting accent in the interior of your home.
And another portion of ideas using branches:

This kind of panel thing can definitely be used to collect branches in our forests.


Problems with choosing lamps are familiar to many. Lamps are purchased last, so combining them with all other interior elements can be difficult. But there is no need to despair. After all, you can make spectacular lamps yourself without spending a lot of time and money.
1. New Year's decor on the chandelier

Plastic beads, which can be purchased in the New Year's decor department, can be used to decorate a finished lampshade. Bright colors and shine will turn the lamp into a real decoration of any interior.
2. Cityscape

The outlines of city roofs, cut out of dark paper, are pasted onto a light lampshade. This application will easily transform a boring monochromatic lamp.
3. The whole world at your fingertips

In every home there are old maps that have been lying around unused for years. You can make a lamp from them with your own hands. Simply wrap a piece of appropriately sized card around an old lampshade. For a more neat look, the paper can be coated with acrylic varnish.
4. From papier-mâché

To make an original lamp with your own hands, you will have to remember the papier-mâché technique, familiar to everyone from childhood. The paper needs to be torn into small pieces and left for a couple of hours in an aqueous PVA solution. Then the paper pulp is applied layer by layer to an object of the desired shape - for example, an inflated balloon. After the papier-mâché has dried, the lampshade is ready.
5. Second life of old newspapers

Simply covering the lampshade with newspaper, artificially aged with tea or coffee, is too simple a solution. Cut out circles from it and glue them so that they partially cover each other. Interesting game light and shadow guaranteed. Additionally, it is better to varnish the lampshade.
6. Eternal lampshade

From an old metal basket or ordinary wire, you can make a lamp with your own hands, which will become a champion in strength and durability. In addition, this lampshade is also completely fireproof.
7. From bright cocktail tubes

A lamp made from cocktail tubes looks democratic, but at the same time impressive. Just glue the tubes on one side to the old lampshade using silicone glue. If you cut the tubes in half, the lamp will be smaller.
8. Chic and shine

Beads that have no use can be used to decorate a lamp. Thread them onto thin jewelry wire (available at craft stores) and attach it to the metal base of the lampshade.
9. Clear geometry

Cocktail straws painted in gold or silver colors will become the material for making a lamp with your own hands. They are fastened together with threaded thread.
10. Lace patterns

Simply cover or cover a plain lampshade with contrasting lace. In the first case, it is better to use elastic lace: they will fit more tightly to the surface of the lampshade and look neater.
11. Paper chaos

Plain white paper, rolled into tubes, becomes the raw material for the original lampshade. Glue them together in a chaotic manner, moving from bottom to top.

12. Cozy lamp for needlewomen
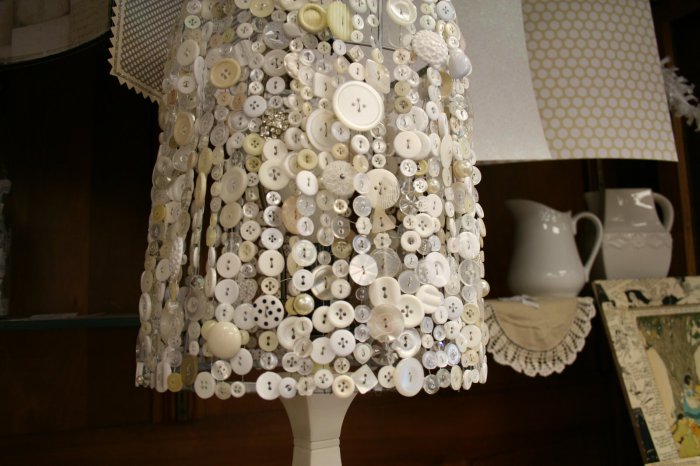
Any unused buttons can be used to make a cute lamp. String the buttons onto strong threads and secure them to the top of the lampshade.
13. In harmony with nature

An intricately shaped branch will be an excellent basis for an unusual lamp. In addition to this, you will need several light bulbs in sockets. Simply wrap the wires around the branch.
14. Almost edible chandelier

The base from an old lampshade, decorated with cutlery, looks quite brutal. This lamp will fit perfectly into the interior of a country or loft style kitchen.
15. Delicate textile petals

To make such a lamp, a fabric is selected whose edges do not fray. Petals cut from it are attached to the lampshade with glue.
16. From decorative rope

Generously spread the base for the future lampshade thick and wrap tightly with a rope with a rough texture. It is not at all necessary to use an old lamp as a base. Even old utensils, such as glasses or bowls, will do.
17. Lamp in a skirt

Translucent textiles, for example, tulle from old curtains, can find a second life. Gather it into folds at the top and secure it to the boring lampshade.
18. Patchwork style

Many multi-colored scraps are tied on the base of an old lampshade. The more there are, the better.
19. From favorite postcards

Often postcards and photos, even those you like, lie unused for years. Cover a boring lamp with them and it will instantly be transformed.
20. Our whole life is a game

A playing deck that is missing several cards should not be thrown away. Thick glossy paper with a contrasting pattern - excellent material for lampshade decoration, practical and beautiful.
So, the lighting problem is solved. It's time to get acquainted
DIY ceiling chandelier made of natural material. When making a chandelier, you can use the most unexpected materials. Keeping the traditions of the site, we will assemble a chandelier from virtually nothing, but using modern, cheap tools. The chandelier is based on literally waste material - thin branches left over from pruning trees and bushes, the use of which, at best, is a fire. However, from this material it is not difficult to make very original item, armed with garden pruning shears and a hot-melt adhesive gun.
Preparation of material
We will need pieces of thin branches with a maximum diameter of 5-6 mm and a length of 7 - 12 cm. The material is cut out with your own hands using garden pruners from the branches remaining after pruning bushes or trees, you need to cut branches with one or two side branches, all side branches should almost lie in one plane (if you have experience, this rule may not be followed further). Branches that look like the letter “Y” are ideal. It is very good if the branches are dry and the bark on them holds tightly; if the branches are fresh, then the harvested material should be dried for several days to give the branches strength. The number of branches depends on their size and the diameter of the chandelier; it is better to make a lot of blanks with a reserve so that there is a choice of different branches.
Equipment and tools
The diameter of the future homemade chandelier is determined by the form for securing the knots. You can use a children's inflatable PVC ball as a form. suitable diameter. When deflated, such a ball takes up little space and is easily removed from the finished lampshade. We will connect the pieces of branches together using hot-melt adhesive applied with a hot-melt gun. Hot-melt adhesive is very convenient for fastening branches, since with a small amount of glue it hardens very quickly and the connection immediately becomes strong. The difficulty in making such a lamp is in securing the first belt of branches to the form. To facilitate the process, a well-inflated ball is wrapped in one layer of stretch polyethylene packaging tape. This will allow you to attach individual pieces to the mold with hot glue.
Chandelier assembly
We start by applying two drops of glue to the first piece and glue it to the ball. Attention! Do not apply glue to the ball with a heat gun! You risk melting the shell of the ball. Glue the second branch to the first branch, then the third and fourth. Periodically glue some twig to the ball. We do this until the first strip of branches closes the ball. When gluing branches, we try to make sure that each branch is immediately glued at two - three - four points. To ensure the strength of the connections, we carry out the work with a well-heated gun. If the bark does peel off, then hot melt adhesive should be applied in the form of a ring in the places where the branches are glued. We cover the entire surface of the ball with glued branches, leaving a small opening for removing the deflated ball and installing the light bulb. Before deflating the ball, we check the reliability of the gluing and, if necessary, carry out additional gluing. We deflate the ball; if there is a pump with air evacuation, it is better to use it, this will greatly speed up the process of removing the shell. Using your fingers, we tear off the polyethylene in the places where the branches stick to the ball. We remove the shell of the ball with polyethylene from the future lamp. Surprisingly, a homemade chandelier lampshade will be quite durable.
Installing a light bulb in a lamp
The lamp, with a light bulb installed inside, creates spectacular shadows on the ceiling and walls, however, the greatest play of light and shadow will be when only incandescent lamps are installed inside the lamp. The specific method of mounting the lamp inside the chandelier will depend on the type of lamp and the socket for its installation. The photo shows a chandelier with a 22o Volt 60 Watt incandescent lamp installed inside with a standard socket. The lamp socket is secured with pieces of wire glued to the side surfaces of the lampshade. The lamp is suspended from the ceiling of the gazebo.
Floral design of various interior elements is now more relevant than ever. This also applies to lighting fixtures. When creating unusual style premises, many now want to buy chandeliers in the form of branches in Moscow.
Finding a lamp in large shopping centers can take a lot of time; a virtual catalog of chandeliers with tree branches in our online store “SvetoDom” will help.
Of course, such ceiling lights. But to implement a given style, this will be the most successful option:
- country music involves an abundance of wooden items in a rustic style;
- Scandinavian - minimalism and objects made from natural materials;
- vintage and Provence, where the usual design creates the effect of artificial aging.
After reviewing the wide catalog, you can choose a lamp suitable for your interior. Buyers are offered affordable prices for chandeliers in the form of branches. You have the opportunity not to damage your budget and save time, since you can purchase goods with delivery. But for those who want to see the selected model in person, it’s worth visiting the SvetoDom order pick-up points.
Today, eco-friendly materials and handmade items are becoming very popular. And designers have more than once turned their imagination to the structure and shapes of wood. Homemade wooden lamps look very interesting indoors. In fact, making a lamp from natural materials yourself is not difficult. All you need is a little patience, the right tools and materials. Let's start by selecting the material from which to create a chandelier from branches with your own hands.
How to choose material?
Wood is a very warm material, working with which brings a lot of pleasure. But in order for you to end up with a beautiful chandelier made from branches with your own hands, you should remember the rules of selection.
Rules:
- You can find the branches needed for the lamp in a forest or park, or you can purchase ready-made options at a florist shop.
- When collecting materials yourself, choose already dry branches, otherwise the drying process can take a very long time.
- Treat trees with care, do not break them. Try to collect already fallen branches.
- You should not take rotten wood. Even if you manage to make a lamp from it, its service life will be very short.
Important! The selection of material also depends on what type of lamp you are going to create:
- for floor lamps you should choose a wide, solid base;
- desktop models can use a thinner base;
- For hanging options, it is convenient to use flexible branches.
But everything depends not only on the model, but also on the design of your future product.
Let's look at a few interesting options DIY chandeliers made from branches.
Do it yourself
When the type of future lamp has been determined, the materials have been selected, work can begin.
Floor lamp
To ensure that the base holds our homemade lighting device firmly, you can proceed as follows:
- We take the container.
- Pour cement mortar into it.
- We install our leg in the solution.
- Next, wait for the cement to set.
Important! If you want to remove the stem with cement after drying, the mold must be removable or easy to cut. If you want to leave the base with a container, think about the decor in advance, or immediately select a beautiful container or flower pot.
- A cord with a lamp is wound around the base.
- Attach it together with the cartridge on top.
Important! Additionally, you can add a lampshade to the floor lamp, but even without it you will get a decent stylish option that will add natural charm to your room.
But this is not the only option for creating a lamp from branches with your own hands.
Hanging option - painting
High-quality preparation is the key to the success of any undertaking, so first let’s look at what we need to work on such an unusual lamp.
Materials and tools:
- Two frames with glass measuring about half a meter on one side and about 5 cm thick.
- LED cord and power supply for it.
- Cable, plug and switch.
- Electric drill.
- Simple pencil.
- Acrylic paint.
- Double-sided tape.
- Wooden rods
After preparing all the materials, you can proceed to work, having previously studied its sequence.
Steps:
- First of all, we remove the glass and the back wall of the frames, leaving only the frame and mat.
- At the top of the frame, measure 10 cm on the left and right, making marks using a simple pencil.
- In the resulting gap we make 12 holes at the same distance. To ensure that all the holes are straight, first measure the distance and make marks with a pencil.
- The drilled holes should be of such a diameter that the prepared rods can be installed in them.
- At the bottom of the frame we glue 2 strips of double-sided tape.
- Glue the prepared material onto tape LED strip with three luminous elements.
- Connectable elements with a cord and plug, as well as a switch.
- Since the back of the frame will be visible behind the branches, it needs to be decorated. For example, you can paint it, or decoupage it, or you can apply special compounds that give the material additional texture.
- Before final assembly of the lamp, check that all its elements are completely dry.
- Next is the final stage: assembly. We insert the prepared branches into the holes, trim them if necessary, and attach the already dried decorated backdrop to the frame.
Important! When carrying out work, a logical question should arise: why are two frames necessary? The answer is simple: such lamps look great in pairs. Therefore, rest a little and repeat the entire process with the second frame.
But the scope for creativity is not limited by anything, so next we will try to make a real chandelier.
Chandelier
A chandelier made of twigs looks incredibly stylish and unusual in the interior. This type of chandelier will probably never go out of style. The principle of working on such a product is somewhat reminiscent of the design of decorative balls of yarn.
To create it you will need:
- Dry twigs.
- A ball shape suitable for the size of the future chandelier. For example, a rubber ball.
- Double sided tape.
- Food or construction film.
- Spray paint and varnish for wood.
- Chain for securing the product to the ceiling.
- Wood glue.
- Secateurs or other device for cutting branches.
After preparation, we begin work on the chandelier. 
Sequence of work:
- We clean the branches and cut them into equal pieces of 20 cm.
- Wrap the ball in film.
- Using tape, secure the ball or other spherical base to the work surface.
- We lay the rods on top of the base and glue them together.
Important! Make sure that the branches do not protrude beyond our ball by more than 3 centimeters.
- Next, you need to wait until the glue dries.
- After drying, turn the ball a little and fasten it again.
- We continue gluing the branches, leaving a window of about 10x10 cm for the top of the product, where the lamp and socket will be inserted.
- At the end of the work, the ball is left until the glue dries completely.
- Next, our base will need to be cut and removed through the window left for the lamp.
- Afterwards, the product is spray painted, varnished or decorated in another convenient way.
- The final stage is to attach the chain to the chandelier and secure it to the ceiling with the socket and lamp.
Important! Wooden products are a fire hazard, so for lighting you should choose a lamp that hardly heats up.
What else can you use?
If you are fascinated by the process of creating lamps from branches with your own hands, there are several more interesting ideas improvised materials from which you can make real designer products:
- tree bark;
- boards;
- tin cans;
- Christmas balls;
- metal pipes;
- yarn;
- cardboard boxes.
Important! Homemade lamps from ready-made bases are also interesting. At the same time, you can choose anything as a base: barrels, driftwood, barrels, boxes, wheels, boards - it all depends on your desire and imagination. If you know how to carve wood, this is another good way to decorate your product.
Let's consider several options on how to create a stylish lamp on a ready-made basis.
Wheel chandelier
To work you will need a base - a wooden wheel. You can look for it in the village, or you can buy a new one in construction stores. Also purchase lamps in the form of candles and a chain for attaching the chandelier to the ceiling in advance.
Important! You can decorate such a wheel with decoupage or stylish forged elements.
Bright "broom"
Strict forms are always neat, but sometimes you want to add a little madness to the interior. In this case, you can collect thin rods into one large bundle and attach multi-colored LEDs to the rods.
 Making pancakes with sausage is an easy and rewarding task
 I dreamed of a squirrel: different interpretations from dream books
 The best games about knights Strategy with large-scale battles on PC
 Nekrasov's poem "Grandfather": analysis and characteristics of the work
 Why do you dream about a house fire?
 Red fish in the oven - the best recipes for simple and original dishes
 How to solve irrational equations