Columnar reinforced concrete foundation. Do-it-yourself columnar foundation: step-by-step work process. How to calculate the design of a fundamental columnar base
At first glance, it may seem that building a columnar foundation for a house with your own hands is an almost impossible task. However, this statement is not true.
Features of a columnar foundation
First you need to understand the definition of a columnar foundation. To put it simply, it is a set of supports that bear the weight of the structure being built. The racks are installed in places of maximum load - these are the corner points of the building, wall connection points and spans longer than 2.5 meters.
The distance between the posts, as well as the shape of the posts, are calculated values that depend on a number of factors:
- type of racks;
- material of manufacture;
- building design;
- planned mass of the structure;
The standard distance is 1.5 - 2.5 m, the cross-sectional diameter for round supports is from 20 to 25 cm. The size for rectangular ones is from 25 by 25 to 40 by 40 cm. It is desirable that the ground part be at least 50 cm in height, length underground part depends on the depth of the backfill.
The upper support points must be at the same level, which must be carefully checked after installing the racks and adjusted if necessary.
Disadvantages and advantages
Before you build a columnar foundation with your own hands for a frame house, you need to understand in which cases its use is suitable and in which it does not make sense, as well as its pros and cons.
Flaws:
- it is impossible to arrange the basement of the future house;
- cannot be used on floating or water-saturated soils
Advantages:
- quick drying and;
- minor costs;
- construction in any season;
- separate installation of each support;
- ease of installation;
- affordable replacement and repair.
Types of columnar foundations
There are different bases depending on the parameters, the cross-sectional shape of the supports, the materials and manufacturing processes of the pillars and the depth of the base. In cross-section, the racks are round, square, rectangular. It is possible to make supports in monolithic form from concrete, or in prefabricated form from bricks, blocks, rubble.
The classification according to the depth of the bookmark is as follows:
- for heaving soil, buried pillars are laid below the freezing point;
- for non-heaving and low-heaving soils with sand and gravel air embankment, use shallow racks with filling up to 70% of the soil freezing point;
- for non-buried for low-heaving or non-heaving soils using a dense sand cushion.
Base structure
In order to competently build a columnar foundation with your own hands for a frame house, it is important to clearly understand the structure and process of its construction.

Work with soil
- To begin work, it is necessary to prepare the site for the construction of the foundation.
- Complete removal of debris and removal of turf by approximately 15-20 cm.
- Leveling the ground surface.
- Marking the area with pegs according to the plan. The pegs are installed at the corner points of the future foundation, connected with a cord, after which the accuracy of the markings is checked along the perimeter.
- The installation points for the pillars are being marked.
- Digging holes.
Support arrangement
1. Brick supports . Some situations make it possible to make support posts from brick, which is advisable to do on stable soils and in places where groundwater is deep.

Laying is possible in two ways:
- laying on a sand bed;
- constructing a concrete shoe, then laying bricks on a hardened base.
The most commonly prepared supports are 25 by 25 cm (a row of 2 bricks). If you plan to build a large building, then you can lay 4 bricks - 38 by 38 cm with additional installation of reinforcement inside the pillar.
It is important to maintain an exclusively vertical position of the supports with regular checking with a plumb line or level.
2. Block . An alternative option is wall or shoe (cushion) rectangular concrete blocks measuring 20 by 20 by 40 cm. The latter should be mounted on top of a sand cushion at the base of the supports, the shape of the posts is trapezoidal. Most often they are erected as shallow or non-buried supports.

3. Monolithic . Such supports are made by pouring concrete mortar into pre-installed formwork, round or rectangular in cross-section, additionally reinforced with steel rods.

4. Rectangular supports . The formwork for such supports is constructed from plywood or edged boards. If construction takes place on stable ground, then the formwork is created naturally from the walls of the recesses. Before pouring the solution, it is necessary to cover the walls of the pit with waterproofing material.

When installing racks in loose soils, it is necessary to erect formwork along the entire height of the future pillar; recesses are dug in such a way that it can be installed and fixed without problems.
5. Round pillars . It is allowed to erect supports that are round in cross-section. For production, wells 20 - 25 cm in diameter are drilled. The construction technology coincides with the production of rectangular supports; instead of formwork, roofing felt, plastic or asbestos pipes are used.

In some cases, TISE technology is acceptable, when specialized drills with a plow are used for wells with expansion at the bottom in order to increase the support area.
6. Combined supports. In some cases, a do-it-yourself columnar foundation for a frame house is built not from one material, but from two. For example, first the buried part of the support is concreted, after which the above-ground part is erected, but using bricks.
Formwork
Before erecting the formwork for both installation options, it is necessary to create a cushion of a mixture of sand and gravel 30 - 50 cm high for shallow and non-recessed racks and 10 - 20 cm for recessed racks.
The formwork is mounted strictly vertically on the cushion, secured with stops. The inside walls are covered with waterproofing.

The supports can be of uniform thickness along the entire length or with a thickened bottom - a “shoe”. In this case, the width of the support pit must correspond to its dimensions. The “shoe” can be installed separately with the reinforcement released from it; after its hardening, the support formwork is installed on top.
Four ribbed reinforcing bars with a diameter of 10 - 12 mm make up the frame, connected by clamps 6 - 10 mm in diameter made of ribbed or smooth reinforcement. The distance between the reinforcement and the formwork is more than 3 mm, a similar gap from the cushion for the purpose of anti-corrosion protection of the metal. You can ensure distance using plastic stands, which will also prevent the reinforcement from moving.
When constructing supports with a “shoe,” the rods are installed before the formwork is installed.
If a grillage is not planned, then the upper point of the end of the reinforcement is 5 - 6 cm down relative to the level of pouring the mortar. It is planned to install embedded studs with a diameter of 14 - 16 mm to connect the supports with the lower trim.
For foundations where the construction of a grillage is planned, the frame protrudes 15-25 cm above the pouring level in order to coordinate with the latter’s frame.
Next, a concrete solution is poured, either made independently or purchased from a brand no less. Filling in portions with compaction using a vibrator or other means. Removal of the formwork is permissible after final hardening.
Grillage
You can install a grillage, or you can do without its construction. This is a solid cast concrete structure, which serves to ensure uniform load on the supports. The lower surface of a high grillage is located at a distance of 10 - 20 cm from the ground surface, a low one is laid on a sand and gravel cushion buried 15 - 10 cm into the ground.

Formwork for grillage
To install a hanging grillage, you need to build formwork. Two installation methods are allowed here: place the bottom at the level of the supports’ heads, or build it to its full length to the ground level, and then fill the space between the ground and the grillage with sand. The formwork must be covered with waterproofing.
The height of the formwork is important; its top should end flush with the level of pouring the concrete solution, or exceed it by 5 - 6 cm. The height of the grillage depends on its type and the type of cross-section of the supports: for a hanging one from 25 to 30 cm, for a low base 50 cm , and width from 25 to 40 cm.
Reinforcement
The frame is made up of 1 - 2 rows of longitudinally located reinforcement, which is connected by transverse rods or clamps. The connection takes place using soft wire. The gap between the frame and the formwork is at least 3 - 5 cm, the same rule applies to the upper surface of the grillage.
The reinforcement must be linked to the outlets of the reinforcement cages of the supports. If the length of the support reinforcement outlets exceeds the height of the grillage, they must be bent at the highest points of the grillage surface at 90°.
Mortgages for vents are mounted at the stage of fastening the formwork along with studs to fix the lower trim. The diameter of the latter is 14 - 16 mm, and they are placed strictly parallel to the supports along the line of the bottom trim beam.
Concreting the grillage
Concrete is poured thoroughly, completely covering the reinforcement and without creating cavities. It is recommended to use tools to compact the solution. At the end of the pouring process, it is necessary to level the top layer so that the surface is even over the entire area. Removing the formwork is permissible only after the concrete has completely hardened.
Using waterproofing
For those parts that are the above-ground component of the supports, waterproofing is necessary, since they are vulnerable to the influence of the environment and the weight of the building. In order to protect against external sources of moisture (rain, snow), wind, physical and chemical influences, you can use roofing felt or solutions designed for such tasks.
Conclusion
In general, it is obvious that a do-it-yourself columnar foundation for a frame house is a completely feasible task. In addition, installing such a foundation makes it possible to build a truly reliable foundation for the future home.
The construction of a foundation on pillars is relevant for houses with lightweight wall structures. A columnar foundation for a house is made if wood, brick or frame products were used as the main material. The base can also be poured under a brick, but in this case deep recesses are made. A strong columnar foundation, compared to a strip foundation, is characterized by an inexpensive cost of work and increases the load-bearing capacity of a building on swampy, peaty, sandy soil, waterlogged or heavily frozen soils.
Differences between bases on pillars
The description of the fundamental basis according to SNiP 3.02.01-87, GOST 20522-75 and SNiP 2.02.01-83 reports the following design characteristics:
- for the product, columns are used, buried 1.5 m into the soil (the average is 0.5 - 0.7 m). The top of the products protrudes by 0.2 - 0.5 m;
- the foundation on pillars is carried out strictly in the corners of the building, at the intersection of walls and interior partitions;
- construction with a heavy load requires reinforcement with additional supports 3 - 3.5 m long;
- the distance between the pillars varies from 1.5 to 3 m and depends on the mass, number of storeys of the house and type of soil;
- The grillage must be organized - it performs the function of distributing the load. In wooden structures, beams or logs with strapping are used. Brick buildings include grillages made of metal channels, beams, and a monolithic reinforcing frame.
Construction according to the design of a light columnar foundation is carried out taking into account regional climatic conditions and the operating mode of the structure.
Main types of bases on supports
The installation of a columnar foundation is justified for country houses, country frame cottages, bathhouses, gazebos, and outbuildings. When choosing material for supports, experts focus on the total mass of the structure. A dwelling or economic block made of heavy materials with a light foundation has risks of deformation - subsidence or curvature of the walls.  The modern classification of plinths made for poles provides for a similar technology. The differences lie in the type of material used to carry out the work.
Reinforced concrete monoliths
Monolithic concrete structures are durable and reliable, suitable for the construction of residential buildings. The bases are characterized by a density suitable for work on stationary soils. Building regulations allow a similar columnar foundation to strengthen wooden houses designed for 1 - 2 floors.
Brick plinths
Brick columnar foundations are common due to their durability and stability. A durable design is obtained if you use high-quality fired material. Activities for the arrangement of a two-story residential building can be carried out on dense soils, observing a support cross-section of 40x40 cm. 
Block structures
Foundation pillars made of rubble, rubble concrete, asbestos pipes or screw piles are comparable in strength and ability to withstand heavy loads to brick ones. Structures differ depending on the material used:
- do not work with rubble stone on hilly areas or on plastic soils - buildings lose stability and may collapse;
- rubble concrete compositions are placed in rows or concrete dough is poured into a rubble frame;
- asbestos pipes are selected with a diameter of 15 cm for wooden houses; for massive structures, the diameter increases from 25 to 40 cm. The pipe is also used as formwork for fastening reinforced piles;
- metal piles are screwed directly into the soil. The technique increases the stability of the building on dense or plastic soils.
Pillars are selected depending on the type of soil and the structure of the building - the foundation must be stable and reliable even under intensive operating conditions.
Technical parameters of materials for construction
When constructing a columnar type of foundation, it is necessary to carefully select materials - this determines the quality of the structure and the duration of installation activities. The modern market offers developers the following types of products: 
- asbestos cement pipes. The elements are easy and inexpensive to transport, but with the inexpensive cost of materials, there are significant costs for drilling holes.
- brick. The blocks are distinguished by their high price, long service life and good maintainability. When laying a foundation on soils prone to swelling, there is a risk of deformation.
- tree. Inexpensive material with minimal wear resistance. Supports can be damaged by insects and rot if preliminary preparation is not carried out - treatment with antiseptic, waterproofing and antiseptic compounds.
- reinforced concrete. Characterized by durability, strength, and optimal price. The disadvantage of the material is labor-intensive installation operations.
Having studied the specific features of materials, owners of private properties can choose the best option.
Foundation depth - classification features
Based on the deepening of the hole under the foundation, structures are divided into shallow and recessed. The selection criteria are based on the typology of soil for development:
- shallow options are built on sandstones and rocks with deep soil waters that do not shift under the influence of weather factors. Supporting elements are buried at a distance of 65-70 cm;
- recessed foundations are located 1.5 - 2 m deep in the soil. The structures are justified in regions with lands that freeze up to 50 cm and unstable mobile soils.
The standard distance between the support pillars for the foundation is 100 - 200 cm. 
How to calculate the design of a fundamental columnar base?
The construction of a columnar foundation with your own hands begins with its calculation. To calculate your project, you can use free online programs. You will need the following initial data:
- depth of support;
- the area in which the structure is located;
- approximate weight of the building, taking into account finishing, communications and furniture;
- total mass of the foundation;
- seasonal factors - wind and snow loads;
- type of soil, freezing area, location of groundwater level.
After carrying out simple operations, you will figure out how to make a base and purchase pillars with the required cross-section and load-bearing capacity.
Technology for arranging a plinth with a grillage
To pour a grillage-type columnar foundation, you will need to calculate the project. The snow load is 100 kg/m2, the internal filling is another 100 kg/m2, the bearing capacity of the soil is 0.5 - 0.6 kg/m2. The work will require step-by-step guidance from professionals, which is given below. 
Digging trenches
For home construction, drilling holes with a diameter of 15-20 cm, which is done with a garden drill, is justified. Further activities include:
- Reinforcement of holes with chain-link with small cells.
- Backfilling trenches with a mixture of M200 concrete and sand.
- Fixation of reinforcing bars in the center of the ditch with a protrusion of 10 cm.
To prevent the liquid cement composition from being absorbed into the soil, waterproofing made of roofing felt or polyethylene is laid.
Installation of supports
The optimal material for the pillars is a piece of asbestos cement pipe 10 cm in diameter. Reinforcing pins 12 mm in diameter are placed on the piece. The structure is installed on a construction “shoe”, filled with sand concrete and compacted. A small reinforcing rod is attached at the top for strength.
Re-drilling
The work is carried out after the concrete has set - after 5-6 days. The sequence of events looks like this:
- Using a drill, holes are made 30 cm in diameter with a recess below the soil freezing level.
- A pole designed for a load weighing 11 tons is inserted into the opening.
- The hole is filled with the excavated soil.
The soil mixture must be compacted. 
Grillage formation
The material for the grillage is concrete, wood or metal. An element is placed with a protrusion of 10 cm above the ground. The structure can withstand the load of small buildings made of timber, logs or frame products.
Classic foundation with columnar support
The algorithm for how to properly make a columnar foundation with your own hands is suitable for all support materials - stone, brick, reinforced concrete. The work has a strict sequence, on which the reliability and strength of the structure depends.
Preparatory tasks
Before concreting the supporting elements, you need to clear the area, remove the top turf layer of soil to a height of 30 cm. In the presence of clay soils, make a substrate based on gravel or sand. Preparation guarantees a flat surface where it is convenient to mark. Transferring the base diagram to the surface is carried out using pegs, rope and sand. 
Construction of pits
When preparing pits, there is one rule - strict axial location. Trenches are dug manually; for large-scale tasks, it is justified to rent an excavator. When removing soil, be guided by the following requirements:
- the walls of holes deepened by 1 m are not strengthened;
- increasing the depth involves the formation of slopes and the installation of beams with spacers.
- the actual depth of the pit is made 30 cm more than the calculated one.
The width of the hole is selected taking into account the availability of formwork and spacers.
Mounting the formwork frame
The formwork for a columnar foundation is made of planed timber 4 cm thick and 1.5 cm wide. Installation of chipboards, metal sheets or plywood with a moisture-resistant coating is allowed. The formwork for a columnar foundation is installed along the concrete line.
Performing reinforcement
To reinforce the foundation support, class A3 rods from 12 to 14 mm in diameter are used. Install the jumpers lengthwise, observing the horizontal direction and a step of 20 cm. As an alternative material, pins 6 mm in diameter are used. 
Pouring technology
Pouring work involves placing concrete dough into pipes. The mixture is placed in layers 20-30 cm high and compacted with a vibropress. Thanks to the use of hand tools, the composition becomes homogeneous - air comes out of it.
Waterproofing measures
To protect against moisture, an approach similar to that used to waterproof a strip foundation is used; cold or hot mastic is made with your own hands, membranes and roofing felt are glued on.
Execution of grillage
With the help of a grillage, the rigidity and stability of the structure is ensured. The simplest option for home construction is to make a prefabricated reinforced concrete belt. The tasks are carried out in stages:
- The jumpers are welded to each other using scraps of reinforcing pins onto mounting points.
- The formwork is installed, the reinforcement frame is fixed and filled with M200 cement dough.
- After the concrete has gained strength and waterproofing work has been carried out, the groove grooves are filled with soil and the floors are secured.
- To protect the basement, a brick fence (wall) is formed.
- Communication holes are made in the intake.
The decor inside the building is made of false panels or siding. To build an elevated grillage, a cushion based on sand or gravel 10-15 cm thick is organized. The design is justified on heaving soils to reduce the groundwater level and raise the soil when the temperature drops. 
Non-buried types of foundations
A columnar, non-buried foundation is easy to do with your own hands - step-by-step instructions present the detailed stages of work.
Construction technology
A non-buried foundation on pillars or blocks is carried out in a strict technological sequence:
- The site is marked - cleared of debris, the drainage layer is removed, a cushion is laid and waterproofing is formed.
- The points for placing supports are determined - concrete blocks with parameters 20x20x40 cm.
- Small trenches are dug with the obligatory construction of a sand base.
- The supporting elements are mounted - for one column you will need 4 blocks of the specified dimensions. They are laid out in two rows, maintaining a checkerboard-shaped distance between the supporting pillars of the future foundation.
- The columnar foundation is being poured - the seams are treated with a dense cement-based mortar.
- The joints must be protected from moisture with bitumen mastic, roofing felt or glass insulation.
 The structure is built on non-heaving soils or soils with weak heaving and is justified for light buildings (wooden houses, bathhouses, utility blocks, outbuildings or summer kitchens). Activities on rocks are advisable when constructing log or timber houses. With reduced heaving, the base is made on a sand cushion.
How to make a shallow foundation?
Installation of a shallow columnar universal foundation is justified for frame structures. Plastic and asbestos pipes are used as formwork, and a reinforced concrete pillar takes the entire load of a light kitchen, bathhouse, house or gazebo.
Selection of pipe diameter
The parameters of the pipe sections are determined by the building load:
- lightweight buildings provide a diameter of elements of 10 cm. They will require about 0.1 cubic meters of concrete dough;
- log houses require products with a diameter of 25-30 cm. In the first case, 0.5 m3 of concrete will be sufficient, and in the second - 1 m3 of the mixture.
The above parameters are relevant for a concrete foundation substrate. 
Scheme of events
You can make a long-lasting columnar foundation with your own hands, because step-by-step detailed instructions include step-by-step work:
- The construction site is being prepared. It is necessary to remove debris and foreign objects, remove the turf layer and level the soil.
- The territory is being marked. Using a peg or rope, mark the configuration of the building - walls, corners, partitions.
- Using a hand drill, trenches are made at a depth of 20 cm. For the cushion, the depth increases.
- A concrete pad is being built. Crushed stone is poured into the bottom of the pit, and formwork for a concrete foundation is installed along the outer contour of the future building. Subsequent actions consist of the formation of a reinforcing frame. Horizontal elements are welded to the reinforcing bars.
- The concrete mixture is poured over the reinforcement in layers and pierced with a reinforcing pin.
- After the composition has hardened, holes are made using special equipment.
- Pipes protruding 10 cm are installed, leveled and secured with wooden beams. The close water level provides for waterproofing work.
- The base of the pipe at 0.5 m is filled with a mixture of concrete and gravel. For 1 part M500 cement you will need 2 parts sand and 2 parts gravel.
- After placing the concrete dough, the pipes are raised by 20 cm, fixed and left for 21 days until the material hardens completely.
- Waterproof the outer surface of the supports with roofing felt, fill the hole with sand, alternately pouring and compacting it.
When working with pipes, it is advisable to place a reinforcing rod inside and fill the pipe with concrete. Further activities are carried out only after the composition has hardened. 
Benefits of building a foundation on pillars
The advantages of installing a solid columnar reliable foundation include the following parameters:
- reliability – the service life of a residential building is extended to 100 years;
- versatility - structures are used on heaving, clay or dense soils;
- efficiency - the work has a low cost, and, compared to a strip or monolithic structure, the developer saves 2 times more money;
- absence of large-scale preparatory tasks, minimal costs for waterproofing;
- speed of installation activities - construction can be carried out independently;
- quick time to build a house, cottage or utility unit.
 The designs exclude the arrangement of a cellar, but are ideal for light buildings. For the purpose of organizing a subfloor, a do-it-yourself strip foundation is justified.
Building your own foundation on columnar supports requires the correct choice of depth, which depends on the distance the soil freezes. Experienced specialists recommend calculating the structure to prevent its deformation and cracking.
The choice of foundation for a house or other building is influenced by many factors. For each specific case, a different foundation design can be used. In first place in terms of frequency of use is the strip structure; for unstable soils, a pile foundation is common. It is quite simple to build a columnar foundation with your own hands, which in some respects is not inferior to the listed foundation options. This design has its own variations and nuances in the bookmark. Each of these points will be discussed in the article.
Benefits of the solution
During the use of this type of foundation design, users and builders managed to compile a certain list of positive qualities that were identified. Among them are:
- possibility of independent design;
- relative simplicity of calculations;
- possibility of use on various types of soils;
- Possibility of use in areas with level differences;
- the ability to avoid site planning;
- high construction speed;
- long service life;
- relatively low project cost.

Perhaps these nuances do not apply to all types of columnar foundation designs, but for a classic structure with a concrete grillage this is exactly the case. There are also disadvantages, of which there are significantly fewer. One of them is the impossibility of constructing heavy buildings whose walls are made of brick. The latter is capable of exerting significant pressure on the base, which often leads to destruction. This occurs due to shrinkage, although on an industrial scale this foundation design is used for brick buildings on soils with permafrost. Another unpleasant point is the inability to build a basement or garage directly under the house, since a foundation of this type does not provide for laying a monolithic structure to a great depth.

Note! Columnar foundations are most often used for the construction of structures that use gas-filled blocks or are made using frame technology. Construction of buildings made of rounded logs is also allowed.
Types of designs

The design of a columnar foundation will largely depend on the specific building it will be used for. If we are talking about an ordinary gazebo, then its dimensions will be significantly smaller than those needed for a bathhouse or cottage. Based on the material used, the types of columnar foundations can be divided into:
- monolithic with a concrete grillage;
- monolithic with a wooden grillage;
- brick;
- bud-filled;
- rubble concrete;
- wood;
- monolithic from asbestos pipes;
- columnar-pile.
The first design option is the most durable. This is due to the fact that the pillars and grillage are a single structure that is capable of evenly distributing the load exerted on all pillars. This design is more expensive than others, but will last much longer. Such a columnar foundation allows the construction of houses of several floors using frame technology or from logs. The next version of a columnar foundation with a grillage is made using a similar technology. Its pillars are also filled with monolithic concrete with reinforcement, only wooden beams are laid on them, which are the basis for the walls of the structure.

Most often, when they talk about a columnar foundation, they mean the third design option, which is laid using bricks. Unlike previous options, a columnar brick foundation is quite simple to construct and requires relatively lower costs. With good soil quality, as well as the right approach to construction, a service life of several decades can be achieved. Many ancient buildings that have survived to this day were built precisely on this type of foundation. In some areas, it is possible to build a house with several floors on a foundation of this type.
Note! Other types of blocks can be used as the basis for a brick foundation. In this case, the strength and stability of the base will depend entirely on the quality and strength of the material used.

A rubble-filled columnar foundation is laid using brick or stone from old structures. This solution is suitable for stable soils and for areas where there are no level differences, since the stability of such a foundation is significantly lower than that of previous options. The base of the structure made of rubble concrete is also built using the materials mentioned above, but the connecting link in this case is cement mortar. The result is a monolithic, but not reinforced structure.

The wooden base of the structure is now practically not used, but it still remains relevant for areas where it is necessary to raise the structure to a considerable height in order to avoid flooding. This applies to warm parts of the world. A similar method was used in other areas, but proper implementation requires special treatment of the wood to prevent rotting and drying out. A wooden columnar foundation is an excellent solution for additional buildings near the house. This applies, for example, to terraces. In addition to antiseptic impregnations, wood is also coated with waterproofing material. As the latter, bitumen mastics are often used.

Another interesting design option is a foundation made of asbestos pipes. Most often, it is manufactured using a solution similar to a monolithic columnar solution. In this case, the pipes act as formwork, into which reinforcement rods are inserted and concrete solution is poured. Usually a pipe with a diameter of 20 cm or more is used. A column-pile foundation is made using screw or other types of piles. In the first case, no special equipment will be needed to build the foundation, except for a concrete mixer. Screw piles can be installed in place by a small crew of three people.

The advantage of this solution is the greater stability of the structure base. This is due to the fact that the pile is immersed to a considerable depth, which passes the freezing level and reaches dense layers of soil, where fixation is carried out. The design with screw piles can be used for a log house or a frame house. If we are talking about bored piles, which are intertwined with a metal frame with a concrete grillage, then such a foundation is used when constructing houses from blocks.
Varieties by depth

The difference between foundations is made not only by the materials that are used to lay them, but also by the depth to which the foundation is mounted. To put it simply, then, as with strip foundations, there are two types:
- shallow;
- buried.

In the first case, the immersion is usually 50 or 80 cm, which somewhat reduces the cost of equipment for the base itself. This support structure is used for buildings that are light in weight. A recessed structure involves the use of supports that go 150 or 200 cm into the ground. This depends on the level of freezing. This design is more preferable for areas where there is heaving soil or high instability of the upper layers. In addition to the depth of the base, the height at which the grillage is located also varies. In this regard, the following are distinguished:
- aboveground;
- ground;
- buried.

Above-ground foundation design options are excellent for cases where the upper layers of the soil have a high degree of heaving. If the grillage is laid directly on the ground, there is a possibility of distortion or damage. In the case of constructing an above-ground version of the structure, the pillars are made of greater height in order to raise the grillage to a certain height. The disadvantage of this solution is the need for additional floor insulation. This is due to the free ventilation of the space under the house. Usually the sides are closed and only small openings are left for ventilation.

The ground version of the structure is built on a prepared bed of sand and gravel. It is placed so that it is flush with the surface. On the one hand, this eliminates strong blowing, as is the case with the above-ground version of the structure, but on the other hand, for such a structure there is a need for a correct approach to waterproofing. The shallow version of a columnar foundation is very similar to a similar strip foundation, but additionally, supporting elements in the form of pillars or piles are prepared in the trench, which are sunk to a considerable depth. The second and third options are most often implemented using a concrete grillage.
Basic Concepts
Almost all types of columnar foundations have one principle according to which they are constructed. Certain nuances are important to consider in order to achieve success. Among them:
- pillar pillow;
- heel support;
- column design;
- arrangement of columns;
- grillage device.
If we are not talking about pile supports, then preliminary backfilling must be done under the posts. For these purposes, medium-grained sand is usually used. The thickness of the pillow itself depends on the amount of moisture in the soil, as well as the expected weight. It can reach 30 cm, and the minimum permissible value is within 10 cm. If additional drainage is required, then an additional layer of crushed stone is laid under the columns, which allows water to pass through faster than sand. The functional purpose of such a pillow is to uniformly distribute pressure, as well as reduce the level of humidity under the posts.
For monolithic columns, which are made by pouring, soles are made, which are a small concrete slab with a thickness of up to 50 cm. It is wider and longer than the supporting column in order to increase the interaction area. The next nuance of such a foundation is the need for reinforcement. If we talk about a monolithic foundation, then there are no questions regarding reinforcement, but this also applies to other options. Only in this case is external reinforcement carried out, which eliminates the deformation of the columns. To prevent moisture from rising to the grillage and the building, it is necessary to approach the issue of waterproofing correctly.
It is important to correctly determine the number of columns in the foundation and distribute them throughout the territory. This will determine how the load will be distributed. The projection of the posts above ground level will depend on the placement of the grillage, as well as the topography of the area. In some cases, owners of houses on columnar foundations prefer to make a fence. This is an additional concrete structure that is placed between the columns to cover the underground space. Reinforcement is also required for it. The fence for the columnar foundation further strengthens the entire structure.
Note! In areas where flooding is possible, the height of the pillars can reach up to 2.5 meters above ground level. The calculation is based on the maximum level to which the water rose in the area.
Self-calculation

The key to successful completion of the construction of the structure is the calculation of the columnar foundation and preparation of the project. They begin even before the process of preparing and planning the site for the foundation. It is better if a professional in his field provides assistance in drawing up the project. Thanks to this, it will be possible to take into account all the nuances that relate to the soil and the expected load. The wishes of the customer himself are also taken into account. The main initial parameter for drawing up a design project is the area allocated for the building. The next important indicator is the mass of the structure. To correctly draw up all the documents, you will need a geodetic survey of the area and linking the future structure to a specific site.

During the design, the following points will also be taken into account:
- soil specifics;
- proximity of aquifers;
- soil freezing level;
- number of floors;
- materials for construction;
- possible additional loads.

The first and second factors will determine the required depth of columns or piles for the foundation structure, as well as their level above the ground. The third factor is necessary to determine below what depth the supporting elements of the foundation should be located. The number of floors affects the number of supporting elements, as well as the choice of material for construction. Additional loads that may be caused by wind, changes in soil or precipitation are taken into account. All these factors give a clear understanding of the number and parameters for the pillars of the future foundation.

With sufficient experience, you can try to perform the design work for the structure yourself. To do this, you will need to collect all the data relating to a specific area. They can be found on the official websites of various services or obtained directly from the services. When taking readings, knowledge of many formulas will be required. But even the use of online assistants may not help, since important factors that can only be assessed while staying at a specific site will be missed. If you turn to specialists who have already performed dozens of calculations for a specific region, you can be sure that they have a good knowledge of all the nuances of the soil in the area. In addition, professional services involve the issuance of specific documents that will be required when obtaining the necessary permits for construction.
Construction process
Each foundation design option has its own construction nuances, so it’s worth considering step-by-step instructions for several options. The first of these will be a monolithic columnar foundation.
Monolithic option
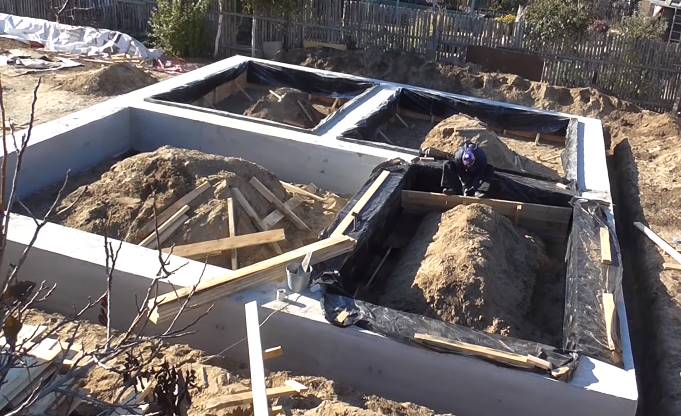
After drawing up the design design, it’s time for practical work. The first step is to prepare and mark out the area for a monolithic columnar foundation.

As you can see in the photo above, it is necessary to pre-mark the area where the structure will be located. To do this, the corners of the building are marked with pegs. A clearly visible rope or twine is stretched between the latter. Particular precision of angles is not required, since the marking of the structure is carried out for preliminary preparation of the area for construction.

The next step is to remove the top layer of soil along with the vegetation that is located on it. To make work easier, you can compact the area to make it easier to move around.

When the preliminary stage is completed, you can move on to more precise marking of the foundation structure. To do this, the corner pegs are placed exactly in their places, and the distance between them is checked. It is also necessary to determine whether the diagonals of the resulting figure of the future foundation structure are equal. If they do not match, then it is worth finding out which of the corners has the wrong angle and moving one or more columns.

In accordance with the developed project, markings are applied to the columns that will be installed later. For these purposes, additional stakes and ropes are used. The latter are stretched in places where the rows of columns will pass. The photo shows that the string, which is stretched in the middle, marks the edge of the pillars of the foundation structure. Simultaneously with this procedure, notes are made on where exactly the columns for the foundation will be located.
If you pay attention to the photo above, you can see that the master specifically marks the boundaries of the pit for the post. To do this, four pieces of reinforcement are driven in along its edges, which makes orientation easier during digging. You can start with it immediately after marking a specific element of the foundation structure. This can be done mechanically or manually. Everything will depend on the quality of the soil that exists in a particular area. A square heel with a side size of 40 cm is considered standard, but in certain cases it can be increased to 80 cm. It is this size plus the gap for the formwork that the foundation pit for the column should be.

The distance between individual pillars of the structure can vary from one to three meters. When the pit for the foundation column is ready, it is necessary to waterproof the lower part, where the heel of the supporting element will be poured. In the photo above you can see that for this purpose a polyethylene oilcloth is laid on the bottom. The density of the oilcloth should be 200 microns. It is located with a twist on the walls. Additional waterproofing and at the same time formwork for the structure is bikrost, roofing felt or similar material that does not have powder. Waterproofing can be fixed to the wall using nails or other fasteners. Subsequently, it will be pressed down by concrete. The height of such formwork should be equal to the height of the heel, which will be poured under the column.

The next step in constructing a columnar foundation structure is the preparation of reinforcing elements that will be poured with concrete. For these purposes, rods with ribs that have a diameter of 10 mm or more are used. It is necessary to calculate the elements in such a way that the heel is larger in size, and the vertical reinforcement corresponds to the post. The height of the reinforcement must be sufficient to combine the pillars with the monolithic foundation grillage, which will be poured later.

To make it easier to bend the reinforcement, you can make a similar device to the one shown in the photo above. For this, two metal corners are used, which are screwed to the wall. Moreover, their length is equal to the length of the element that will bend. The distance between the two strips is equal to the diameter of the reinforcement that is used for the foundation. To make it easier to bend the rods, you can use a metal pipe as a lever.

To make it easier to assemble the sheathing, stands are made, as shown in the photo above. A support is screwed to the vertical plane, in which notches are made at a distance from the reinforcement bars that will be embedded in the column. Additionally, a stand is made that can be rearranged depending on the length of the reinforcement. She can be seen on the right.

After this, the horizontal structural elements are distributed at an equal distance. To do this, use a tape measure or other device. The next step is to lay two more vertical posts, as seen in the photo above. To fix the structural modules together, it is necessary to use a binding wire that securely clamps them in place. For knitting, you can make a small hook yourself, which will simplify the task.

Reinforcement under the heel is performed separately and is represented by a small square in which rods are laid perpendicularly, as shown in the photo above. They are tied at all intersection points to ensure reliable fixation.

Next, preparation of the support stands of the structure is carried out, which will raise the reinforcement under the heel and under the column a short distance from the ground. This is necessary so that the element is filled with concrete mortar and from below.

The reinforcement for the heel structure is installed on plastic legs, and the reinforcement for the posts is fixed on top. All elements are tied together with knitting wire. So that it turns out as shown in the photo below.

Once the reinforcing elements for the columnar foundation structure are ready, formwork is manufactured for each column. An OBS board with a thickness of more than 12 mm is perfect for this. If you take a material with a smaller thickness, it will bend under the pressure of the concrete solution. To properly reinforce a columnar foundation, concrete must cover the mesh by at least 5 cm on each side. This means that the length and width must be 10 cm greater than the reinforcing elements. The height can be 5 cm greater.

To fasten the walls of the formwork under the posts together, hangers for a plasterboard profile are suitable. In this case, the middle part of the structure is cut out and only perforated strips remain, which are bent into the corners, as shown in the photo below. They are screwed to the walls and combine them into the required structure.

When all the elements are ready, they are assembled into a common structure, which will ensure high-quality pouring of the foundation.

In order for the OSB structure under the foundation columns to have a sufficient water-repellent effect and not to swell under the influence of moisture from the solution, it must be covered with cold-prepared bitumen mastic. This is done both externally and internally.

The next step is to install the armored belt under the foundation structure in the prepared pits.

The frame must be placed exactly in the middle of the prepared pit so that the concrete solution can freely and evenly fill the space around the structure. In addition, the structure must be exactly vertical and level. To achieve this, you can resort to the trick shown in the photo below.

A regular bubble level is used to ensure the structure is vertical. After this, the reinforcing base is tied to an additionally laid beam so that there is no displacement during pouring. The beam is fixed with weights in the form of bricks or other devices.

In this way, all elements that are responsible for the stability of the columnar foundation structure are installed.

Next, concrete is mixed for the foundation structure. The columns will be filled in stages. The first step is to fix the heel of the column under the foundation. It is enough to knead for each heel. The mortar for the foundation structure can be laid with a shovel. Its level will be equal to the height of the prepared waterproofing. To evenly distribute the concrete in the heel under the foundation, you will need an electric vibrator. It is lowered into the solution to fill any voids and remove air that could weaken the foundation post structure.

All that remains is to wait for the time during which the heel under the foundation column gains strength. As soon as this happens, you can begin installing the formwork for the column, which was prepared from OSB sheets. The formwork is placed in such a way that the reinforcement is located in the middle.

If you pour concrete into the formwork without fixing it, this will lead to displacement of the formwork and disruption of the foundation structure. Therefore, it is necessary to perform backfilling, which will fix the formwork under the foundation column. When performing backfill for the foundation structure, soil may get into the column form. To prevent this from happening, the upper part of the formwork structure under the foundation is covered with a thick film, as shown in the photo above.
Additionally, it is fixed to the formwork using a construction stapler so that the oilcloth does not move during operation.

For backfilling, you can use the soil that was removed when digging pits for the foundation columns. It is carefully poured between the pit wall and the formwork under the foundation column. After this, compaction can be done using a hand tamper, which can be easily made from a log and a small handle-shaped crossbar.

To protect everyone who will move around the construction site, it is necessary to cover the protruding rods with plastic bottles. The latter are easy to find and will do the job perfectly.

To make the backfill dense, you can additionally compact it with water, which will allow the soil to sink under its own weight.

The protective film is removed from the formwork under the foundation column. There are small pebbles and other debris left at the bottom of the structure that may interfere with good adhesion. To eliminate this, you can remove them using a regular or industrial vacuum cleaner, the tube of which will be tied to a pole, as shown in the photo above.

Before pouring the next portion of concrete under the foundation, it is necessary to wet the heel under the foundation, as well as the formwork. This is done for better interaction between the components of the foundation structure. After this, you can fill the column into the prepared formwork. The solution must be compacted with a vibrator to eliminate the presence of air in the structure. To ensure that the foundation column does not lose too much moisture during the process of gaining strength, it is necessary to put an oilcloth on the foundation reinforcement, which prevents soil from getting inside the column.

After pouring the foundation columns, you can begin digging a trench between the foundation columns. In this case, a trench will be needed to construct a grillage for the foundation. Its depth is calculated in such a way as to accommodate a cushion of gravel and sand. The second in this case will be 30 cm, and the first will be sufficient at 15 cm. In this case, it is also necessary to decide at what level the foundation grillage will be located. If it is a little deep, then you need to go deeper to this level.

The first to be laid is a sand cushion under the foundation structure, which is well compacted. Next, the second cushion is backfilled under the foundation in the form of fine crushed stone. It also needs to be compacted well in order to achieve uniform distribution of the load from the foundation to the ground. For this, a gasoline or electric vibrator is used. It is best to work by placing it perpendicular to the trench under the foundation, so as not to collect rubble along the edges.

When the backfill for the foundation structure is ready, you can proceed to the construction of formwork for the columnar foundation. Wooden beams will be needed. The length of such a beam for foundation formwork should be such that it can be 45 cm immersed in the ground and protrude to the full height of the foundation grillage. To make it easier to hammer the timber into the ground, it must be sharpened from below with an axe, as shown in the photo.

After this, the element is leveled and driven in with a sledgehammer to the required depth. It is necessary to periodically check the level of the structure, as it may go astray. In addition, this will be the key to the correct installation of formwork under the foundation.

A board is nailed to the installed supports under the formwork. It is necessary to arrange the individual elements for the foundation formwork in such a way that there are no gaps between them.

The foundation formwork board will deform from exposure to moisture, so it must be protected. The easiest way to do this is to use plastic film. It is fixed to the boards using a construction stapler.

To strengthen the formwork structure, jibs are installed that rest against another rack. The elements are mounted through one rack. The free racks are connected to each other using a knitting wire, as can be seen in the photo below.

Additionally, transverse elements are nailed on top of the structure, which tighten the walls of the foundation formwork together. It is first necessary to lay reinforcement inside, since this will be problematic later.

Note! To reinforce the foundation, reinforcement with a diameter of 14 mm is used. In this case, the clamps can be made from rods with a diameter of 8 or 10 mm.
The reinforcement that remains protruding from the foundation columns must be bent to intertwine it with the reinforcement for the grillage. It is tied to the rods, which are laid in the formwork using a knitting wire.

When everything is ready, you can pour the foundation with concrete. This is easier to do with a concrete pump, which can be directed along the entire perimeter of the foundation. After pouring, the foundation grillage is processed with a vibrator and leveled with a trowel.
When the foundation has gained a sufficient measure of strength, the formwork can be dismantled and the foundation can be cleared of soil residues. You can clearly see the process of installing the structure of this foundation in the video below.
With brick pillars
This design option is constructed somewhat simpler than the previous one, but it is worth understanding that a columnar foundation made of blocks cannot be used for serious buildings. It is perfect for sheds or gazebos where the weight will be minimal. Marking for this type of foundation structure is carried out in a similar way as for the previous option.
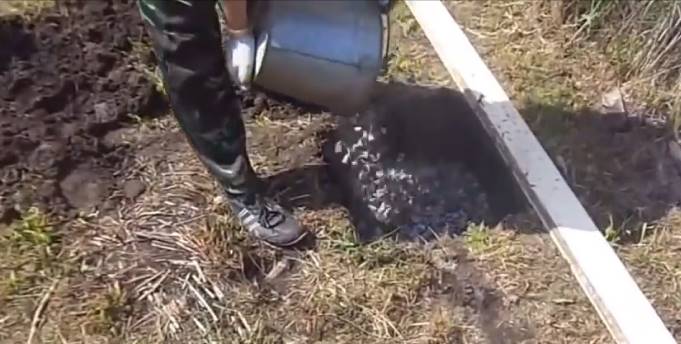
The pits for the foundation columns are constructed with a small margin so that the support pad is slightly larger than the area required to support the blocks. Crushed stone is laid on the bottom of the prepared pit. Its layer can reach 20 cm. It is important to compact the material well. It not only ensures proper distribution of the load, but is also responsible for drainage, which will eliminate the impact of liquid on the laid blocks.

After laying the crushed stone, sand is poured. Its layer will be ten or more centimeters. It is important to compact it well and level it in a horizontal plane.

After this, you can proceed to laying the blocks. They are leveled and secured with cement mortar. The second row is laid out perpendicular to the first to ensure ligation of the seams for greater structural strength. Foundation waterproofing in the form of roofing felt is laid on top of the blocks. It is necessary to prevent moisture from entering the grillage, which can rot from it. A wooden beam with a cross-section of 15 cm is most often used as a grillage for such foundation structures. It is laid along the entire perimeter of the foundation.
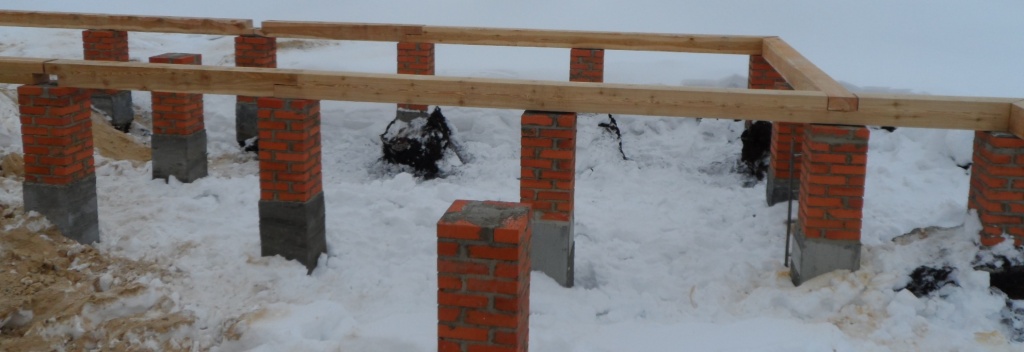
At the intersections of the structure, weaving is done using a tenon joint. The photo shows that two beams can also be connected using the half method. In this case, in each of the elements for the foundation grillage, a cut is made to half the thickness and width of the log. After this, the two foundation elements are fixed to each other using a pin or a self-tapping screw with a hex head.
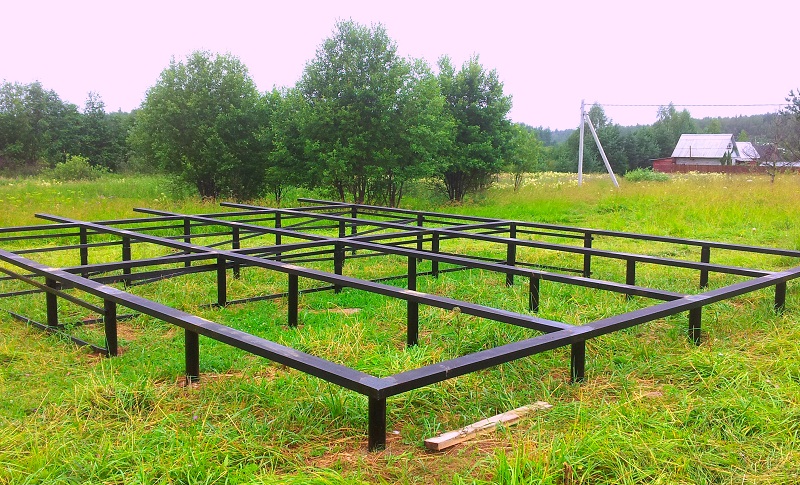
Pile option
The next option for foundation design, which can also be classified as columnar, is a pile foundation with a grillage. For independent construction of the structure, screw piles are suitable, which are easiest to install without additional equipment. Such a foundation is sufficiently reliable and allows it to be anchored in strong layers of soil. This is done quite simply, since piles for such a foundation can be selected in a wide variety of lengths. The only question will be the convenience of screwing them in. In some cases, additional platforms will be required when work begins. But most often such a foundation is installed without them.
The issue of marking for a foundation design based on screw piles at the initial stage is relative. This is due to the fact that during work you should push off from the first pile. Its installation for the foundation is determined by the plan, which indicates exactly how the house should be located on the site. It is necessary to choose any corner of the foundation from which it will be convenient to start work. This pile will be the starting point from which it will be easy to make the rest of the measurements for the foundation.

It will be easier to install the pile if you prepare a small pit for it. Typically, a depth of 30 cm is sufficient for these purposes. The diameter of the pit is made slightly larger than the diameter of the foundation pile. You can dig it out with a garden drill, if its diameter allows this, or with a regular shovel.

It will be easier to install such a foundation if you do not just screw in the pile using a lever that is inserted into the hole, but with a special device. You can rent a pile sleeve, as shown in the photo above. Thanks to the arcs that are located on the sides of the coupling, it is easier to transmit force from the lever, which is in any position. In this case, the immersion of the pile under the foundation proceeds smoothly. Rotating a pile under the foundation through a hole that is located on top is not always convenient, since there may be restrictions on the area of movement around the pile.

As a lever that will be used to immerse the pile into the ground, one pipe will not be enough, since the direction of the force that will be applied with its help can change the position of the foundation pile, which is very inconvenient. To build the structure you will need at least two levers. The length of each is from three meters. In some cases, longer levers will be required to properly install the structure if the pile must lie quite deep.

To make installation of the structure easier, at least three people are required. Two of them act on levers. The third person’s task at the initial stage is to keep the pile in a vertical position. As long as the main part of the pile is on the surface, there is no point in using a bubble level for the structure. This is due to the fact that the pile still has a significant amplitude of movement.
Note! The wall thickness of the lever must be at least 3 mm in order to provide the required force for screwing in the pile.

Screwing occurs clockwise. This can be determined by the direction of the screw at the end of the pile structure. As you can see in the photo, the main load during screwing of the structure for the one who holds it in a vertical position falls not on the hands, but on the shoulder. Hands act as assistants, since it is almost impossible to grasp a pile of such diameter well. The emphasis is supported by half-bent legs and widely spaced legs.

As soon as most of the pile structure is in the ground, it is necessary to increase the force, since screwing will be more difficult. To do this, the levers are extended to their maximum distance so that only a small part engages the coupling arcs.

As soon as it becomes clear that the pile has taken a good position and is firmly held by the soil, you can proceed to the precise vertical positioning of the structure. To do this, you will need a level that can be fixed to the body of the pile with a magnet. The photo shows that the level is located on the pile for a reason. It is placed perpendicular to the two support arms. This is the only way to correctly track the position of the pile. To make monitoring easier, you can use another level, which is installed directly under the lever.
When the level is in place, you need to position the structure in a slightly different way. If in the previous version the pile was held by the shoulders, now it must be leveled with the weight of the body, directing it in the opposite direction from the one in which the pile is tilting. Support is also provided on legs widely spaced and bent at the knees.

The deeper the pile goes, the more effort will have to be made to guide and rotate it. You may have to enlist the help of a few more people, as can be seen in the photo.

When the installation of the first element of the foundation structure is completed, it is necessary to determine the point at which the second corner pile will be located, which is in line with the first. It is best to take measurements at the centers of the circles. This means that the end of the tape measure is installed on the central part of the pipe. The distance to the center of the second pile for the foundation is measured. It will be equal to the total length or width of the house, from which the width of one wall is subtracted. Once the distance is determined, it is necessary to position the foundation piles on the same line. The easiest way for these purposes is to find a common landmark, for example, a fence, and place the foundation structure at the same distance from it.

The second pile is screwed in in the same way as the first. But now it is necessary to monitor not only the vertical level of the foundation pile, but also the distance at which it is located from the first pile. If in the process there is a need to adjust the position of the structure, then you should not act by simply tilting it in the intended direction. The photo shows that the pile must be tilted in the opposite direction to the one in which it is necessary to align the pile. After this, two turns of the pile are made under the foundation, and it is leveled to a vertical position. If this fails to achieve the desired effect, then the operation must be repeated.

When two piles are already in place, you can proceed to the installation of the third. The point of its installation is calculated somewhat more complicated than in the first and second cases. To install the third pile of a columnar foundation structure, you must be guided by the Pythagorean theorem. The width of the building is known, the length is also known, now you need to calculate the diagonal or hypotenuse of the right triangle. To do this, the thickness of the wall is subtracted from the width and length, since the measurement is taken at the centers, and each figure is squared. The sum of the resulting numbers will be the size of the diagonal. The photo shows that one of the ways to mark the third point of the foundation structure is to use two tape measures. At the intersection of the required values, the location of the third pile is located.
Note! If you don’t have two long tape measures, then you can use twine on which the required size is marked.

After determining the location of the third pile under the columnar foundation, preliminary installation of the pile is carried out in the pit prepared for it. Once it is securely in place, it is necessary to re-measure to ensure that the foundation pile is in place. If there are certain errors, then it is necessary to level the foundation pile in the manner described above.

When the installation of the pile in place is completed, it is necessary to further secure it. To do this, the pit that was dug earlier is filled with soil. It is important to compact the latter well so that the upper part of the foundation pile does not become loose.

The fourth pile under the foundation is also mounted using the diagonal and wall dimensions. In this case, all the indicators are known, so you can use tape measures or twine and screw the pile into place under the foundation. Periodically, when screwing the pile into place, it is necessary to check whether the distances at which it should be in relation to other piles are maintained.

The support of the entire structure is ready, now it will be easier to install the remaining piles under the foundation. For these purposes, a string is stretched between all risers. It must be located as close to the ground as possible. It will be easier to operate if two strings are pulled between the foundation piles, which will mark the corridor in which the piles should be located. Each wall is divided into two halves. The resulting size is marked on a stretched string and a pit is dug under it for the pile of the future foundation. This must be done on all four sides of the house.

During screwing, you must ensure that the marked point is in the center of the pile pipe. All foundation piles are immersed to the required level.

Foundation piles will also be required for interior walls. To mark them, you can use the intersection points between the lines of existing piles. To do this, ropes are stretched between the piles, which are clearly visible. At the intersection points, where necessary, a pit is prepared and the pile is screwed in. At the same time, it should be positioned in such a way as not to strain the rope or deflect it. It is important to monitor the level of the foundation pile throughout the screwing process.

The pile should be located at the intersection of the stretched ropes as shown in the photo above. The ropes are tangential, so the center of the foundation pile does not coincide with the center of the pile that will be screwed in.

Once all the piles are in place, it is necessary to trim them horizontally. This will allow you to correctly position the foundation even on an inclined area. For this purpose, you can use two tools. One of them is a laser level. It's easier to use. It is enough to position the beam at the required height and project it onto the body of the piles. After that, markings are applied to the foundation piles and trimming is done with a grinder.

Another option is to use a water level. Before use, it must be well aligned to avoid any bends. Next, the container containing water for the hydraulic level is installed on one of the piles. One of the craftsmen lowers part of the tube into a container, and the second creates a vacuum so that water under its own pressure begins to fill the tube.

Next, the functionality of the hydraulic level is checked. Its two ends are connected together and a certain time is waited. After this, the liquid in the two pipes should reach the same common level. If this happens, then you can proceed to the process of measuring the height for the foundation piles. If not, then you should carefully examine it and identify kinks or places where airing has occurred.
Note! The longer the hydraulic level, the more time it takes for the liquid inside it to calm down.

On one of the corner piles of the foundation, a point is drawn where all foundation piles should be located. One part of the hydraulic level is applied to it, and the second is brought to the next corner pile. Once the water level has calmed down, you can make a mark on the pile to guide the cutting. This way the mark is transferred to all corner piles of the foundation.

To mark a line over the entire area of the foundation pile, it is necessary to make a pattern from a plastic pipe, which will be cut on one side for ease of installation on the pipe. Using a marker, draw a circle.

To transfer the marking line to the remaining piles, which are located in the middle of the foundation structure, it is necessary to pull a strong fishing line along the marks on the outer piles. It will be the indicator of the required line. After this, marking is carried out with a marker at the selected point. Using the prepared pattern, a line is drawn over the entire area of the piles.

Once the marking of the piles for the foundation is completed, you can proceed to cutting all the elements along the drawn lines.

The next step is to fill the installed screw piles for the foundation. This is not done with concrete, but with an ordinary cement-sand mortar in a ratio of three to one. The solution must be liquid enough to fill the pile cavity. The purpose of this procedure is not to impart additional rigidity to the foundation, but to prevent the exposure of the internal walls of the pile to oxygen, which could lead to corrosion and destruction of the foundation. Filling is not done to the very top. It is necessary to leave a gap of 10 cm. It is filled with a dry mixture, which can be purchased ready-made.

The next step is to install the head on the pile. It must be located on a horizontal surface. The purpose of the head is to hold the grillage on which the walls will be fixed. The head is welded to the pile so that the fixation is as reliable as possible.

Welding seams are cleaned and coated with paint, which will protect them from corrosion. A video of the complete process of constructing this type of foundation is below.
Summary
As you can see, a columnar foundation is a fairly common design. It is an indispensable option when it is planned to build a small lightweight building. The last one can be a rounded log or frame. When laying the foundation, it is important to take into account all the features of the soil, as well as other parameters that were discussed in the article.
In the article we will look at the columnar foundation of a house and describe the columnar strip foundation (column foundation with a grillage). We will tell you in what cases the construction of a columnar foundation is most applicable. The structure of a columnar foundation, recommendations and errors when installing a columnar foundation are described in separate parts.
General information about columnar foundations.
The preparation stages and manufacturing technology for a columnar foundation and a strip foundation are in many ways similar. Therefore, it is not advisable to repeat general provisions typical for the manufacture of foundations (assessment of soils, freezing depth, presence of groundwater and communications, preparatory work, installation of formwork, pouring concrete, possible errors during design and construction) in this article. To get acquainted with them, just refer to the article.
Along with an overview of all options for columnar foundations, we will focus on foundations made of prefabricated concrete and reinforced concrete blocks.
A columnar foundation is a system of pillars located in the corners and at the intersections of walls, as well as under heavy and load-bearing partitions, beams and other places of concentrated load of the building. To create conditions for the pillars to work together as a single structure and to increase the stability of columnar foundations, to avoid their horizontal displacement and overturning, as well as to arrange the supporting part of the base between the pillars, a grillage (tied beams, rand beams) is made.
The main type of columnar foundations used in mass construction are monolithic reinforced concrete foundations.
As a rule, the distance between the pillars is 1.5-2.5 m, but it can be more.
With a distance between pillars of 1.5-2.5 m. The grillage is an ordinary reinforced lintel. At the same time, it is impossible to combine an attached terrace, veranda, or porch into a single constructive solution. These rooms must have their own foundation, that is, they must be separated by an expansion joint, since the load from the porch is not comparable to the load from the walls of the house, and accordingly their settlement will be different.
You can read more about the design of such a seam in the topic .
When the distance between the foundation pillars is more than 2.5-3 m, the grillage is made from a more powerful, so-called rand beam. The rand beam is made in the form of a monolithic or prefabricated reinforced concrete beam. It can also be metal (I-beam, channel, profile).
- for houses without basements with light walls (wooden, panel, frame);
- under brick walls, when a deep foundation is required (1.6-2.0 meters, i.e. 20-30 cm below the depth of seasonal soil freezing) and a strip foundation is uneconomical;
- when the soils during the operation of the building ensure that the settlement of the columnar foundation (at equal pressures of the pillars on the ground) is significantly less than that of a strip foundation;
- when it is necessary to eliminate as much as possible the negative impact of frost heaving on the foundation, because columnar foundations are less susceptible to this phenomenon.
a - prefabricated-monolithic when the groundwater is located at the time of work below the base of the foundations;
b - prefabricated for any location of groundwater;
1. prefabricated reinforced concrete support column with a rod reinforcement cage;
2. the same, with a steel pipe core;
3. the same, with a rod reinforcement frame and a shell made of asbestos-cement pipe;
4. the same, with a core made of steel pipe and a shell made of asbestos-cement pipe;
5. Prefabricated steel pipe support pole;
6. backfilling with excavated soil;
7. base plate made of monolithic reinforced concrete;
8. base plate of prefabricated reinforced concrete foundation;
9. sand cushion.
Let's consider several points in favor of using a columnar foundation:
- If the cost of other types of foundations is 15-30% of the cost of the entire house, then the cost of a columnar foundation will be no more than 15-18%.
- Columnar foundations are 1.5-2 times more economical than strip foundations in terms of material consumption and labor costs.
- Columnar foundations have another positive quality, which is that the foundation soils under free-standing supports work better than under solid strip foundations, as a result of which the settlement under them at equal pressures on the ground is much less than that of strip foundations. Reducing the amount of settlement makes it possible to correspondingly increase the pressure on the ground by 20-25% and, consequently, reduce the total area of the foundation.
- The most dangerous forces acting on the foundation of low-rise individual houses are the forces of frost heaving. Therefore, almost all of the given options for constructing foundations are considered from the point of view of their construction on heaving soils. It is generally accepted that when building on heaving soils, the depth of foundations should be lower than the calculated depth of seasonal freezing. However, for lightly loaded foundations of small houses, heaving forces usually exceed the total load from the house acting on the foundation, as a result of which various types of deformations occur.
Therefore, when building houses without basements on heaving soils, it is better to build shallow or non-buried foundations. Let us explain their differences.
- Shallow foundations with a laying depth of 0.5-0.7 standard freezing depth are considered. For example, with a standard freezing depth of 140 cm, the depth of a shallow foundation will be 140x0.5 = 70 cm.
- Non-buried foundations- foundations are considered to be those whose laying depth is 40-50 cm, and is on average half or a third of the freezing depth.
For large freezing depths in heaving soils, anchor columnar reinforced concrete monolithic or prefabricated foundations are effective. Such foundations are insignificantly affected by frost heaving forces acting on the side surface, since the pillars are made with a minimum cross-section. If the foundation is built from stone, brick, small blocks, or monolithic concrete without reinforcement, its walls must be made tapering upward, this will save material and evenly distribute the load from the walls.
Additional measures to reduce the influence of frost heaving forces can be: covering the side surfaces of the foundation with materials that reduce soil friction, such materials are bitumen mastic, plastic lubricants (synthetic grease “S”, CIATIM-201, BAM-3, BAM-4), organosilicon compounds , epoxy resins, furan-epoxy composition, polymer films, as well as insulation of the surface layer of soil around the foundation. The feasibility and options for such insulation are outlined in the question.
Conditions under which columnar foundations are not recommended:
- in horizontally moving soils and soft soils, since their design is inherently insufficiently resistant to overturning. To absorb lateral shear, a rigid reinforced concrete grillage is required (its construction will negate the cost savings on the difference between columnar and strip).
- Their use is limited on weak-bearing soils (peat, subsidence rocks, water-saturated clay, etc.) and in the construction of houses with heavy walls (massive brick with a thickness of more than 510 mm, standard reinforced concrete slabs and blocks);
- If you have limited financial capabilities or time period for installing a plinth. If with a strip foundation the base is formed as if by itself, then with a columnar foundation, filling the space between the pillars with a wall (taking in) is a complex and time-consuming task;
- It is not recommended to install columnar foundations in areas with a sharp difference in heights (the height difference in the area under the foundation is 2.0 m or more).
Let's consider what materials a slab foundation can be made of, depending on the design of the house (primarily its mass and number of storeys):
- The stone foundation is made from rubble stone or medium-sized flagstone. It is advisable to select a stone of the same size, and the flatter it is, the better.
- It is advisable to make brick foundations from well-burnt red brick (black), preferably iron ore. Poorly fired bricks quickly collapse.
- Concrete foundations are made of heavy concrete grades B15-B25;
- Rubble concrete;
- Monolithic reinforced concrete (a monolithic foundation has increased strength and has the longest service life - up to 150 years);
- Ready-made prefabricated concrete and reinforced concrete blocks. In the prefabricated version, the poles are manufactured separately and mounted during installation.
- asbestos-cement or metal pipes filled with concrete mixture.
- concrete and rubble concrete - 400 mm;
- masonry - 600 mm;
- brickwork above ground level - 380 mm, and when tied with a pick-up - 250 mm;
- from rubble - 400 mm;

Photo of a columnar foundation for a small private (country) house.

Information about the depth of laying columnar foundation supports
It is necessary to pay attention to three main points when determining the depth of laying a columnar foundation:
- the depth of soil freezing in your area where the house is being built; (The best option is to lay the pillars below the freezing depth of the soil, thus eliminating deformation of the foundation)..
- determination of the type and composition of the soil (fixed soil or mobile, clay or sandy. The best soil can be sand, since water drains through it instantly and it has a high load-bearing capacity; it is impossible to build on silt and peat soils, it is necessary to arrange a partial or complete replacement of the soil to sandy);
- groundwater level (is there a pond or river nearby, if there is this indicates the presence of a high groundwater level, it is necessary to do waterproofing or drainage)
These factors must be taken into account in the house project you order.
Also, when calculating the foundation depth, the designer should take into account not only natural influences on the foundation, but also the following indicators:
- the weight of the future house;
- weight of foundation supports;
- the weight of the furniture in the house and the number of people who will live in this house;
- seasonal, temporary loads (snow).
It is advisable to contact a designer who has all the necessary data to carry out such calculations (groundwater level in your area, freezing depth, soil structure, etc.). The value of the designer's participation in the design process is that he will calculate the depth of the foundation with absolute accuracy (without excess depth margin). This will allow you to save on building materials and financial resources without compromising the quality and safety of your home.
Construction of a columnar foundation
In this section we will look at the technology for constructing a monolithic reinforced concrete columnar foundation as the most common type in private construction.
1. Preparatory work
Work must begin with cleaning the construction site. To do this, it is necessary to cut off the vegetation layer, preferably at least 2.0-5.0 meters in each direction from the planned location of the foundation. Its thickness is 10-30 cm, and it is not suitable for the base of the foundation. This soil needs to be cut and transferred to the vegetable garden or garden.
If the soil under the cut layer consists of sand mixed with small stones (gravel sand, coarse or medium-grained sand), then it is used as the base of the foundation, regardless of humidity, groundwater level or freezing depth.
If there are clayey soils (clays, loams, sandy loams), then a sand-gravel cushion must be installed. The thickness of the cushion depends on the geological characteristics of the soil.
If you find peat or silty soils under the cut layer, then it is necessary to completely replace the base; in this case, you need to consult a geologist on the composition and design of the artificial base.
Garbage and all foreign objects are removed from the construction site.
After the construction site has been cleared, it is leveled. The mounds are removed and soil is poured into the existing holes. Control of the horizontality of the area is carried out with a level, which is installed on a 2-2.5 meter flat board or rail. Preparation ends with the delivery and storage of building materials to the site.
2. Foundation breakdown
The breakdown of the house plan on the site consists of transferring from the drawings to the land plot and fixing the axes and main dimensions of the foundation.
Before laying out the foundation of the house, pillars (cast-offs) are installed along its perimeter, at a distance of 1-2 m from the building. Wooden boards or slats are nailed level to the pillars on the side of the future walls of the house and parallel to them, on which the dimensions of individual parts of the pit (trenches and holes) and the foundation itself and future walls are marked. The accuracy of the center lines is controlled by accurately measuring distances with a tape measure. It is imperative to check the corners of a rectangular or square foundation; they must be strictly straight at 90 degrees. Be sure to check the mark of the bottom of the trench with a theodolite, at least at the corners of the house and at the points where the tapes intersect. It must correspond to the design (that is, if you decide to deepen the foundations by 1.4 m, then the bottom of the trench should be 1.4 m below the zero level of the house).
Check the correctness of the axes, their intersections, the angles must be strictly the same as on the house plan.
As mentioned above, pillars should be under each crosshair of the walls.
The pillow is poured generously with water and compacted using a hand tamper. To prevent water from escaping from the poured concrete, polyethylene or roofing felt is placed on the cushion.
4. Installation of formwork
For the manufacture of formwork, boards of any type of wood, 25...40 mm thick and 120...150 mm wide, are used, planed on one side (the planed part is installed facing the concrete). Lumber for formwork should have a moisture content of up to 25%. Wide boards for formwork, as a rule, are not suitable, since cracks appear during their installation. You can also use particle boards, metal structures, and waterproof plywood.
Wooden formwork is preferable to metal formwork, as it is lighter and has less adhesion to concrete. The disadvantages of wooden formwork include the possibility of its deformation and hygroscopicity. The formwork is installed close to the walls of the pit, strictly perpendicular to the base of the foundation, checking this with a plumb line.
In some cases, if the walls of the pit are dry and do not collapse, concrete can be poured without formwork. At the same time, polyethylene is laid around the perimeter so that water does not escape from the concrete.
You can also use asbestos, ceramic, and iron pipes in the form of formwork. Depending on the design of the building, pipes with an internal diameter of 100 mm or more can be used. Concrete is poured directly into the pipes, and they remain in the ground along with the foundation.
When installing wooden formwork, you must remember that the boards must be damp, for which they are well moistened. Otherwise (dry boards) will absorb water, which negatively affects the strength properties of concrete.

If it is possible to use ready-made panel formwork, then this is a plus. Such formworks have a large number of options for their installation, which is very convenient when constructing foundations with a large number of angles. Inventory formwork panels can be rigid or flexible, their length can be from 0.5 to 3 m.
5. Installation of fittings
The pillars are reinforced with longitudinal reinforcement with a diameter of 10-12 mm with a mandatory device, through 20-25 cm of clamps with a diameter of 6 mm. They are installed vertically and secured with clamps or annealed wire to prevent them from diverging to the side. It is advisable to ensure that the reinforcement extends above the top of the foundation (as shown in the figure) by 10-20 cm, so that the monolithic grillage reinforcement can then be welded to them.

Photo of columnar foundation reinforcement.
6. Concrete supply
Here everything is the same as in strip foundations, concrete is laid in layers of 20-30 cm with vibration using manual vibrators.

Photo of concrete being fed into the pillar formwork.
7. Grillage arrangement
The grillage can be made in the form of a monolithic or prefabricated reinforced concrete rand beam.
After completing the installation of columnar foundations, check the marks of the top of the columns and, if necessary, level them with a cement mortar of a 1:2 composition. After this, they begin to construct a prefabricated, precast-monolithic or monolithic reinforced concrete belt (grillage).
The installation of a monolithic belt will ensure proper longitudinal rigidity and stability of the foundation. Before installing the belt, the prefabricated jumpers must be securely connected to each other. To do this, the mounting loops are tied crosswise with twisted wire or connected by welding cuttings of reinforcement with a diameter of 8-10 mm. Then formwork is placed on top of the lintels, a reinforcement cage is installed, and M200 concrete mixture is laid.

Photo of the grillage arrangement for a columnar foundation.
The concrete surface is leveled and covered with any waterproofing material to protect it from atmospheric influences. After gaining strength and waterproofing, you can begin installing the floor slabs.
8. Pickup device
When installing columnar foundations to insulate the underground space and protect it from debris, snow, moisture, dust, cold air, etc. a fence is installed, a fencing wall between the pillars. The fence can be made of various materials, most often stone or brick.
To install a fence between the supports of a columnar foundation, it is necessary to make a concrete screed that will serve as its foundation. The concrete screed does not have a depth; it is placed on a sand cushion, which has a depth of 15 to 20 cm. To install a concrete screed, you will need formwork and a frame made of reinforcement, to prevent possible rupture of the screed due to soil movements.
Place the screed on the concrete screed. As in the plinth, technological windows are made in the inlet for supplying various communications. The pick-up is not connected to the supports, since uneven settlement can lead to the formation of cracks.
The height of the fence must be at least 40 cm. The degree of exposure to moisture on the walls of the house depends on the height of the fence; the higher the fence, the less exposure to moisture on the walls of the house. Also, a house with a low base looks squat; visually it may seem that such a house has no foundation and is built directly on the ground, but houses with a high base look much more attractive and reliable. In this case, the height of the supports must correspond to the height of the base. More details about the design of the plinth can be found in the article
9. Foundation waterproofing
Foundation waterproofing can be done in one of the following ways:
- Apply a layer of bitumen to the top of the supports and the fence. Lay a strip of roofing felt on this layer and again apply a layer of bitumen, after which you lay another strip of roofing felt;
- On the top of the supports and backfill, apply a layer of cement mortar, in which the ratio of cement to sand is 1:2. After you have leveled the mortar, sprinkle dry cement on top - the layer thickness is from 2 mm to 3 mm. After allowing the cement to “set”, lay a strip of rolled material (roofing felt or roofing felt).
How to perform such waterproofing, and with what materials, you can read in the article .
Important points when building a columnar foundation
- When constructing foundations on heaving soils, it is necessary to have a clear understanding that the construction of a house and its commissioning must be carried out in one construction season. Foundations built on heaving soils and left unloaded during the winter (without walls, ceilings or roofs) may become deformed. This is true for all types of foundations, but is especially important for columnar foundations, since each column behaves like a separate foundation (due to the absence of a single rigid frame, unlike a strip or slab foundation). Each pillar gives its own settlement, which in the future (after frost - in the spring) can complicate the construction of the grillage and walls.
- Unforeseen deformations can also occur when the built house is not used or heated in winter, and the depth of the foundation was designed for the thermal conditions of the heated house. A favorable time period for laying a foundation is considered to be the period of time when the soil “moved away” from the frost and groundwater descended to the lower layers. This could be the summer months and early autumn.
- If you have made the supports of a columnar foundation from monolithic concrete, then you should know that the “readiness” of the concrete is achieved after 30 days. During the entire “maturation” period, no loads should be placed on the concrete supports, and care should also be taken to ensure that the top layer of concrete does not dry out. To do this, you can cover it with film or roofing felt. To ensure that the concrete sets evenly, the supports should be moistened with water from time to time (two or three times a week, depending on weather conditions).
- To prepare concrete, it is best for you to use M400 cement. Fine gravel and coarse sand can be used for concrete filler.
An example of calculating components for preparing a concrete mixture:
- cement 20 kg;
- sand 50-55 kg;
- gravel* (crushed stone) 80-85 kg.
- If the composition of the concrete mixture is too liquid or, on the contrary, too thick, then the strength of the concrete structure is reduced by 25% of the strength of the same structure, during the manufacture of which all the requirements for the proportionality of the components were met.
What mistakes can occur when laying a foundation and how to avoid them
Many developers who decide to build a house on their own often make a number of mistakes when laying the foundation, which lead to varying degrees of damage to the foundation and walls of the house. These errors can be systematized as follows:
- An insidious defect of the foundation is the unevenness of its subsidence. This can occur for a number of reasons, which include:
- the foundation depth was not calculated correctly;
- the supports have different depths.
- The load on the foundation supports is uneven.
To eliminate this phenomenon, it is necessary to perform an accurate calculation of the systematic distribution of the load on the foundation. Do not forget to take into account the load on the foundation when adding a second level to the house (for example, building an attic);
- The material used was of low quality - the wrong brand of cement, sand that contained an admixture of clay, etc. Or a material, for example cement, has a long shelf life (it should be recalled that when stored for six months, its grade decreases by 25%, and when stored for a year or more by 35-50%);
- The load-bearing properties of the soil were not assessed correctly.
A correctly completed project by specialists and constant monitoring of construction by you or an independent expert will help you avoid these mistakes.
Estimated cost of a columnar foundation
Note from the editor: Prices in this article are as of May 2009. Be careful.
The cost of a columnar foundation is determined by the technology of laying the foundation and its depth and consists of the following components:
Prices for laying the foundation:
- installation of a sand base 100 mm thick - 80-100 UAH/m2 (or 10-13 US dollars);
- construction of a crushed stone base (depending on the fraction) - 80-100 UAH/m2 (or 10-13 US dollars);
- concrete preparation device (with a thickness of 10 cm); - 100-120 UAH/m3 (or 13-16 US dollars);
- laying reinforced concrete pads or blocks - 160-180 UAH/piece (or 21-24 US dollars);
- installation of monolithic reinforced concrete foundation walls - 1300-1500 UAH/m3 (or 179-198 US dollars).
Prices for masonry work:
- rubble foundation masonry - 300 UAH/m3 (or 40 US dollars);
- laying brick pillars - 250 UAH/m3 (or 33 US dollars);
- walls - 600 UAH/m3 (or 80 USD).
Prices for floor installation:
- installation of a monolithic reinforced concrete floor (formwork, reinforcement, concreting) - 1300-1500 UAH/m3 (or 170-198 US dollars).
Relationship between contractor and customer.
It would not be amiss to remind you that if the construction of a house is carried out by a construction organization (contractor), then the relationship between you should be built only on a contractual basis.
A construction contract is the main document of the relationship, which stipulates the terms of cooperation, the cost of work, the start and end dates of construction, etc.
The estimate is an integral part of the Construction Contract. It describes all types and costs of work and materials.
The work schedule must include deadlines for completing the work and payment terms for the stages of work.
The contract must also provide for design documents: architectural design of the facility, structural sections of the project and other documents necessary for construction.
For an overview of the types of foundations for a house, read the article.
The durability of each building directly depends on the strength of the foundation underneath it. But is it always justified to install a massive continuous foundation strip if you plan to build a light wooden or frame building? Increasingly, in this case, a columnar foundation that is less expensive and can fully withstand the expected load is installed. Support pillars are made from various materials, using different methods and technologies. Next we will talk about the foundation of the building, made of concrete pillars.
Features of a columnar base
Such a foundation resembles a pile foundation, with the difference that the finished piles are driven (screwed) into the ground, and the pillars are poured or laid out in place in prepared recesses. A base made in this way makes the work much cheaper and less labor-intensive.
However, a columnar foundation is not always suitable. If the mass of the above-ground part of the building is significant (the walls are made of brick, concrete, cinder block or other heavy building material), a large area of support on the ground is assumed. In this case, it is better to prefer the construction of a buried or shallow (depending on the soil structure) strip base with a sufficient base area.
If the house is supposed to be built from light building materials (wood, foam concrete, materials for frame construction), a columnar foundation, or rather the area of its support on the ground, is sufficient.
Important! The area of the base of the columnar foundation is also calculated. This indicator is regulated by the number of vertical supports and their own transverse area.
A symbiosis between the strip version of the house foundation and the columnar one is the columnar-grillage foundation, when the vertical supports are additionally reinforced and connected to each other by a shallow reinforced concrete strip. This is done not only to strengthen the pillars, but also in situations where the usual shallow strip foundation of a building may be unreliable due to loose or heaving-prone soils on the site. In this case, the pillars, resting their soles on deeper and more reliable soil layers, act as piles that strengthen the main belt.
Advantages and disadvantages of a pillar foundation

The installation of concrete piles has a number of obvious advantages, such as:
- relatively low consumption of materials;
- much less labor intensive (compared to a strip base);
- greater efficiency and strength in waterlogged, loose soils and those prone to heaving;
- the ability to combine with other foundation structures.
However, there are also disadvantages that limit the construction of a columnar foundation in some cases:
- cannot be constructed in case of a large expected load on the foundation (heavy buildings);
- impossibility of constructing a basement;
- instability to horizontal movements of soil layers;
- void under the base floor (to cover it, a fence is constructed around the perimeter of the base).
That is, the construction of a foundation structure from pillars, including concrete ones, is not always permissible, but only under certain conditions. However, taking into account the trend towards accelerated construction of buildings from lightweight materials, the construction of inexpensive foundations from pillars is becoming more relevant every year.
Principles for calculating a columnar foundation

The construction of such a foundation for construction also requires calculations. It is necessary to calculate the number of support pillars, their location and the total area of support on the ground.
The supports are arranged according to this principle. The pillars must be at the corners of the building and in places where the piers adjoin the external walls. The location of the remaining pillars depends on the calculations of the load on the base. However, regardless of the calculated area of the sole, the distance between adjacent supports should not exceed 2-2.5 m (depending on the chosen grillage design). The minimum appropriate distance between pillars is 1 m.
If the calculation of the required total area of the foundation base shows the need to further reduce the distance between the supporting structures, it means that a columnar foundation may be ineffective for the mass of a given building. In this case, it is better to choose a strip foundation for the building or its combination with pillars or piles (if the type of soil does not allow pouring a simple shallow concrete strip).
Methods for pouring concrete pillars

Before proceeding with the installation of concrete foundation supports, the site for construction is marked according to the project. With the help of stretched threads, external contours and right angles are formed. If it is planned to install a column-grillage foundation, the inner perimeter corresponding to the edge of the trench is also hammered out with threads, after which the latter is dug to the calculated depth.
The most common way to construct pillars is to pour concrete into pre-prepared forms. The process looks like this.
- Along the perimeter of the future foundation of the building, the installation locations of the supports are marked according to the calculations performed.
- The holes are prepared using a hand drill. Their depth depends on the degree of soil freezing in the region and the level of occurrence of stable soil layers. Even if the stable soil is shallow, the base of the pillar is 15-25 cm below the freezing level. The diameter of the supports must correspond to the calculated area of each pillar.
- A cylinder (2 layers) is formed from rolled waterproofing material (roofing felt, waterproofing), 3-4 cm deep into the already prepared recess. The longitudinal joint is secured with tape, and several fixing stitches are made around the prepared cylinder.
- The form for pouring concrete is placed in a recess, and a sand and gravel cushion is poured onto the bottom. A reinforcing structure formed from several metal rods is welded or twisted with knitting wire. One reinforcement, usually the central one, is made 30-40 cm longer than the others so that it protrudes beyond the head of the cylinder. It will be connected into one structure with the reinforcing frame of the concrete strip.
- The pipe formed from waterproofing material is gradually filled with liquid concrete. It is advisable to shake the cement mortar layer by layer using a vibrating device. The upper edges of the poured pillars must be located in the same horizontal direction, for which purpose the pipes are aligned using a water (laser) level before pouring. The poured pillars are allowed to stand until the concrete has completely set, after which they move on to constructing a grillage.
The most common method of arranging supports is described above. As an option, they often use ready-made pipes (PVC sewer pipes) or lay out pillars from ready-made concrete blocks. The second method is more labor-intensive, since you have to dig a hole under each post. With a large depth of placement of the base of the pillar, this is very inconvenient.
Options for grillage installation

One option is to pour a shallow concrete foundation tied and supported by columnar supports. To fill it, a trench is dug (as described above) and vertical wooden formwork is installed around the perimeter of the future building and under the internal walls.
Before pouring the tape, a reinforcing structure must be formed, which is connected to the protruding reinforcement of the pillars. This results in a monolithic structure, where a surface-constructed concrete strip rests on formed pillars. This achieves the following goals:
- cheaper design (compared to the installation of a buried belt);
- sufficient strength of the base;
- a solid base for the construction of walls (there is no need to make a fence between the supports).
After reinforcement, the formwork cavity is filled with concrete, and when it hardens, the wooden enclosing structure is dismantled. Before starting the construction of wall structures, the concrete is allowed to gain strength (mature), after which the foundation surface is waterproofed.
The second option for a grillage is to install wooden logs (beams) on top of the pillars. This design is prepared for lightweight frame, frame-panel type buildings or wooden houses. In this case, an empty space is formed between the bottom of the house and the ground surface. In order to protect the lower structures from weather influences and to improve the overall appearance of the building, a fence is made between the supports - a fence that covers the space between the ground surface and the bottom of the walls.
Collection device options

Nowadays, fencing the space between foundation pillars is done in several ways using various materials. Wood is often used to cover the base between the pillars under a wooden house. Also used as building materials:
- brick (masonry);
- concrete (pouring with reinforcement);
- sheet materials (corrugated sheets, flat slate, dense insulation (extruded polystyrene foam).
The peculiarity of the construction of the fence is that the structure should not be rigidly connected to the foundation supports and have ventilation holes. The first condition is met so that the enclosing structure does not collapse due to possible settlement of the foundation and ground movement. Ventilation holes prevent excess moisture from accumulating in the space under the building, which has a detrimental effect on building structures. One of the most popular options is to make a wooden fence like this.
- Between the pillars along the perimeter, a trench is dug about 30 cm deep at the lowest point of the ground. The bottom of the ditch is covered with crushed stone and sand and a beam (log) is placed on the formed cushion after it has been compacted and leveled. The second beam is attached to the bottom of the building’s perimeter wall.
- Boards are vertically attached to the beams and protected with waterproofing material from below to ground level. Afterwards, the trench is filled with crushed stone or expanded clay and concreted on top.
- The above-ground part of the boardwalk is processed and painted or sheathed with some external finishing material. If cladding is intended, the boards are not attached continuously, but with a certain step, forming a sheathing for fixing the finishing material.
A columnar foundation made of concrete supports costs owners about half as much as a strip foundation, even taking into account the need for a back-up device. In terms of strength, the foundation of the building, made of pillars, is not inferior to a solid reinforced concrete strip.
 Scheme of a bipolar stabilizer from one transformer winding (KT827, KT825)
 High voltage and more
 Classification of spring steels
 Characteristics, online calculator, datasheet
 Heating cable into a pipe: description and characteristics
 Do-it-yourself pool vacuum cleaner: manufacturing instructions How to remove clay sediment from a pool
 We make our own pool on our own site