Do-it-yourself children's town
I thought for a long time, is it worth it to start writing this article now, while the construction work has not yet been completed? The answer came by itself - yes. The work is moving forward, I will say not quickly. I work only on weekends with breaks for children's sleep. At this rate, construction will not be completed until the beginning of July (or even later). Maybe during this time many loving fathers will visit this page and my work will encourage them to build their children's towns :). And I undertake to update the material of the article every week.
When I first thought about building a town, I went through many pages on the Internet in search of a suitable example. I was surprised how little specific information is available on the internet... The pro-parent of my town was the slide from the article "Playground in the country. Implemented project (Cherkasy, Ukraine)"
The main selection criteria were:
- Reliability (security);
- Durability (both in the construction plan and in the duration of the child's interest);
- Sandbox under the hill;
- The design must withstand the weight of several cheerful adults who came to the holiday to eat barbecue and drink tea;)
After sleepless nights, the following picture was born in my head, later redrawn on paper (no artist from me):
He became a working drawing during the construction of the town. I have no experience in building such buildings, so I had to improvise during the play.
As you can see from the sketch, in the first section, there will be a sandbox under the slide. The second section is the bridge. The third is a house with a window and a door on the first floor, a platform with a steering wheel on the second. Next to the third is a pole for a swing, a trapezoid, a rope. I will definitely install a basketball backboard, a horizontal bar, a log, a flagpole somewhere.
I must admit that at the beginning of construction, I already had an electric planer, an electric jigsaw, an electric drill in my arsenal of tools. Of the other tools - angle, ruler, tape measure, chisels, hammer. Without all this tool, the construction of the town would have turned into hard labor. In addition, I would greatly facilitate my work by having a router and a manual circular saw. However, the most necessary for work is a workbench. I understand this only now, when I can barely unbend after processing the next board or bar. Working in a semi-squat, at an inclination of almost 90 degrees, pressing the boards with your knees, working either with your left or with your right hands from the impossibility of doing it alone ... This drastically reduces labor productivity and leads to increased fatigue and a desire to quit everything and go watch TV. Think about your workplace in advance!
The first thing I was puzzled by was the material, size and method of attaching the pillars. The choice, as in the article from Cherkassy, fell on a beam 100x100mm with concreting into the ground. Analysis of the rubble of old building materials on the site brought one disappointment. There is a bar, but after long-term storage it is all bent and twisted with a screw. I don’t know how to work with such a “material”, so I started the car and rushed to the nearest construction market.
After purchasing the first batch of building materials, the building area was divided into squares with vertices - future pillars:
Marking the area for construction using a rope and pieces of slats inserted into the ground![]()
All distances, dimensions were chosen arbitrarily and randomly. In no article on the Internet, I did not find at least approximate sizes. I will have them :) If possible…
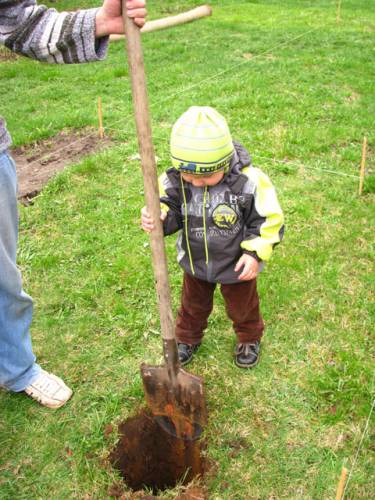
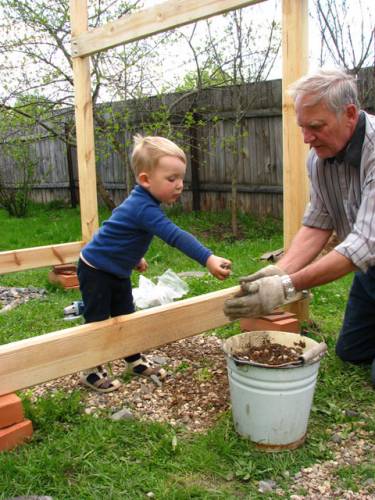
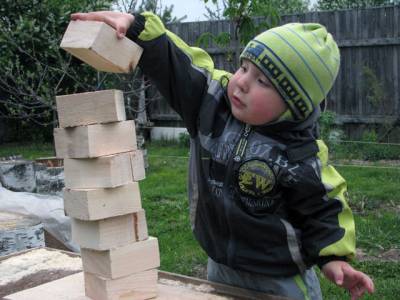
The main assistant and the one for whom all this is being built :)
The height of the bearing bars (pillars)- 3.7 m.
Height of the second floor (without floorboards) from ground level- 1.85 m.
Post center spacing- 1.8m.
Estimated length of the slide- 6 m.
The depth of immersion of pillars in concrete- approximately 50 cm.
Pits depth- approximately 60 cm.
Pillar hole width- may be slightly wider than a conventional bayonet shovel.
Weak alternative to the workbench (the benches were later accidentally broken and then heroically repaired)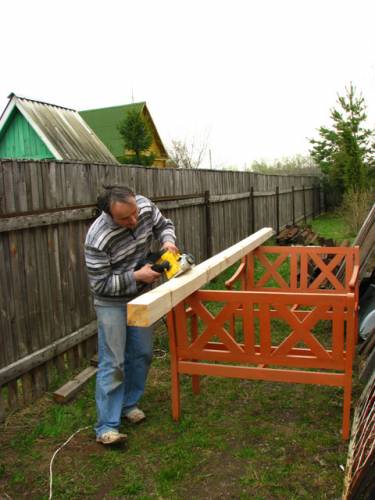
Digging holes for poles. Slightly wider than a bayonet spade
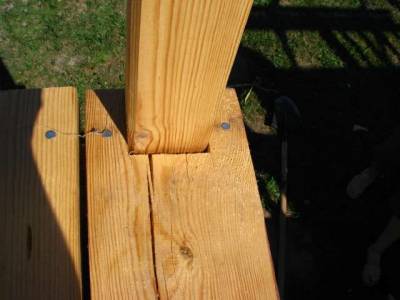
To stiffen the structure, just above the ground and at the level of the future site, the pillars were fastened together with boards 150x50 mm. He pulled the boards to the beam with an M12 hairpin. Definitely with a wide washer. Ideally, of course, there should not be a washer, but a steel rectangle.
It should be noted separately - I tried to process the surface of the tree as cleanly as possible so that burrs did not remain. In addition, he chamfered almost everywhere so that it would not be possible to hit his head on an acute angle.
Fastening horizontal load-bearing boards to poles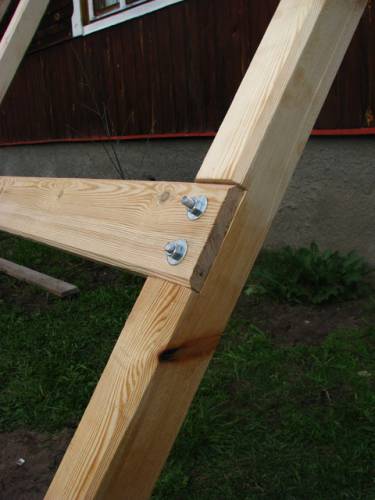
In the process of joinery work, a lack of purchased building materials was revealed - the declared dimensions were rarely observed. For example, the size 105x95 for a bar 100x100 is a common occurrence. The size of 146x53 for a 150x50 board is also not uncommon. If the processing with a planer removed the excess, then at the same time it reduced the already smaller sizes. I had to put up with this and make all measurements somehow from the center of the workpiece, or something ...
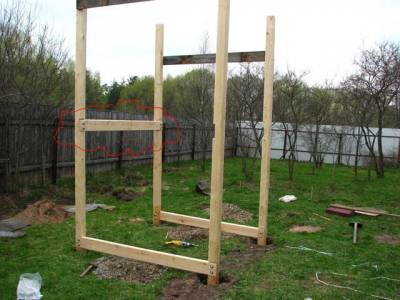
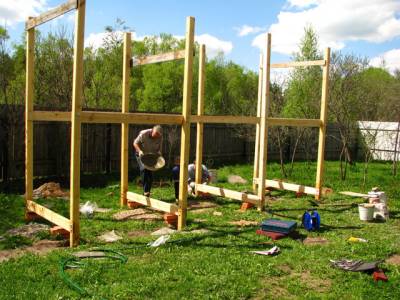
In the meantime, the design was slowly going:
First section
In red, I highlighted the board, which I would now make not inward, but outward. This would make the job easier later on.
Before pouring concrete, all pillars were carefully leveled. I tried to achieve the maximum verticality of all the pillars and the horizontality of all the boards. It turned out, of course, plus or minus ...
Chief assistant with grandfather
Before pouring concrete, the posts were smeared with engine oil and left to air dry for a week. From time to time thoughts visit me - did I choose the right method of installing load-bearing pillars? Hope so
The pillars were concreted and left to dry for a week. The concreting of 8 pillars (the ninth for the horizontal bar I will concrete later) took 2 with a small bag of cement (50 kg, brand M500). How much sand and gravel I do not know. Complied with the approximate ratio of cement to sand 1:1. If possible, make sure that the concrete protrudes slightly above the ground and slopes away from the post. This will effectively drain water from the column.
Concrete was kneaded in old enameled basins using a special nozzle on a drill.
The process of pouring concrete pillars. All sections are assembled (except for one swing post)
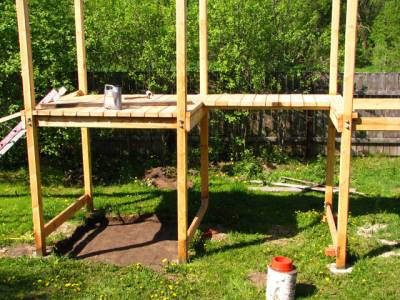
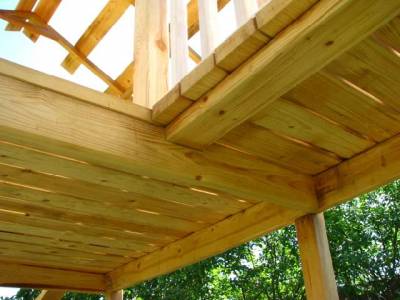
After that, the production of floorboards began. For the floorboards between the posts, a 200x50 board was purchased. She lay down just fine.
The board wraps around the posts:
The rest - 150x50. The length of each board (except for the bridge) is 2 m. The length of the boards on the bridge is 80 cm. In each section, 10 floorboards were obtained. They were evenly distributed across the entire width of the site. After nailing, this is what happened:
Second floor floor
To lay the floorboards on the bridge, I laid a 150x50 board as a second stop for the floorboards. To do this, grooves were made in the side boards:
The one that holds the boards on the bridge :)
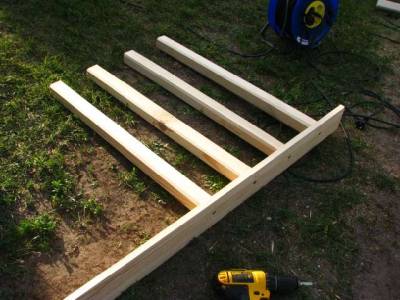
The next step was the production of a trial batch of railings. For this, bars 50x50 and boards 100x20 mm were bought. The height of the columns is 75 cm. The columns were placed at the rate of one column in the middle of the floorboard. The posts are nailed between the bottom and top boards with galvanized 9 cm nails. Later I began to fasten the posts with screws. I think this is a more reliable and convenient option.
Of course, this is not very correct, but I did not think of another way. Maybe then I will make a decorative overlay on top.
Handrail manufacturing process:
For fastening the railings, cuts of 1 cm were made in the bearing beams. In the corner beams - 4 cm. Long screws were screwed through the beam into the ends of the handrails. This is enough to fix the railing.
Cutout 1 cm in the bearing bars:
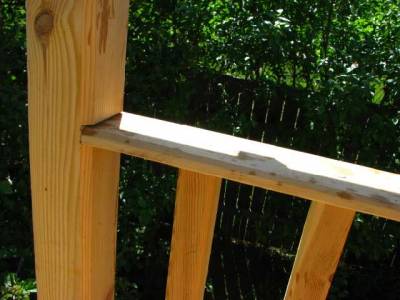
In the corner bars, the cuts are made on both sides (the railing is attached to them on both sides). One of the adjoining handrails has a cutout that
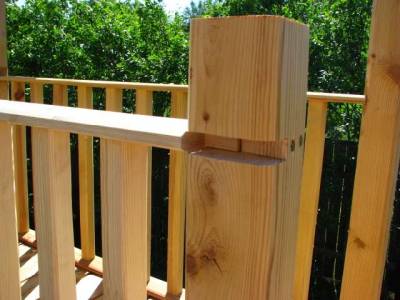
Cutout 4 cm in the corner posts-beams:
After quite successful railings, I took up the manufacture of the roof. This moment was completely incomprehensible to me. After reviewing the relevant sites, it was decided to make a gable roof, not four. Of course it is less beautiful, but more easily manufactured.
For the rafters, the same bar 50x50 was taken. Again, I repeat, the fact that I bought it as a “bar 50x50” does not mean that it is. The sizes sometimes dance almost from 40x40! Plus, in some places the bark (either wane, or obapol), which I always diligently cut with a planer. After processing, the bars sometimes take on bizarre shapes, which, well, make it SO difficult to make a product with high quality and evenness. In this case, the rafters.
The length of each rafter is 1.55 m. I don’t know what this length is connected with. It happened. To give rigidity, cuts (locks) were made in the bars and, in addition, the bars were pulled together by a horizontal segment of the bar:
Cutouts on the boards (lock):

To attach the rafters to the bearing bars, again, two bars were screwed. In order to securely fasten the rafters to these bars, cuts were made in each of the shoulders (measured in place) so that the rafters lay flat to the plane with the bars. I don't know how else to say:
Fastening rafters to crossbeams:

Three such rafters were made per section, on which boards (battens) will be laid next weekend. I'm going to cover with something like an ondulin - a soft roof. Metal and slate do not want for security reasons.
From the remnants of the boards, not bad educational toys are obtained :)
That's all for this week.
Done not as much as we would like, but still ...
The complex as a whole. In the middle is the window of the future house
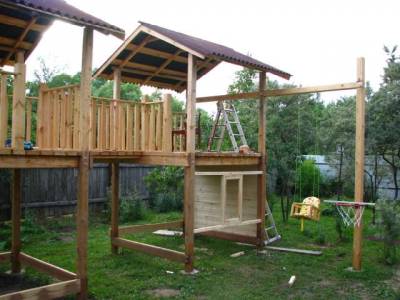
At the moment, both roofs have already been made and covered with a roof, a swing has been made. One of the walls of the future house was upholstered with a block house (imitation of a log). A basketball hoop is screwed onto the pole.
Complex from a different angle:
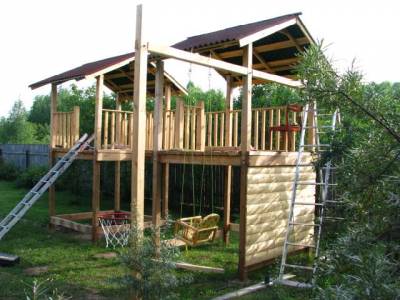
And the swing is our everything! The child loved them very much. Can ride for hours without getting off. The ropes are long enough, so the amplitude turned out to be quite large.
Mounting the swing is done as follows:
Swing attachment
Such a complex fastening system was not just invented. Screw carabiners allow you to remove the swing and hang something else if necessary. Screws with a ring (wide washer + nut on the bottom of the log, wide washer + nut + locknut on top) allows you to fine-tune the swing plane. A slight skew causes the swing to twist and go to the side. The rope clamps were used to tighten the swing lines in order to avoid their distortion during the swing.
The swing is a bit tilted back. This is necessary to compensate for the tilt angle at high amplitude.
swing tilt
And this is the future window of the house:
Future house window
For reliability (it is foolish to assume that the child will only look out the window), the horizontal slats are slightly recessed into the bars:
Cutouts 5 mm deep
$IMAGE24$
In the future, stops will be added. This will allow even an adult to climb through the window
So far, that's all that's been done.
Not much has changed in a month, but still... :)
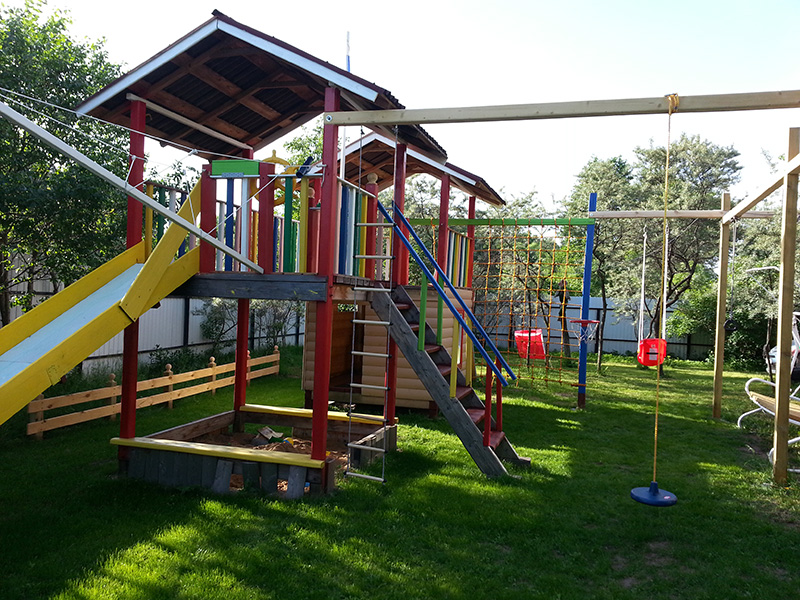
The current view of the town at the moment:

House:
In the window, as you can see, I made a horizontal bar. After laying the floor in the house, the window turned out to be very low to the floor, so there was a danger of falling out of it. The crossbar helps to avoid this :)
House inside: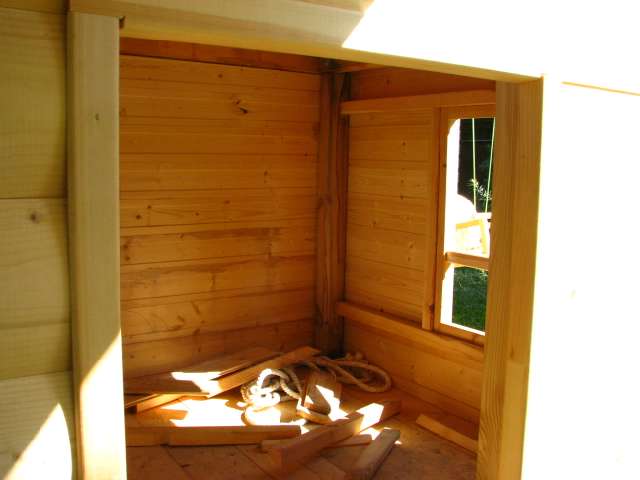
Stairs: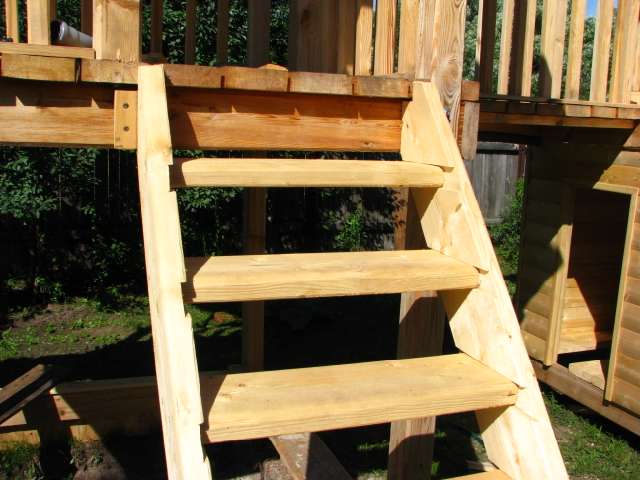
The ladder is the heaviest element in the whole town! It's easier to build two towns than one staircase :)
It was very difficult to calculate the angle of inclination and cut out the recesses for the steps. Railings will definitely be made, but later.
____________________________________________________________________________________________________________________
Much water has flown under the bridge since that time..
The state of the town at the moment:
There is still a lot of work, as always :) And the new is being done, and the old needs to be repaired ...
 Masonry mortars for brick kilns
 Why do the windows fog up in the apartment
 Construction and schemes of brick ovens
 How to lay paving slabs: tips and tricks
 How to drill bathroom tiles
 Monolithic slab on coarse soil
 Which electric heater is economical