How to build a barn with your own hands with a shed roof in stages
Not a single country house or cottage can do without a shed for storing garden tools and various equipment. We invite you to find out how to build a barn with your own hands with a shed roof in stages. To do this, you must follow certain recommendations from the videos and diagrams of experienced gardeners.
Do-it-yourself barn construction step by step
The first step is to choose a place to place a frame outbuilding with a shed or gable roof. It is best to choose a place where the soil is not suitable for beds. A wooden shed cannot be placed on garden paths and car passages. The best option would be to place them at some distance, near the landings. The entrance to the barn should allow you to easily place overall equipment.
The next step is to clear the place of debris and grass for the construction of a barn with your own hands. The upper part of the soil is cut off twenty centimeters. The roots are removed, everything is aligned.
Before further work, the necessary material and tools are prepared. As lumber for the construction of a frame shed with a shed roof, the second - third grade of wood is suitable, so it is cheap and will reduce construction costs.
For the construction of a frame wooden shed, it is taken:
- timber for frame construction 10 by 10 cm;
- for rafters board 5 by 15 cm;
- for sheathing - board 4 by 15 cm;
- for the crate, unedged wood is needed.
- for moisture protection - film and roofing material.
- for the roof - corrugated board, metal tiles, soft tiles.
- for concrete - gravel (crushed stone), river sand and of course cement.
- for fastening nails or self-tapping screws, steel corners.
Tools for the construction of a wooden frame shed in the country will need the following:
- screwdriver;
- electric drill;
- electric planer;
- jigsaw;
- saw.
For outbuildings, even from wood, only a columnar type of foundation is always erected. Crushed stone and gravel pillow is not suitable for this purpose.
Step 1. First of all, the markup for the pillars is done. The spans must be less than 1.5 meters.
Step 2. The pillars are placed at the corners of the future building, along the perimeter inside it.
Step 3. Holes are dug 0.5 meters deep.
Step 4. Formwork is built to a height of 0.3 meters.
Step 5. A sand and gravel mixture is poured to the bottom.
Step 6. Reinforcement is placed, concrete is poured.
Step 7 Boards for the barn are treated with an antiseptic and refractory varnish.
After 4 days, the concrete hardens, then the formwork is removed from the foundation for the future barn. A two-layer roofing material is distributed on the pillars. A rectangular shape from a bar is mounted at the top. The ends are connected with steel brackets. Vertically arranged racks are exposed. Fastened with steel corners. One front wall of the barn needs to be built higher. The entrance is planned according to the step-by-step instructions and drawings.
Logs for the floor are connected to the sweat, and then they are closed with tongue-and-groove or edged boards. Beams for floors are laid, vertical beams go on top, which are fastened with steel brackets, corners.
Watch the video: How to build a do-it-yourself barn with a shed roof in stages
How to make a roof for a barn with your own hands
When all the stages of construction have been completed, you can start building a shed roof for a wooden shed with your own hands. For high-quality protection of the barn from the weather, a multilayer cake is made. The upper frame harness acts as a Mauerlat.
The length of the rafter legs should be equal to the distance from one to the other slope. 0.5 meters are added to the overhangs on each side. One leg is made for the pattern, and others are made according to it. Notches are made on all parts for fastening to frame beams.
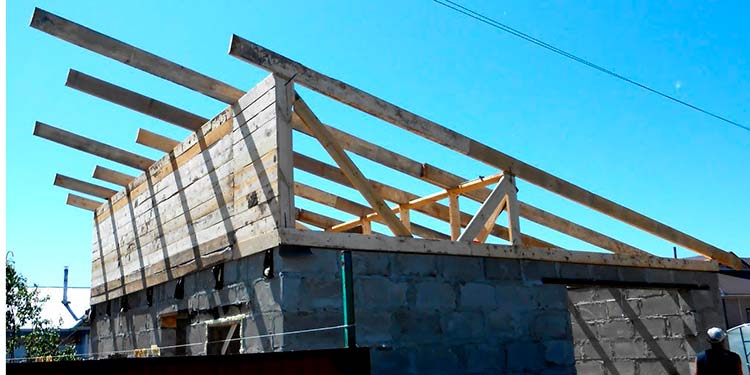
- Rafter legs are installed with a span of no more than 80 centimeters and are fixed with metal corners or nails.
- The waterproofing is overlapped and fixed with a stapler or small nails.
A crate is made from an unedged board. - When using a soft roof, the lathing becomes more frequent.
- The roofing material is fixed with galvanized self-tapping screws with a rubber head specially designed for this purpose. When screwing in such self-tapping screws, the cap flattens and closes the hole.
- The frame is sewn up with processed boards.
- Doors with windows are installed.
- The final finishing of the premises is being carried out.
In the outbuilding there is a countertop, wall shelves. - The outer part of the barn, if desired, is closed with siding.
- The facade of a wooden barn can be painted with enamel. It is necessary to refresh the coating after five years.
Useful video: Do-it-yourself frame shed-workshop for a week
Subject to the stages of construction, it is possible in a short time build a wooden shed with a pitched roof, without which not a single country resident or summer resident can do.
 Masonry mortars for brick kilns
 Why do the windows fog up in the apartment
 Construction and schemes of brick ovens
 How to lay paving slabs: tips and tricks
 How to drill bathroom tiles
 Monolithic slab on coarse soil
 Which electric heater is economical