How to lay a wooden floor with your own hands
Wooden flooring is the best choice for a private house and apartment. If it is properly laid and looked after in time, then it serves for decades without losing its qualities. Wood is an environmentally friendly material, it has low thermal conductivity and good soundproofing coefficient. It is pleasant to walk on such a floor barefoot, it retains heat even in winter and looks great. Run wood flooring you can do it yourself - for this, use our recommendations.
If you decide to create a wooden floor in your home, then the first step is to choose a quality material. This must be approached very responsibly, because if you buy under-dried boards, they can burst, and gaps will appear between them.
Note:some people believe that only hardwoods should be laid on the floor. This is not entirely true: pine, spruce, fir, larch, cedar are great for the floor.
For the floor, you need a high-quality board of the same thickness, cut off on both sides
Choose the wood that is available in your area. It makes little sense to overpay for harder types of wood for residential premises, since even soft pine holds the load well. From the middle price segment, you can advise oak, alder, aspen. Exotic varieties can be laid if you are not going to cover them with a floor covering.
The main selection criteria for wood:
- The material must be dry. If it is wet, it will definitely lose its shape and dry out. If it is too dry, it may burst or wrap itself with a “screw”.
- Before you buy boards, inspect their surface. They should not have cracks, a large number of knots, dark spots, traces of insects.
- The length of the panels must be at least 2 meters. It should lie on at least three lags so as not to swing from side to side.
- Remember that you will definitely have to cut the boards, so take the material with a margin of 10-15%.
- If you want that you do not have through cracks in the underground, order a tongue-and-groove board. It is connected to each other by means of a “thorn” - “groove” lock and is securely fixed to the lags.
- Try to buy boards from the same lot. If this is not possible, then take “room by room” so that the pattern and drying time at least approximately coincide.
Types of boards for flooring
There are several types of floorboards:
- Solid (array). It is considered the most common and cheapest - it is simply cut off on both sides.
- Solid wood parquet. It is similar to laminated panels: it has locks on four sides and a ventilation cutout at the bottom. It is laid on the draft floor, has a thickness of about 20 mm, a length of 500-2000 mm.
- Glued. In fact, this is a classic parquet board, which was “assembled” from three layers. The top layer consists of valuable and beautiful woods, the second and third are protective and “filling” layers.
- Classic parquet. These are small wooden slats. They can be smooth or with spikes and grooves.
How the floor is laid
In 99 cases out of 100 flooring done on the lag. This is a classic system that is suitable for both an apartment and a private house. In an apartment, logs are laid on a screed or concrete slab, in houses - on posts or beams. If the floor is made in a private house, then it is best to make it double: the first draft layer is hemmed from the bottom of the log, then a vapor barrier, insulation and a finishing floor are laid. This is the most optimal scheme.
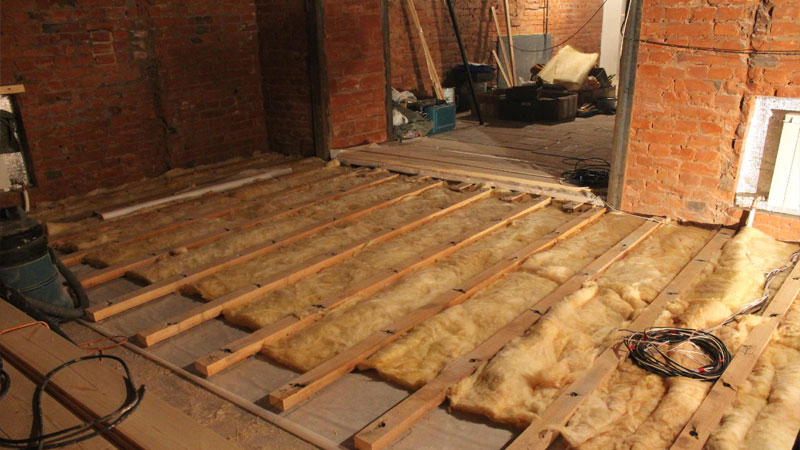
Logs allow you to hide insulation between them, communications, vapor barrier
Preliminary work
Before laying the board, you need to do a few manipulations. Be sure to treat the wood with antiseptics and flame retardants to protect it from decay. If you have high humidity in your house, then you can impregnate the tree with bio-impregnations - they keep it well from the appearance of rot, mold, fungus, etc.
The second stage of preparation is laying waterproofing. Use roll or film materials for this, be sure to overlap and glue the edges to each other. Proper waterproofing is done with a “trough” - materials are brought onto the walls, and after laying the boards, they are cut off with the edges under the plinth. Do not save on waterproofing - it will protect your home from dampness, and the boards from rotting.
Installation lag
After all the materials have been processed, it's time to install the lags. These are long wooden bars with a thickness of at least 50 mm, a height of 70 to 150 mm. With the help of a log, you can level the surface, under them you can hide communications, lay insulation, etc.
Note:logs have a certain height, like a board. Be sure to take this into account when arranging - the floor level will rise by about 100-200 mm.
If you are laying logs on a screed in an apartment, then simply lay them on top of the waterproofing across the future location of the boards. The step between the lags is selected depending on the thickness of the board you have. So, for forty, the step should be 85-90 cm, for fifty - 100 cm, for thirty - 60-70 cm.
If the logs are laid on the ground, then for them it is necessary to create brick or concrete columns. It is advisable to use red brick, because it is not afraid of moisture. The surface of the columns is also waterproofed. The step between the columns is selected from the thickness of the lag - usually it is 90-100 cm. The lag should lie on at least three columns. It is recommended to lay solid logs, but if this is not possible and they need to be spliced, then the seam should lie on the post, and not hang. The bars are symmetrically sawn down to half the thickness, connected and knocked down with nails through and through. Self-tapping screws can also be used for connection.
The joists should not rest rigidly against the walls - leave a distance of 15 mm between them on each side. This will allow the tree to expand and contract depending on the humidity. It is not necessary to attach the logs to the posts - they will not budge after the boards are nailed to them.
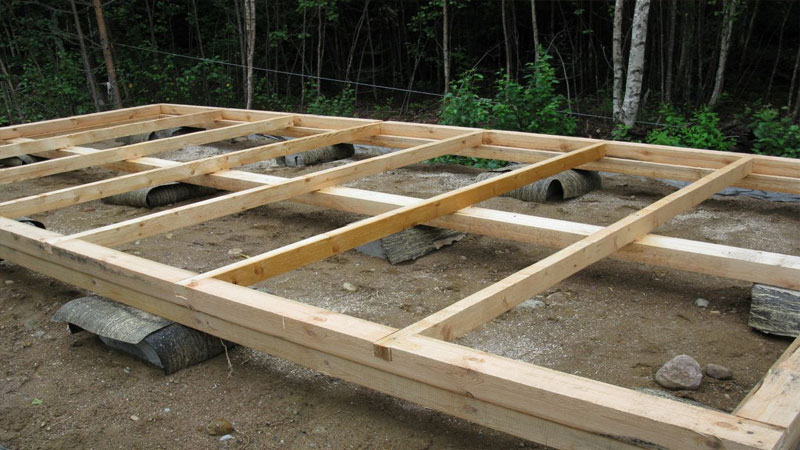
Logs are located at a width of no more than a meter from each other
Marking and laying lag
How to properly lay the logs to get a perfectly flat floor? First, lay the first and last log against opposite walls. Level them up. You can use a laser level or a regular dropsy. Tension the thread every one and a half meters - it will show you the desired level. Then start the lags under the threads and set them to the required level. For lining, use solid materials that will not disintegrate from moisture - the remains of ceramic tiles, flat pebbles, profile pieces. You can use wedges made of wood, but it is recommended to treat them with an antiseptic. If the logs are laid on beams, then it is better to nail them to avoid rubbing wood against wood.
Note:you can check the correct installation with a long level or a board that fits into three logs. She should not play, but lie tightly on all points of support.
Laying boards
Once the joists are level, it's time to start laying the boards. Two options for arranging the floor are allowed:
- Floor in one layer. A board is laid on top of the logs, which serves as the basis for the floor covering. As a finishing option, it is rarely used, since the single-layer coating is quite cold.
- Floor in two layers. A similar floor is made when the board will be used as the final version of the coating. In this case, an inexpensive third-rate board is hemmed from below under the logs, then a vapor barrier and insulation are laid in the gap.
First, the first board is laid parallel to the wall. Usually they are placed along the light falling from the windows so that the cracks are less noticeable. But if a laminate, linoleum or other coating will be laid on top, then there is no difference in how to position the board. Be sure to leave a gap of 15 mm from the walls. It can be closed with a damper tape or a plinth. Fasten the first board securely with nails or self-tapping screws. The length of the nails should be chosen so that ⅓ is in the board, ⅔ in the log. If the boards are grooved, then you can screw the screws into them at an angle of 45 degrees. But still, it is better to fasten them in the normal way, hammering nails to a depth of 2-3 mm. nozzle, and then filling the holes. The second is tightly pressed against the first with spacers or brackets. If the board is tongue-and-groove, then it is necessary to insert the tooth into the groove until it stops and tighten it with self-tapping screws.
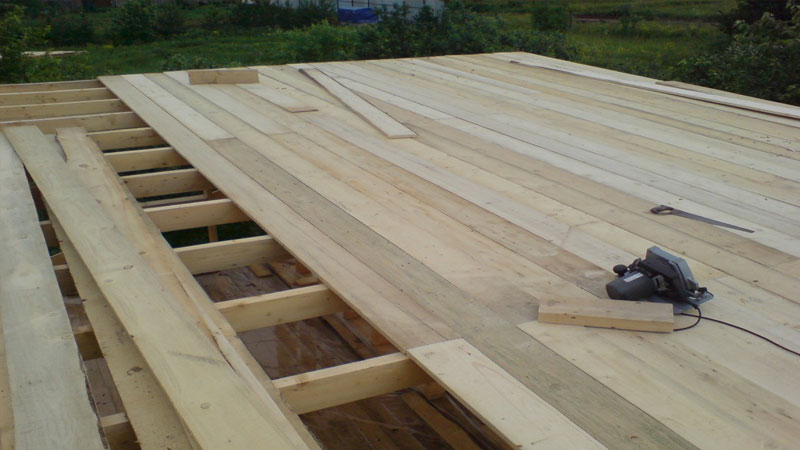
Boards must be well pressed against each other and spliced only on logs
If you decide to do handmade wood flooring be sure to follow the tips below.
- Boards must be laid taking into account age-old rings. They should look in different directions - so the entire surface will be stronger and play less during thermal expansion.
- First of all, lay out the boards on the joists, trying to select them so that the gaps are minimal. Number the selected boards so as not to confuse them.
- Be sure to leave a seam of 10-15 mm around the perimeter of the room. It can be filled with damper tape or stuffed with a plinth on top.
- Try to drive in nails and screw in screws at an angle of 60-80 degrees, and not vertically. So they hold better and will not be squeezed back during operation.
- Be sure to deepen the hat to a depth of 2-3 mm. The resulting holes can then be puttied.
- The boards must be pressed tightly against each other. Fasten the first, then lay next to the second. At a distance of 5 cm from the edge, hammer in a joiner's bracket, put a safety rail in the slot and push the structure apart with wooden wedges. The boards will shrink tightly, after which they can be tightly fixed.
- After fixing the second board, the staples are pulled out, the third is laid and the procedure is repeated.
- The last board will probably have to be cut. Measure the distance from the penultimate panel to the wall, subtract 15 mm from it for the thermal gap and cut out the required bar. We also recommend that you cut off the corners that will be adjacent to the wall - this will make the board easier to lay.
- After all the material is laid and fixed, nail the baseboard around the perimeter. If you used a waterproofing film, then cut it at a level of 20 mm from the surface of the boards.
- Professional builders recommend leaving ventilation holes connecting the underground and the room. Usually they are equipped in corners or under batteries. This is necessary so that moist air does not stagnate below, and the boards do not rot.
Final stage
After the boards are laid, they must be painted or varnished. If you want to give the floor color, but leave the texture of wood, then use a variety of stains.
Note:if the boards are of different heights, then it is necessary to grind them. To do this, use special grinders that can be rented.
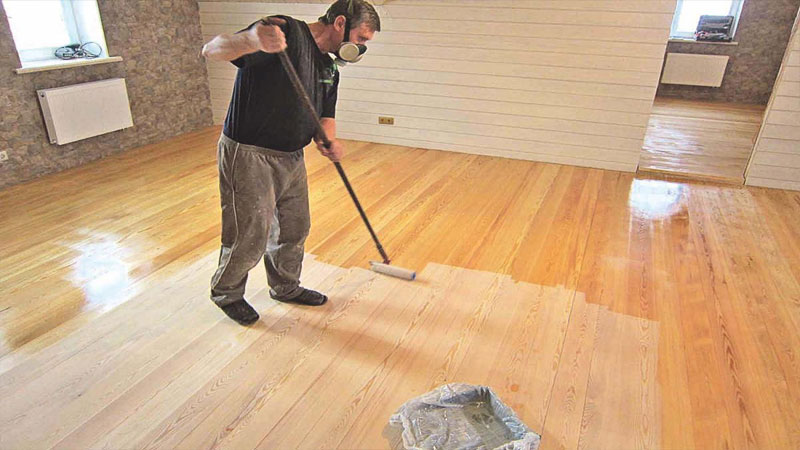
Be sure to treat the surface of the boards with varnish or paint
You need to paint the surface parallel to the fibers, smoothing them, and not bullying them. We recommend that you cover the surface with at least two coats, as the first one will probably be absorbed into the wood.
 Masonry mortars for brick kilns
 Why do the windows fog up in the apartment
 Construction and schemes of brick ovens
 How to lay paving slabs: tips and tricks
 How to drill bathroom tiles
 Monolithic slab on coarse soil
 Which electric heater is economical