How to make an electric underfloor heating with your own hands - installation technology from preparing the base to connecting the system
Almost every sane person is now engaged in home insulation. This is dictated by the desire to reduce utility costs. Very popular now is the electric underfloor heating, which is not so difficult to install with your own hands. However, some skills in connecting the system are required. Incorrect connection may result in inefficient operation of the structure or a short circuit that could cause a fire.
An electric heating cable or mat is usually laid in the bathroom, nursery, kitchen, balcony. This system can be used as primary or secondary heating.
There are several types of electric floors. For heating is used:
- heating mat,
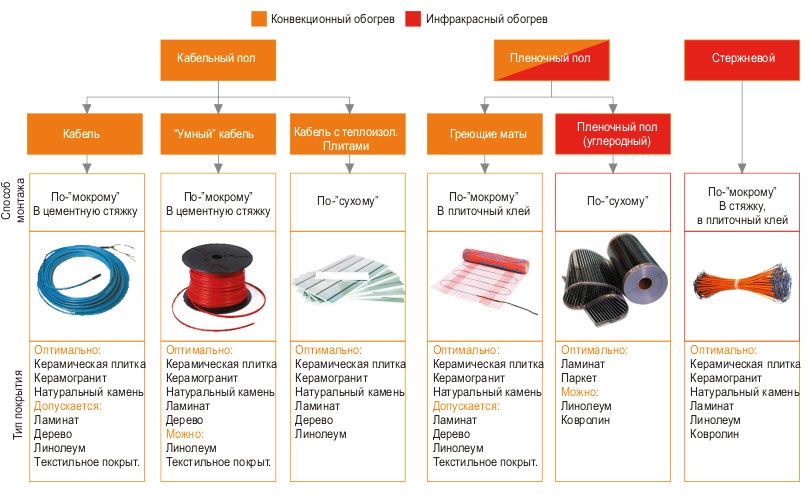 Types of electric underfloor heating, methods of their installation and recommendations on the type of coating
 Each design has its own. However, in this article, we will look at how to make an electric underfloor heating from a heating cable.
Before you install a warm floor, you need to carefully calculate it, as well as choose the place where the mats will be located. First determine the localization of the system. At the same time, do not forget that it is better not to put it in those parts of the room where heavy furniture will stand in order to avoid overheating. Now calculate the total laying area and multiply it by the power of the system. In this case, one should not forget about the type of room, and the possibility of heat loss.
 An example of the calculation of an electric underfloor heating, performed as auxiliary heating to the main radiator
 Foundation preparation
Installing an electric underfloor heating with your own hands is not so difficult. Literally one day is enough for laying the heating mats, with the cable option, the installation time will increase. All operations should be carried out with the utmost care. First, prepare the base for installation:
- Carefully inspect the subfloor. If it has serious differences, they must be eliminated. For this, or is equipped. All cracks and crevices in the base must be sealed to reduce floor heat loss.
- Remove all debris and dust. It is best to use a vacuum cleaner for this. It should be powerful enough, so perhaps the industrial version should be used.
- Installation of heat-insulating material, which will allow the most efficient use of the heating system. It will direct the heat upwards.
- Room layout. It is best to accurately take all measurements and mark on the floor those areas where the structure will fit. This will help you avoid confusion and speed up the work.
- Priming the surface of the subfloor. In this way, you can improve the adhesion of the cement screed to the base.
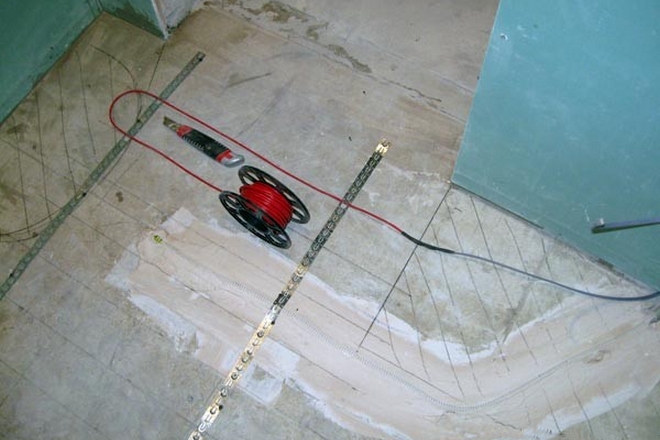 On a leveled, dust-free base (without major defects), the cable is installed according to the laying scheme
 Installing a thermostat
Do-it-yourself installation of an electric underfloor heating is carried out only after the location has been determined. It should be located in an easily accessible place. At the same time, the thermostat must not be closed, obscured by furniture, otherwise it will not work correctly.
The distance from the floor to the regulator must be at least 30 cm.
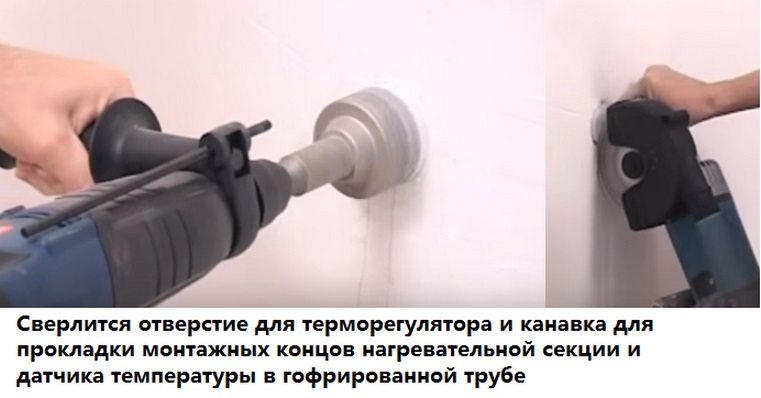
If you want to install a heating cable in a bathroom or sauna, it is best to mount the thermostat outside the room. To fix it, you need to make a hole with a drill with a special nozzle. And you will also have to work hard on chasing the walls for laying the wiring from the temperature sensor. The latter must be placed in a corrugated tube. This will help protect it from the effects of negative external factors.
Mounting technology
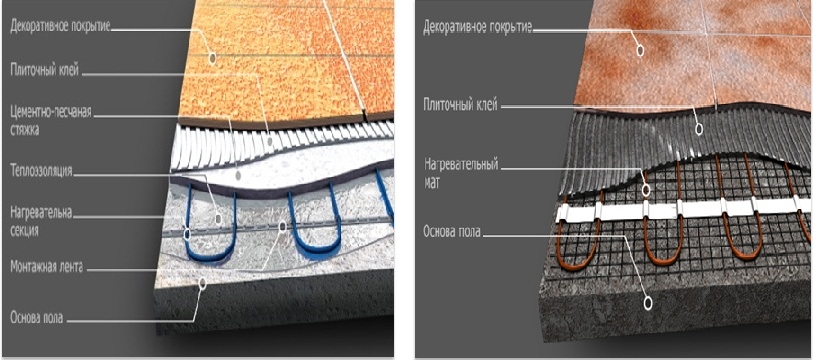 Pie electric floor heating. When using a cable, a screed is required; when using heating mats, installation is carried out in a layer of tile adhesive
 After the preparation of the premises is completed, you can proceed with the installation of the cable. The technology of work provides for the implementation of such manipulations:
- Waterproofing installation. For this, a conventional polyethylene film or a special membrane can be used.
- Laying damper tape around the perimeter of the floor. It will make it possible to observe the technological gap between the walls and the screed. If this material has a sufficient width, then it can be mounted even before fixing the thermal insulation.
- Installation of temperature sensor and regulator.
- Cabling. Here it should be borne in mind that the heating elements should be located at some distance from the wall - 20 cm. The cable should also not be positioned so that the coils are close to each other. If you purchased electric mats, then the distance between them should be 5-10 cm. Fix them on the base using a special construction tape.
- Installation . Please note that its height should not exceed 3 cm above the surface of the mats. In any case, during pouring, you should monitor the level of the future base. Heating mats are best laid under the tiles not in a screed, but in a layer of tile adhesive.
After all work is done, the floor should be allowed to dry. This may take a whole month. At this time, it is better not to ventilate the room so that the draft does not worsen the quality of the screed. In addition, you can not turn on the warm floor until the solution has completely solidified. Therefore, it is better to carry out an initial check of the system's performance before filling.
Connection Features
This part of the installation of the electrical cable is the most critical and complex. Here you need to do everything right. The work on connecting the system consists of the following actions:
- Checking the cable and wires with the help of special devices: a multimeter (to find out the resistance of the system), a megohmmeter (to find out the insulation resistance of the mats).
- Connecting the temperature sensor, thermostat and power cable. This should be done according to the instructions that come with the purchased system. It may differ from manufacturer to manufacturer. Please note that when connecting the underfloor heating, you need to turn off the power supply.
- The mat cable and power cord must be secured with a protective clamp to provide additional grounding.
Installing the cable yourself is not entirely simple, but it is quite possible, however, certain rules must be observed:
- During installation, follow the scheme.
- Be careful not to kink or twist the cable.
- If the cable is two-core, then it cannot be cut.
- Do not step on the heating mats before pouring them. Otherwise, they may be damaged.
Compliance with the instructions will give you the opportunity to carry out all the work yourself, without the involvement of specialists. And this, in turn, will save you money. Although connecting the system is an important and crucial moment, which not everyone can handle. If in doubt, it is better to leave the work to specialists. Leave a comment on the article or share your experience in installing underfloor heating systems.
 Masonry mortars for brick kilns
 Why do the windows fog up in the apartment
 Construction and schemes of brick ovens
 How to lay paving slabs: tips and tricks
 How to drill bathroom tiles
 Monolithic slab on coarse soil
 Which electric heater is economical