Useful video: Laying porcelain stoneware on the floor without a level
Often in construction and repair, laying porcelain stoneware on the floor is used. The most demanded finishing material at the moment. Explained simply. The production technology of porcelain stoneware makes it wear-resistant, durable, able to withstand any chemical and mechanical stress. When buying a facing material, a reasonable question arises: how to lay it correctly so that the coating serves for many years and does not create problems.
Floor porcelain tile has certain properties, which determine its advantages. Let's consider them in detail:
- This material has low moisture absorption provided by technological processes. This is possible due to high-temperature firing, which seals all the pores of the coating. It also helps to withstand the lowest temperatures;
- Wear resistance. If we consider a ten-point scale, then the indicator of ceramic granite 8 is very good. Only diamond can compete with it. Not only mechanical, but also static and chemical loads are maintained;
- Not subject to fading in the sun, not able to crumble and wipe over time;
- The tile is quite hard, resistant to splits. Used for finishing warehouse and industrial areas;
- Natural and environmentally friendly material, no synthetic components are used in the production. Another name for the material is pottery tiles;
- Manufacturers use innovative technologies in production aimed at improving quality.
How to choose the right tile?
Floor tiles - for the right choice, you need to know the types of facing material that are on the shelves. Several qualification qualities are known, porcelain stoneware on the floor, they distinguish the material from each other.
Pictures:
- Salt and pepper is the simplest material with a reasonable price. Usually a solid gray finish, interspersed with light and dark tones;
- Monocolor - plain tiles. The color is obtained by dyeing raw materials before production;
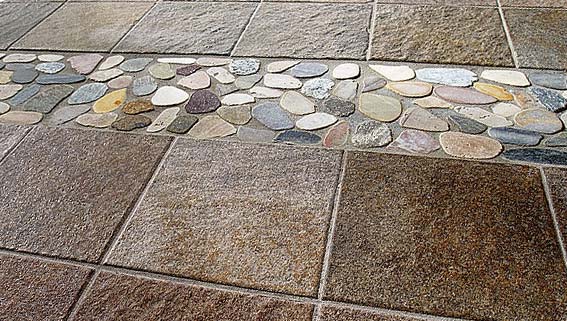
- Natural stone - a complex repeating natural stone pattern;
- Textured - porcelain stoneware for the floor, repeats various natural materials - wood, leather.
Surface characteristics:
- Matte - a non-shiny, untreated surface, but this does not mean that its strength indicators are inferior to treated surfaces;
- Polished - shiny, attractive material. When polished, changes occur in the material, they make it less moisture resistant;
- Polished - has a shiny surface, unlike the previous type, is able to withstand a humid environment;
- Polished - with a mirror shine, achieved by coating the tiles with a special glaze, a stable and wear-resistant material;
- Rough - has an imitation of chips, the surface is uneven. Well suited for flooring with moisture, non-slip.
Aesthetic characteristics of ceramic granite, there is a class of material that determines its suitability for laying in rooms:
- PEI I and II - option for bathroom, bedroom, room, toilet, kitchen. Where a person walks barefoot or in soft slippers;
- PEI III - rooms with low traffic, they do not have direct access to the street;
- PEI IV - premises with high traffic;
- PEI V is a tile that withstands the most intense impact on it.
The most optimal option for residential premises in apartments and houses is the tile of the third group, the strength and porosity of the material is at a high level. The fourth option is well suited for the street, its quality indicators allow it to be used in open space.
Aesthetic characteristics may affect the choice of facing material, they are secondary. Everyone has different color and design preferences. When choosing, it is better to rely on the two previous criteria.
Tile selection
Before buying, the room where the tiles need to be laid is assessed. For example, a smooth glossy finish on the floor is dangerous and wrong:
- When moisture hits the surface, it becomes slippery;
- Under mechanical influences, it loses its qualities;
- Scratches are visible on the glossy surface - they appear during operation.
You need to choose matte ceramic granite, glossy with volumetric embossing, with decor.
The size and pattern of the tiles must be chosen based on the quadrature of the room. The selection should be aimed at ease of laying the pattern, and at reducing the amount of waste.
The technology of laying porcelain stoneware on the floor
The best option for finishing the floor in any room. Loads on the coating will not cause harm. But high-quality use of the material is possible with proper observance of laying technologies. The process should be given special attention.
For the correct laying of porcelain stoneware, you need to draw up a project. We choose a scheme, styling. In this case, the diagram will help to understand the amount of coverage to be purchased. There are many options, for example, create a creative mosaic pattern made up of material of different colors. The easiest way to do the litter yourself, for a beginner, is ordinary laying.
Useful video: Laying porcelain tiles on the floor
Ceramic granite can be mounted using seamless technology, or seams can be made using crosses. Subsequently, they are rubbed with a special grout on the tile.
We decided on the amount of material per square of the surface, it should be added to the number of 10% - they will go for cuts, a possible marriage.
What tools and materials are needed
Before starting the installation, we prepare the necessary tools, you will need:
- Bucket, or other container for mixing glue;
- Drill with a mixer - mix the solution;
- Roulette - measure the size;
- Corner, necessary for even cutting at an angle;
- Building level, without it you will not get a flat surface;
- Notched spatula;
- Crosses for seams;
- Master OK;
- Tile cutter;
- Bulgarian;
- A set of crowns (if you need to outline heating pipes).
Glue for porcelain stoneware, we buy with increased adhesion - porcelain stoneware does not let through, does not absorb moisture. Auxiliary materials - primer, roller, bath, for soil.

If you do not have this tool in stock, then you will have to buy it, or rent it. You need to calculate what will be cost-effective, purchase a tool, or hire a team of builders for laying.
Before installation, take care of the grout to fill the seams. Although it can be bought after installation, it is better to have everything ready.
Surface preparation
Prepare the base for laying - be careful, it will depend on the preparatory actions how firmly the facing ceramic granite will lie on the floor. If it is laid on a concrete screed, it is enough to clean the area from dirt and dust and impregnate it with a deep penetration primer or concrete with contact. If there are irregularities, in a centimeter, then they need to be filed with a “file”, or a rough leveler. Laying tiles on a flat surface is much easier at home. The soil dries out, you can start lining.
But porcelain stoneware can be laid not only on concrete, it is possible to put porcelain stoneware on a wooden floor, but there is more work.
Wood floor preparation
First of all, the old coating is removed, and new logs are set to a horizontal position according to the level. For insulation, expanded clay is poured into the gaps between the lags. With the help of self-tapping screws, the board is fixed. The screw pitch is 15 cm. The draft floor is ready.
Waterproofing is laid, which serves as the basis for laying. There are two ways to arrange the floor:
- The first - on the subfloor, after waterproofing, a reinforcing mesh is stuffed, construction beacons are installed, and a concrete screed is poured. Let's apply and self-leveling floor. As the screed hardens and dries, we begin the installation of ceramic granite.
- The second is a dry screed. They take GVL sheets in three layers, screw them to the subfloor, there is already insulating material there. The surface is primed.
You can safely lay tiles on the base, the glue should be on drywall, for porcelain stoneware.
Plywood - laid directly on the logs, the thickness of the sheets is 28 mm. Rolls well and grinds well. Particular attention should be paid to the seams. After grinding, it is better to vacuum the surface, and prime it twice, filling the seams. After the second layer has dried, we proceed to installation. Glue in this case is needed on a polyurethane base.
The presence of large cracks and potholes on the surface where porcelain stoneware is planned to be laid is not allowed. Works are carried out at a temperature not lower than 5 degrees. You can not lay tiles if underfloor heating is working, or heating that passes through the floor.
How to lay tiles on a wooden floor
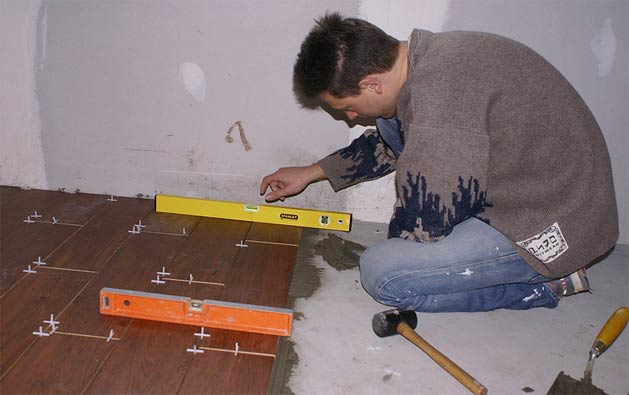
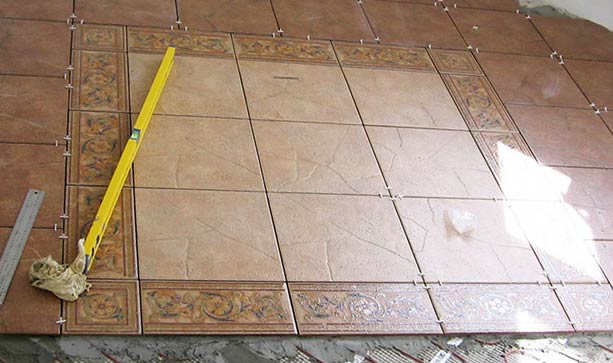
The surface preparation is completed, now you can proceed with the installation of the cladding. It is better to start laying from the middle, for this you need to draw a room, or pull a building thread. For simplicity and convenience, you can use the laser level. Why from the middle? Using this laying method, the middle of the room will be from a whole tile, and the cuts will evenly disperse along the walls.
The adhesive solution is applied with a notched trowel to a small area, while the trowel is at an angle to the surface - 40 degrees. Manufacturers apply a protective layer on the front surface of the tile to prevent scratches during transportation - it must be removed before laying porcelain stoneware on the floor.
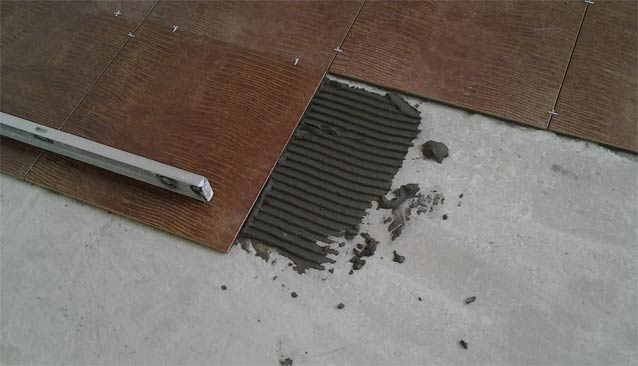
Tiles are laid on the level, tightly to each other. The level is reached, the tiles are carefully moved away from each other, and a cross is inserted into the resulting gap. Thanks to this, no glue remains in the seam. Laying goes without seams - this is not necessary. For a presentable appearance of the surface, the seams should be at least three millimeters.
You need to check the level constantly. Supported when adding adhesive under the tile. It is advisable to lay the surface immediately. If it doesn’t work, then it’s worth noting that you can’t step on the tile for 24 hours. It dries up within 4 days.
The seams are overwritten after the solution has solidified. The color of the grout is the same tone as the tile, or use a contrast. A common option is gray grout, it does not wash out, dirt is not visible. The seams are rubbed with a special soft, rubber spatula. After grouting, you need to wait two hours and wash the seams with a soft sponge. Do not forget to embroider the seams before grouting, removing the remaining glue. The surface is ready, and after a week it can be washed with a regular detergent.
Tile on the floor without dismantling the wooden surface
If the decision is made to cover the floor with tiles in the house, without dismantling the wooden floor, then you need to properly prepare it.
- If there is paint on the floor, it must be removed. This is done by grinding machine with a special nozzle. You need to shoot to a clean tree;
- Then, if there are large gaps on the floor, they are puttied. Provided that the floor is level, you can lay tiles directly on the boards;
- Waterproofing is being installed. But this is an optional manipulation, provided the floor is made of wooden boards;
- A screed is poured, or a dry leveling is arranged. If the floor is uneven;
- Primed and tiled.
If it is not possible to remove the paint, then you need to make a frequent notch, and prime the floor well with special compounds. Laying porcelain stoneware on the floor will be of high quality when using this technology.
Conclusion
Approach the choice of this coating responsibly - it is not cheap, and is mounted for a long time. It is necessary to choose such a design that in 10 years it will not lose its relevance and attractiveness.
Useful video: Laying porcelain stoneware on the floor without a level
In an apartment, or in a private house, anyone can lay porcelain stoneware with their own hands. The main thing is to know the installation instructions, and correctly apply it. Of course, the services of specialists are not cheap, and not every inhabitant can afford to hire a qualified team. And I want to have a floor covering made of ceramic granite. Armed with this article and the necessary tools, you can make your dream come true without spending a lot of money on installation.
 Masonry mortars for brick kilns
 Why do the windows fog up in the apartment
 Construction and schemes of brick ovens
 How to lay paving slabs: tips and tricks
 How to drill bathroom tiles
 Monolithic slab on coarse soil
 Which electric heater is economical