Floor screed - how to do it yourself
Floor screed is the beginning of any repair. In this article, we will describe in detail how to make a cement-sand screed in an apartment or house with our own hands. At the end of the article you will also find visual video materials.
Even if there is an absolutely even and smooth concrete slab on the floors, it is necessary to do a screed. In general, all the tasks that the floor screed is designed to solve can be divided into two categories: visible and tangible.
Visible tasks include leveling the floor relative to the horizon and creating a perfectly smooth surface. The fact is that during construction, laying of floor slabs with a slope of up to 20% is allowed. But this is necessary for builders, but it is better for residents to get rid of such tolerances. After all, laying of any hard floor covering must be carried out on a completely flat surface.
But the tangible tasks include reduction of heat loss. Even a thick-skinned person will feel that after organizing the floor screed, the apartment has become warmer. And here the role is played not even by an increase in thickness, but by the addition of a new layer. No matter how well it fits, but these are heterogeneous layers. And heat transfer in heterogeneous layers requires additional energy and takes more time.
To all this, it should be added that do-it-yourself floor screed can be easily poured without the involvement of craftsmen. Of course, you will need a certain set of tools and materials. But more on that below.
Floor screed device
before work, Prepare tools and materials. In particular:
- Laser level;
- Rule (at least 1.5 m);
- Construction square;
- Concrete mixer;
- Flat spatula (20-30 cm);
- Galvanized beacon profile (10 mm);
- Deep penetration primer;
- Gypsum building 5 kg.
- Cement;
- Sand;
- Polypropylene fiber;
- Liquid glass.
An explanation is needed here. A concrete mixer is a rather expensive thing, and it makes no sense to buy it. But in any city, such equipment can be rented. The average price for a concrete mixer with a tank volume of 150-200 liters, about 500 rub/day. And it will really facilitate the work, and at the same time the quality of the solution will be much higher.
The number of beacon profile is calculated based on the size of the working room. For example, in a 4x5 m room, it is better to install beacons along the long side. The first and last strips should be 20 cm from the walls. And between them place two more beacons, at an equidistant distance. As a result, the following scheme is obtained: 0.2→1.2→1.2→1.2. This means only 4 profiles of 5 m each. The distance between the beacons is 1.2 m, which facilitates the work. An experienced specialist can work with a two-meter rule with three beacons for the whole room, but for the first time we will not chase records. Our goal is quality.
IMPORTANT: be sure to use a galvanized profile. It can be left in the floor screed without removing it.

Building gypsum is used to install beacons.
Try to buy cement M500.
Sand is needed only river and washed. The fact is that river sand grains have a slightly rounded shape, and they have fewer sharp edges. They are much better wrapped in cement, and hold more securely. And the washed sand does not contain impurities of clay, dust, silt. These ingredients, destroying the integrity of the cement-sand bond, drastically reduce the quality of the solution.
Separately, we will discuss the volumes. The mass of the floor screed, with an area of 1 m 2 and a thickness of 1 cm, is approximately 16 kg. Including:
- Cement - 3.5 kg;
- Sand - 10.5 kg;
- Water - 2 liters.
Based on these indicators, you can calculate the material needs for any room. But first, you need to decide on the thickness.
The minimum thickness of the screed should be 3 cm. But this is for the highest corner in the room, and for the lowest, you will need to add the height difference. IMPORTANT: in any case, the volume of material must be calculated for the maximum thickness of the screed in the room. This rule will not allow you to make mistakes in the calculations. Even if there is a small surplus, it is better than a shortage of material at the most crucial moment.
Liquid glass added to the solution significantly increases the waterproofing properties of the screed and improves its strength characteristics.

Polypropylene fiber is added at the rate of 0.8 kg / cubic meter of solution, for dispersed reinforcement. Such a floor screed in terms of its performance will be much better. Increases resistance to shock loads, resistance to fracture. And most importantly, a perfectly smooth, silky surface is formed.
Floor preparation and installation of beacons
Everything is taken out of the room. The floor covering is removed. We also recommend removing tiles. The base is carefully swept and then primed. A brush is preferable, because it allows you to work well on corners and the smallest cavities. The drying time of the soil is 1-1.5 hours.
Before installing beacons, you need to find the highest angle in the room. Work will start from this point.
Set the laser level to a height of 20 cm in the middle of the room, and by turning it, determine the highest point in the room (it is almost always located in the corner). To do this, use a square to measure the distance from the floor to the laser beam at each corner. Where the reading will be the smallest, there is the highest point. Subtract 3 cm from this value, and the resulting difference must be maintained when installing beacons. For example, there are four corners in a room with the following indications: A - 17.5 cm; B - 17 cm; C - 16 cm; D - 15.5 cm. The highest angle is D. So, 15.5-3 \u003d 12.5 cm. Thus, from the upper edge of the beacon, to the level of the laser beam, there should be 12.5 cm. Please note that at the same time, the minimum thickness of the floor screed will be 3 cm, and the maximum 17.5-12.5 = 5 cm. But! As a result of the work, the floors will be perfectly aligned with the horizon.
![]()
Having determined the level, you can set beacons. With a marker, mark the profile installation line. Dilute 1 kg of gypsum to the density of rustic sour cream, and lay it in small piles along one marking line, every 20-25 cm. Immediately attach a beacon profile to these tubercles, and carefully align it along the entire length so that the readings are the same from the upper edge to the beam. In the same way, expose all beacons.
Gypsum sets very quickly, and yet it needs an hour of exposure.
After half an hour, treat the plaster stops with a deep penetration primer.
Cement-sand mixture - preparing the solution
To obtain a solution of the M200 brand, it is necessary to mix the M500 cement with sand in a ratio of 1: 3. It is more convenient and practical to do this in a rented concrete mixer. The sequence is as follows. In the switched on concrete mixer, pre-prepared components are poured in small portions (in a bucket). Mixing is done dry. After filling up the entire volume, fiber is added. The calculation is as follows, 1 m 3 - 0.8 kg. The volume of the mixer, for example, is 200 l, which means that the fibers will be required 5 times less.

And only after that, water is added to the mixture. For every 10 liters of water, add 0.5 liters of liquid glass. Don't make the solution too thin. For 50 kg of cement, about 30-35 liters of water are required.
The duration of the batch is 15-17 minutes. After that, the solution is poured in buckets on the prepared surface, between two lighthouses. As soon as the concrete mixer is emptied, it is necessary to knead the next portion. Therefore, it will be much more convenient to work with a partner.
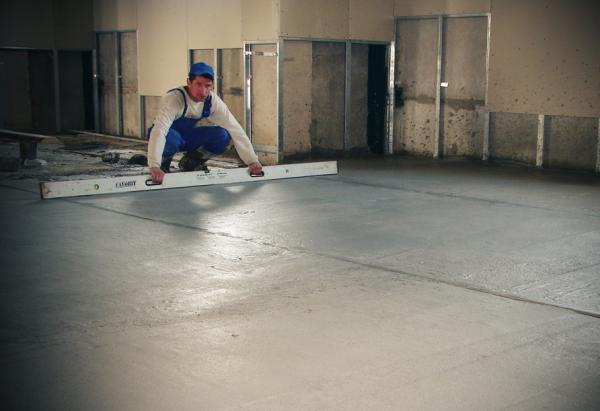
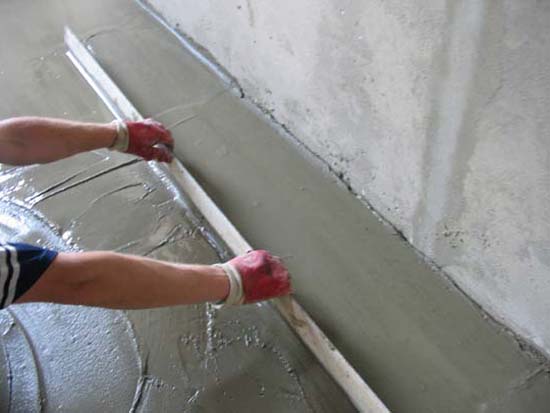
Leveling the screed and working with the rule
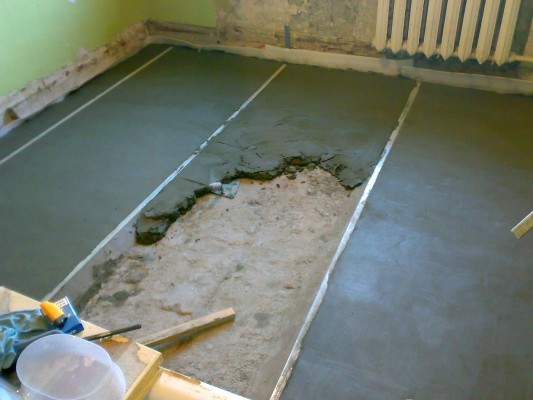
The solution loses plasticity within 1.5-2 hours. The poured mixture is pre-leveled with a spatula, and then the rule comes into play. It is applied to the two nearest beacons, and with wave-like movements along the profiles, with a small amplitude to the left and right ( 5-10 cm) level the floor screed with their own hands.
The work is done without fanaticism, so as not to tear off the profile. The transition between two fills should be smooth. At the same time, each next portion of the solution is poured in such a way that it adjoins the previous filling from all sides.
Working together and using a concrete mixer with a volume of 150 liters, a room of 20 m 2 is poured with a 4 cm thick screed for 2.5-3 hours.
One day after work, surface can be ironed. To do this, the floors are slightly moistened and dusted with cement. Then, with the help of grout, it is carefully rubbed into the surface.
The need for this procedure is due to the flow of cement milk into the lower layers of the solution. Thus, the ratio between the components is violated on the surface. And after ironing, you can even ride on the floor on a tank - strength will be beyond praise.
Floor screed - drying time
The screed drying process is not just a physical evaporation of water, but a long-term chemical reaction of cement hydration. At the same time, there are some nuances that need to be taken into account in order to obtain a high-quality floor.
On the surface, the water evaporates quickly enough, and the hydration process is disrupted. If you miss this moment, then the top layer will be fragile, loose. And for all thicker, stratification will begin. To prevent such excesses, throughout the entire period of curing, the floor screed needs to be moistened a couple of times a day.
You can make the task easier if you cover the surface with burlap ( canvas), moisten it, and then cover it all with a covering film. In such a "greenhouse", the humidity regime will be maintained at an acceptable level for 3-4 days.
The maturation rate of cement is calculated based on the thickness of the screed: 1 cm - 1 week. But too thick fills, more than 4 cm, require an additional 3 days per 1 cm. For example, a 6 cm layer will mature (4 cm x 7 days) + 2 cm x (7 days + 3 days) = 48 days. The time frame is decent enough. But technology requires it.
Readiness can be judged by the residual moisture. It should be within 4-7%. But devices are not available to everyone. Therefore, we will offer a "folk" way.
A piece of polyethylene meter by meter, glue it to the floor around the perimeter with tape. It is important not to leave gaps. After a day, check the screed under the film. If moisture has appeared there, or the shade has changed, then the time for laying the flooring has not yet come. Must wait.
What to do with a beacon profile
In general, removing the beacon from the screed leads to very negative consequences. The fact is that the poured solution, immediately after setting, forms a monolithic structure. Removing the beacon leads to a violation of the integrity this conglomerate. The expected strength and reliability will no longer be. To describe this visually, try picking out the raisins from the bun and laying the dough back. Will you get something decent? Not! We hope the analogy is clear.
 Masonry mortars for brick kilns
 Why do the windows fog up in the apartment
 Construction and schemes of brick ovens
 How to lay paving slabs: tips and tricks
 How to drill bathroom tiles
 Monolithic slab on coarse soil
 Which electric heater is economical