Efficient wood burning stove
An efficient wood burning stove must be attractive, economical, inexpensive and easy to operate. A skillfully and competently built wood-burning stove is not only a decoration of the house, but is also able to heat the room of the house without any problems during the cold season. This stove project, which really exists, is in my opinion a successful combination of styles between a Swede-type stove and a cooking stove. To see in more detail how to carry out approximately such a furnace project, maybe in another The only difference between that project and this one is the lack of firewood, everything else is identical.
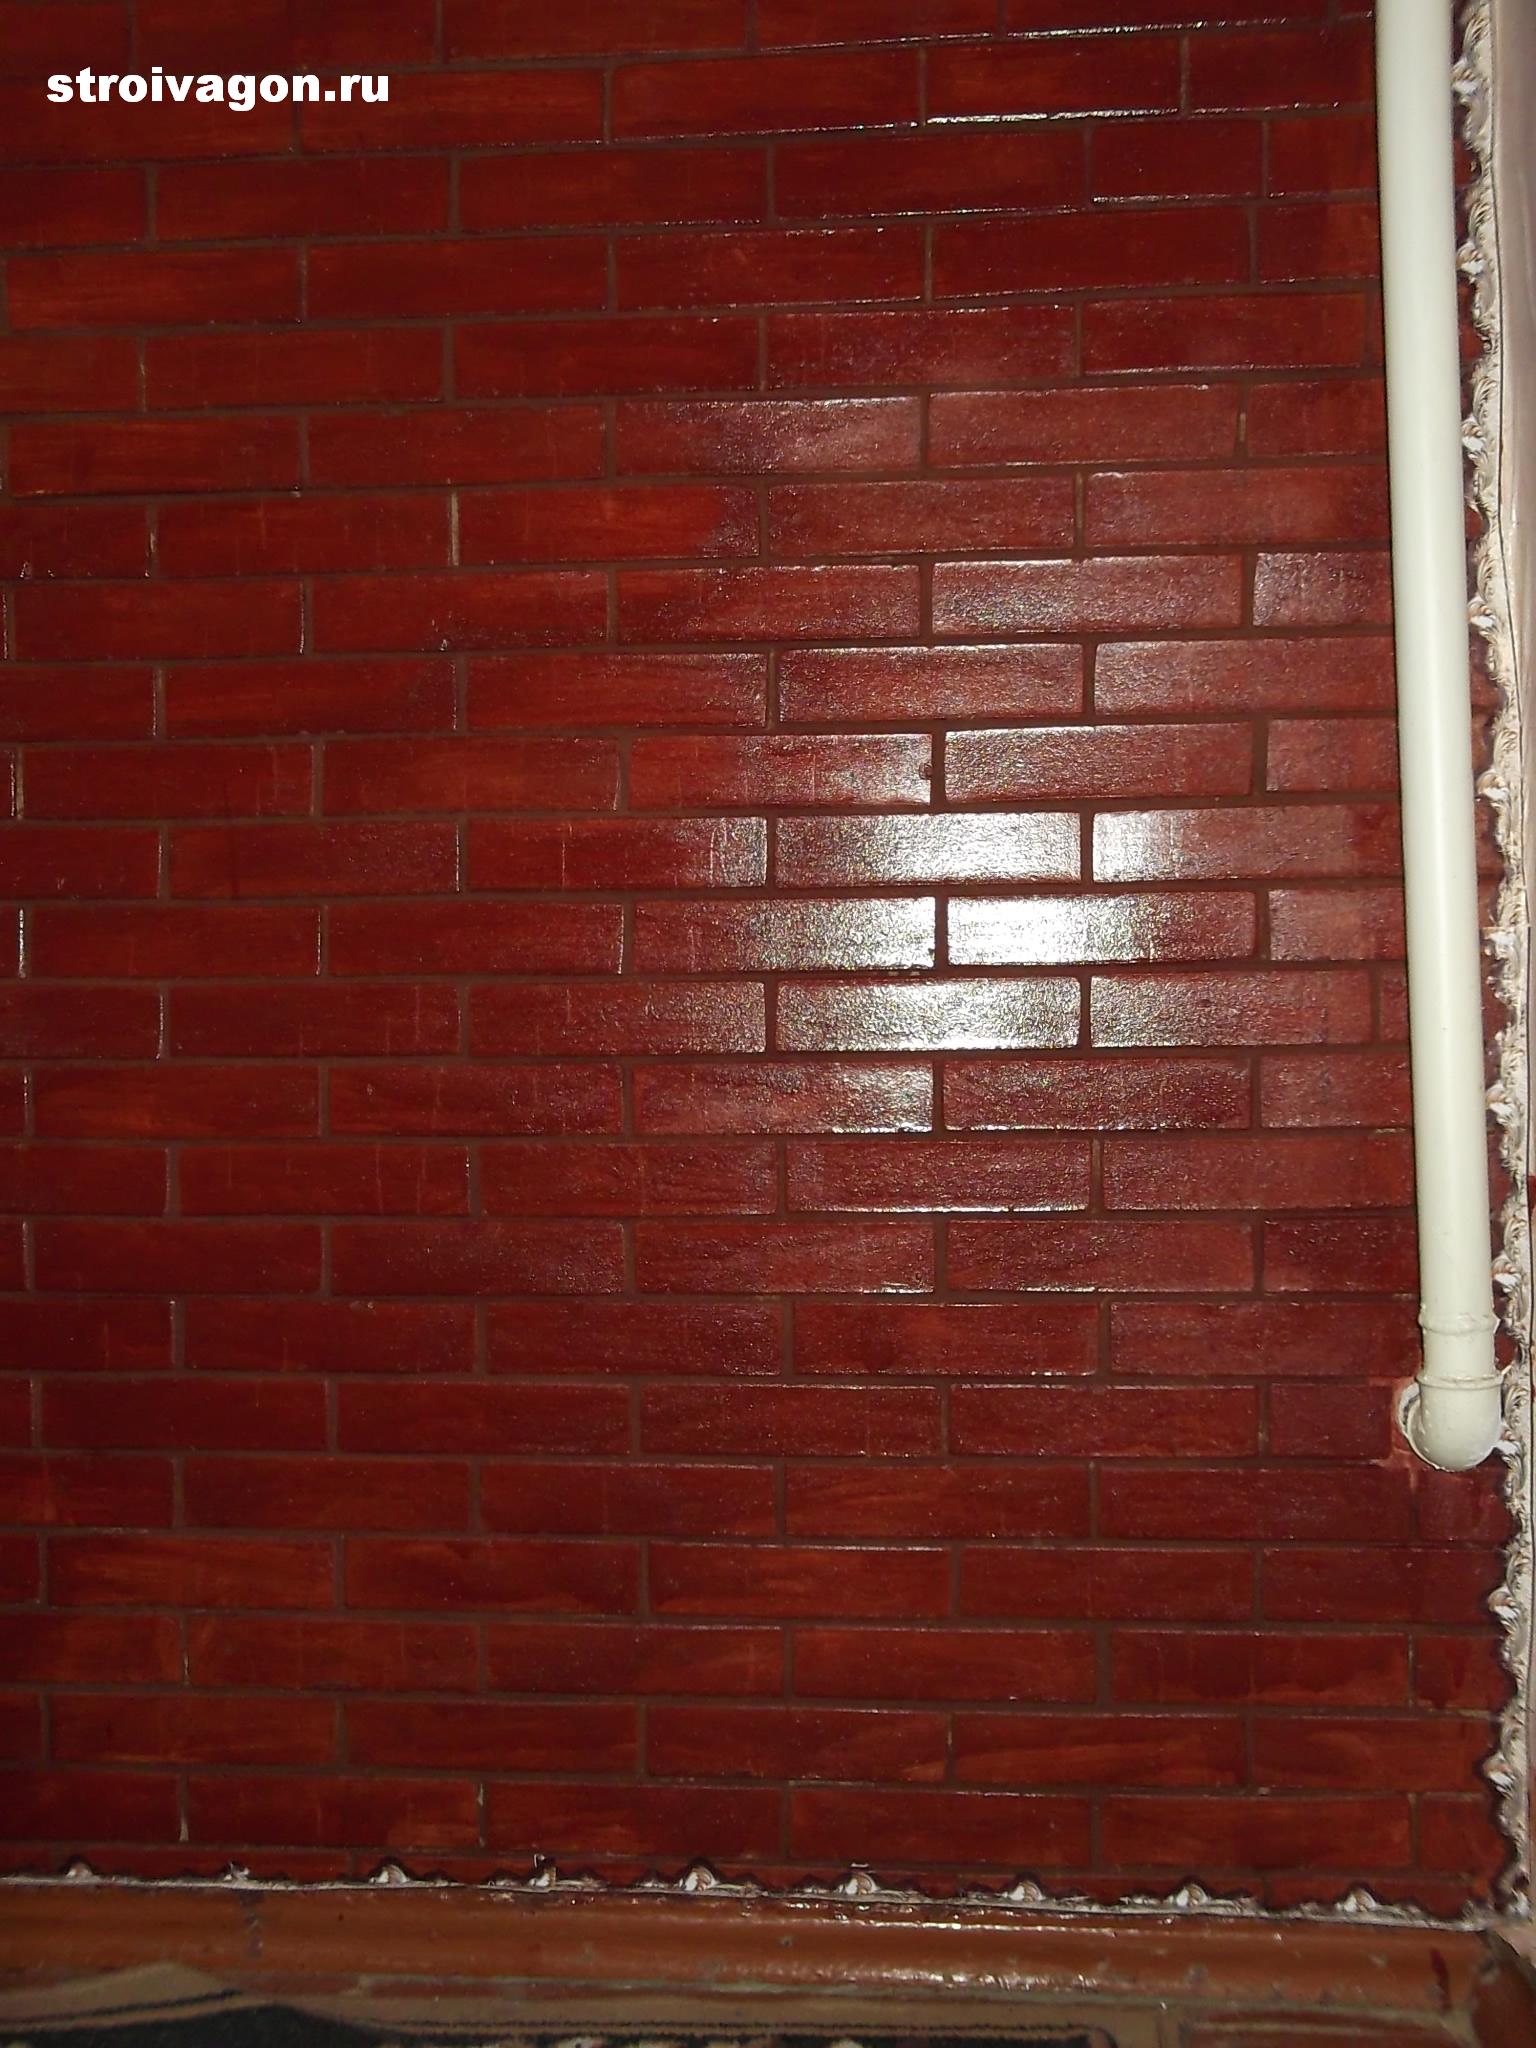
Photo-1. Appearance of the furnace
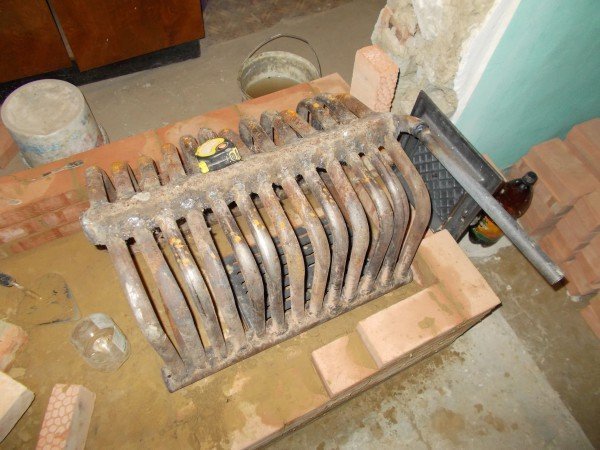
To heat the whole house, a home-made pipe coil is mounted in the firebox of the furnace. The coil consists of pieces of pipes of the required section, which are connected firmly and reliably to each other by welding. The return line is mounted on the bottom side, and the feed is located on the opposite side at the very top.
Thus, when the stove is fired with wood, the water is heated in the coil and the water circulating through the pipes and radiators heats the whole house.
Photo-2. View of the oven from the back
 the use of coal. If you use coal, it will turn out much less, although I do not advise using it. The fact is that when burning high-calorie fuel such as coal, there is a risk that the thin walls of the coil pipes will not withstand and melt. Therefore, I do not advise you to take risks .The same stove can be built without a coil, and then the use of coal as a fuel is advisable. I do not advise building a stove with central heating for summer residents who come only for weekends to the dacha. In winter, the water in the system will simply freeze and the entire central heating system will fail.
Photo-3. Coil made of metal pipes
 It is necessary to build such a system in houses where they live permanently, and there is no way to stretch natural gas. There are plenty of such remote areas in which, for one reason or another, it is impossible to use natural gas. Due to the fact that the stove is massive (heated twice a day), it retains heat, with an evening furnace until the morning.
I had the idea to build such a stove when my parents decided to move to a dacha from a city apartment. Since they are people who were born and raised in the village, they did not have to get used to the dacha for a long time. Rural life is familiar to them from an early age. And the urban comfort in the form of heating the whole house only pleased them.
Do-it-yourself wood-burning stove
Photo-4. Design scheme

1-heat-resistant concrete to save bricks; 2-firebox lining made of refractory bricks (laid on edge); 3-blowing and furnace doors; 4-grate; 5-metal sheet with a thickness of 3 mm to 5 mm (used to cover the firebox); 6-cast iron stove; 7-metal corner or strip steel; 8-valve; 9-smoke channels; 10-cleaning - box;
Photo-4, a. Design Scheme-2
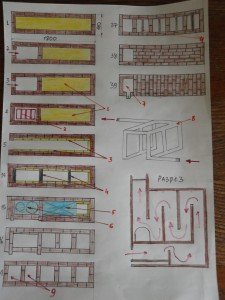
1-heat-resistant concrete to save bricks; 2 grate; 3-firebox lining made of refractory bricks (laid on edge); 4-metal corner or strip steel; 5- metal sheet with a thickness of 3 mm to 5 mm (used to cover the firebox); 6-cast iron plate; 7-valve; 8-coil design from metal pipes; 9-chimneys of the stove.
For such a furnace project, 1200 bricks will be needed. When laying the stove, I used stove bricks with dimensions of 200 x 100 x 50 mm (European standard). You can use other sizes if desired, based on what is at hand. The dimensions of the furnace itself are as follows: 1800 x 600 mm, but it is also possible to change its dimensions if necessary.
For such a massive structure, it is necessary to perform a durable foundation for oven brick or concrete. How to build a foundation, I described everything in detail in another article. The top of the foundation is brought out five centimeters above the floor level or at the level with the floor covering and leveled strictly according to the level, using a water or ordinary level.
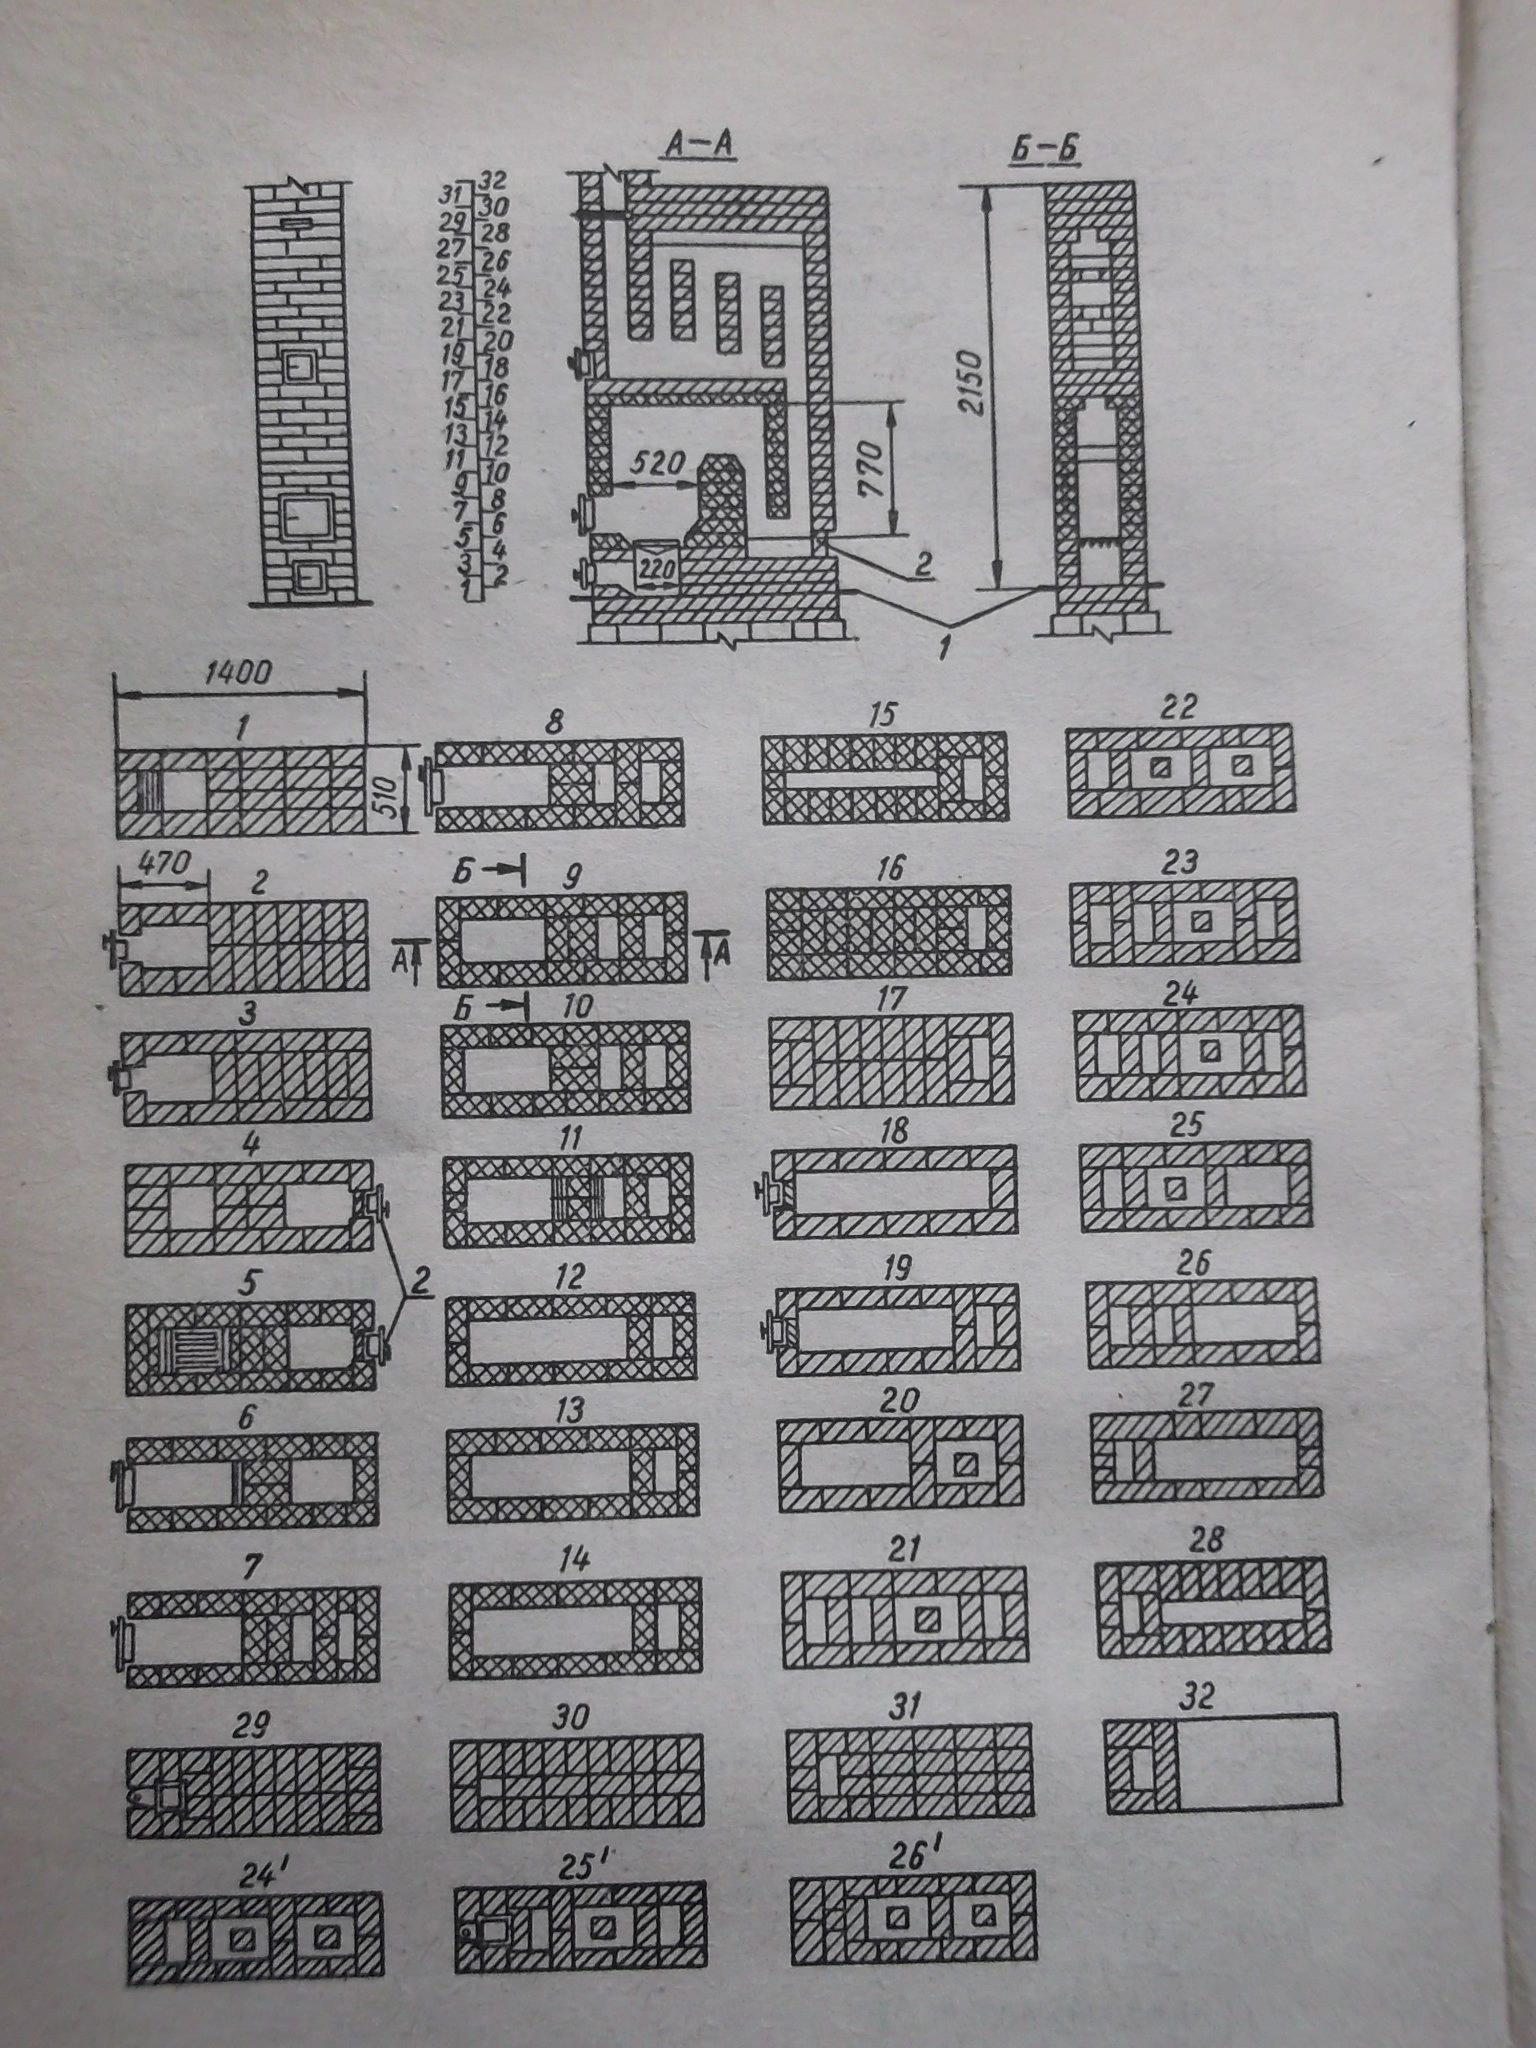
Photo-5. Furnace section
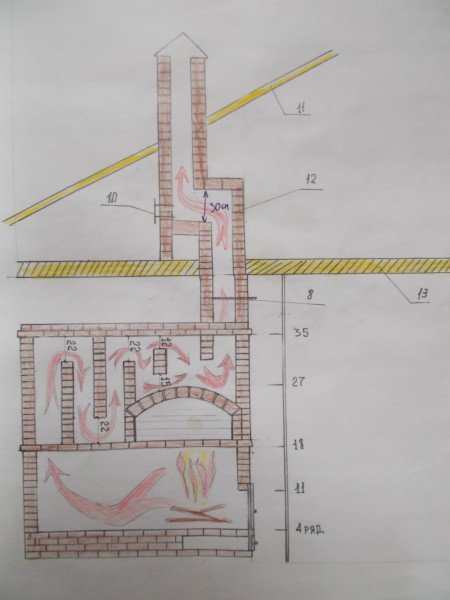 In photo-5, the following positions are indicated by numbers:
10-cleaning box, 11-house roof, 12-chimney, 13-floor slab. And the red arrows indicate the movement of flue gases through the channels of the furnace.
On the foundation they arrange waterproofing and are taken for laying the first row of the stove. When designing this stove, I was guided by the principles that the lower the firebox is, the better, because the heating of the room should occur from the bottom to the top, the legs should be warm.
Therefore, I ignored all those projects with a high level of location of the fireboxes, I think that such solutions are not correct and not practical. The lower the furnace firebox is located from the floor, the better. The laying of the first to the fifth inclusive, we construct according to the drawing, on a clay mortar.
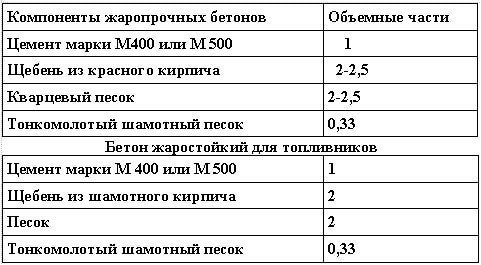
Table number 1. Approximate compositions of heat-resistant concretes for furnace fireboxes
To save bricks, the space indicated on the design scheme by the number -1 is filled with heat-resistant concrete. On the 2nd, 3rd and 5th rows, we install the furnace and blower doors-3. On the fourth row, we install a grate-4, and a coil (the design of the coil and a detailed description of how to install it can be found in the article of the firebox).
The ends of the return and supply pipes of the coil should extend about twenty centimeters from the furnace walls to the outside. The furnace firebox is lined with refractory brick-2, which we place on the edge. A detailed description of the design of fireboxes designed for different types of heating oil can be found in the article furnace device.
We continue laying the furnace firebox up to the 18th row, using the same method as the laying of the fifth row (simultaneously with laying the lining), observing the dressing of the seams between the bricks of the firebox walls.
Between the walls of the firebox and the lining, it is necessary to leave a minimum gap for thermal expansion linings furnace (approximately 5 mm at least).
Each brick must be laid in the masonry evenly and strictly according to the level. Depending on the type of furnace door, installation is carried out on the desired row and with the help of a wire that is attached to the masonry.
The wire should be soft and thick so as not to burn. To do this, it must be placed on the fire before being used. On the 18th row, we install a cast-iron stove -6 and a metal sheet -5, which will close the furnace firebox. Instead of steel sheet-5, the firebox can be covered with brickwork.
Starting from the 19th row, we install the formwork and lay the arched vault. On the 20th and 28th rows, we install cleaning boxes-10. They are used to clean furnaces from the accumulation of soot. On the 23rd row, we divide the resulting area into chimneys-9. On the 30th row, we finish laying the vault and add two more chimneys. Further, according to the drawing, on the 36th row we close the furnace and on the 39th row we install the valve-8.
Design scheme - No. 2 of the heating furnace.
And in conclusion, I will say that when designing this stove, I was guided by another project for a heating stove, which does not provide for the laying of an arched vault above the stove. Otherwise, the design scheme is not much different from mine. Therefore, just in case, in this article I also post it, suddenly someone needs it.
– 8.
 Masonry mortars for brick kilns
 Why do the windows fog up in the apartment
 Construction and schemes of brick ovens
 How to lay paving slabs: tips and tricks
 How to drill bathroom tiles
 Monolithic slab on coarse soil
 Which electric heater is economical