How to make a warm water floor with your own hands
For space heating, in particular the bathroom, the house is increasingly using a system of underfloor heating. The most popular types include electric and water structures of underfloor heating. The latter have a number of advantages, such as a high level of health safety, no radiation, and relatively low installation costs. In addition, the help of professionals in the installation of warm water floors and pipe laying is completely optional. If you follow certain instructions, it is quite possible to make a warm floor with your own hands. So you can not only gain experience, but also save a significant amount of money. First you need to figure out - what is a water floor, where to take the first step, is it necessary to draw up a project?
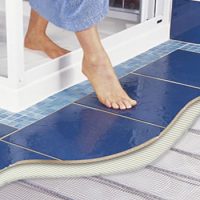
Underfloor heating and topcoat
The ideal coating option for a warm water floor will be tile or porcelain stoneware and this is due to certain characteristics of these materials:
- strength and durability;
- they do not emit harmful substances when heated;
- have a high heat capacity and heat up quickly.
Scheme of the surface of the warm floorBut if desired, a warm floor can be equipped with a laminate, linoleum, PVC tiles and even carpet.
Installation methods
Installation of a water heated floor can be done in one of the available ways:
- concrete screed - pouring must be done at least 3 cm above the pipes;
- laying pipes in pre-prepared grooves of polystyrene foam. After laying the pipes, a screed is made;
- laying in wooden grooves - most often used in wooden houses with a wooden floor.
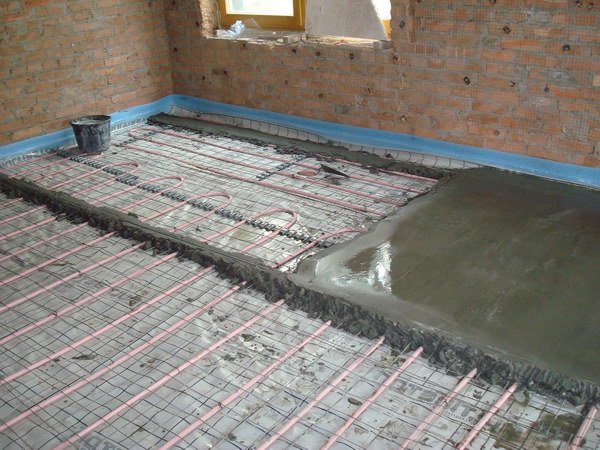 Laying a warm floor under a concrete screed
 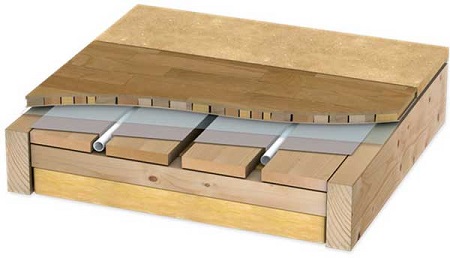 Laying underfloor heating pipes in wooden grooves
 Laying underfloor heating pipes in polystyrene foam grooves
Types of pipes used
Pipes are sold in coils, they must be marked "for heating". This guarantees temperature resistance up to 95 °C and pressure up to 10 bar. The optimal diameter is 20 mm. As a rule, they offer a choice of metal-plastic or polypropylene. The latter tend to expand linearly when heated. Fiberglass reinforcement can reduce this figure. The maximum length of the pipe loop for a bathroom or other room is 90 meters. But it is better not to exceed a flow rate of 60 m. If the area is too large, then when drawing up a project, it is preferable to calculate the number of individual circuits. Provided that the length of each does not exceed 60 meters.
 Pipes for water floor heating
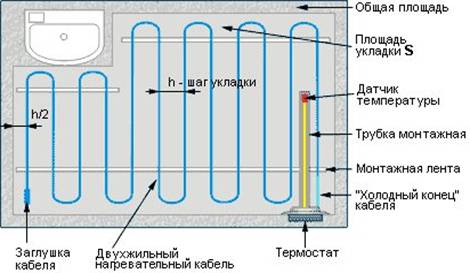
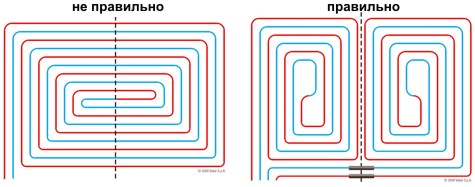
Laying pipes for a warm water floor is carried out according to the scheme:
- snail or spiral - ideal for a large room, contributes to uniform heating. Pipes are laid from the center in a spiral, parallel to each other;
- snake - often used for small rooms. At the beginning of the circuit there will be the highest temperature, so the laying starts from the wall with a window;
- double snake - optimal for medium-sized rooms. The peculiarity lies in the fact that the laying of the hot pipe is carried out in parallel with the return, which allows you to distribute heat evenly.
Each pipe connection carries the risk of leakage. Therefore, the rarer they are, the less likely the floor will be dismantled in the coming years. If conditions permit, it is correct to make connections only at the outlet and at the inlet to the boiler.
Fastening pipes to a reinforced screed is carried out using fastening tapes, clips or wire every meter. To minimize the risk of leakage, pipes should not be joined at bends. When the laying is finished, they can be connected to a water heating boiler.
Calculation and design
To achieve maximum efficiency and trouble-free operation of the heating system in the future, it is best to entrust the project to specialists. Due to the lack of experience, it will be quite difficult to make a project on your own. The calculation of the pipe for the warm floor of the bathroom depends on:
- diameter and material from which they are made;
- power of the boiler that heats water;
- the quality of the selected thermal insulation;
- area of the room where the system is installed;
- wall and floor materials.
Using a special program, a diagram must be drawn up to determine the level of heat loss. The result can range from 40 to 300 W/m 2 . A high figure indicates a large loss of heat. Under such conditions, no more than 15 cm should be a step between the pipes. If the room has thick, warm walls and high-quality windows without gaps, the result of the calculations will be minimal. Then the step between the pipes can be increased to 30 cm.
 Calculation option for underfloor heating
If there are areas in the room where heavy furniture or plumbing fixtures will invariably stand, if the bathroom is insulated, then there is no need to run pipes under them. Which also affects the design and installation schemes of the future warm water floor.
A continuous section of the pipe loop can be no more than 40 m 2. Exceeding the recommended area will inevitably lead to cracking of the screed. The reason for this is the high heat load.
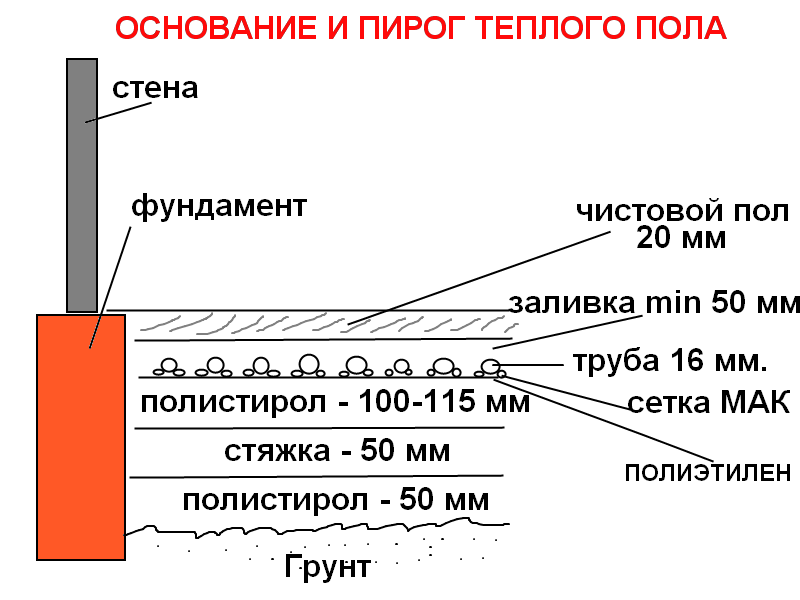
A warm water floor pie looks like this:
- if there is soil under the floor: compacted sand up to 7 cm, about 10 cm of crushed stone, the granule size of which should be at least 30 mm, a polyethylene film and a rough screed. In the event that the room to be insulated is located above the first floor, the first layer of the pie is the floor slab;
- coating or pasting waterproofing;
- individually calculated layer of thermal insulation, as well as insulation with the addition of foil to prevent heat transfer down;
- reinforced screed on which pipes will be laid;
- polypropylene, polyethylene or metal-plastic pipes;
- depending on the type of installation chosen, the next step is a concrete screed or wooden, polystyrene structures;
- final flooring.
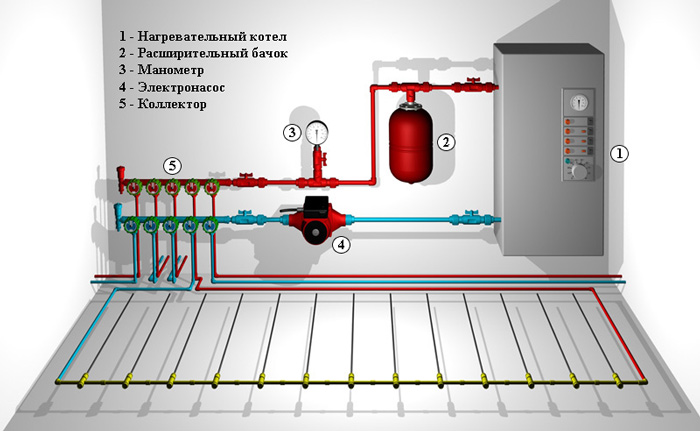
manifold cabinet
It is the first element of the system assembly scheme. It is installed in the wall of the heated room, preferably in the center. The main task is to ensure the circulation of hot and cold water. This is ensured by two pipes connected to it: supply and return. The feeder, which is also hot, is responsible for the flow of heat along the circuit. After going all the way, the water cools down and is sent back to the boiler for heating through the return pipe. A pump for a warm water floor must be built into the collector cabinet, it regulates the circulation of water to the boiler and back. Rarely, but there are models that do not use a floor heating pump, then the purchase of a pump should be included in the project so that the design is complete.
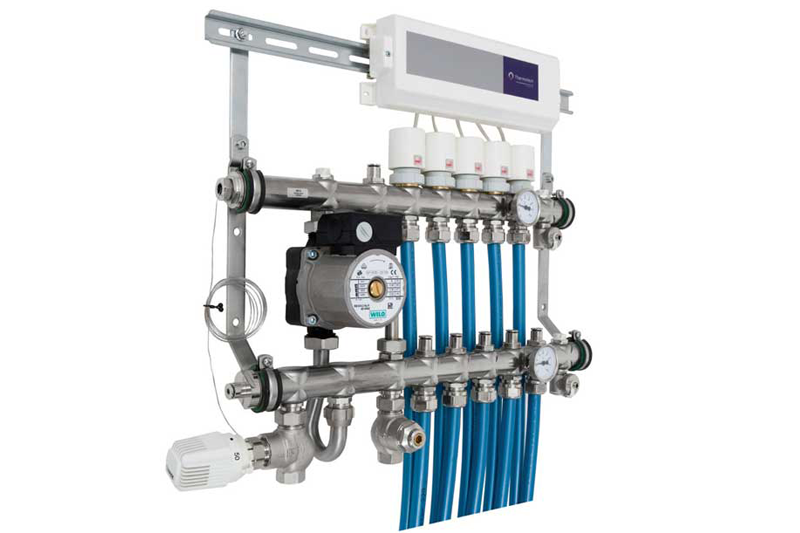 Collector in the water floor system
 There must be an air vent and a drain cock on the back of the manifold. The manifold can be fitted with conventional shut-off valves only, or it can be fitted with an adjustable mixer. The latter will be significantly more expensive.
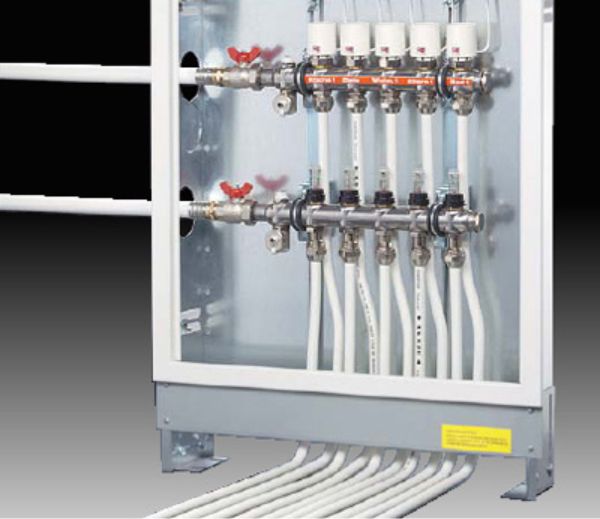 In the collector cabinet, the supply and return pipes from the boiler are connected to the pipes of the water floor heating system
 The thermostatic mixer is responsible for mixing hot and cold water from the return circuit. There is a mixer of different types:
- two-way mixer - usually in the amount of two pieces are installed on the supply and return pipes;
- three-way mixer equipped with an electric drive. Such a mixer is installed at the outlet of the boiler;
- mixer with mechanical drive.
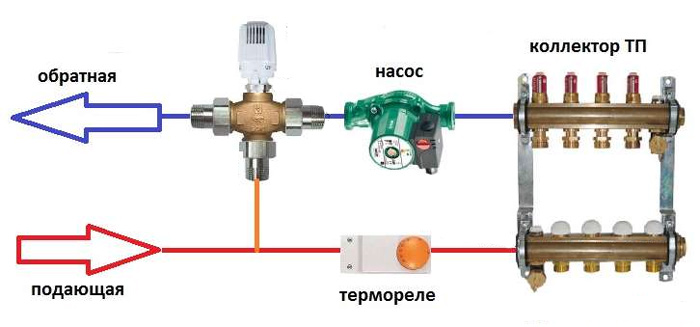 An example of connecting a collector of a warm floor
 Which mixer from the presented options differs not only in functionality, but also in price. Not everyone can buy an expensive mixer. But such a purchase will be justified by the guarantee and quality.
Temperature control device
To automate and simplify the operation of the underfloor heating system, a servo drive and a thermostat are used. These elements are directly related. The device thermostat controls and controls, the servo receives the command and executes. The servo drive is responsible for the function - to control the start of the amount of hot water supplied to the circuit, a servo drive is installed on the water supply comb, and the servo drive will control this.
The thermostat for a water heated floor can control the temperature regime of not only water, but also air. On the device itself, you should set the desired number of degrees. In case of excessive heating or cooling, the thermostat will give a command, and the servo drive will reduce or increase the flow of coolant, thereby regulating the temperature. So the heat level will always be in the same mode, and the thermostat will control it.
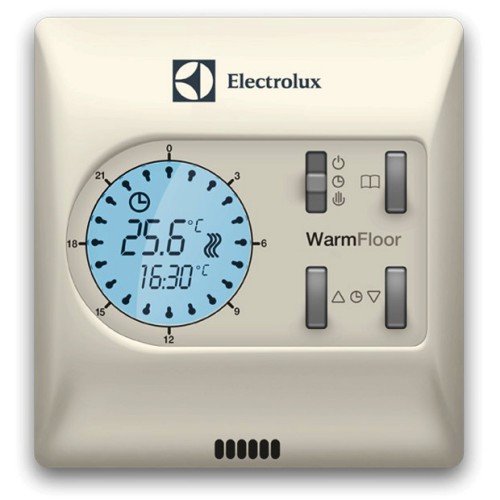 Thermostat
 Regulators on the market differ from each other not only in the way of control, but also in price. Each device has a number of advantages.
| Thermostat | Advantages | Price |
| Mechanical thermostat | The device has a low price, reliability. The temperature setting is carried out using a mechanical disk. Its displacement in a certain direction sends commands to the servos. The on/off button is responsible for starting. The user manual is extremely simple. | ? 15 € |
| Electronic thermostat | The thermostat has a digital screen that displays the current or set temperature, as well as buttons for changing indicators by acting on servos. | ? 20 € |
| Programmable thermostat | The device allows you to set the desired temperature of water and air at a certain time. For example, reduce pressure when there is no one in the room and increase by the time people return. Significantly saves energy. It can be programmed using a portable control panel or remotely using a computer. | from 40 € and up |
| Touch thermostat | The only difference from the electronic one is touch control for influencing the servos. | ? 30-40 € |
| Radio thermostat | Refers to a number of innovations. Absolutely automated. The device can be connected to a mobile phone and remotely send commands to the servos. | from 50 € and up |
Installation of a warm floor
To make a warm water floor with your own hands, first of all, you need to completely remove the old floor covering to the ground or floor slab. After the old screed is dismantled, all debris, construction dust, and foreign materials should be removed. You can level the surface with the help of special leveling mixtures. If the room to be insulated is located above the first floor, the floor slab will be leveled. Often, after dismantling the floor, small cracks and chips remain on it, which must be eliminated. Provided that the base is soil, the leveling compound will be applied as a rough screed. You can make such a solution from cement or gypsum. Next, a series of mandatory processes for a warm water floor follows.
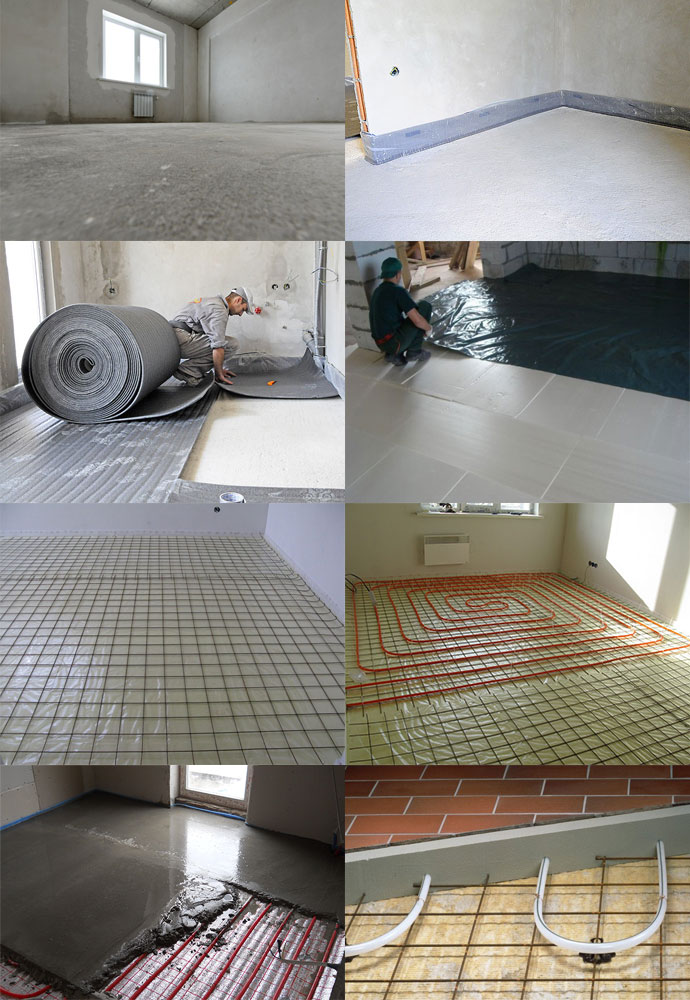 Stages of installation of a warm water floor
 Waterproofing and insulation
The next step is the coating with waterproofing and heat-insulating layers. For the latter, you can choose mineral wool, penoplex, polystyrene foam or special mats or materials for a water floor. Waterproofing prevents moisture absorption, and thermal insulation traps heat, preventing it from escaping into the ground or to the lower floor. To compensate for the expansion of the rough screed, which occurs due to frequent temperature changes, a damper tape should be distributed around the entire perimeter. Any project provides for an optimal width - 15 cm.
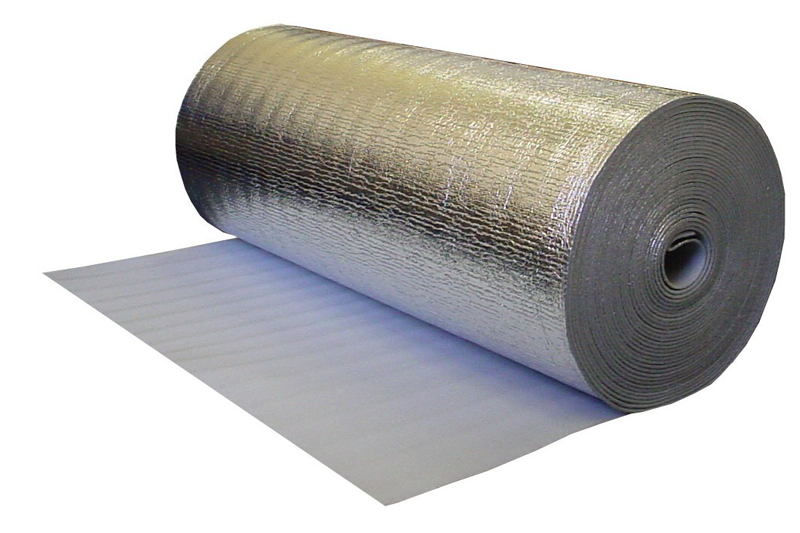 Option for thermal insulation
 damper tape
You can purchase ready-made damper tape, which should be glued around the perimeter of the room. Most often, the thickness of this material is from 5 to 8 mm, and the height is from 10 to 15 cm.
The height of the tape must be above the fill level; in case of excess, they can be easily cut with a regular knife. If you are doing the work yourself, then it is best to glue the tape or, if possible, fix it with self-tapping screws. Installation is very simple and will not cause any special difficulties.
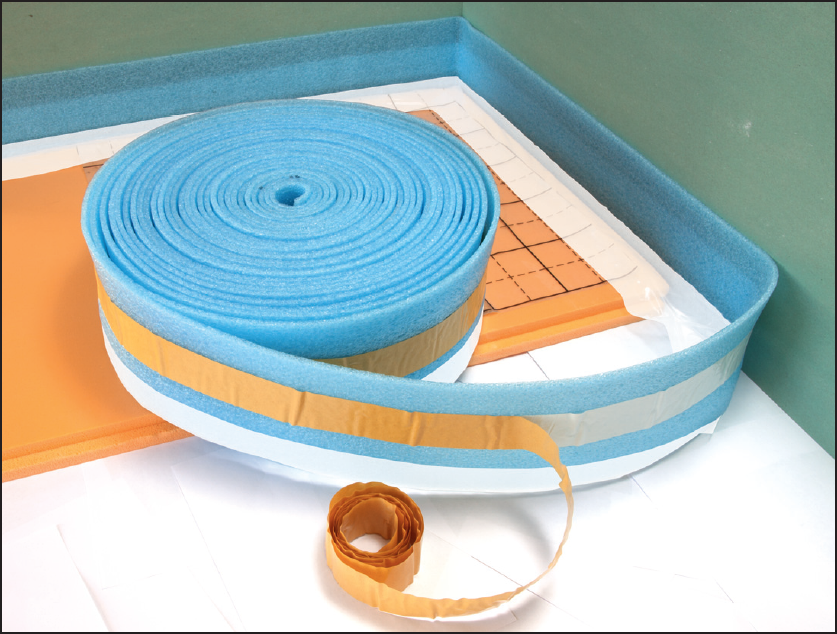 damper tape
 Reinforcement
The first layer of reinforcing mesh is laid on the insulation, to which contours will subsequently be attached, distributing heat over the floor surface. To attach pieces of mesh to each other, ordinary wire is used. With the help of nylon clamps, the pipes are fastened to the grid.
It is worth choosing a grid in such a way that the diameter of the twigs is 4-5 mm, and the cells must be selected taking into account the pipe laying step, so that they can be conveniently fixed.
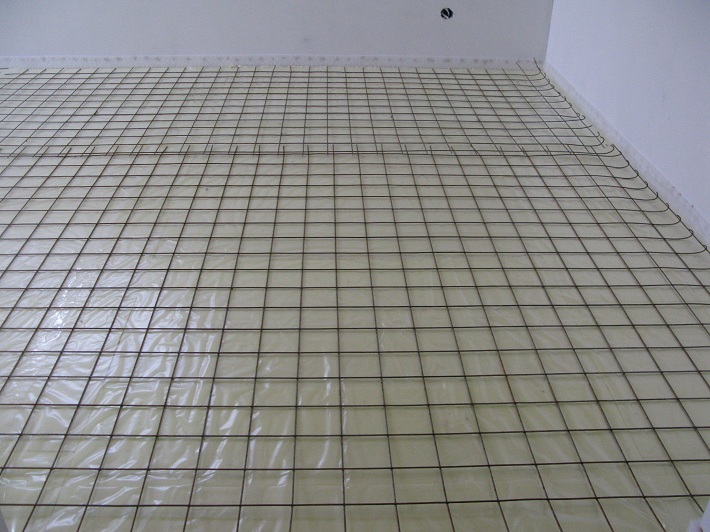 Floor reinforcement
 Pipe Fixation Methods
You can lay a warm water floor in one of the available ways:
- polyamide tightening clamp - you need about 2 pieces per 1 meter;
- fixing steel wire - the consumption is the same as that of the polyamide tightening collar;
- stapler and clamps - you need 2 clamps for each meter;
- fixing track - is a PVC bar attached to the floor;
- polystyrene mats - the pipe is laid in the middle of the grooves;
- aluminum distribution plate.
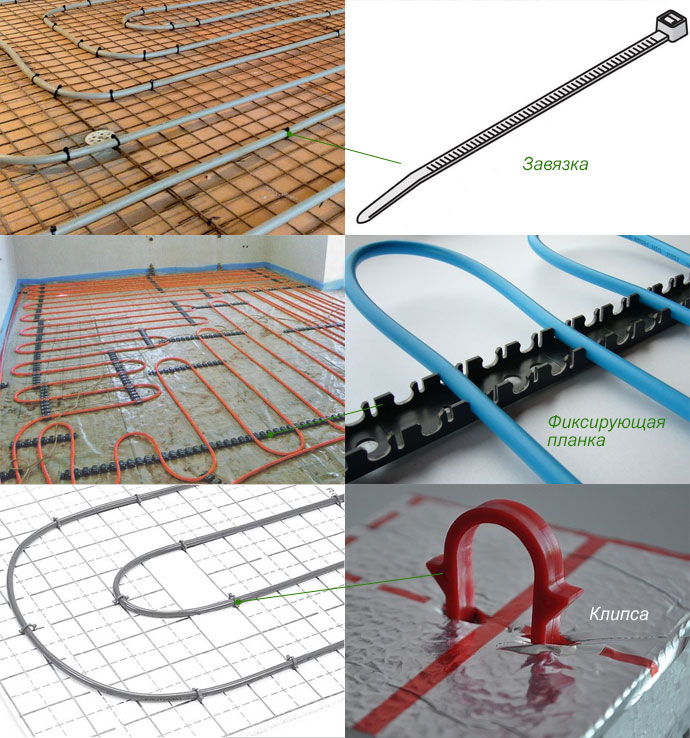 Mounting options for underfloor heating pipes
  Pipe fasteners
 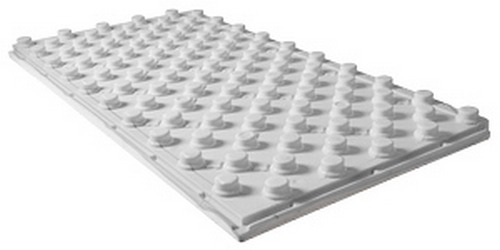 Expanded polystyrene mat for laying underfloor heating pipes
 Pipe laying and system checks
Before laying pipes, it is necessary to make a structure that will fix them. This is a reinforced mesh with cells of 1.5 x 1.5 cm. It is made of wire with a diameter of not more than 5 mm. A special plastic tie is ideal for attaching pipes to the grid. In the absence of such, you can use clips, strips for fastening. The step should not exceed 1 m. When the installation is completed, you can start laying pipes according to a pre-compiled scheme. They can be arranged in a spiral, serpentine or double serpentine pattern. Depends on how the project is set up. To calculate the flow rate, you should take into account the size of the bathroom and the step between the pipes.
Due to the increase in heat loss at the outer walls, the pipe pitch in these places should be reduced. Otherwise, a decrease in pressure in the entire system may be provoked.
 Schemes for laying a water-heated floor
 At the end of the work and before the final screed is made, the structure must be checked for strength. To do this, it is recommended to start the water under pressure more than usual, but not exceeding 0.6 MPa. After half an hour, the indicator should drop to 0.06 MPa. After another two hours to 0.02 MPa. The figures indicated are the maximum threshold. The result can exceed them, but in no case be less. Then, using a mixer, adjust the pressure to normal and leave the system in working condition for a day. The temperature must remain the same. If after 24 hours no incidents have occurred, you can finally fill the floor. It can be a concrete screed or a polystyrene slab coating.
Connecting circuits
Often, the circuits are connected through a distribution unit, which performs a number of useful functions, including increasing the pressure in the system, adjusting the temperature, and combining it with radiators.
There are several possible connection schemes to the boiler:
- with manual adjustment;
- with weather automatics;
- auto-adjustment using sensors and servo drives.
Eurocone clamp fittings are used to connect pipes.
 Scheme - an example of connecting a water heated floor
 Crimping
After installing all the circuits, a mandatory process of pneumatic testing of the system for tightness follows. This will help crimping, carried out using compression.
For testing, a household compressor with a pressure of more than 6 bar is required. After the pressure reaches 4 bar, the compressor must be left in this state until the system is started. With this method, it is easy to notice even the slightest depressurization and then it can be eliminated in time to avoid problems in the future.
Underfloor heating screed
Depending on the type of flooring planned, the thickness of the concrete layer may vary. It is easy to calculate it. Under the tile, it is necessary to fill in a layer of at least 4-5 cm, and under linoleum or laminate, 1.5-2 cm is enough. Moreover, in this case, experts strongly recommend placing another reinforced mesh on top, as a reinforcement of the structure. The concrete screed must be carried out with the system turned on, under pressure. The cement used in this layer must be at least grade 300. Drying time is at least 28 days. The greater the consumption of the solution and the thicker the layer, the longer it will take to dry. Only after that you can do the finish coating. Learn more about the process before starting work.
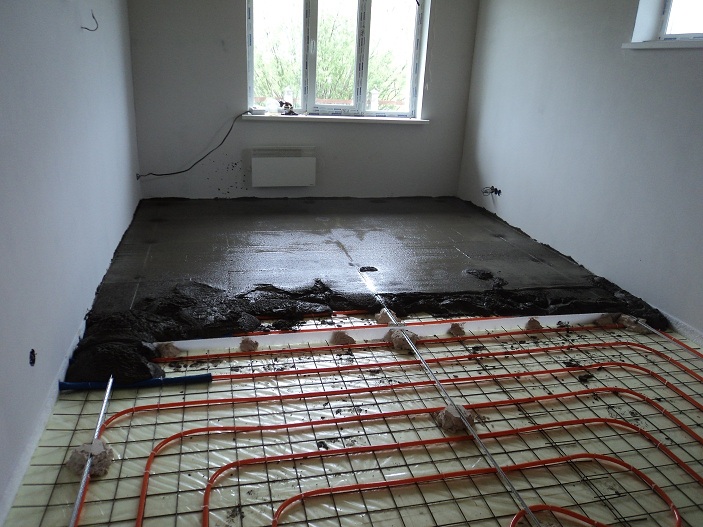 Screed
 For those who cannot or do not accept waiting almost a month before the completion of work, the concrete pour can be replaced by a floor covering. Making a warm floor with your own hands will be even easier. In such conditions, after laying the pipes, it is necessary to make a substrate under the finishing floor. Cardboard or polyethylene foam is suitable if laminate flooring is planned. Under linoleum or tiles, a special construction of cement-bonded particle boards is mounted.
Due to the absence or incorrect position of the temperature gaps, the destruction of the screed in the bathroom may occur. To prevent this from happening, shrink seams are needed. They are made in the following cases:
- in a room with an area of more than 30 square meters;
- if the walls are more than 8 meters long;
- if the length and width of the room differ by more than two times;
- the room has a curved shape.
 Expansion joints - the correct laying of a warm floor
 To make such a seam, a damper tape is laid around the perimeter, and the reinforcing mesh is divided at the seam. The upper part of the seam, which should be 10 mm thick at the base, is treated with a sealant.
If pipes pass through the expansion joints, then they must be laid in a corrugated pipe.
After drying, cracks may appear on the screed, and this happens for a number of reasons:
- low density of insulating material;
- poor compaction of the mortar used;
- lack of plasticizers;
- large thickness of the screed;
- quick drying of the concrete mix;
- lack of shrinkage seams;
- non-compliance with the proportions in the preparation of the solution.
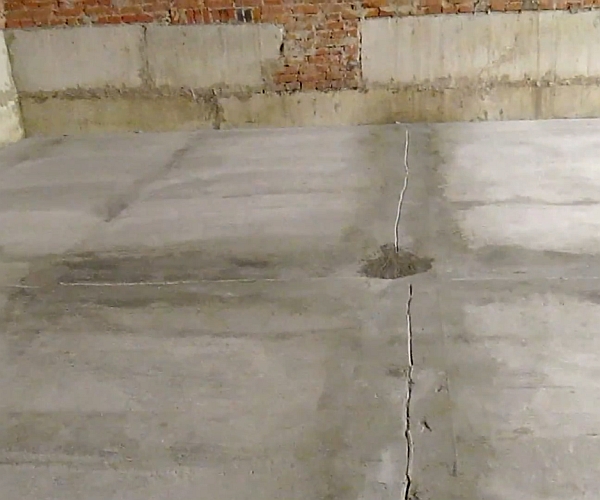 The consequences of improper laying of the screed are cracks
 To prevent the occurrence of cracks, you need:
- use insulation with a density of more than 35-40 km per m3;
- add fiber and plasticizer to the screed solution;
- in large rooms, shrink joints cannot be dispensed with;
- cover the concrete with plastic wrap so that it does not dry out too quickly.
Screed mortar
To prepare a screed solution for a warm water floor, one cannot do without a plasticizer, only it must be non-air-entraining. To make a good solution, you should adhere to the following proportions.
Using 10 liters of cement, you will get 41 liters of mortar.
Mounting on a wooden floor
Installation of a warm water floor on a wooden floor is quite possible. This will require distribution aluminum plates, and the pipes are placed in wooden grooves prepared by attaching pre-prepared boards.
If it is necessary to make a flat surface in the bathroom, then a layer of chipboard, plywood or GVL should be placed above the laid pipes. When choosing these materials, you need to ensure that they comply with sanitary and hygienic standards.
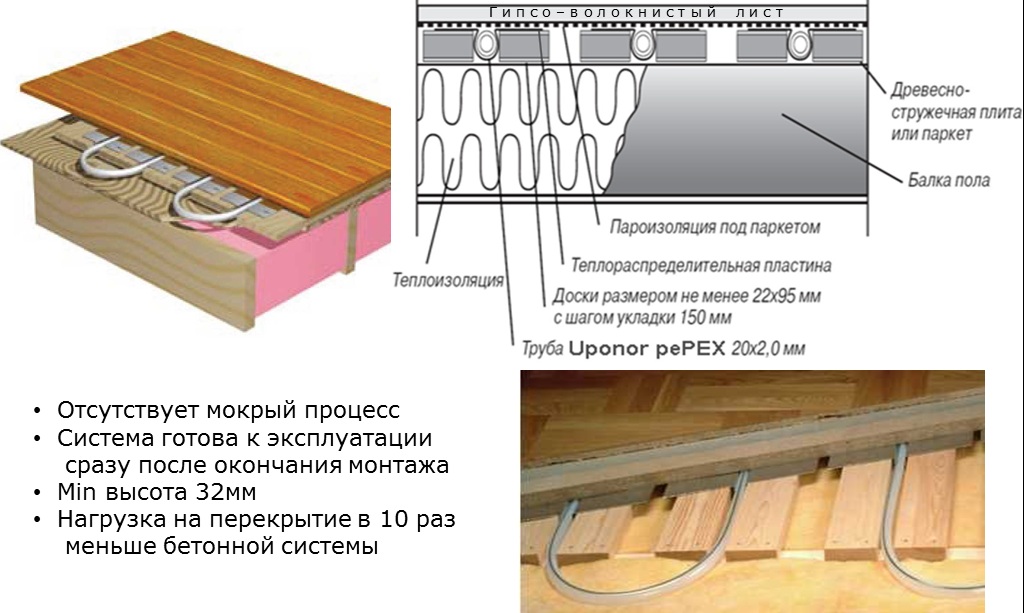 Features of a warm floor in a wooden house
 Prices for underfloor heating
The following factors influence the cost of warm water floors:
- the cost of the materials used;
- the cost of the collector and the pumping and mixing unit;
- ground leveling work;
- installation cost.
The average cost of a turnkey water heated floor, together with materials, can range from 1,500 to 3,000 rubles per sq. M. Do-it-yourself warm floor in the bathroom is a significant step for warming the bathroom. Using the help of specialists to draw up a project and diagrams of the heating system, purchase the necessary materials, installation can be carried out independently. To avoid leaks and unforeseen failures in the operation of the structure, it is important to correctly follow all the recommendations and follow the values \u200b\u200bthat the drafted project contains step by step. Modern innovations and materials allow you to remotely control the warm water floors of the bathroom. This is not only convenient, but also beneficial, especially when there is an instruction.
 Masonry mortars for brick kilns
 Why do the windows fog up in the apartment
 Construction and schemes of brick ovens
 How to lay paving slabs: tips and tricks
 How to drill bathroom tiles
 Monolithic slab on coarse soil
 Which electric heater is economical