DIY gable roof - step by step instructions
In the construction of a private house, one of the most important stages, along with the installation of the foundation, is the device of the roofing system. The most common option, due to its simplicity and reliability, is installation.
Recently, roofs of various configurations have appeared, but a gable roof remains a widespread and generally recognized roofing structure. Advantages and advantages of such a system:
- Economical - do not require large expenditures for building materials.
- It goes well with any building.
- Due to the correct slope of the slopes, precipitation does not collect on it and it easily disappears.
- Quite not labor-intensive installation work of this design.
- Such a roof can be made original and unusual.
- You can cope with the work on your own without involving specialists.
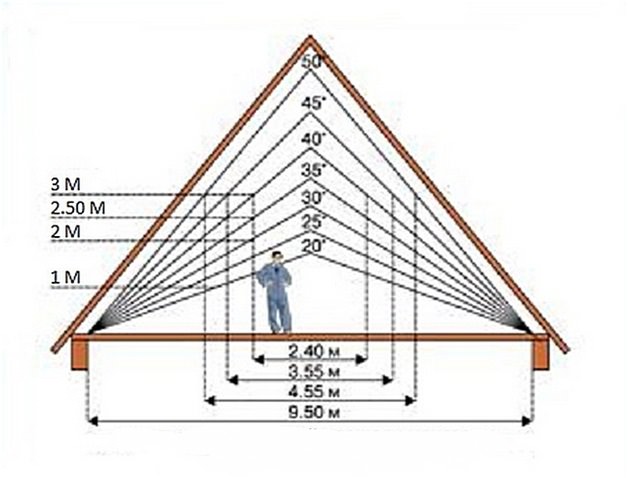
What you need to know and do before self-design in the first place? You need to know how to calculate the slope of the slopes. Let's figure out how the slope of an existing roof is calculated, later you will understand how to use this:
If the width of the house is, for example, 8 m, and the length of the rafter leg on the roof is 10 m:
- A - slope angle;
- c - half the width of the house;
- b - the length of the rafter leg.
It is clear that half the width of the house will be 4 meters - c = 8 ÷ 2 = 4. Now you need to calculate the radial measure of the angle - cos A = 4 ÷ 10 = 0.4. To finish and convert the value to degrees, you need a Bradis table (use the Internet), but in this example the slope is 66 °.
The shape is chosen depending on the size of the house, only after making all the basic calculations, you can start creating drawings and sketches. In construction do it yourself gable roof the whole technology has been worked out in stages to the smallest nuances. When using any roofing material, the entire sequence of operations remains unchanged.
As part of this article, we will tell you how a gable roof is built in step-by-step instructions. But first, let's take a look at what types of gable roofing configurations exist, and which rafter systems are used.
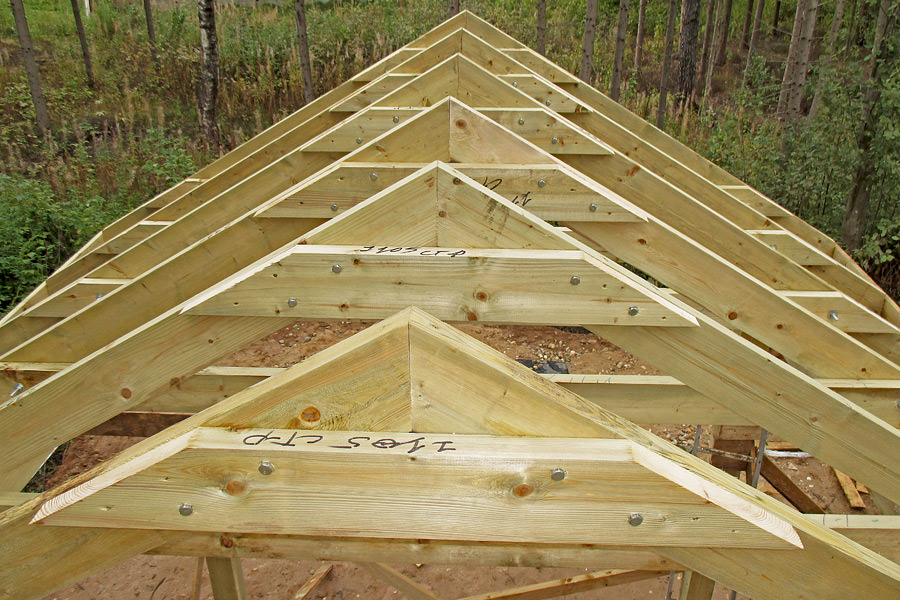
Symmetrical roof
The most common roofing device, due to its simplicity and reliability, is quite suitable for construction do it yourself gable roof... Due to the symmetry, a fairly even distribution of loads on the main load-bearing walls and the Mauerlat is achieved.
The larger the cross-section of the timber, the greater the reserve of the bearing capacity of the structure. As with the installation of all types of gable roofs, the slope is of great importance in the design of a symmetrical roof. It is recommended - in regions with a windy belt and high humidity, arrange a slope of 60 degrees.
The symmetrical roof has a drawback. As you know, the structure is in the shape of a triangle and "blind zones" are formed in the sharp corners of the roof, which excludes the construction of a full-fledged attic floor.
Asymmetric roof
The design is essentially the same symmetrical, but differs in the location of the ridge, as a result of which the sides of the asymmetric roof differ in slope and size. The installation work is quite difficult, mainly due to the displaced ridge. But such a roof, despite the complexity of installation, is ultimately compensated for by its original and beautiful appearance.
Advantages and disadvantages of an asymmetric gable roof
There is no doubt that there is an opportunity to significantly increase the living space. But at the same time, the load will be uneven, and requires a thorough preliminary calculation.
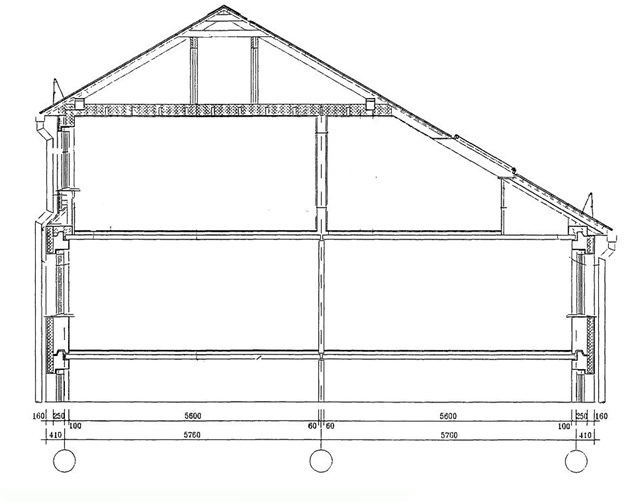
Broken structure
It is, in contrast to the usual gable construction, the shape of a pentagon. It has an upper part in the shape of a triangle, and the main one, conditionally resembling a trapezoid, is located below. Thus, it is divided into two parts, snow usually does not linger on the side lower slopes, which cannot be said about the upper part of the structure.
The advantages of a broken roof structure:
- Can be built on any sufficiently sturdy building.
- The additional floor area is increased by means of an attached floor.
- Attractive exterior of the building.
- It is possible to build a two-level attic.
- Reduction of heat consumption due to roofing and reduction of heating costs in winter.
- You can carry out work without leaving your home, and without involving professionals and special equipment.
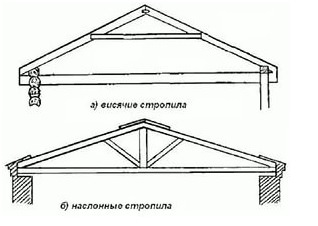
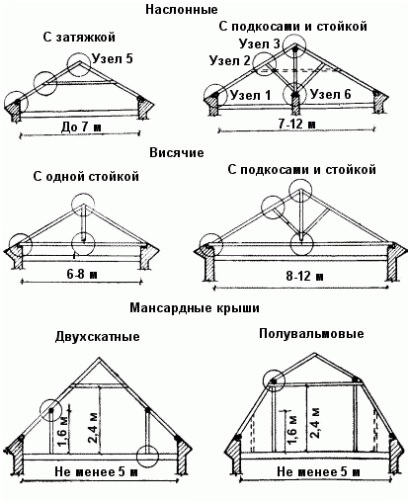
Types of rafter system
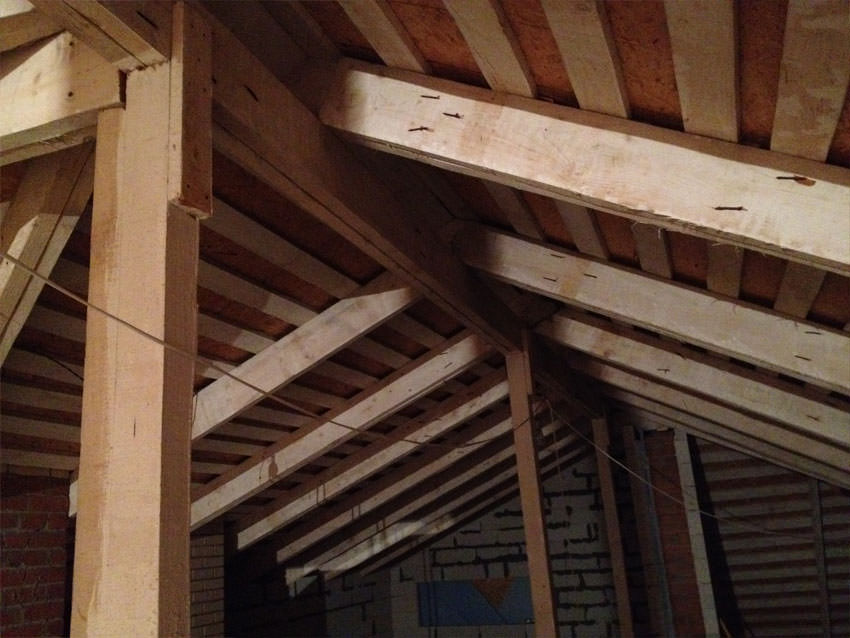
In fact, in principle, there are only two systems: hanging and layered rafters. They differ among themselves in the use of the bases for the rafters. But there is also a hybrid option that includes both rafter systems - this method is especially suitable when the house is divided by columns, instead of load-bearing walls.
First, they are installed if the side support walls are up to 8 meters apart from each other, and secondly, there should not be a load-bearing wall between the supports, otherwise a layered system must be erected. In fact, this is the simplest installation method: the trusses are assembled at the bottom, as a result of which a rigid triangle should be obtained that can withstand the loads. To make the structure solid, puffs are attached between the rafters.
In this system, it is considered a positive point that it is possible to do without a Mauerlat, but for the construction of an attic room it is recommended to use not only a Mauerlat, but also floor beams. Therefore, experts do not advise using this type of rafter system for the construction of an attic.
In this design, a vertical post is usually installed exactly in the middle. The support of the upper edge of the rafters can be the same opposite rafter (spacer) or run (non-spacer). Thus, they are divided into spacer and non-spacer layered systems.
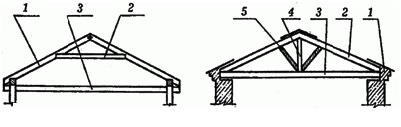
There are several ways of this type of device, see the diagram. In the first case, the support for the rafter lags is the Mauerlat. The rafter legs are subject to the load (bending), thereby not pressing and not pushing the walls.
Wall or hanging - which is more profitable?
In the device of a layered structure for the construction of rafters - the timber comes with a small section, because it has additional supports under it.
In the device of the hanging structure, on the contrary, the cross-section of the rafters is larger than in the layered version. Even the section of the puffs, experts recommend making the rafters similar to the section. Even if the Mauerlat is not installed, all the same, the economic losses will be greater in the hanging method.
Drawings and sketches
The difference in the structure of the systems:
Structural calculations
To erect do-it-yourself gable roof, you need to calculate the mass of the structure, the correct angle, area and even the amount of material required, and this is a rather difficult task. When carrying out calculations, the following important points are taken into account:
- width and length of the base;
- ridge lifting height;
- the length of the front, rear and side overhangs;
- rafter pitch, rafter wood grade;
- the type of material you want to use for the coating;
- the thickness of the lathing boards;
- the distance between the boards in the crate;
- type of terrain - region.
It would be possible to turn to the help of specialists, as they usually do - they go to a nearby construction site and find a foreman, since the reliability, and therefore the safety of your structure, depends on the correct calculation performed. But everything is not so complicated. For this, there are online payment services on the Internet.
In our case, the most convenient and reasonable option would be to choose an online calculation service for gable roofs, where you will only have to enter the specified parameters.
Online calculation takes place instantly, but the most important thing is that you will be helped to calculate the load, the amount of lathing, as well as the required amount of material, for example, slate, tiles, profile in your region. All calculations on such services are made taking into account SNiP - "Loads and Impacts".
The structures of the described roofs
Asymmetrical roof
Do-it-yourself installation of a gable roof rafter system - step by step instructions
- Check the diagonal and flatness of the surface. Eliminate the disadvantages. Some elements, including the Mauerlat, the bed, the girder should be strictly horizontal, but it is not necessary to place them in the same plane.
- Wooden elements must be treated with an antiseptic.
- Before laying the Mauerlat, you should put the waterproofing, also observing a clear diagonal.
- Mauerlat is the foundation of the roof and when installing the frame, in addition to fastening by means of oblique log cabins, it is duplicated with brackets and bolts.
- Install the lezhen on waterproofing. Secure with bolts. Mark on it the places for the support posts that will hold the girder.
- Since a clear horizontal position is observed, the racks are prepared in one size, fastened, and the girder is installed on top. We fix the girder using special metal plates.
- Mark the attachment points for the rafter legs. Experienced roofers, without complicating the process, use a rail, the length of which is equal to the distance between the rafters.
- The rafters are attached to the Mauerlat, and only then from above to each other or to the girder.
- Check the structure in a simple way, using a rope, pulling on one side and adjust, if necessary, the position of the rafters.
If you follow these instructions, then you can easily cope with the construction do it yourself gable roof... After the work done, proceed to the crate. The installation of the lathing is a simple process, but do not forget that the further laying of the roofing material depends on this.
Choose high-quality material, for example, raw lumber, after drying, is deformed, and therefore does not fit. Also choose lumber without knots, such material may not withstand the load.
Please note that if you are building a crate for slate, then each sheet should have a support of at least three bars. In this case, even bars should be 30 mm thicker. This ensures uniformity of the load and a tight overlap. Such an important nuance with this fragile building material is worth knowing. Good luck in job!
 Masonry mortars for brick oven
 Why do the windows fog up in the apartment?
 Construction and diagrams of brick ovens
 How to lay paving slabs: tips and tricks
 How to drill bathroom tiles
 Monolithic slab on coarse soil
 Which electric heater is economical