Stages of installation of a roof from a metal tile
The roof of each house is a very important element from all points of view. It performs one of the most important functions of any premises (regardless of whether it is intended for housing or for any commercial activity) - protective. It is on the roof from all sides that a real flurry of all kinds of bad weather constantly falls, which leads to physical and other types of damage to the roof. Thus, the roof, acting itself as the defender of your home, takes all the blow. In order to at least somehow reduce the level of this stress and negative impact, it is necessary, firstly, to correctly select building materials, and secondly, to professionally install the selected roofing materials and, of course, constantly monitor their condition. It is these 3 important steps that will lead you to the fact that in a few years after the installation of the roof is completed, you will not have to start overhauling it.
The roof performs one of the main functions - protective. Provides comfort, cleanliness and coziness to your home.
Rules for the installation of metal roofing
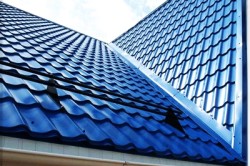
If you intend to roof your own home, the best option would be a material such as metal tiles. It has been used in this area for quite a long time, it has its own characteristics, however, until now, many of the nuances of how exactly this type of material is installed on the roof are not known to everyone.
The main characteristic of a metal tile
More recently, metal roofing as a roofing material was practically a foreigner here in Russia. Most of it was imported material brought into the country under the brand name "Rannila Steel Oy". Now the number of manufacturers has increased significantly, which, of course, was reflected in the products offered in construction stores. And this also affected the price, because the cost of domestically produced metal tiles is much lower than those installed on imported products. The choice of metal tiles will be a wonderful alternative to real tiles. After all, not everyone can afford to buy natural material, and metal tiles are a kind of “budget” option for those who cannot afford more expensive roofing materials.
The disadvantages of this choice include the fact that in cold climatic zones it retains heat very poorly in the house.
The disadvantages of this choice include the fact that in cold climatic zones it retains heat very poorly in the house and, on the contrary, passes cold air flows from the outside very well. Accordingly, in this case, no sound insulation will be observed. That is why, in order for your decision not to disappoint you later, you will have to use additional materials and take appropriate measures to increase the performance of sound and heat insulation. The appearance of the metal tile will immediately transform your entire structure and now, in addition to the protective function, the roof will also perform an aesthetic one, decorating the house and giving it a complete look. Saturated and bright colors will allow you to focus on your building. It is not only able to withstand the sun's rays and, accordingly, does not fade, but also always looks almost like new. In addition to all of the above, a metal tile is a lightweight version of natural material (tiles), which facilitates the process of applying a roof to a particular building.
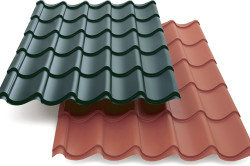
The metal tile has several varieties. The most similar to natural tiles is such a type as Monterrey, which, accordingly, is the most expensive. A more economical option is presented. It allows you to save on the fact that it has an unusual shape and, accordingly, the larger size of individual sheets. Outwardly, the Cascade looks like a chocolate bar. And the third option is called Shanghai. It is more suitable for the roof of large buildings. Its appearance resembles a kind of mixture of the two above-mentioned varieties, although the height of the crest in it is much higher. So, considering that all manufacturers currently available on the building materials market offer each of the three types of metal tiles, we can say that its choice has really expanded over the past few years.
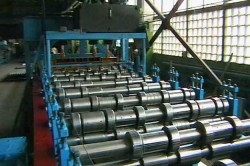
A fully automated complex is used in the production of metal tile sheets.
A fully automated complex is used in the production of metal tile sheets, in other words, the human factor, which can adversely affect the quality acquired by the material, is completely excluded. Many believe that this material is too thin and therefore poorly protects the house from possible chemical and physical damage. But this is completely wrong, since the metal tile, despite its completely inexpressive and insignificant thickness (the original sheet is not thicker than 0.7 mm), is quite strong. In the same place, in production, the metal sheet is processed with a polymeric material, which allows you to extend the life of the roof from the metal tile.
The sequence and basic rules for installing metal tiles
The main condition for covering the roof with metal tile sheets is that the slope of the roof is not less than 10 degrees.
As already mentioned, metal tiles do not isolate cold and noise very well, so under it it is necessary to create a so-called “layer cake” of soundproof and insulating materials. Especially this advice should be heeded by those who decide to build an attic right under the roof or a real residential floor. Few people like it on a rainy night not to sleep peacefully, but to count the drops that have fallen on the roof. That is why it is necessary to follow all the instructions for laying metal tiles prescribed by the manufacturers. The main advice that professionals give is that the slope of the roof with such flooring should not be less than 10 degrees. If the angle is more than 20 degrees, then additional work is needed to seal the joints. The overlap with the longitudinal coating should not be less than 25 cm, with the transverse coating - for a whole corrugation.
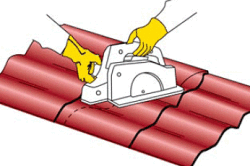
For this, in no case is it allowed to use abrasive wheels, with which one or another metal is usually sawn on a grinder.
If the length of the roof slope exceeds 6 m, then it will be necessary to calculate the required dimensions of the purchased material with the condition of adding to the necessary joints.
In this situation, at the place where the cut takes place, the temperature rises very quickly. As a result, the protective painted polymer layer and, sometimes, even the metal itself burn out. All this leads to further destruction of the composition of the material and easy susceptibility to corrosion, which will then be associated with other even the most insignificant impacts. In normal sawing, do not forget that constantly formed sawdust must be swept off the sheet so that it is not damaged. In the event that the length of the roof slope exceeds 6 m, you will need to calculate the required dimensions of the purchased material with the condition of adding to the necessary joints. This will allow you to save energy on installation, since it is much more convenient to work with short sheets of metal tiles than with large ones. In addition, this process is quite dangerous to carry out on the roof.
Rules for laying metal tiles
In order to implement you will need:
- sheets of metal;
- electric jigsaw;
- screwdriver;
- self-tapping screws;
- building level;
- wooden beam and boards;
- nails;
- waterproofing;
- stapler.
As with any other roofing material, you will need to lay a base under the metal tile. These rules are mostly the same. Unlike covering with natural tiles, there should not be a reinforced coating, but there are some rules according to which these events are carried out. First, a crate is needed. For these purposes, a wooden beam and boards are suitable for you. The step between the bars should not be more than 70 cm. If this happens, then you will need to apply a rather dense layer of boards along it. If you strengthened the bars within the permissible norm, then the boards can also be placed a little less often. The height of the boards stuffed on the cobbled crate should not exceed a size of 5 cm.
After this whole structure is fixed, you can proceed to. This is done using ordinary sheets, which are sold at any hardware store. The range of such films is very wide and you can choose them at your own discretion. For their attachment, a stapler with large staples is used. Waterproofing should not be placed on the roof in a taut state. The length of the gap must be at least 1.2 - 2 cm. This procedure can be repeated several times and make multilayer insulation. In some cases, experts use different types of films for waterproofing. They depend on what type of roof you cover, on the natural conditions in which the house is being built.
Features and sequence of laying metal tiles
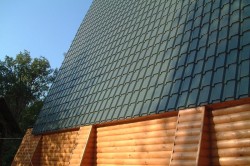
After that, we proceed to mount the metal tile itself. Its laying begins from the lower edge of the rectangular slope. The most convenient way is one in which the metal tile laying pattern starts from the lower left corner of one slope. The first sheet of metal tile is attached to the lower rail. Experts advise first to make a temporary fastening with a self-tapping screw using an ordinary screwdriver. This method is needed so that in case of discrepancies with subsequent sheets, you can correct the first sheet. Its evenness must be carefully verified using the building level. Then there is an alternate imposition of the following sheets of metal on top of each other. It is necessary to move from the lower edge of the slope to the ridge. After completing the work in one row, you can move on to the next one. Some some use a different way. First, they strengthen the top row at the ridge, and then, in turn, put each subsequent sheet under the previous one. Such an implementation is not recommended, since constant impact on an already fixed part can damage the surface of the sheet.
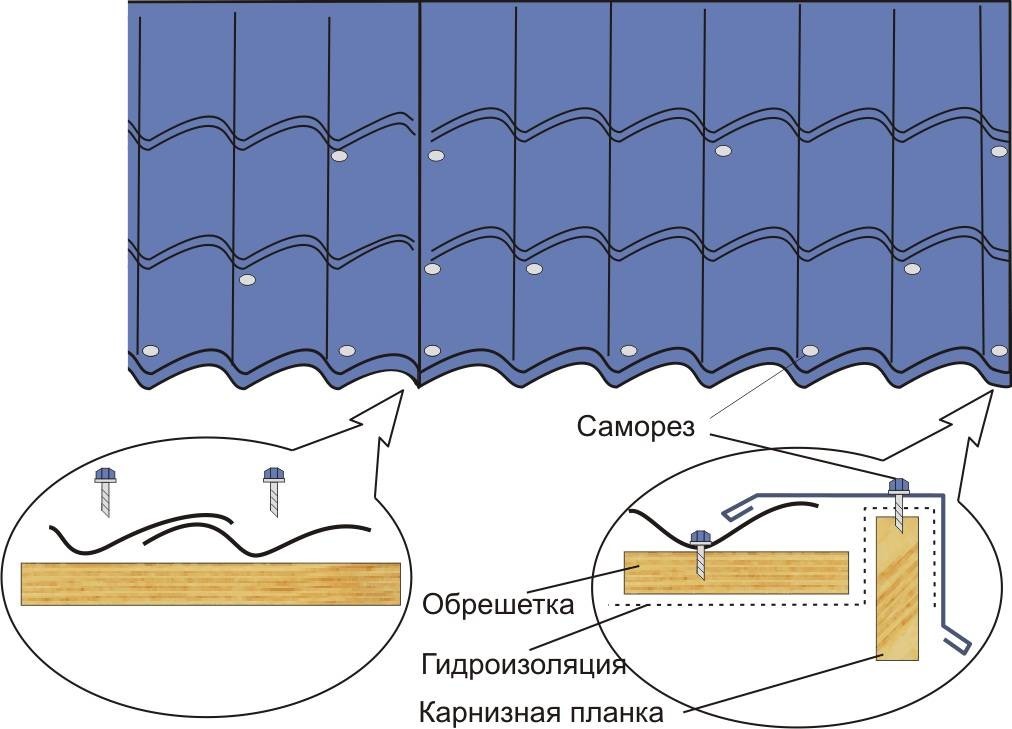
The screws are screwed in in places below the stamping line by 1.5 cm in the middle between the crests of adjacent waves in a regular place, where it is guaranteed that there is a stepping board.
Starting with laying the bottom row, give preference to the longest sheets. This will significantly lighten the load on the entire roof. Also, do not forget that a large amount of water will often drain from the roof due to precipitation. Therefore, do not leave the cornice open. The minimum value of the descent of the roof over the eaves should be 40 mm. When connecting several sheets, we pay attention not only to the fact that their edges coincide, but also to the features of the waves of the combined parts. Fastening of metal tile sheets is carried out using self-tapping screws.
The distance between them should be no more than 35 cm. They are screwed with a screwdriver and, if it is not possible to purchase it, with a drill available to almost everyone. In this case, the number of its revolutions should be reduced. Self-tapping screws can be attached to the bottom of the comb as well as to the top of the comb. But at the same time, do not forget that the dimensions of the screws in different cases should be different. Some builders do not advise screwing self-tapping screws into the upper crest of the wave, but if you are still going to do this, then you need to increase the space on the bars or boards in advance, against which the sheet of metal will lean. In the first (lower) sheets located at the cornice, self-tapping screws are screwed into each wave. Further (in the second and third sheets) you can fasten them through one wave. You can cut the material not only with a jigsaw, but also with conventional manual or punching electric shears. A circular saw is also suitable for this purpose.
After all the installation work is completed, you should not expect that your work is completed on this. We carefully sweep away all excess chips from the roof, in places where scratches have formed, it is necessary to carry out decorative repairs. Once every 2 years, do not forget to wash the roof with a mild soapy solution. After a few months after covering the roof, it is necessary to tighten the screws, because the material will sit down and you will need to strengthen the roof.
 Masonry mortars for brick kilns
 Why do the windows fog up in the apartment
 Construction and schemes of brick ovens
 How to lay paving slabs: tips and tricks
 How to drill bathroom tiles
 Monolithic slab on coarse soil
 Which electric heater is economical