How to make a gable roof
The durability of the walls of a private house and comfortable living in it directly depend on a reliable roof. Among the various types of roofs for country houses, the gable roof is the most common. It owes its popularity to the simplicity of design, ease of construction and the presence of a large attic space in which you can equip an attic. When building a gable roof with your own hands, you must have an understanding of what you are doing and be able to handle the tool. Therefore, before making a gable roof, you should familiarize yourself with the roof structure, its elements, installation features and develop its project.
Gable roof device
The choice and creation of a gable roof structure begins at the design stage of a house. But if you have to redo the roof of an already built house, then a gable roof project can be developed separately and then implemented. The main thing is to keep the general architectural style.
Before building a gable roof, it is necessary to develop its project with drawing documentation. You can create it yourself. This will require computer skills and knowledge of an architectural program such as ArchiCAD. Performing such work for the first time, it is best to seek help and advice from a specialist. Also, all work on the project can be delegated to specialized organizations that have been doing this for more than one year and can provide a number of ready-made and time-tested gable roofs.
Gable roof: photo
To create a roof project on your own, you need to understand the structural elements and materials for its construction, since without this knowledge you can make a serious mistake.

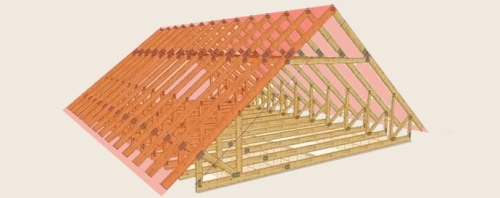
The design of a gable roof consists of the following main elements:
- Roof.
- Lathing and counter lathing.
- Skate ride.
- Rafter.
- Mauerlat.
- Racks.
- Braces and diagonal ties.
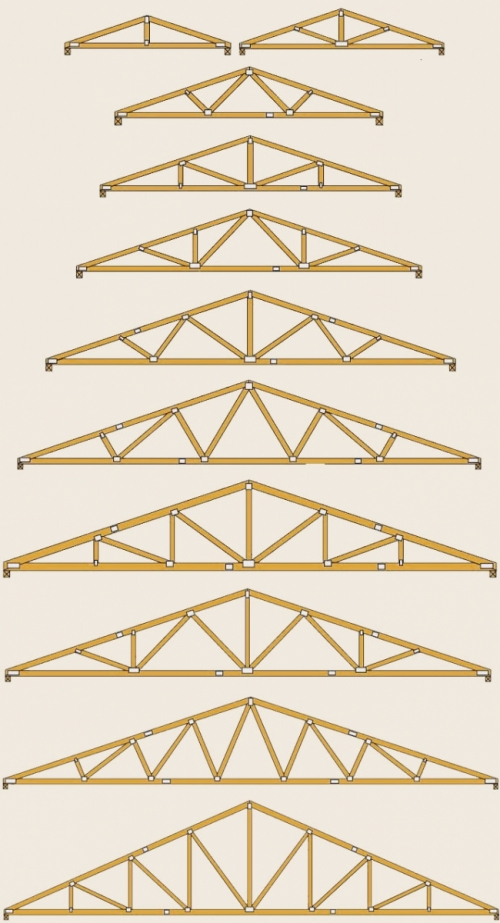
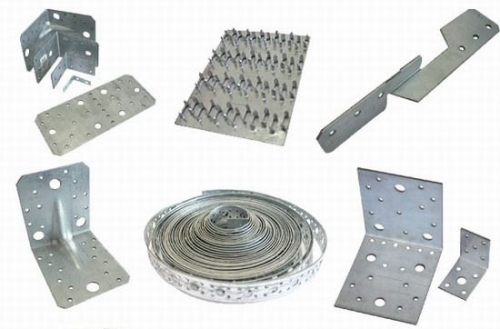
Important! Two rafter legs connected to each other and reinforced with braces are called a "truss". The photo shows several types of different farms.
All these elements are part of the rafter system, which can be of two types: hanging and layered. The first is used when the rafters rest only on two outer walls. The second type has three or more support points - external and internal walls. These two types can be used at the same time. For the part of the house where there are intermediate supports, layered rafters are used, and where there are no such supports, they are hanging.
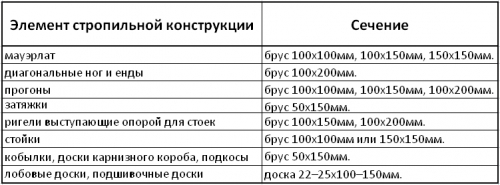
The material for the rafters and battens can be metal or wood. In private construction, wood is more preferable, and the reason for this is its low cost and availability. The table below shows all the elements of the truss structure and the recommended cross-section of a wooden beam and board.
Table #1
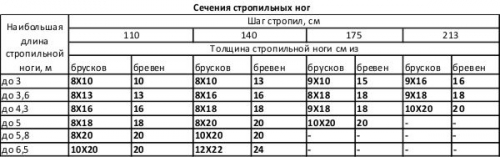
When creating a project, it is also necessary to take into account the length of the rafters and the step with which they will be installed. The thickness of the beam will depend on this. It should be noted that a wooden beam with a maximum thickness of 250 mm is presented on the market. This is quite enough for roofs with a rafter length of up to 7 m and a pitch of 150 cm. But quite often the rafter pitch is adjusted to the size of the insulation so as not to cut the latter and get a tighter fit. In such cases, to create a reliable structure, a beam of a larger section is required. The way out in this situation can be glued timber, the thickness of which reaches 300 mm, which, in combination with the support frames, will make the roof as reliable as possible. The table below shows the relationship between the thickness of the rafters and their length.
Table number 2
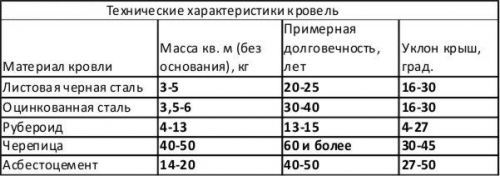
By tradition, the angle of a gable roof is chosen in the range of 11 - 45 °. But in order to obtain more accurate data, it is necessary to know a number of other factors on which the angle of inclination will depend. First, it is the material used for the roof. Secondly, these are wind loads in the region where the house is being built. Thirdly, these are snow loads in the selected region. All these factors are interconnected. For example, if you make a large angle in a region with strong winds, you will have to strengthen the truss structure, which will entail additional costs. In addition, the larger the angle of inclination, the larger the roof area and, accordingly, more materials are required. But in a region with heavy precipitation, a small angle of inclination will lead to the fact that they will accumulate on the surface and thereby increase the load, which will also require strengthening the truss structure.
The table below shows the angles of inclination for various types of roofs:
Table #3
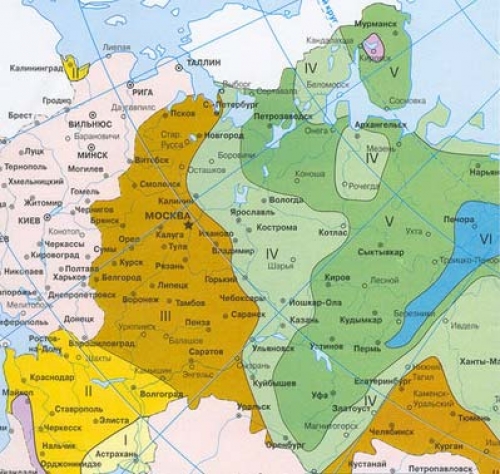
Taking into account the snow load, you must first determine in which area the house is located. To do this, you can use the special map below, as well as SNiP "Loads and Impacts". Then do a little calculation.
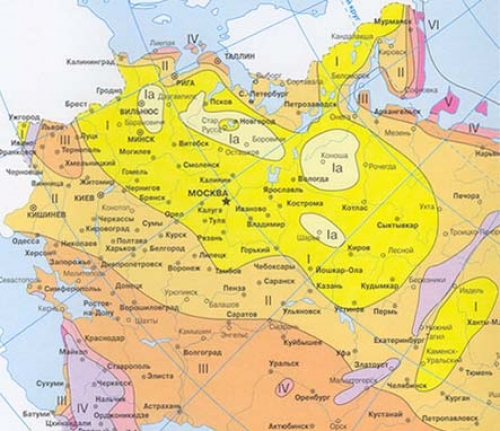
So that the roof does not act as a sail, and at the same time precipitation rolls down it, for calculations it is necessary to use a map of wind belts and SNiP “Loads and Impacts”.
Important! When performing calculations to determine the optimal angle of inclination of a gable roof, it is necessary to remember about such a type of precipitation as snow, or rather, about its thermal insulation characteristics. The thing is that snow is a natural thermal insulation at low temperatures, and its presence on the roof will keep the heat in the house. Therefore, do not make too much angle and rush to get rid of all precipitation from the roof surface.
Gable roof: video
Construction of a gable roof
All work on the construction of a gable roof is divided into three main stages. The first is the construction of a truss structure. The second is the creation of insulating layers, namely heat, hydro, vapor barrier and, if necessary, sound insulation. The third is the laying of roofing. Using the previously made drawing of a gable roof, and having purchased all the necessary materials, you can begin to build it.
Construction of a truss structure
The first thing to do is lay and secure the Mauerlats. To do this, along the perimeter of the walls of the building, as well as on the intermediate walls, we lay a layer of waterproofing from roofing material. On top of the roofing material, we lay the wooden beam intended for the Mauerlat and fix it to the walls with the help of metal studs previously embedded in the walls as shown in the figure:
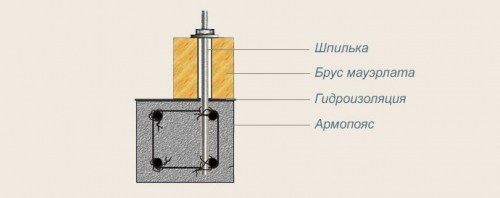
The metal pin is a threaded rod. The length of such a stud is selected on the basis that half of it will be embedded in the wall, and the protruding part should be 3–4 cm higher than the laid Mauerlat so that the nut can be tightened.
Now let's start installing the rafters. This work can be done in two ways. The first is to collect the farm on the ground, and then raise it to the top. The second is the assembly of the farm directly at the place of its installation. Which of these two methods to choose, decide directly to the masters. In any case, for the convenience of mounting the rafters and creating the same type of trusses, it is worth making a template according to which the rafters will be cut and connected.
Making such a template is quite simple. To do this, we take two boards, slightly longer than the rafters, lift them up and set them in place like rafters. We align them vertically, make sure that the top of the ridge is set in accordance with the drawing and connect the boards with one nail. Now it is possible, by raising or lowering the ends of the boards, to obtain the required angle of inclination and, having achieved the desired, we connect the boards with a transverse bar to fix them in this position. Using this template, we fit the rafters under it and then connect them. To connect the rafters with the Mauerlat, we make undercuts in them in the form of a right-angled triangle, and for the connection we use stamped metal corners or brackets.
We mount farms at the beginning and at the end of the building, then we stretch the cord between them. We make sure that the horizon level is perfectly even, in case of skew, we lower one of the trusses a little. Under this cord, we install all the other rafters with a step specified in the project. Then we mount braces, crossbars, retaining beams and frames.
Important! To connect structural elements and strengthen it, it is best to use stamped metal nail plates, corners and staples.
Gable roof insulation
After installing the rafters, you can begin to create a multilayer insulating cake that will protect the internal structures, keep warm and cool in the house. The insulation consists of several layers: waterproofing, vapor barrier and thermal insulation. In some cases, when roofing materials with a low level of sound absorption are used, sound insulation is also equipped.
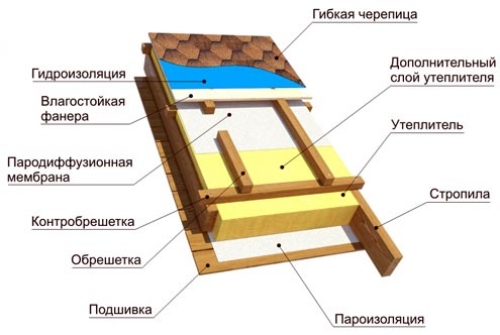
We start creating an insulating cake by laying a layer of waterproofing on top of the rafters. To do this, you can use various films and membranes that will reliably protect against the penetration of moisture inside and at the same time let the excess out. We begin to lay the materials themselves from the bottom up, letting them overlap by 15 - 20 cm. We use wooden slats 25 mm thick as fasteners. These slats are a counter-lattice and are attached to the rafters along. It is worth noting that the counter-lattice allows you to equip the roof with good ventilation. On top of the counter-lattice we lay the main crate, which runs perpendicular to the rafters, and to which the roof will be attached.

Important! There are two types of crates: solid and discharged. The first is used for soft and rolled roofing materials. The second is for materials such as slate, tiles, galvanized sheet.
Having finished with waterproofing and crate, we proceed to the arrangement of thermal insulation. Various materials are used as insulation. The most popular of them are mineral wool, glass wool and polystyrene foam. But today on the market you can find other heat-insulating materials that are more suitable for roof insulation and at the same time are not inferior in characteristics to the already familiar ones. Among these are foamed glass, algae ladders, extruded polystyrene foam. When choosing one or another material for roof insulation, you should focus on its characteristics:
- Thermal conductivity should be, the lower the better.
- Specific gravity. The smaller, the thicker the layer can be made without strengthening the structure.
- Moisture resistant. The higher it is, the better.
- As well as the fire hazard and environmental friendliness of the material.
Important! Choosing mineral or glass wool as thermal insulation, you should be prepared for the fact that it absorbs moisture very well, while losing its insulating properties. Even having created an excellent waterproofing, cotton wool will draw in moisture from everywhere like a sponge.
The heat-insulating material itself is laid between the rafters. As noted earlier, the pitch of the rafters is selected according to the size of the thermal insulation. Therefore, mats or slabs are simply laid tightly between the rafters. A vapor barrier film is stretched over the thermal insulation, which is fixed with wooden slats nailed to the rafters in 50 cm increments.
Important! If in the future it is planned to equip the attic, then the heat-insulating layer must be strengthened. This is done very simply. On top of the thermal insulation laid between the rafters and on top of the rafters themselves, another, already continuous, layer of thermal insulation is laid. For these purposes, extruded polystyrene foam with a selected quarter at the end is perfect. This is necessary, since the rafters act as cold bridges, in addition, if small gaps remain somewhere, a continuous layer will block them.
Roofing
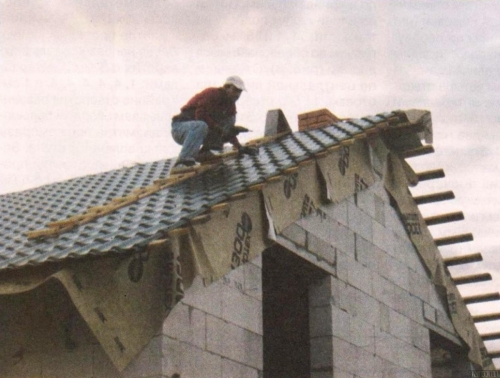
The final step in the construction of a gable roof with your own hands is the laying of the roof. There are many different roofing materials on the market today. The choice depends on the financial capabilities and wishes of the owners. Metal tiles, bituminous tiles and slate sheets are especially popular. In many ways, this popularity is due to the ease of installation and reliability of these materials. Regardless of which roof was chosen, its laying takes place from the bottom up. Thus, the overlap of the sheets is ensured, which makes it possible for water to drain and not get inside.
Building a gable roof with your own hands is a very responsible business. The slightest mistake in the calculations during the design and construction will result in additional costs or a decrease in the reliability of the entire structure. If you have to perform such work for the first time, it is better to play it safe and invite an experienced craftsman who will supervise the work.
 Masonry mortars for brick kilns
 Why do the windows fog up in the apartment
 Construction and schemes of brick ovens
 How to lay paving slabs: tips and tricks
 How to drill bathroom tiles
 Monolithic slab on coarse soil
 Which electric heater is economical