Roofing from a metal tile
Metal tile - popular in the private sector. This is due to the durability of the material, beautiful appearance and good protective properties. It is also important that it is easy to lay it yourself, without resorting to the help of specialists. The laying of metal tiles includes: the choice of material, calculation, preparation of the roof and the actual work on the installation of the coating.
How to choose a metal tile
Modern metal tile in appearance is similar to natural tile. But it protects the roof from bad weather by an order of magnitude better, has more color variations and is not so expensive. The thickness of the metal tile sheet is 0.5 mm, it is covered with a polymer on top. For this, polyester, pural, armacor, plastisol are usually chosen.
Which exterior coating to give preference, largely depends on the climate where the house is located. you need to do not only in appearance, but also based on weather conditions and temperature changes that will be during the year.
![]()
Polyester is great for any climate. A metal tile with such a coating can withstand large temperature fluctuations. The downside is the fragility of the material, so care should be taken when laying. Pural does not fade under the influence of sunlight. This coating is stronger than polyester, although thinner than it.
Coating similar to pural - armacor. It resists direct sunlight well, does not fade. Armacor is not afraid of any, even the most severe climate. Plastisol also resists mechanical damage well, but when heated above + 60 ° C, it becomes unusable. In addition, it is not like other coatings, resistant to sunlight - the paint quickly fades.
Instructions for calculating the material
Before laying the selected metal tile, you need to calculate how much material is needed for this roof. The difficulty at this stage lies in the fact that the metal tile is not symmetrical. That is, during the installation process, you should not confuse the top and bottom of the coating. Therefore, if the roof of a complex structure, has many protrusions and elements, it will become a difficult task.
Steps for calculating the amount of material:
- We transfer the roof plan to graph paper, taking into account all dimensions. We measure the length and width of the slopes.
- Any metal tile has two lengths - common and useful, since the material will overlap. Usually the useful length is the same for all manufacturers. She is 111 cm.
- We calculate the number of vertical sheets of metal tiles. To do this, we divide the horizontal length of the slope by the working width of the coating. The resulting number is rounded up to the nearest integer.
- Determine the length of tile sheets in a row using the formula:
where a is the number of sheets, x is the length of the roof slope from the ridge to the eaves, y are allowances for eaves (standard 5 cm), z are allowances for overlapping sheets in the vertical direction (15 - 25 cm). But if the length of the sheets allows you to carry out in one row, then the overlap is not taken into account.
- We calculate the number of additional elements for roof building structures (ridges, slats). To do this, we divide the length of the building structure by the working length of the additional element (usually 190 cm). The resulting number is rounded up to the nearest integer.
- We calculate the number of screws for fastening. For the roof: multiply the area of the roof by 8. For additional elements: multiply the length of the planks by 8. Add the numbers obtained. This is the required number of screws.
Metal tile transportation technology

In order for the self-assembly of the metal tile to proceed correctly, you need to pay attention to the delivery and method of storing the material.
- The metal tile should be loaded with soft slings. Sheets should not stick out of the car body so that they do not break. It is forbidden to lay other materials (especially heavy ones) on top.
- Packages with metal tiles must be carried in an upright position, without sagging or breaks.
- Sheets should not be stored on bare ground. It is best to fold the metal tile in a dry room. If this is not the case, then under a canopy on a wooden flooring.
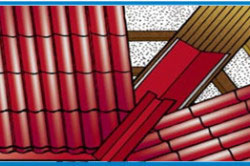
Roof preparation
Operating instructions
The rules for laying metal tiles are as follows: work should start from the lower left corner of the roof, you can’t walk on the roof in hard-soled shoes, and you can step on metal tiles only where the material is in contact with the crate.
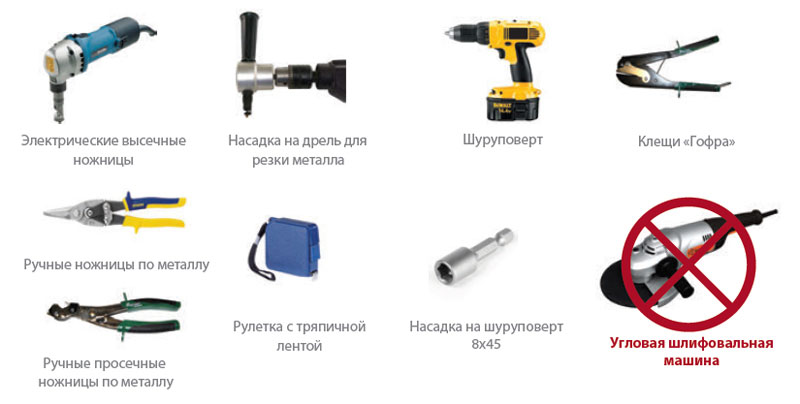
Tools for laying and fastening: metal scissors or a hacksaw (in order to cut sheets), a cordless screwdriver, a hammer, self-tapping screws, ropes, a ladder, boards and slats for lifting sheets to the roof.
The rules for fixing metal tiles are as follows:
- Before starting work, you need to read the instructions again.
- Laying of material goes from left to right, overlapping.
- To the lowest board of the crate, the sheet is laid above the step, to the rest - as close as possible to the bottom step.
- After the sheets are laid, they must be pressed tightly to the roof boards with your hands.
- The metal tile is attached to the roof with self-tapping screws. Fasteners must be with sealing washers. Sheets are fixed between waves. The self-tapping screw must enter the material at an angle of 90°.
- Particular attention should be paid to the installation of the material on the ridge. For it is necessary to leave space under the metal tile. Therefore, sheets are fixed on the ridge with gaps. On top, the sheet should be insulated, and the ridge should be fixed on self-tapping screws.
- Sheets of metal tiles are also insulated near the walls of the building. For better adjoining to the house, you can use special strips.
- At the end, you should install the ridge and ground the roof.
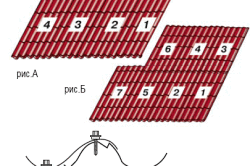
The metal tile is laid in one row:
- put the first sheet from the bottom edge of the roof;
- align with the eaves;
- “bait” the sheet in the center onto the screw;
- leveling on the first, lay out the second sheet;
- sheet fastening technology - overlap;
- using this method, mount 4-5 sheets in a row, except for the last one;
- fix all sheets with self-tapping screws (the technology is described above);
- lay out the next row, only then fix the last sheet in the bottom row.
The metal tile is laid in several rows:
- the instructions for attaching the first sheet are similar to the previous one;
- put the second sheet not next to (left), but on top;
- "make" a metal tile;
- check whether the sheets lie evenly, fix them with self-tapping screws to each other;
- put the third sheet to the left of the first, and the fourth above the third, and so on.
Technology of laying sheets on triangular slopes:
- determine the center of the slope, mark with a line;
- on a sheet of metal, also find the center and draw a line;
- installation should start from the ridge;
- combine the marks on the roof and sheet;
- fix the metal tile;
- instructions for subsequent mounting are described above.
Proper cutting of metal sheets
It is best to select sheets so that they do not have to be cut. But if this is not possible, then you need to use an electric jigsaw or a metal saw. It is strictly forbidden to cut metal tiles with a cutting machine. Sections of sheets must be treated with bituminous mastic to prevent corrosion.
 Masonry mortars for brick kilns
 Why do the windows fog up in the apartment
 Construction and schemes of brick ovens
 How to lay paving slabs: tips and tricks
 How to drill bathroom tiles
 Monolithic slab on coarse soil
 Which electric heater is economical