Metal roof installation
Construction is an expensive industry. And, as you know, there is never a lot of money, so you can save on labor, i.e. do everything yourself.
Before proceeding with the installation work, you should:
- firstly, to determine the amount of financial costs;
- secondly, to choose the design of the future roof;
- thirdly, carefully study the technological process.
Whatever the design of the roof, its cost is made up of four positions:
- frame;
- insulators;
- top roofing material;
- wages of workers (in our case, this cost item is absent).
The first and easiest way to determine the cost of your roof is to call local firms and ask the manager about the prices for installing a roof made of metal, having previously calculated the area of \u200b\u200byour roof. Many employees will gladly tell you approximate prices. The second option (calculate everything yourself) is more difficult, but no less accurate and reliable.
Volume calculation
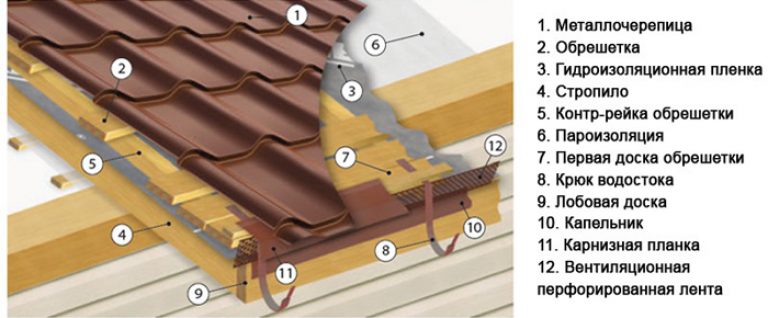
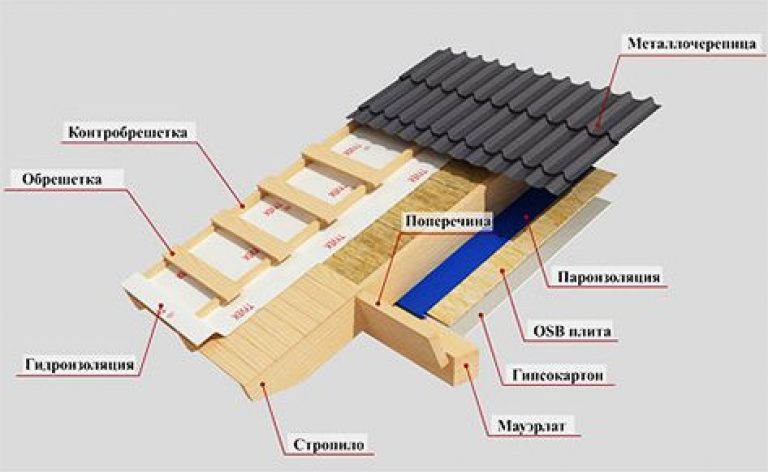
Frame - a wooden structure consisting of main and auxiliary fragments. The first - Mauerlat, rafters, crate; the second - tightening, racks, struts. Together they make up the roof truss system.
There is a good online calculator on the Internet, with which you can calculate the volume of lumber, the current loads, see the layout of the rafters, etc.
But there is one caveat - the calculation is not carried out for all types of roofs, but for single-pitched, gable, attic (including) and hip. That is, if you have more than four slopes, then you will have to count manually. After we have determined the number of boards and timber, we select insulating materials for.
Insulating materials
Insulators for roofing work will require the following: vapor and waterproofing and thermal insulation.
The main volume of atmospheric moisture is retained by the metal tile, but the vapors contained in the outside air still get inside. To protect the underlying structural layers, vapor barrier is used. The difference between vapor barrier and waterproofing is that the first one is aimed at passing vapors from inside the room to the outside, and the second one is aimed at ensuring that external moisture does not penetrate inside the roof structure. Film vapor barriers combine the functions of both layers and are perforated and non-perforated. On the packaging of such rolled material, after the name, a number is indicated, it indicates the weight of 1m2 of film.
In addition to the common film insulation, builders also use special polyethylene materials, reinforced with aluminum foil on the inside. For a residential building, such films are rarely used; they are usually laid during the construction of baths, saunas, and pools.
Isopsan, KLØBER, TechnoNIKOL, DUPONT can be considered the leaders in sales in the market of moisture-proof films, but there are also cheaper analogues.
Enclosing material
As mentioned above, the main protective function is performed by the upper roofing layer - a metal tile, which is sheets of thin sheet steel (galvanized), aluminum or copper, coated with a polymer layer and deformed by a cold method. Visually, a metal tile is very similar to an ordinary tile, but it has a much smaller mass - 5 kg / m2, and this is not its only advantage.

We will also name tangible advantages:
- durability (15 - 20 years);
- aesthetic appearance;
- ease of installation and repair during operation.
Beauty, of course, is important, but quality characteristics play a decisive role. It is worth paying attention to:
- a steel base containing the necessary alloying elements that improve the strength and rolling of the metal;
- class and type of protective coating;
- class and type of protective and decorative polymer coating.
The optimum thickness of the steel sheet is from 0.45 to 0.5 mm. With a smaller thickness, difficulties arise in the installation of a metal roof: deflections, kinks and other deformations. The protective basis of the metal coating in the production of metal tiles is:
- zinc;
- zinc-aluminum;
- aluminum-zinc;
- aluminosilicon;
- iron-zinc.
Zinc consumption during production is 225-275 g/m2.
As a protective and decorative layer in the production of metal tiles, the following types of coatings are used:
- polyester (PE);
- polyurethane (Pural);
- polyvinylidene fluoride;
- acrylate;
- plastisol.
For operation in an urban atmosphere (except when plants are located nearby that emit aggressive substances into the environment), polyester coating with a thickness of 25 to 30 microns is optimal. The above "pure" coatings are not applicable. Foreign and domestic firms apply complex compositions of copolymers with various additives. The recipe for such coatings is kept in the strictest confidence.
After purchasing all the necessary materials, we begin construction.
Technology of installation of a roof from a metal tile
DIY roofing tool
To make a roof with your own hands, you will need the following tools:
- ladder;
- metal scissors;
- screwdriver and electric drill;
- long rail;
- mounting tape;
- hammer;
- marker;
- level and tape measure (preferably metal);
- brush of low hardness;
- a mallet with a rubber head;
- manual circular saw.
Remember: in no case can a metal tile be cut with a grinder! This can lead to damage to the polymer protective coating, after which corrosion of the base metal will begin to form during operation.
Step-by-step instructions for the production of installation work
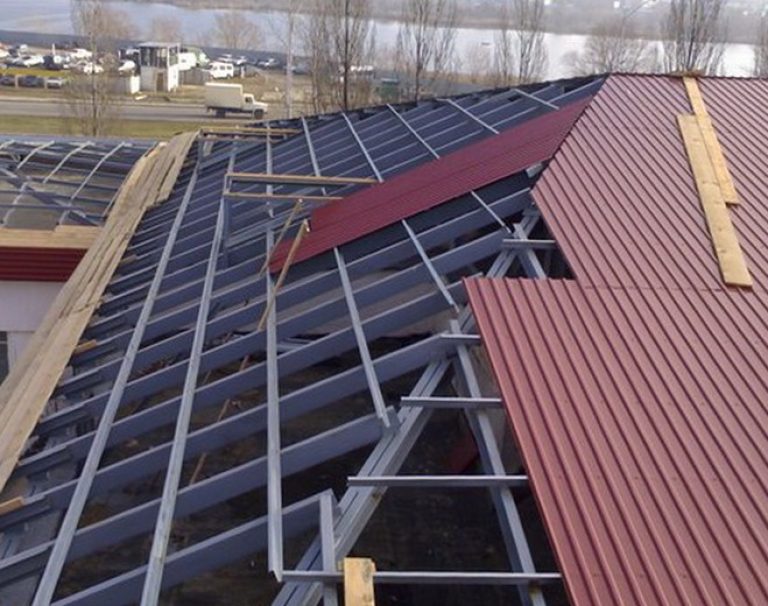
The beginning of all work is the installation of the truss system, carried out in several stages. Installation instructions for both cold and warm metal roofing can be concluded in the following installation scheme:
Step 1. Wall waterproofing
The first step is to waterproof the walls. This can be done using a conventional roofing material. A bar is laid on the walls from the pediment to the pediment along the entire length. After we check the level of horizontalness of the structures, and control the step of laying the timber. Mauerlat is fixed with anchor bolts in pre-drilled vertical holes in the beams. Later, rafter legs begin to be mounted to it.
Step 2. Installation of runs
Installation of girders helps to simplify the work, as it becomes possible to attach each pair of rafters separately. The run is placed in the highest positions of the front walls and fixed in the design position with anchors or steel corners. The ends of the runs are also waterproofed.
Step 3. Attaching the rafters
Before you start attaching the rafters to the already assembled frame elements, you should lay out all the rafter boards in the strict sequence of their further installation. All elements must be labeled to avoid confusion.
We cut the rafter legs, precisely adjust all the gaps and corners. In the upper section, the rafters are connected with overlays. Each connection must have at least 5 nails. First, the extreme rafter sections are mounted, and then those between them, distributing them along the entire length of the house. Puffs are mounted at the bottom of the rafters. All structures during installation must be verified.
Step 4. Installation work
After installation, alignment and final fastening of the truss system, we begin roofing installation work. In order for the roof to serve for a long time, and the metal tile to reliably protect against precipitation, the installation of all fragments is carried out in a strict technological sequence, which includes the following steps:
- installation of counter rails;
- laying waterproofing;
- fixing the elements of the vertical crate;
- installation of the initial bars of the horizontal crate;
- additional crate;
- installation of wind boards;
- installation of brackets for drainage gutters;
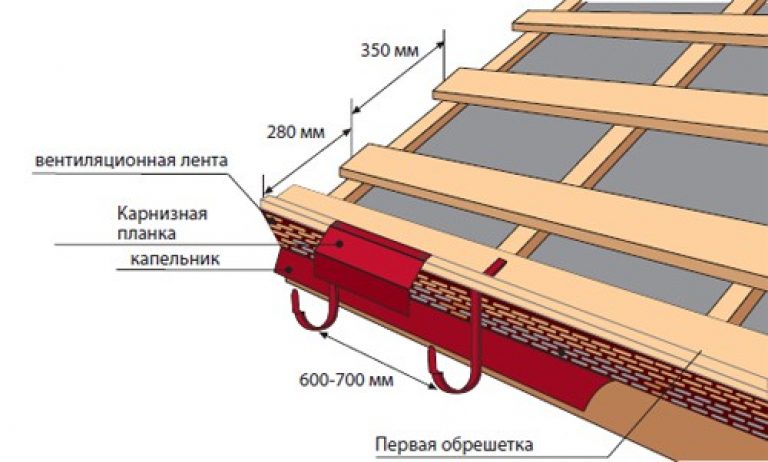
- cornice strips;
- installation of metal tiles;
- roof ridge and its sealant;
- thermal insulation works;
- vapor barrier;
- attic filing (for attic roofing).
If the roof is cold, then the last three stages are not taken into account.
Metal tiles are suitable for roofs with a slope of at least 14°. The step of the transverse wave of the metal tile directly affects the spacing of the battens. So, with a transverse wave with a range of 300.350 and 400 mm, the step of the crate will be 300.350 and 400 mm, respectively. The distance between the lowest rail of the crate and the one following it is 230.280 and 330 mm, respectively. The fragments of the crate themselves must be subjected to antiseptic treatment.
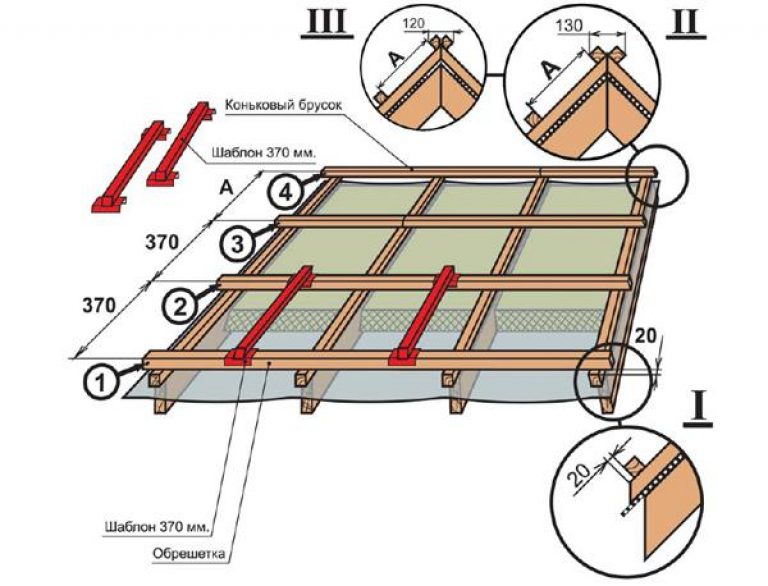
A continuous crate is arranged in the places of chimney passages, at the location of the valleys. Before you start fastening the metal tile, be sure to fasten the bottom planks of the valley along the continuous crate. The overlap of one part on another is about 100-150 mm. The tile is mounted from the bottom up. The areas where the sheets of metal tiles are joined are additionally covered with decorative inserts - the upper planks of the valley.
Remember: junction nodes are the most vulnerable places, therefore, they are approached with increased attention to their arrangement. Use sealants for outdoor work, seals, an additional layer of waterproofing.
Another extremely important aspect in the self-assembly of a metal roof is fasteners. Purchase a set of fasteners and metal tiles from the supplier together, otherwise you may lose the warranty rights for the purchased product.
Safety
Construction and installation work is a dangerous activity. Perform all sawing, cutting, drilling, fastening operations in overalls, gloves and protective masks or goggles. When working for a long time, hands sweat, tools can slip out, injure fingers and cause infection. Wearing masks and goggles will help protect your eyes from metal dust and your airways from micro-granules of insulation. As which rolled mineral wool materials are used.
Compliance with safety rules is the guarantee of your health.
 Masonry mortars for brick kilns
 Why do the windows fog up in the apartment
 Construction and schemes of brick ovens
 How to lay paving slabs: tips and tricks
 How to drill bathroom tiles
 Monolithic slab on coarse soil
 Which electric heater is economical