We make installation of soft tiles on the roof with our own hands
The first thing people pay attention to when looking at a house is the roof, so they are very picky about the choice of topcoat. The soft tile of a photo differs in beautiful appearance, a variety of coloring, drawing, low cost thanks to what installation of a roof from a soft tile is very popular.
Aesthetics and advantages of soft tiles on the roof of the house
In addition to aesthetic advantages, a soft roof has technical advantages:
- service life - 50 years;
- excellent sound absorption;
- reliable thermal protection;
- tightness;
- small weight (average 7 - 8 kg / m2);
- non-waste (elements of the ridge and valley can be made of the same material);
- comparative ease of installation of shingles.
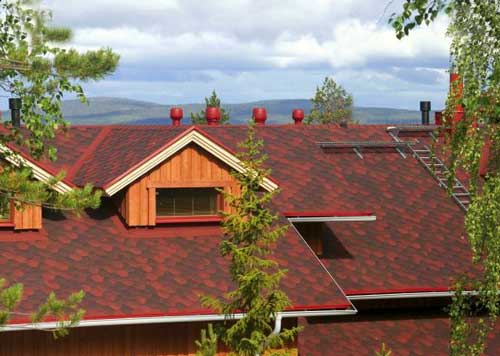
Soft tiles look good
An important plus is also that the installation of soft tiles is quite easy to perform on the roof of any configuration (with a large number of valleys, attic, chimneys, multi-level, with original asymmetry).
In this review, we will describe how to make a soft tile with your own hands, getting a beautiful durable coating.
So, let's begin.
Getting started, it is desirable to understand what the material with which you have to deal consists of.
The composition of the soft roof
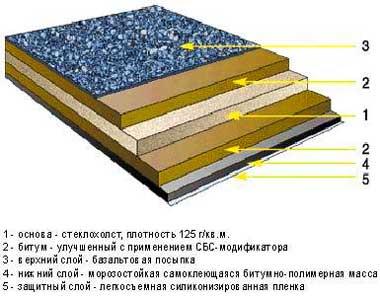
Layered composition of soft tiles
The structure of soft tiles is multi-layered.
The basis is a film (lining), which prevents the sheets from sticking together during storage and transportation.
A self-adhesive composition is applied to the part adjacent to the base.
In the middle - elastic layers of polymer-bitumen mass. The base layer provides tensile strength and is made from polyester, fiberglass, or a similar material.
The outer part of the tile is made of stone chips with expanded clay granules.
This structure allows the production of tiles of various shapes.
- It is desirable that the material was from the same batch.
- The tiles of different batches must be mixed during installation so that there are no differences in the color scheme.
- For large areas of slopes, foil tiles, or shingles with a large pattern, look very nice.
Now, having chosen the appropriate material, we move on.
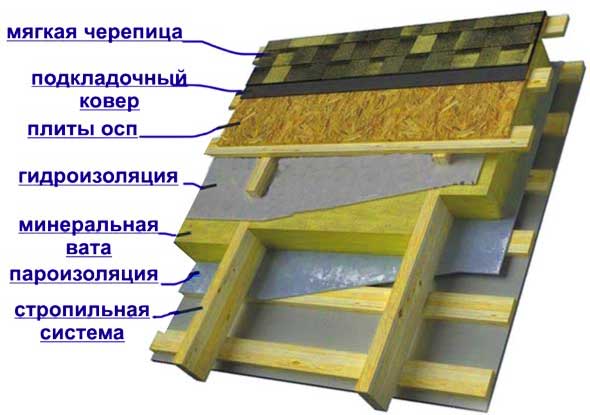
Tiled roof installation 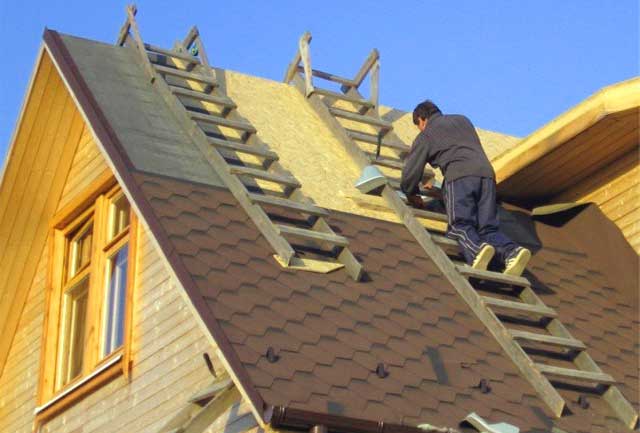
The main nodes of the roof structure are:
- continuous crate
- underlayment for shingles
- protective elements of overhangs, ends, valleys, ridges
- roof space ventilation
- soft tiles.
The structure determines the order of assembly.
Stages of work:
- preparation of tools, components, consumables;
- crate device;
- flooring of lining carpets;
- fastening of protective cornice and end profiles;
- marking the roof area;
- ventilation device;
- installation of soft tiles (shingles);
- closing of skates, valleys.
The roof will turn out to be beautiful and durable if, when installing soft tiles with your own hands, the technological requirements are strictly observed. Therefore, we will describe in detail all the stages.
Required Tools
For work you will need:
- a construction knife for cutting and trimming shingles;
- scissors for metal;
- tape measure, hammer, level;
- hacksaw, circular saw;
- screwdriver;
- mounting gun for sealing joints and seams;
- spatula for applying bituminous mastic;
- stairway;
- a pencil or construction crayons for marking.
Accessories, consumables
- crate (OSB board or planed edged board);
- bituminous mastic (or glue);
- lining carpet;
- cornice strips (drip);
- wind (end) strips;
- valley carpet or metal valley (if this element is present in the roof configuration);
- junction bar (if necessary);
- sealant, mounting gun;
- outlet elements of ventilation (aerators, valves, fungi and the like);
- roofing nails, self-tapping screws, nails for lathing;
- pitched tiles, cornice, ridge elements.
Lathing device
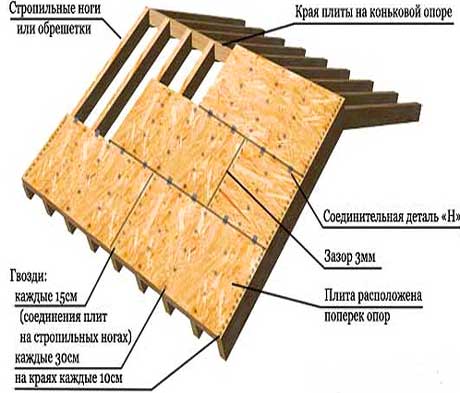
Lathing for soft tiles
Roof lathing made of soft tiles is continuous.
For its device, a moisture-resistant oriented strand board or a dry edged board calibrated in thickness is usually used.
If you use a regular edged board, you will have to perform additional work on grinding and leveling the surface.
When laying OSB boards, the joints are spaced, the gap between the boards is about 2 mm.
The use of dry planed lumber has the disadvantage that the wood "breathes" during operation, so the gap between the rows should be 2 - 5 mm.
The thickness of the crate depends on the pitch of the rafters.
For a standard step of 0.6 m, the thickness of the plate should be 9 - 12 mm, a dry edged planed board is used with a thickness of 20 - 22 mm.
If the pitch of the rafters is 0.9 meters - the thickness of the plate should be 18 mm, dry planed edged board - 25 mm.
Underlayment carpet flooring
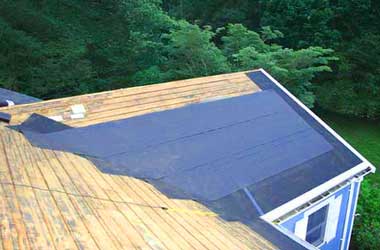
Carpet backing
A carpet backing is mounted along the plane of the lathing, which prevents slipping, deformation of soft tiles during operation, especially when snow melts and melts.
With a small slope (up to 18 degrees) of the roof, it is possible to install a carpet only along the eaves, ends, ridge and valleys.
For a steeper slope, the carpet is laid over the entire area of \u200b\u200bthe roof.
The lining carpet is produced in rolls, usually 12, 15 meters long.
- The bottom of the valley, if any, is closed first.
- Next, lay the substrate parallel to the overhangs.
- The carpet is glued to the flooring with special bituminous mastic or glue. The joints are glued especially carefully.
Recently, self-adhesive lining material has been more often used. If you purchase it, there will be no styling problems.
On the overhangs, it is good to release the carpet by 2 cm, tucking it under the eaves bar.
Important: be sure to ensure that when installing the substrate, there are no bubbles or wrinkles on the material.
Fastening of eaves and end profiles
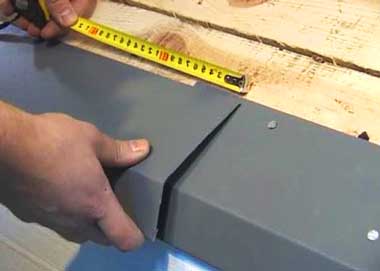
Curtain plank
The cornice strip (dropper) is a corner element with a stiffening rib. She closes the overhangs of the slopes.
The profile is fastened along the carpet along the overhang with an overlap of 50 mm, the edges are cut at an angle. The plank is nailed with a distance of 10 cm. Two nails are additionally nailed at the junction.
The installation procedure for the wind (end) plank is the same - the joints are cut, the nails are nailed along the length with a distance of 10 cm, at the joints - reinforced fasteners.
At this stage, it is possible to perform filing of cornices and roof overhangs (although it can be done after the installation of soft tiles). The filing is made with a planed frontal board, 20-25 mm thick or with plastic spotlights.
When making overhangs with a frontal board, a gap of 2-3 mm is left between the rows.
If PVC soffits are used for sheathing, they have the necessary gaps for ventilation.
Roof area layout
Without professional skills, do-it-yourself installation of soft tiles is easier to do if you make markings on the lining carpet with chalk.
After measuring the slope, draw control horizontal lines at a distance of 40 cm, vertical marking is done in meter steps.
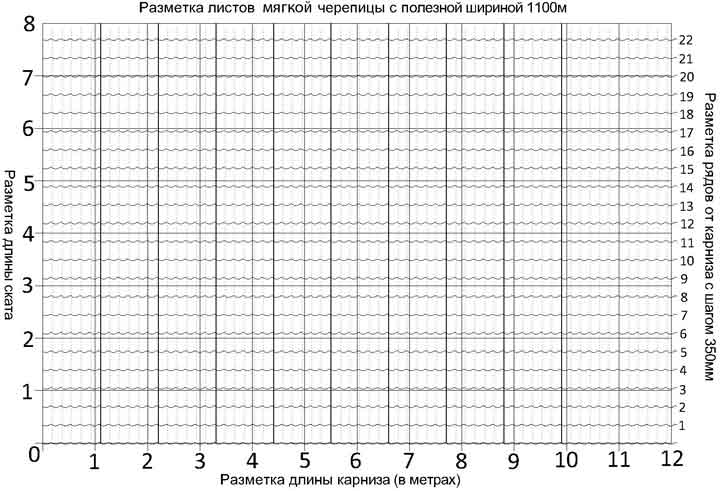
Tile marking
Ventilation device

Ridge ventilation device
Any roof must be reliable in the under-roof space to prevent the formation of ice on overhangs, icicles, fungus on wooden structures, and condensate. In general, all the negative phenomena that significantly reduce the life of the roof.
Ridge ventilation is considered the most optimal. For its device in the area of \u200b\u200bthe ridge, we will put aerators or ventilation valves, and we will perform the filing of cornices and overhangs with gaps. Providing under-roof ventilation is an important and voluminous topic, so we will not dwell on it in detail in this review.
Well, the preparatory work has been completed, you can start directly installing soft bituminous tiles on the prepared base.
Note: although the solid surface of the battens simplifies the work, the installation requires the use of a pitched ladder. You can buy it or make your own.
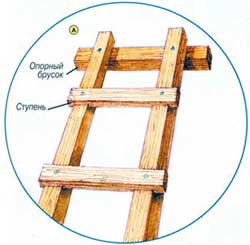
roof ladder
It is made from a bar 50 * 50 mm and a board 25 * 100 mm. It is better to use dry material so that it is easy enough to move around the roof.
The finished ladder is, of course, more convenient, as it is made of aluminum tubes and is lightweight. However, the angle of the ridge is not taken into account in the purchased ladder, and with large slopes, the length may not be enough.
Installation of soft tiles
An instruction with a brief description of the sequence of work, developed by the manufacturer, is available in each package with the material.
Important: prior to installation, the packaging should be stored at positive temperatures (preferably from +10).
When soft tiles are laid, the installation technology provides for a temperature regime of +5 degrees. If it is necessary to carry out work at low temperatures, use a building hair dryer.
First of all, the cornice details of the roof are laid out. The lower part is laid along the drip at a distance of 2 centimeters from the roof slope, covering the profile, and carefully glued. The upper side of the cornice elements is nailed with roofing nails with a wide head (10mm) and a sealant.
Nails are not recessed, but are stuffed on the same level with the coating.
If you did not purchase cornice elements separately, you can start laying soft tiles with ordinary shingles, cutting off the petals, with a straight edge to the cornice.
Be sure to remove the protective film from the inside of the sheets.
After making the first row, close the valley (if any).
To finish the valley, a decorative carpet 70 centimeters wide or a metal valley profile is used.
The valley carpet is glued with bituminous mastic or glue and nailed along the perimeter in increments of 20-25 cm. The metal profile is simply nailed.
Important: the nails on the valley carpet go strictly along the perimeter, they should not be in the center along the axis of the valley!
The main shingles can be laid in two ways: vertical and horizontal.
- When laying tiles vertically, installation starts from the end of the roof.
The pattern looks most beautiful with horizontal installation, when, after the cornice row, the laying is carried out from the bottom up, starting from the middle to the ends.
At the ends, excessively protruding above the wind bar, the tiles are cut and glued with bituminous mastic to a depth of 10-15 cm.
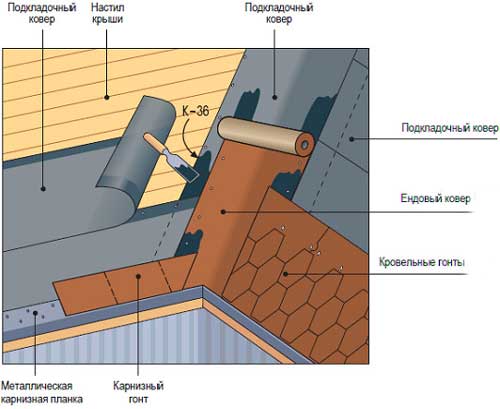
Valley at soft tiles
In the valley, the shingles are also cut off, leaving an open part (about 10 cm) of a decorative carpet or metal profile. The edges of soft tiles are carefully glued. It is convenient to cut shingles with a knife, placing pieces of OSB or plywood.
When laying, the elements of the soft roof are glued, pulling tightly. The upper part in the place where the drawing ends is pierced with 5-6 nails with a hat.
The next row of tiles covers the nails of the previous row.
Remember to constantly look at the markings, referring to the lines, to be sure that the roof goes smoothly without distortion.
Important: do not hit the nails in the center of the shingles or close to the edge.
Having covered all the surfaces of the slopes with a soft roof, the tiles of the last row are cut along the edge of the ridge.
From above the ridge is closed with special ridge details.
If you did not buy ridge shingles, then the elements can be cut from ordinary shingles. Usually 3 ridge elements are obtained from one shingle.
The cut strips are laid on top of the ridge, with an overlap of 50 mm, fixing the edges of the strips from different sides. Ridge tiles are first glued, then nailed onto 4 nails.
All outlet elements of the roof (ventilation valves, chimney, skylights), places where the roof adjoins vertical surfaces require careful sealing.
Note:
- Arrangement of junctions is carried out using special strips or with a sticker of the upper part of ordinary tiles on a vertical plane.
- To prevent the accumulation of snow behind the chimney pipe, grooves are mounted.
The last stage of installation will be the installation of snow-retaining elements. Sometimes these elements are abandoned for aesthetic reasons, which is quite acceptable.
Proper installation will ensure a long service life. We hope that after reading this review, installing a soft roof with your own hands will not cause you any difficulties, and its appearance and quality will please households and friends.
 Masonry mortars for brick kilns
 Why do the windows fog up in the apartment
 Construction and schemes of brick ovens
 How to lay paving slabs: tips and tricks
 How to drill bathroom tiles
 Monolithic slab on coarse soil
 Which electric heater is economical