Do-it-yourself gable roof truss system
How to make a truss system with your own hands? What are the options for attaching rafters? From the article you will learn how to arrange hanging or layered rafters and in what cases they are used. We will give examples of the techniques of professionals when creating a gable truss system.
In previous articles, we talked about the truss system and the features of the gable roof device. In this article you will find step-by-step guides for DIY installation. In order to follow the manual exactly, the necessary terms will be given, without understanding which the correct installation will not be possible.
The device of the truss system. Nuances
Gable roofs fundamentally differ only in the way the rafters are installed - hanging or layered - which directly depends on the length of the span. In this guide, we'll cover both options and use a set of basic terms.
Attic height- the distance from the top of the wall (the place where the rafters rest on the wall), either from the upper plane of the Mauerlat, or from the upper plane of the floor beams to the upper point of the gable roof ridge.
cutting- pairing (connection) of wooden parts by creating an anchor and a seat, or a hook or stop from the body of the tree of the element itself. Basically, the cutting points are reinforced with various anchors - a wooden chop, a threaded rod (stud), self-tapping screws, turboprops.
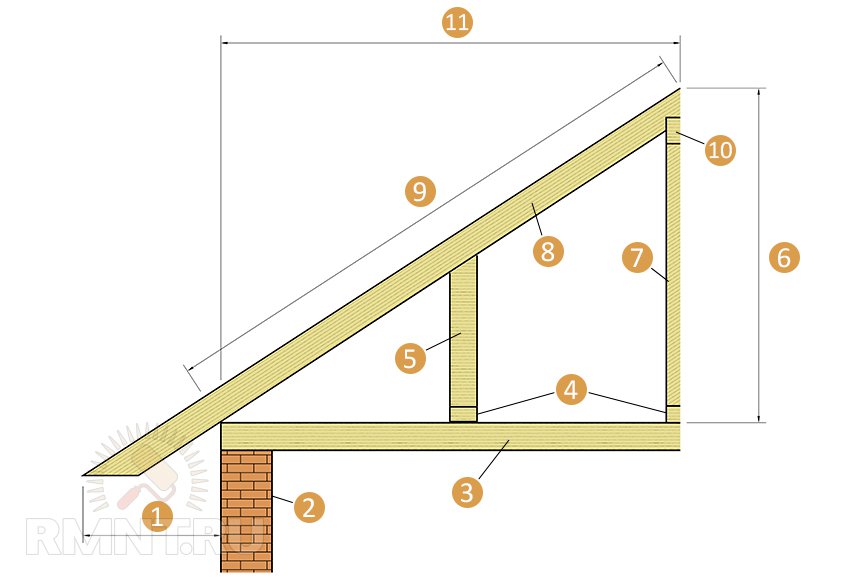 1 - roof overhang; 2 - wall; 3 - beam; 4 - bed; 5 - intermediate rack; 6 - height of the attic; 7 - central pillar or "grandmother"; 8 - rafter; 9 - working part of the rafters; 10 - skate; 11 - projection of the working part of the rafter
Other basic terms are given in previous articles.
Their function in the supporting area can significantly affect the design of the rafters. Supports are of three types.
1. Support without cutting and cutting. It is used only on temporary, auxiliary buildings, or for roofs that do not carry significant loads. In such cases, a powerful wedge is installed in size.
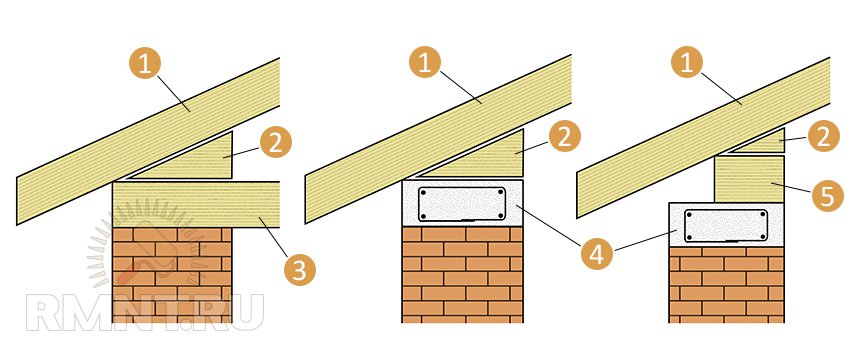 Support without cutting: 1 - rafters; 2 - wedge; 3 - beam; 4 - armored belt; 5 - Mauerlat
2. Full cut or end cut support. The rafters rest on a beam or Mauerlat on the area of the entire cut or on the end tooth. In this case, to create a roof overhang, a filly is built up or an additional counter-lattice is mounted. Usually, this method is resorted to when the length of the slope is approximately equal to the length of one unit of material (board, beam) adopted for the rafter leg (usually 5-6 m). This is done in order not to splice the rafters in the working part.
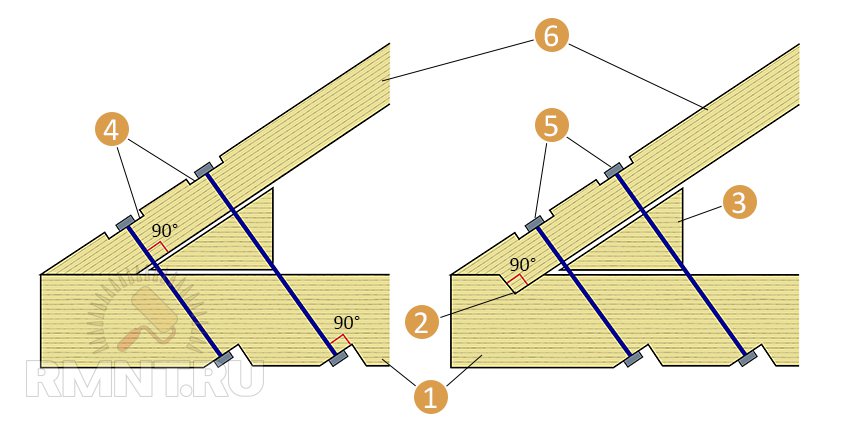 Support on a full cut or end tooth: 1 - beam; 2 - end tooth; 3 - wedge; 4 - cutting; 5 - studs with nuts; 6 - rafters
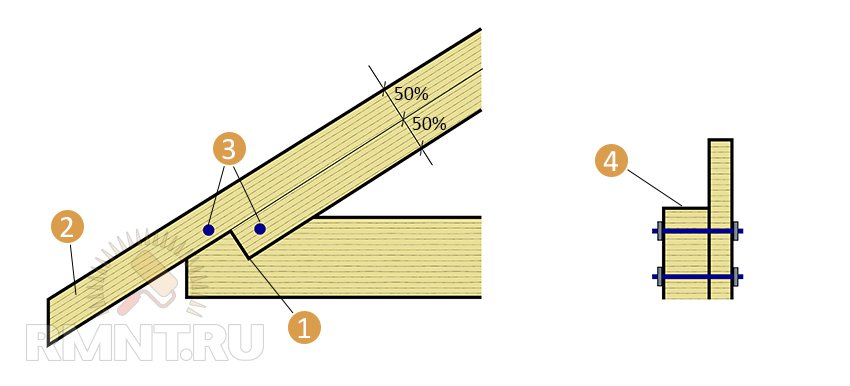
3. Reliance on an intermediate cut. The rafter leg remains solid from the ridge to the edge of the roof, i.e., the function of the overhang is performed by the extreme part of the rafter leg. The most common option with a slope length of more than 5 meters. In this case, splicing of the rafters is inevitable. The notch gives an additional hook for rigidity, and the sufficient length of the rafter leg guarantees the optimal length of the roof overhang. The depth of the cut into the rafter leg should not exceed 40% of its height.
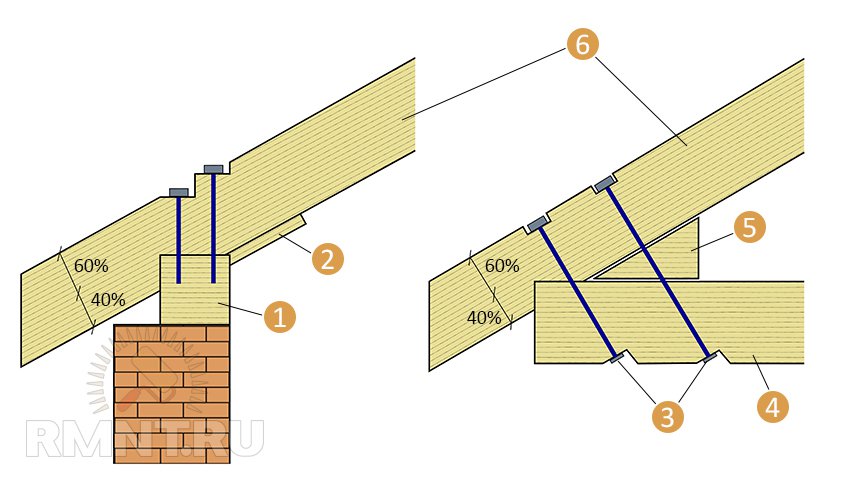 Support for an intermediate cut: 1 - Mauerlat; 2 - support bar; 3 - studs with nuts; 4 - beam; 5 - wedge; 6 - rafters
To create a gable rafter system with your own hands, you will need a set of carpenter's tools:
- Power tools - a circular saw, a jigsaw, a powerful drill with a set of "feathers" for wood.
- Hand tools - saws, an ax, a hammer, a sledgehammer, a set of chisels, locksmith keys.
- Measuring tool - tape measure, levels, hydraulic level, as a rule, cord, plumb line.
Training
In preparation for work, you need to create drawings or sketches. To do this, you need to decide on the choice of the principle of the roof structure and draw specific nodes:
- Rafter leg support unit. Here it is necessary to take into account local conditions - the material of the walls and the distance between them.
- Skate. This is an equally important area and the method of connecting the rafters must be selected in advance, based on the dimensions of the projection of the rafters, the span and the thickness of the beams.
- The choice of material for the truss system. If nodes are selected that provide a through screed in width, then the thickness of the rafter leg must be at least 60 mm. If rafters of such power are not needed, choose another option for supporting the rafters (for example, “on the overlay”).
 Overlay notch: 1 - notch on the side of the beam; 2 - departure; 3 - studs with nuts; 4 - top view
Hanging rafters for a small span
The method of constructing a truss system without intermediate supports is applicable only in the case of a small span - up to 6 meters. As mentioned in the previous article, in this case, a floor beam or a rafter crossbar serves as a puff. We will consider two options for installing rafters.
Option 1. With a subfloor
This method is convenient if it is possible to arrange a draft floor along the floor beams.
Operating procedure:
- Arrange a draft floor from unedged boards and improvised material.
- Mark the Mauerlat or beams - step, cutting places. Pull the cord over the future skate. Be sure to check the perimeter.
- Apply material for rafters to the ceiling.
- Choose the best option for attaching rafters at the place.
- Craft two truss trusses*.
- Install the outer trusses using temporary spacers (beacon trusses).
- Check for correct installation, compliance with levels and tolerances.
- Fabricate and install the rest of the trusses according to the size of the lighthouse trusses on self-tapping screws and nails. At the same time, it should be possible to correct the step and dimensions.
- After installing all the trusses, you should once again check the compliance with the levels and tolerances.
- The final unfastening of the truss system is the installation of ties, brackets, turboprops and other elements provided for by the project.
* FROM trail farm- one complete element of the truss system.
Option 2. Without subfloor
In this case, the overlap is not arranged, the space of the floor is combined with the attic.
Operating procedure:
- Carefully measure the dimensions at the installation site.
- According to local sizes and conditions, choose a method for supporting the rafter leg and tying the ridge, a variant for cutting the slope.
- Create a polygon that repeats the dimensions of the span and the projection of the rafters. On a horizontal grid or workbench, install a stop system that guides the board to the design position in the truss.
- Assemble one experimental roof truss.
- Raise the truss to the installation site and install on temporary fasteners.
- Choose a cutting method locally and make a cutting for an experimental farm.
- If necessary, correct the dimensions, angle and design.
- After achieving a high-quality landing, finally fix the truss nodes and lower it to the landfill.
- Correct the stops of the polygon (workbench) according to the template.
- Make the required number of roof trusses using the experimental truss as a template.
- Make cuts or seats at anchor points.
- Install and unfasten a number of roof trusses in the design position.
Often the project involves the unification of space on large spans - up to 9 meters. In this case, hanging rafters with a rafter crossbar are also needed. Such projects must necessarily take into account three points:
- The rafter leg must be made of a board with a thickness of at least 75 mm and a width of 200-250 mm.
- All cuts, anchor points, junctions must be tightened with a through threaded tie (stud) with a diameter of at least 12 mm. It is desirable to cover the joints of the planes with carpentry glue.
- The installation level of the rafter crossbar (puffs) is from 1/2 to 2/3 of the height of the attic.
The rest of the rafter installation technology repeats the described options.
Rafters
The device of this type of roof will require advanced carpenter skills. This type of rafter is suitable for large spans and when the attic space is planned to be used separately. Before installing the rafters themselves, additional preparation is necessary:
- Under the vertical supports, a bed should be installed - a board or timber with a thickness of at least 60 mm.
- Since roof trusses have a larger number of elements, they are assembled only on site. This may require scaffolding.
- Mauerlat is a mandatory element of the system. It must be fastened to the armored belt with anchors and connected at the corners with cuts in half a tree.
The thickness of the board for the rafter legs and intermediate supports (if any) is at least 50 mm with a width of 150 mm or more. It is desirable to make the central support (headstock) from a bar 100x100.
Installation of rafters. Operating procedure:
- Install Mauerlat. Usually it is mounted on the inner plane of the bearing walls. Based on the fact that the thickness of the wall is obviously thicker than the width of the Mauerlat, the distance to the edge of the wall will allow it to be insulated. Docking of elements - only through a cut with fixation with brackets or ties.
- Install a number of central supports on the bed, securing them to the design position with temporary rods (rail). Fasten a temporary or permanent ridge run along the tops.
- Temporarily fix the board for the rafter leg in the desired design position. At the same time, it does not need to be cut or trimmed in advance.
- Correct the ridge run.
- Mark the seats on the headstock, rafter leg and Mauerlat and make cuts.
- Install the rafter leg in the seats, measure and check the correct installation. Adjust seating if necessary.
- Make cuts and cuts under the entire row of rafters of one slope, observing the step.
- Make cuts and cuts on the rafter board for one slope (wing) according to the template.
- Install a number of slope rafters on temporary fixators (self-tapping screws, corners).
- Fit the opposite roof slope in the same way.
- Check correct installation and tolerances. Unfasten the trusses with a transverse crate.
- Install the beds under the intermediate supports (if any) and the supports themselves.
- Mark and cut in place the cut of the roof slope and install, if necessary, a wind board.
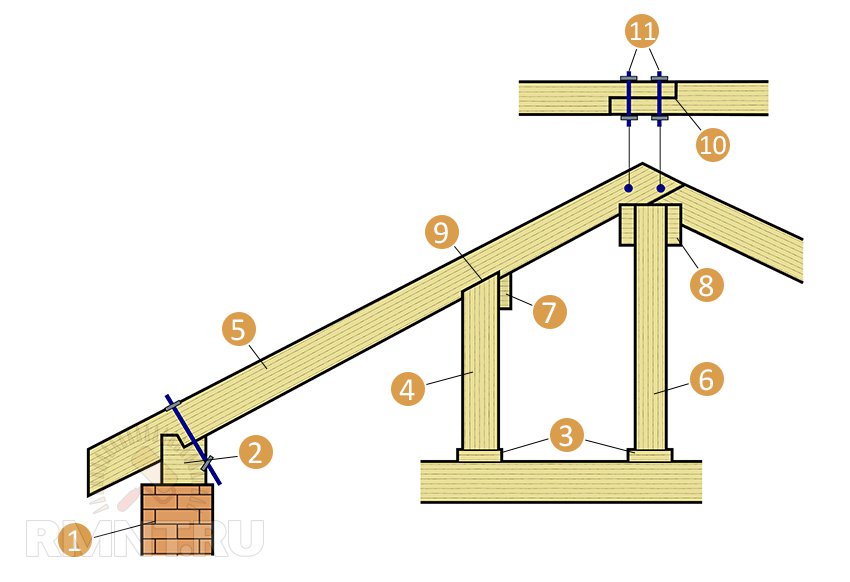 Variant of the device of the truss system: 1 - wall; 2 - Mauerlat; 3 - bed; 4 - rack; 5 - rafter; 6 - "grandmother"; 7 - run; 8 - ridge run; 9 - intermediate cutting; 10 - cutting half a tree; 11 - studs with nuts
Rafter step
When selecting, follow the rule: The pitch of the rafters should not exceed ten times the thickness of the rafter leg.
This rule also applies in the opposite direction: The thickness of the rafter board should not be less than 1/10 of the rafter pitch (along the axes).
The most popular step - 600 mm between the inner planes of the sinus - is due to the standard width of the plate (sheet) of mineral wool insulation, which enters such a sinus without trimming. The thickness of the board should be 60 mm.
Rafter length
- c 2 \u003d a 2 + b 2, where
- a - rafter projection
- b - attic height
- c - the length of the working part of the rafter leg
However, this does not take into account the overhang of the roof. Therefore, the length of the rafter row is recommended to be adjusted in place, cutting the ends after installation. This makes it possible to make the ends even. The optimum constructive overhang of the roof is 600 mm.
When creating roof rafters with your own hands, remember the dangers of unreasonable savings. The rafter system, as well as the bearing walls and foundation, is an irreplaceable element of the building. This means that to replace it, a complete dismantling will be required. As a rule, this happens during the reconstruction or overhaul. If the rules described in the article are not followed, this procedure may be required after 2-3 years.
Vitaly Dolbinov, rmnt.ru
 Masonry mortars for brick kilns
 Why do the windows fog up in the apartment
 Construction and schemes of brick ovens
 How to lay paving slabs: tips and tricks
 How to drill bathroom tiles
 Monolithic slab on coarse soil
 Which electric heater is economical