How to soundly put paving slabs on the sand
Paved paving slabs and garden plots look very aesthetically pleasing, but the durability of this beauty depends on the observance of the technology of laying this coating, and especially on the correct preparation of the base. A guarantee of high strength is given by the technology of laying paving stones on cement-sand mortar or concrete, but due to the laboriousness of doing it yourself and high costs, this technology is not available to everyone.
You can refuse to use concrete when laying paving slabs if sand is used correctly to prepare the base. This will save both energy and money.
Let's break down into its component parts the entire scope of work on laying paving slabs on sand:
- Marking paths and playgrounds.
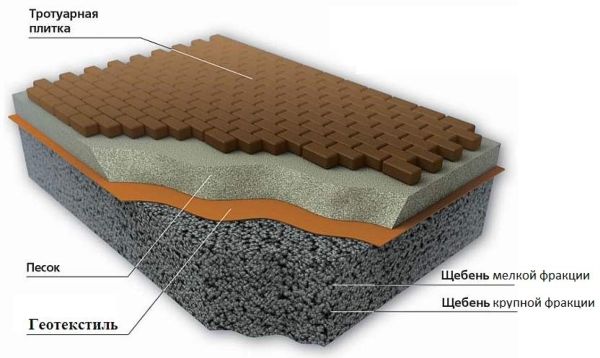
- Removal of the top layer of soil, followed by compaction of the surface and laying the first layer of geotextile.
- Construction of crushed stone cushion and installation of curbs.
- Laying the second layer of geotextile.
- Device for cement-sand preparation.
- Paving stone laying.
- Seam filling.
We will briefly consider the traditional types of work performed when laying paving slabs, paying more attention to the technology of installing paving stones on a sandy base.
Marking paths and playgrounds
The marking of surfaces to be faced with paving stones is carried out taking into account the following factors:
- location;
- slope away from buildings;
- surface load (pedestrians, vehicles);
- configuration (conditions for safe passage of vehicles).
The squares are marked with their own hands using a construction tape measure 10 meters long, wooden pegs and twine.
The paving of the paths is carried out with a slope of 3% in the direction opposite to the existing buildings, in order to divert storm and melt water from them.
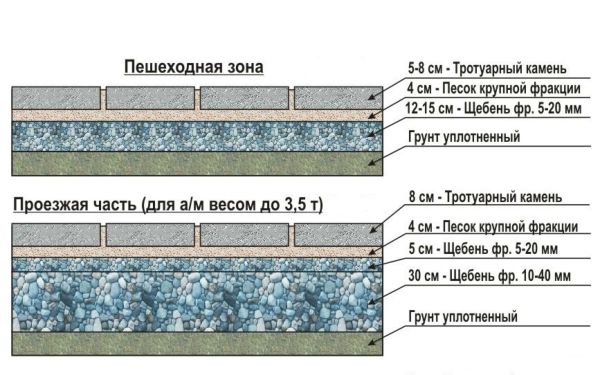
If the paths are planned for the movement of passenger vehicles, then the thickness of the paving slabs used must be at least 6 cm. The radius of curvature of uneven sections of driveways should allow the car to make a turn, and the dimensions of the site or parking lot - to turn around.
Removing the top layer of soil
From the surfaces planned for laying tiles, remove the top layer of soil with a thickness of 25-30 cm, this is approximately one bayonet of a shovel. If the areas are significant, this operation is carried out using a bulldozer. The new foundation is then manually leveled and leveled. If the soil is sandy or sandy, then it must be compacted.
Compaction is carried out with a rammer, made by hand from a piece of log 1 meter long with a transverse crossbar nailed to the end. Higher quality compaction is performed by a movable vibrating plate with an electric drive, the use of which, in addition, will save time and effort.
Then on the compacted base it is necessary lay down in one layer of geotextile with an overlap on the shoulders to isolate the soil from the equipped crushed stone preparation and prevent paving subsidence in the future tiles.
The type of geotextile used in this technology does not matter.
Crushed stone pillow and installation of curbs
On a compacted base covered with geotextile, rubble of a fraction of 20–40 mm is poured and leveled, taking into account the planned slope, with a layer of 12–15 cm. -10 mm. To form ovals, do-it-yourself borders are cut in length into 4 parts with a grinder with a dry cutter and smooth mates are laid out from the quarters.
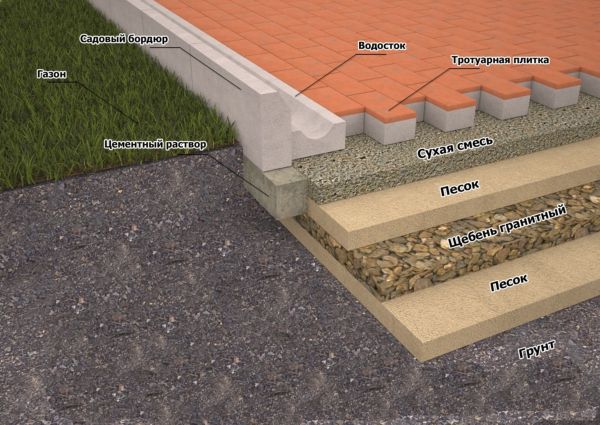
The upper mark of the curb should not be more than 5 cm higher than the curb. After the installation of the curbs is completed, the joints between them are filled with cement-sand mortar and rubbed. A day later, a final layout of the crushed stone cushion is made with a rake, indicating the slope and taking into account the selected transverse profile of the track (flat or convex), and then compaction with a mobile vibrating plate with an electric drive.
After compaction, sand is poured over the crushed stone, it is distributed over the surface with a layer 3-5 cm thick, and the compaction of the base with a vibrating plate is repeated, filling the voids in the crushed stone with sand.
Laying the second layer of geotextile
On top of the compacted sand and gravel cushion, a second layer of geotextile should be laid with an overlap on the curb stone. This technology allows you to isolate the sand cushion from the rubble, which is to be built from above under the laying of paving stones.
The device of a sand cushion for laying paving slabs
A layer of sand 4-5 cm thick is poured over the second layer of geotextile, leveled and compacted. Geotextiles will not allow sand to crumble into the lower layer of rubble and cause subsidence of paving stones. On this sandy preparation begin to lay paving slabs.
However, there is a technology that is not much different from the sand preparation device in terms of costs, but guarantees a higher paving result in terms of strength and durability. On the second layer of geotextile, you need to put a thoroughly mixed dry mixture of sand and cement in a ratio of 7: 1 with a layer of 4-5 cm and level it.
Cement in this proportion will slightly increase the cost of laying tiles, but, gradually absorbing moisture due to its hygroscopicity, will make the pillow monolithic. The procedure for preparing such a dry mix is incomparable in terms of labor intensity with the preparation of concrete with one's own hands, on which paving slabs are also laid, but gives a result close to it.
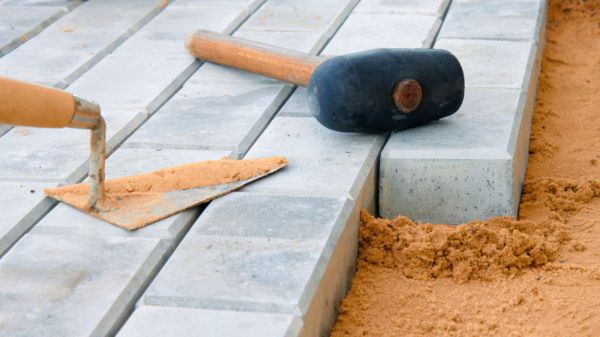
paving stones
After the installation of a sand cushion, they begin laying paving stones. Paving slabs are laid in the direction “towards themselves” with a gap between the products of 2-3 mm. A trowel and a rubber mallet are used for laying paving stones and its adjustment in place. Trimming tiles is also done with their own hands by a grinder with a dry cutter disk, which allows not only cutting concrete, but also undermining it with its side surface.

When laying paving slabs, through each linear meter of masonry, compliance with the slope and cross-sectional profile of the coating is checked. Correctly forming the bulge of the track profile allows the periodic application of a do-it-yourself plywood template to the coating.
Arrangement of seams of paving slabs
Having laid the tiles, they begin to process the joints of the paving stones between themselves and with the curbs. To do this, using sifted sand, they prepare a dry cement-sand mixture in a 1: 1 ratio with their own hands, which is poured one bucket at a time onto the floor tiles and swept with a hard broom towards the slope, filling the joints and seams of the coating.
When the entire surface is processed, the paving stones are lightly watered with water from a garden watering can, in order to only moisten the seams and achieve shrinkage of the dry mixture in them.
A day later, the procedure for filling the joints with a dry solution, followed by wetting, is repeated. When refilling, do not put the mix in the joints flush with the surface of the tracks, the joints must be clearly marked on the surface of the coating. 5-7 days after the arrangement of the joints, the pavement is washed with water from a hose using a stiff brush to remove traces of cement mortar.
Conclusion
The use of this technology makes it possible to obtain a strong, durable coating that does not sag from the effects of storm and groundwater, with minimal use of cement and without the expenditure of physical effort for concrete mixing.
 Masonry mortars for brick kilns
 Why do the windows fog up in the apartment
 Construction and schemes of brick ovens
 How to lay paving slabs: tips and tricks
 How to drill bathroom tiles
 Monolithic slab on coarse soil
 Which electric heater is economical