How to make a corner on a ceiling plinth
Usually, the installation of foam or polyurethane ceiling moldings, as well as the installation of a floor plinth, becomes the final stage of the repair work. And if gluing fillets on a straight surface is not particularly difficult, then you will have to work hard with the corners, especially when there is no skill and little or no experience. With all this, docking itself is a simple matter, the main attention and diligence is given to cutting the sticks at the right angle, which, by the way, can be external and internal.
Subtleties of the upcoming task
The most difficult thing is with the outer joints. But even in this case, you can make a neat design of the room on your own and in two ways:
- The first is to buy special fittings, which, in general, rejects the need to cut the skirting boards. This is the simplest solution to the problem, because both external and internal corners with grooves are on sale, into which the edges of the stucco molding are inserted.
- In the second version, the corners are cut using a special tool called a miter box. Its use ensures an even and tight fit of the planks to the surface. By the way, you can simply make markings on the skirting boards and cut the product with a metal file or a sharp knife.
We use a miter box
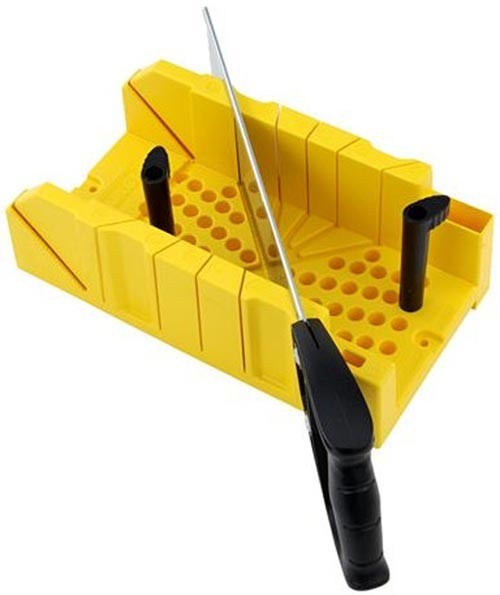
Using a miter box for cutting fillets
This tool was originally created for cutting finishing materials, which subsequently need to be mounted at a specific angle. The appearance of such a device and its design may differ slightly depending on the model, but the principle of operation remains the same.
So, for example, when cutting a ceiling plinth, future angles can be adjusted, and the simplest version of the tool is a wooden tray with vertical slots on the walls. They are needed in order to be able to insert a hacksaw and make a cut at an angle of 45 or 90 degrees. If desired, the miter box can be made on your own.
A slightly more complex modification is a tool that allows you to make cuts at an angle of 60 degrees, or to position the file at an angle of 45 degrees. Professional repairmen use a miter box with swivel mechanisms that allow you to fix the hacksaw as needed in each case.
Instructions for cutting skirting boards
Skirting cutting tools
Before you make a corner on the ceiling plinth with your own hands, it is recommended to study the simple instructions:
- To cut corners, the baguette is inserted into the miter box, the desired cutting slope is selected, then a file is installed in the corresponding cut in the wall of the tool, and you can cut;
- A similar procedure must be done with another fillet, only the corners must be cut through the opposite cut in the tool wall, but at the same angle.
We draw your attention to the fact that it is not necessary to immediately cover the skirting boards with an adhesive mixture and mount them on the ceiling. First, eliminate any cutting inaccuracies by joining the parts and checking if they form a perfectly straight joint. To everything else, it is added that the outer and inner corners for the ceiling plinth are cut differently.
If it comes to cutting the plinth for arranging the outer corner, then:
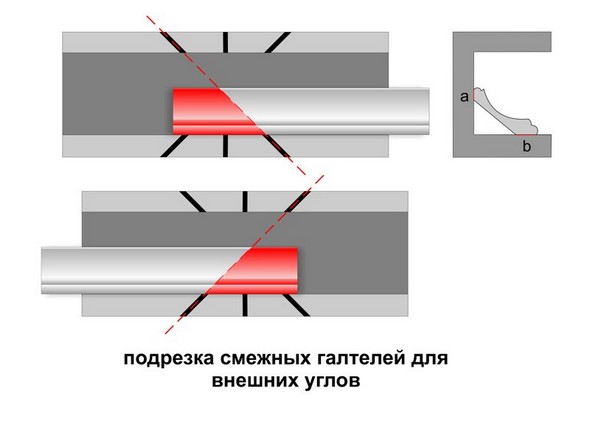
Trim adjacent fillets for outside corners
- The bar that will be attached to the left should be on the side of the miter box closest to you, and lie with the bottom up. The hacksaw should be inserted into the farthest right and closest left cut;
- The bar, which will be attached to the right, is placed in the same way, only now the hacksaw must already be brought into the far left and near right incision in the wall of the miter box.
In the event that you need to ennoble the inner corners, proceed as follows:
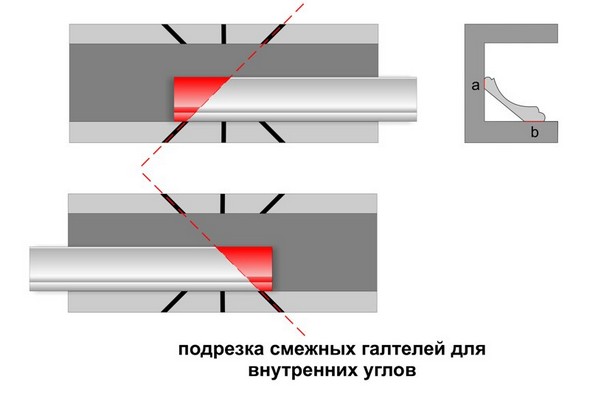
Trimming the inner corners of the ceiling plinth
- The bar that will be glued on the left should lie with the bottom side up and on the near side of the miter box. The cutting tool is inserted into the far left and nearest right incision.
- The baguette, which will be mounted on the right, is placed in the same way, only the hacksaw must be inserted into the far right and closest left grooves.
What to do if there is no miter box?
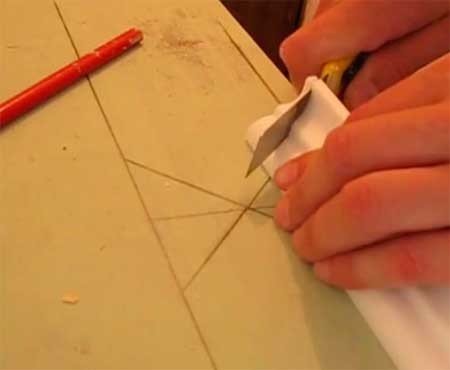
Cutting a skirting board without using a miter box
Now we offer an option on how to cut the desired corner of the ceiling plinth if there is no necessary tool. In this case, you can make a markup, and use it with a saw or a knife. To get started, prepare a ruler, pencil and stationery knife, and the process itself is as follows:
- Initially, the corner of the room itself is measured, for which it is enough to attach a baguette to it and make the necessary notes on it. Usually it is equal to 90-hundred degrees, but there are errors.
- To the baguette, at an angle of 45 degrees, you need to attach a ruler, and cut off the excess part with an accurate sharp movement. If you have to work with harder materials, such as wood or polyurethane, you will have to use an electric jigsaw or hacksaw, and cut along the line drawn with a pencil.
- Be sure to check whether both cut strips form a right angle, and only after that start mounting them under the ceiling.
- In the event that the corner of the wall is uneven, you need to measure it, and divide the resulting value by 2. This will be the required indicator for marking the baseboard.
Uneven corners can be corrected with sandpaper, or cut a little to the desired position, but for a ceiling plinth with a large error in the straightness of the corner, it is difficult to come up with something, and it is better to start cutting new planks.
After reading all this, it may seem that you will not be able to cut the required corners on your own. But, if you carefully read all the recommendations, it turns out that everything is much simpler and faster.
 Masonry mortars for brick kilns
 Why do the windows fog up in the apartment
 Construction and schemes of brick ovens
 How to lay paving slabs: tips and tricks
 How to drill bathroom tiles
 Monolithic slab on coarse soil
 Which electric heater is economical