Doors on rollers: DIY manufacturing and installation
Sliding doors on rollers have become popular with owners of apartments with small footage, as they save not at all extra space. The owners of spacious apartments also fell in love with these door models for their style, beauty and originality. It is also important that such door structures are quite capable of being made and installed with their own hands and without the invitation of specialists.
Sliding doors on rollers:
- do not require a lot of space for do-it-yourself installation, because they look like hinged structures;
- door handles are recessed into the canvas, so they will not damage the walls;
- performed in an extensive design;
- safe to operate.
Among the shortcomings of most sliding models, a rather high cost and insufficient insulation stand out, as a result of which sounds and smells penetrate the room, and heat is lost.
This does not apply to the roto- and compartment doors, since their box is attached inside the wall.
Types
- Coupe - doors on rollers, made with one or two canvases. For them, a mechanism is used that allows the structure to be moved along the wall surface or inside the wall.
- Roto models are distinguished by the fact that when opening the canvas, turning slightly, it turns out to be at a 90-degree angle relative to the opening, and then deviates both to the right and to the left.
- Accordion, book - doors with two or more elements linked by movable hinges. The upper or lower end part of the sliding models is equipped with rollers that move along the guide.
- Hinged doors move only along the top track. Similar cassette models are shifted along two rails or mounted.
Sliding doors, made, including the type of compartment, are panel or panel. They are also made from expensive wood species, chipboard, MDF, using lamination. Plastic models are popular, pasted over with cloth, wickerwork, with and without glass inclusions.
Roller door installation
You can install such a “coupe” with your own hands in two ways.
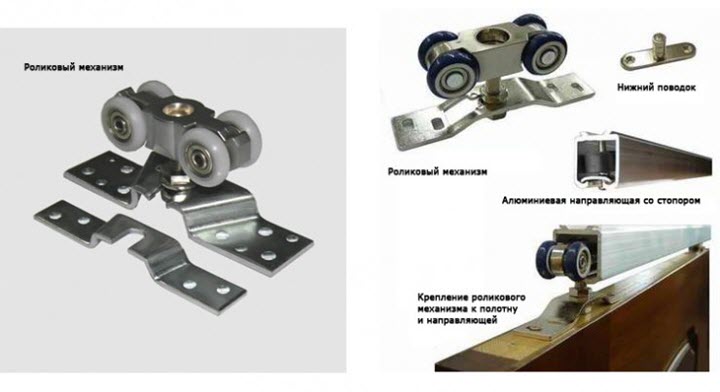
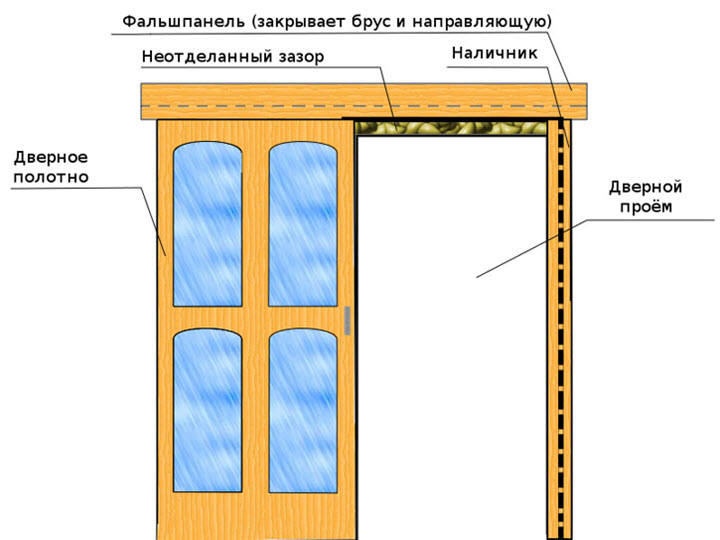
- For mounting along the wall, a beam is attached to its surface, and a sliding mechanism guide is attached to it, designed to move the wheels. They are held by special brackets at the top of the end of the door. So that the canvas does not stagger, a slot is cut out in the area of \u200b\u200bthe lower end face for the guide flag. The latter holds the door and prevents it from loosening. At the end of the installation, the opening and the guide are equipped with platbands and extensions.
This way of mounting a sliding door on wheels with your own hands saves space, since the model is opened along the wall. - Installation inside the wall is distinguished by the fact that the fasteners are hidden in the depths of the wall or its falseness, as well as plasterboard modification. For such installation, it is required to make a recess in the wall, similar to the letter P. It is simplified to cut the groove when arranging a new wall partition. It is not difficult to install a hiding door into a ready-made factory metal model in the form of a pencil case or cassette. Such products are first inserted into the wall, and after that they are plastered or GKL is attached.
With this tactic, when the door is hidden in the wall cavity, it is important to observe the correct placement of the handle.
Choosing a door according to the method of its fastening
Top or hanging option. It is characterized by two steel units with wheels, an upper guide and a restrictive lock. There is no holder at the bottom, so the design is lightweight. However, this method of attaching the door is accompanied by backlash (model wobble). To somewhat level out such a nuisance, installation on the flooring specifically for this intended guide flag will allow. But with this method of door mounting, nothing extraneous will penetrate into the rails, leading to a “stumbling” of the canvas.
Bottom or floor type. In this case, the door moves with the help of rollers along rails bolted to the floor, as in compartment cars. Here, it is not possible without the presence of an upper guide, which helps to maintain the hinged door and guarantees its stability. But the rail, placed on the floor, is subject to the penetration of dust and foreign objects.
Self-assembly of sliding doors
To do their own installation, you should adhere to the following recommendations.
- Preparation of basic materials. The parameters of the canvas should exceed the height and width of the opening by several centimeters. The guides are selected with a length twice the length of the door and with the inclusion of an additional 5 cm. You will need tools: a screwdriver, a drill, self-tapping screws, corners (brackets), door fittings, a building level, a square, a pencil, glue (epoxy).
- Canvas assembly. In order to do the assembly with your own hands, you should have: a timber beam (in a section of 4x4 cm), a door leaf, platbands, a rack, an attachment mechanism, grooves and “legs” for an “accordion”, a locking device with handles.
The frame made of timber is connected by the thorn-groove method, smeared with glue for reliability. A canvas of glass, wood, MDF, plastic, and other materials you like is inserted inside the resulting frame. - Preparation for installation. The mechanism with rollers will work properly on the door guide installed on a flat floor. If the canvas is hidden in the wall cavity, it is equipped with GKL. In such a "pocket" guides are attached, and the door will move inside the wall.
- Markup. It consists in measuring the height of the door and then adding 20 mm to the resulting figure for a gap. After establishing the height of the device with rollers and guides, it is required to find out the sum of all terms.
- Installation of guides. First you need to fix the upper rail, then the lower one.
Taking into account the gap between the guides and the wall surface, it will be possible to achieve unhindered movement of the web along the rails. - Installation of the mechanism with rollers. This must be done on the most massive section of the door. Most often, the rollers do not need to be embedded in the door leaf. But with the help of a chisel, you can level the gap between the flooring and the moving door.
- Finally, all elements are connected. To do this, the door with rollers is inserted from the side, and a limiter is placed. With two hands, this work is easier to do.

Possible errors during installation
For those who dared to install the door with their own hands, expert advice will help to avoid some shortcomings.
- Work must begin on the site put in order. To do this, move away from the wall or completely remove furniture that prevents free movement.
- As an "eye" you need to use the level. With an imperfect floor plane, it is worth focusing on the ceiling, since the structure will be held on it.
- You should not buy heavy canvases. This will avoid a possible fall, for example, of an installed solid door. It is better if the full-bodied door is lightweight.
- Correct counting of the number of clips is important. For a typical opening, they will need from six pieces and two more for each element of the "bellows" of the accordion door or the "cover" of the book.
- The most reliable rollers for doors are made of metal, not plastic. Plastic wheels are not durable.
- It is forbidden to attach roller mechanisms to suspended ceiling structures. Ideally, acceptable ceilings have a concrete, brick, or wood surface.
Do-it-yourself sliding compartment doors will serve the inhabitants of the dwelling for a long time with special care for the roller mechanisms. For ease of movement, they must be regularly lubricated with a silicone agent (it is used for car locks). Elements are covered with a special syringe with a mass, which then move easily and without creaking.
The cleanliness of the canvas is maintained by simply wiping with a rag soaked in a solution of a household detergent.
 Masonry mortars for brick kilns
 Why do the windows fog up in the apartment
 Construction and schemes of brick ovens
 How to lay paving slabs: tips and tricks
 How to drill bathroom tiles
 Monolithic slab on coarse soil
 Which electric heater is economical