How to install an interior door
The decision to replace the old interior door can be postponed for a long time by the owner of the house until “tomorrow”, because having a desire to carry out this procedure on his own, he does not have knowledge of the installation nuances and confidence that he will be satisfied with the result. For high-quality and trouble-free installation of the door, the newly-made master must be guided by the advice of professionals with extensive experience in this field. This article contains all the important subtleties of choosing and installing an interior door, detailed photos and video instructions are attached.
The market for interior doors is full of variety, the quality and nobility of the appearance of the door often corresponds to the price. The cheapest doors differ from, first of all, expensive materials from which they are made. The door leaf exists in the following types:
- From fiberboard. These are canvases, which are a wooden frame sheathed with a laminated fibreboard. The advantages of such doors include light weight and the lowest cost on the market, but this affects the low suitability in everyday life: such doors have high sound transmission, they can deform from moisture, and from a careless push with a solid object they can remain with an ugly hole.
- From MDF (finely dispersed fraction). These are medium density fibreboard doors. They are the most popular on the market today, due to their average cost combined with good quality: such doors do not swell from moisture, are wear-resistant to scratches and rubbing, have good sound insulation and will last a very long time.
- From wood. These are the heaviest and most expensive doors, but they are the most environmentally friendly and beautiful, thanks to the rich decorative possibilities. Also possessing both durability, and excellent sound insulation. The choice of wood species from which the doors are made is very wide, it can be oak, ash, and even exotic polysander.
Door frames are made in pair with canvases from the same materials and also have their own characteristics. For example, a box made of fiberboard, although it has a completely trustworthy appearance, is very inconvenient and plastic to install, and from the frequent opening and closing of the door, the colored film peels off from it in places where it is touched by the canvas. Wooden boxes are sold without any external finish, they will have to be painted by yourself, but they can be decorated with wood carvings and varnished.
The market for interior doors is so wide that, despite the strictly defined standards of manufacturers, you will surely choose a door for an existing opening without any problems. Russian hinged doors are made from 600 mm wide in 100 mm increments. At the same time, doors brought, for example, from France, will have lengths from 690 mm in width in increments of 100 mm.
As can be seen from the table above, when choosing the width of the door leaf, it is necessary to take into account the width of the frame, which should fit freely into the opening, as well as the evenness of the bare opening: if it is uneven, then it is necessary to choose the width of the door leaf, based on the width of the opening itself. If this minimum width is, for example, 89 cm, then the most successful door for installation will have a width of 80 cm. It will not be possible to insert a wider one into such an opening, and a narrower one will be unreliable.
If the standard for the height of doors in a residential area is obvious and stable: 2 meters from the floor, then not all doors in the house must be the same size in width. In accordance with common standards, the width of the door varies depending on the purpose of the room to which it leads:
- a door from 60 to 120 cm should lead to the living room.
- the door leading to the bathroom should be no narrower than 60 cm.
- the kitchen door should not be narrower than 70 cm.
If the owner of the dwelling has a desire to increase or decrease the door opening, then he can do this without obtaining additional permits, but without violating the strength and stability of the wall.
In stores, sellers offer a choice of several types of door configurations. The maximum of them is a door block, that is, doors ready for installation, they come with an assembled box with hinges. The master will only have to cut the sidewalls to the height, set them evenly and fix them. And vice versa, the minimum equipment includes only the door leaf, the frame and lining will have to be bought separately, as well as hang the hinges and file the corners and connect it together.
If you are installing an interior door with your own hands for the first time or do not have a carpenter's miter box available to properly cut the corner, consider the first configuration option. Despite the highest price, you will save your nerves and time.
Step by step installation of interior doors
There are many subtleties in the installation of an interior door, the consideration of which will determine how long the door will last to the delight of the owner-master. The most important nuances will be presented in a step-by-step diagram in the photo and video.

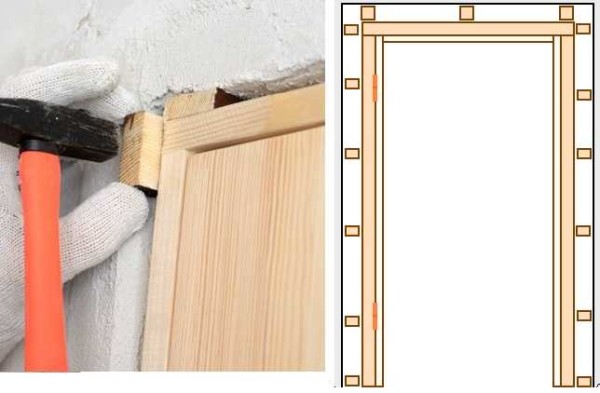
One of the most crucial moments affecting the quality of the result is the assembly of the door frame. It consists of two long posts located on the sides of the doorway and one of the shortest crossbars at the top, called the lintel.
Connection methods.
There are at least two ways to implement the connection of racks and lintels with each other:
- At an angle of 45°. This is the most aesthetic option, but also the most difficult. It is necessary to cut the beams so correctly at the required angle that no gaps appear when joining the beams. To achieve such high accuracy, you can use a special tool in your work: a carpenter's miter box. An important nuance is that when sawing a laminated material with a hacksaw, the blade leaves small but noticeable chips on it. To avoid this, only well-sharpened tools should be used.
- Butt at 90°. This option is much simpler, but will not look in delicate and classic interiors.
Before installation in the opening, it is necessary to dock the door frame on the floor to check the correct connection. If defects in docking are noticeable somewhere, you can eliminate them with sandpaper fixed on a bar.
Determining the dimensions of the box.
Another important nuance is that the racks can often be of different sizes. This has the right to be due to the unevenness of the floor in the opening. You can determine whether there are differences between the right and left sides of the opening using the building level. If the floor is perfectly level, then the racks will be the same. If there is a deviation, then it must be taken into account: make one of the racks shorter. Despite the fact that the deviation can reach only a few millimeters, this is enough to warp the future door.
Also, when calculating the height of the racks, it must be taken into account that the racks should be 1–2 cm higher than the door leaf (including saw cuts). A gap of 1 cm is made if a rug is not supposed to be under the door. Accordingly, if a carpet is located under the open door, then the gap should be increased. Also, gaps are necessary for normal ventilation in the room. Once again, pay attention: the height of the rack is measured along its inner part - from the bottom edge of the cut. The prepared rack must be used in the doorway.
Next, work is underway with the lintel. It must be sawn to length and sawn from both sides (if the 45° joint option is selected). It is important that the lintel is long enough to ensure the difference in the width of the frame and the door leaf, between which a certain gap must remain. The minimum gap is 7 mm, but it can be more. This minimum gap is necessary for the installation of hinges - 2 mm, and 2.5–3 mm are considered compensation gaps, since any interior door, regardless of its constituent material, can change its dimensions. In damp rooms, there is a high risk of door swelling and by large amounts, in such cases the gap must be increased in order to avoid trouble with the operation of the door in the future.
Conclusion on the minimum gaps when installing interior doors:
- on loops - 2 mm;
- top, bottom and sides - 3 mm;
- below - 1–2 cm.
Box assembly.
Regardless of what material the box consists of and how it is connected, holes for fasteners in the opening are pre-drilled. This is done in advance so that the material does not break during fastening. The diameter of the drill should be 1 mm smaller than the diameter of the self-tapping screw.
The box is folded, 90° angles are set. The drill drills holes in the uprights and the lintel. This is where a helper will come in handy. If the work is done by one person, a correctly exposed box can be temporarily fastened with two transverse bars at the top and bottom. This will save the master from correcting errors.
If the connection is made at an angle of 45 °, three holes are made on each side. Two are located on top in a centimeter from the edge, and one on the side - in the center. The connection is made with self-tapping screws, the direction of their installation is perpendicular to the connection line.
If the connection is made at an angle of 90 °, then just two holes are drilled from above, the drill is directed exactly down.
Often the door leaf is hung on 2 hinges, but more of them can be used, depending on the severity of the door and the reliability of the hinges themselves. They are installed at a height of 200-250 mm from the edge of the door leaf. If a wooden box and a door are used, it is necessary to choose a place so that the loop does not fall into the knots.
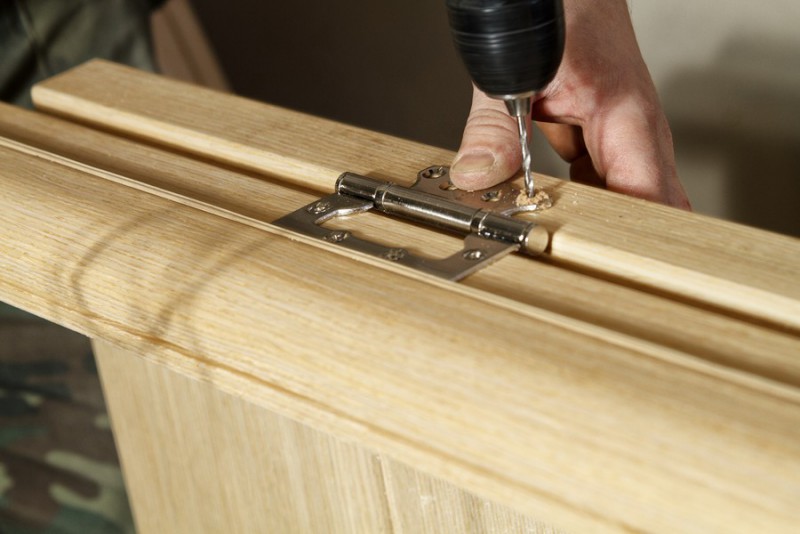
First of all, the hinges are attached to the door leaf according to the following instructions:
- The loops are applied to the place chosen on the canvas and outlined either with a finely ground pencil, or, as experts advise, with a knife blade. The knife allows you to outline the loop more accurately, respectively, the gaps between the suspended door and the frame will be smaller.
- If the door is not fiberboard, then inside the delineated space, part of the material is removed strictly to the thickness of the hinge.
- Next, a loop is installed in the prepared recess. The plane of the hinge must not protrude from the plane of the door leaf.
- The inserted loop is fixed with self-tapping screws.
- The door leaf with fixed hinges is placed in the assembled frame, the necessary gaps are set: 5–6 mm from the side of the hinges, 3 mm each from the side opposite to the hinges and between the leaf and the lintel. When the gaps are set so that they do not go astray, the door leaf is fixed with wedges. At the same time, the canvas is set exactly in the vertical and horizontal plane.
- Further, the places on the racks are marked, in which the reciprocal parts of the loops will be located. Perhaps for this procedure, in certain circumstances, it is convenient to remove the loop already installed on the canvas and then install it back. In the racks, a notch is also made inside the marked area, deep enough so that the loop does not extend beyond the plane of the rack.
More information on how to hang the door with your own hands is described in the video.
 The door frame is installed in the opening in the assembled state. This task is extremely responsible. Before placing the box in the opening, it is necessary to beat off the falling off plaster, cut off the protrusions. If the surface of the wall crumbles easily when touched, it is treated with a deep penetration primer with an astringent effect. Large holes in the opening are covered with plaster. With the installation of the door in the prepared opening, there will be no complications.
The box is exhibited without a door leaf. It must be oriented strictly vertically. For which, during the installation process, not only a building level is required, but also a plumb line, since it has no errors.
Temporary spacers are installed on the floor to prevent the box from skewing, bevels are placed in the corners, giving a high degree of rigidity. In order for the door to swing open completely, it is installed flush with the wall.
After accurately determining the position of the box, it is fixed. This is done using mounting wedges. First, they are placed on both sides of the lintel, then above the racks. This allows the position of the box relative to the doorway to be fixed. Next, the verticality of the racks in two planes is re-checked, they should not be tilted either forward or backward.
Then the wedges are installed at the bottom, and then after 50–60 cm, it is still necessary to check the accuracy of the position of the box. An additional transverse bar is wedged in the middle. It is important to check if the elements of the box are bent in some places, if necessary, correct. The box is then fixed.
There are two ways to mount the box. You can mount it straight through to the wall, you can fix it with mounting plates. The first method may not look aesthetically pleasing, due to the presence of self-tapping screws on the rack plane, but this method is the most reliable.
For an interior door, two twisted self-tapping screws into the cutouts for the hinges and two self-tapping screws on the other side - under the plate of the counterpart of the lock are quite enough. Additional holes are drilled in the cut plates. They are made so that they do not coincide with the holes for attaching the hinges or the counterpart. It is necessary to ensure that the head of the self-tapping screws is recessed deep into the surface, otherwise it will interfere with the installation of the hinges and lining.
The video shows the installation of an interior door according to this scheme. It also indicates several subtleties associated with the installation of the door frame.
It happens that such a quantity of fasteners seems insufficient in terms of reliability, then the holes are drilled through and closed from above with decorative washers matched to the tone. For convenience, there is a special MDF molding with removable slats. It differs in the installation of fasteners: it is installed in the prepared groove and closed with a bar.
You can install fasteners in a different way - secretly, so that the fasteners are not visible. For this, mounting plates are initially attached to the back of the box. To install an interior door in terms of reliability, there will be enough plates used for.
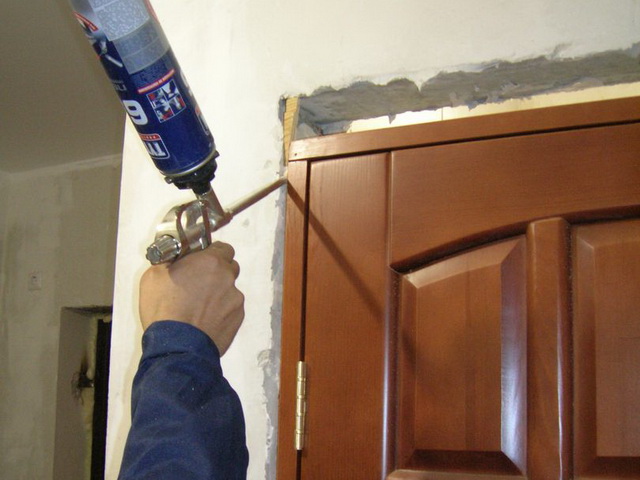
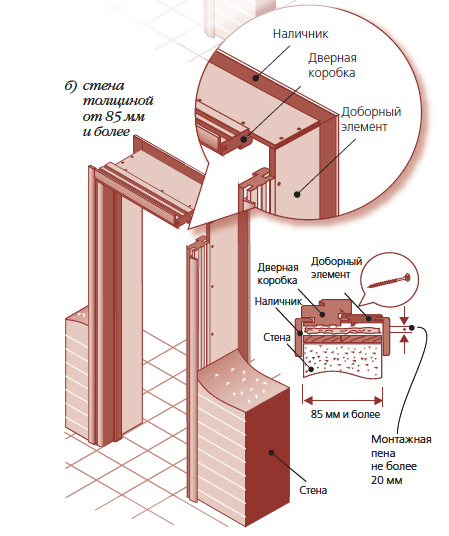
The gaps formed between the fixed box and the wall are filled with mounting foam. The wall is wetted with water from a spray bottle for better polymerization of the foam. The foam is squeezed out in such an amount that 1/3 of the gap space remains free, it will be filled after the foam hardens. If you overdo it with foam, it can deform a fragile door frame. To prevent this from happening, you can install temporary spacers in the opening of the box.
The exact time of polymerization of the foam is indicated on the box, after it the spacers are removed, the door leaf is hung. The operation of the door is immediately checked.
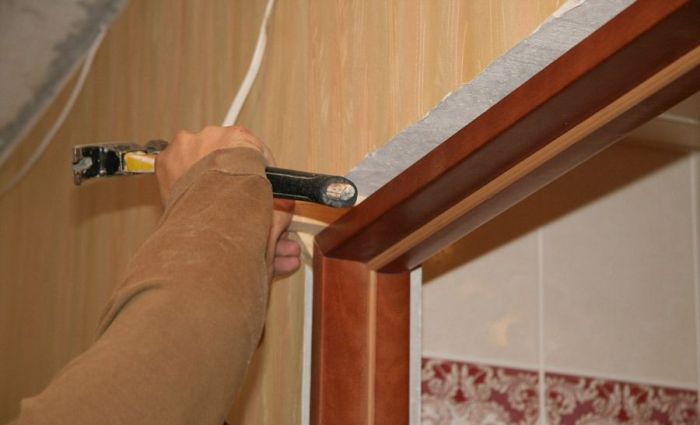
Finishing work is carried out next: platbands and slopes are fixed, as well as extensions, if necessary.
There is nothing super complicated in installing an interior door, it is easy to do it yourself, following the algorithm described above. To assimilate the knowledge gained, we also attach a video instruction from door installation specialists.
 Masonry mortars for brick kilns
 Why do the windows fog up in the apartment
 Construction and schemes of brick ovens
 How to lay paving slabs: tips and tricks
 How to drill bathroom tiles
 Monolithic slab on coarse soil
 Which electric heater is economical