How to make the outer corner of a ceiling plinth in different ways. How to make a corner of a ceiling plinth: features and methods of forming corners, making a corner with and without a miter box Ceiling corners how to make beautifully
The ceiling repair is completed with the use of ceiling plinths. Trimming them is not an extremely difficult task, but it does require some skill and accuracy. We will tell you how to cut ceiling moldings using a special tool - a miter box. Since it is not available in all homes, we will also consider Alternative option, in which you can do without it.
And now - about everything in order.
What tools will you need?
- Miter box - this aluminum, plastic or wooden professional carpentry tool has the shape of a groove in the shape of an inverted letter P. With its help, the material can be sawed at the required angle. Usually it is mounted on a table or workbench. It is safe and easy to use;
- An electric miter saw that replaces a miter box. Provides high cutting accuracy;
- An electric jigsaw with which you can;
- A sharp and well-sharpened knife for processing foam baseboards;
- A saw for manipulating wooden baguettes or a blade - when working with all others, including foam and plastic.
Miter box for cutting skirting boards
Cutting with a miter box
The use of a miter box is justified when the room has relatively smooth corners and walls. To cut the corner correctly, the part in which the cut is supposed to be made is placed in the miter box, and a saw is inserted into the guides of the tool. Remaining motionless, the part allows itself to be “cut off” at the required angle.

For fillet cutting to be effective, it must be in close contact with both surfaces at the same time. This is possible if it is pressed tightly against the wall of the tool with a section closer to the one working.

Let's say you need to cut an angle of 45 degrees. First of all, the baguette must be positioned correctly in the miter box.


Cutting sequence:
- Having determined the direction in which the cut will be made, cut off the corner;
- We put the cut out sections together, we get two angles: external and internal;
- Applying the miter box to the ceiling, we check how even the cuts are. If necessary, you can correct some things with a knife or use the services of putty.
Cutting without a miter box
Often, it simply doesn’t make sense for a professional to purchase this tool for one repair. You can completely do without a miter box, with the help of a pencil, a sharp sharpened knife and a good eye. How? There are several ways here.
Method one: prepare something similar yourself. To do this, you need to put together a tray using three planks, then make a cut at an angle of 45 degrees, and to facilitate further actions, make markings using a school protractor or a square.

DIY miter box
Method two: A paper or cardboard template is cut out and an approximate line is drawn on it. In this case, when knocking together planks at an angle of ninety degrees, you will no longer need three, but two! How are corners cut? We put the baguette into the analogue of the tray we prepared so that its position corresponds to the one with which the plinth will be fixed to the ceiling, then we position the tray along the edge of our standard. Next, you should cut the baguette along the line drawn on the standard, holding the cutting tool in a vertical position.

Another method using a random tray. It can even be imitated by a table moved close to the wall, or at least by the corner separating the wall and the flooring.

Cutting corners:
- We mark the expected angles on the ceiling and wall, as well as on the fillet itself, focusing on an imaginary line cutting both parts of the baguette;
- We install the plinth in the tray in the same way as it will later be fixed to the ceiling, and cut it using a knife or blade held in a strictly vertical position.
How to cut without any tools at all?
In this case it is necessary:
- Make the necessary marks on the baguettes;
- Connect the edges of the baguettes with the marks using a regular ruler. In the future, trimming can be done by already taking measurements at the top;
- Having placed the section intended for trimming on the table with the area that will join the ceiling, we cut it at a 45 degree angle. The need for adjustments will be much less in this case;
- The above steps are repeated for the outer corner.

Have you noticed that there are no special means we didn’t need to: we just need to tune in to the fact that there may be a need for adjustment.
How to make the correct docking?
If after gluing part of the baguette there is some distance left to the corner, you need to think about how to avoid making a mistake - a small margin will not hurt. First, it is better to cut off a piece with a good margin of about 10-15 cm. Then, having cut off the corner using any convenient method, try it on a dry surface. To do this, you should attach a bar to the ceiling and mark the point where the shortening border will pass. We cut at right angles.

Equally important is the correct alignment of the corners. Finished skirting boards are usually fixed at an angle slightly less than 45 degrees, so there may be inconsistencies between the cut edges and the appearance of gaps. Here, the initial cutting of the corners is followed by dry, as precise as possible joining of the skirting boards on the ceiling itself. Problems usually arise when using wooden and plastic materials.

After completing the rough joints of the fillets, either screw them in, and then, if necessary, use putty and then seal all existing seams.
Installation ceiling plinth Only at first glance it seems like a very simple task. In fact, you may encounter small and not so small problems that can not only exhaust you, but also completely discourage you from doing repairs. One of these problems is joining the ceiling plinth in the corners.
Quite a few copies were broken by ordinary apartment residents over the question of how to make the corner of the ceiling plinth, because it cannot simply be cut at an angle of 45°. What to do in this case? Let's turn to professionals for advice.
How to make a corner of a ceiling plinth, how to properly join and cut the plinth
Yes, the main and most insidious nuance in the technology of installing ceiling plinths is how to properly cut the plinth and join it at the internal and external corners. The fact is that, unlike ordinary skirting boards, ceiling molding It is attached to the base at an angle of 38-45°, which makes it difficult to make a classic 45° cut at the joints. On the inside, the cut edges do not meet, leaving gaps.


But these are all complex professional lyrics. How to make a corner of a ceiling plinth at home? The easiest way to work is with foam accessories. First of all, measure the angle between the walls. If it's 90° or so, cut the edges at a 45° angle. Do the same with the second cut. For uneven joints between walls and ceiling, the corner radius is divided by two. Do not confuse the parts with each other: the baguette that will be glued on the left should have a cut on the right side, and the right fillet on the left.
To create an internal corner of the plinth on the ceiling, its lower part should protrude above the upper; for the external corner, the opposite is true. Thanks to their soft and pliable texture, it is not necessary to adjust polystyrene foam fillets to each other, but you will have to tinker with plastic or wooden ones. After making the side cuts, try the planks on the ceiling and, if necessary, cut them in accordance with the direction in which the accessory joins the surfaces.
After rough joining the ceiling skirting boards, screw or glue the fillets to the ceiling and wall, and then seal the seams.
How to cut corners of ceiling plinths, tools for trimming and cutting corners
To cut the corner of the ceiling plinth, you will need certain tools. If you want to make joints as well as a seasoned repairman, then an electric miter saw or miter box will be useful to you. With the help of these devices it is possible to achieve high cutting accuracy. There is no need to make any effort. You just need to set the necessary parameters and lower the sharp saw blade onto a plastic or wooden surface.
You can trim the ceiling plinth more economical materials such as a hacksaw or a hand miter box. A simple saw is very cheap, and it is extremely easy to operate. The only drawback of this device is its roughness. There is always a risk of spoiling the material. If you bought plastic or wood of poor quality, then during operation the product may begin to crumble or delaminate into fibers.


A jigsaw will help you make a corner on the ceiling plinth without burrs. The advantage of this tool, in addition to high accuracy and efficiency, is also ease of operation. The jigsaw can be set to any direction of movement and make the highest quality cuts.
But these are all products that help solve the problem of how to join a ceiling plinth made of wood or PVC. To work with polystyrene foam, it makes no sense to use such a complex technique. An ordinary construction knife will do here. The main thing is that it has a well-sharpened blade, then you will be able to make a high-quality cut without tearing or delamination of the material.
Still haven't decided how to cut the ceiling plinth? No problem. In stores you can find fillets already prepared for joining in the corners. In this case, the opposite principle applies. When working with such a plinth, you need to make not oblique, but only straight cuts to connect the parts frontally. True, the cost of such accessories is higher compared to classic ones.
In order to start cutting the corners of the plinth, you need to acquire a tool such as a miter box. This device adjusts the desired angle for cutting with a mounting knife or spatula. Its dimensions depend on the complexity of the work being done. To install a plastic structure, it is enough to use miter boxes with low slopes of up to 90 degrees. The most difficult point here is, perhaps, joining all the elements so that there are no gaps between them. First you need to make a sketch. The plinth is placed directly on the wall. If you don’t have a miter box on hand, you can get by with a regular stencil. The photo shows the process of cutting a small piece of foam with a knife. 
How to make a corner on a ceiling plinth
In order to make a corner on the ceiling plinth, you need to get two important elements. This is the material you will use to glue the ceiling, as well as a measuring ruler with which you can measure the corners on the ceiling. If the wall is smooth, then, as a rule, no special problems arise with measurements, but if there are gaps on it, then you cannot do without improvised means. It is better to pre-treat the corners with sealant; sometimes painting may be required. It is important to remember that you first need to decide on the angle of the product, and then carry out the following operations, such as cutting out a ceiling corner. In the diagram you can see a hint on how to make corners correctly. 
Ceiling baguettes
Ceiling baguettes are special decorative strips for the ceiling, which can be decorated in various elements. Such a product can give the surface a beautiful aesthetic appearance. Most often, the baguette acts as a cornice and is used in theaters and other buildings of cultural education. However, now you can buy varieties of it in stores for home use. Most often, the product acts as an additional element. Its design can be different, both the inner corner of the plinth and the outer corner of the plinth. Baguettes are recommended to be installed by experienced repairmen.
The figure shows one of the types of ceiling baguettes. 
How to cut ceiling skirting boards in corners
In order to cut ceiling skirting boards in corners, you need to have several important building materials with you and follow certain important rules:
- Use a pencil to measure the required length of the ceiling in which you are going to lay the plinth.
- Using a miter box, you need to measure the length to which you will lay the corner of the plinth and cut the corner.
- draw up a rough layout with length measurements and cut directly with a mounting knife.
Miter boxes can be purchased at any hardware store in your city.
In the figure, mark the area whose corner needs to be trimmed.
Watch the video for more details:
Ceiling fillets
Ceiling fillets are now gaining wide popularity due to their ease of installation. To begin installation, you need to measure the perimeter of the room using a regular ruler. We divide the area by approximately 2, depending on the area of the room itself. You need to decide how many fillet strips you need to take. You can glue them in two ways: using glue or putty. In the first option, you will need a flat surface of the wallpaper; for the second, we cut the corners of the PVC baseboard with a stationery knife, and then strengthen the products with putty. 
How to cut a ceiling plinth
In order to cut the ceiling plinth, you need to use a miter box. If you resort to professional repairs, then you can buy the simplest option with a narrow range of corner radii, approximately from 45 to 90 degrees. In order not to be mistaken about how to cut the plinth, draw a layout. This can help, for example, when installing a plastic product. It is cut off with the very edge of the miter box; if there are uneven edges, they are sawed off with a mounting knife. For plastic skirting boards, it is advisable to measure out several pieces of stucco molding, and then start separating them. You can use a regular saw to cut the ceiling plinth. 
What are corners for ceiling plinths?
Corners for ceiling plinths, or, as they are also called, baguettes, are special pieces of plastic that have a decorative finish. In everyday life you can also come across such a name as ceiling cornices. They were originally used for decoration in buildings of cultural importance, but over time their use expanded to simple home decoration. For corners, it is also necessary to first measure the length of the ceiling. Corners are most often made of polystyrene and have a dense texture and structure. In order to install such baguettes, concentration and attentiveness are required. Installation is not much different from conventional ceiling finishing.
Corners for skirting boards come in various shapes. Their main feature is decorativeness and protection of the outer corner. 
How to join a ceiling plinth
We will give you some tips on how to properly join ceiling plinths. And it doesn’t matter whether you have a narrow or wide ceiling plinth. In order to start joining each piece, you need to place one piece of foam baseboard on the diameter of the wall and draw a line with a pencil to the other corner. This way you can measure the joint between the ceiling plinth and its gusset. Next, you need to place the fillet directly on the corner (not on the mark!), and use a regular stationery knife to cut it. For a successful connection, use sandpaper blocks. The corners are assembled directly into a monolithic structure and of the same color. 
What is a wooden ceiling plinth
Wooden ceiling plinth - variety decorative finishing for the ceiling, which allows you to hide visible unevenness of the wall and add attractiveness to your room. In addition to standard plastic products, there are also wooden ones. You can get them at the warehouses of logging factories, or at a regular hardware store. You should only choose one that will match the decoration of your home. Be sure to purchase nails or screws to hold the wooden ceiling cornice in place. Installing these elements takes some time, but the installation process itself is not as complicated as it seems.
You need to carefully file down the pieces, cut out the corners, and process the areas of future joints. You will need various tools and accessories to cut wood. The joining technique is practically no different from other types of similar products. The main thing is to carefully read how to calculate and how to adjust all the joints. Then the connection will proceed without problems. 
How to join skirting boards
In order to begin the process of joining skirting boards, you need to prepare several tools:
- pencil for measurements;
- docking stationery knife.
First, measure the length and perimeter of the ceiling and mark it with a pencil. If your surface is flat, you can get a regular miter box. The device is used when laying skirting boards at small angles, approximately 90-120 degrees. One strip of the product is placed under the miter box and cuts are made with the help of a knife in order to form grooves for the arrangement. A docking utility knife is used if the corners of the ceiling are not even. 
What is a foam baseboard?
Polystyrene has long established itself as a good construction material, due to its simplicity in installation conditions. Found for ceilings wide application namely the baseboard is made of polystyrene foam. Such products are now readily available and can be bought at absolutely any construction market. Polystyrene foam has good decorative properties. This type of plinth is usually supplied in pieces. To secure it, several objects are used, such as a miter box, a stationery knife. In order to measure the length, you can get by with an ordinary well-sharpened pencil 
How to cut a corner for a ceiling plinth
How to cut a corner? In order to begin installing ceiling plinths, you first need to know how to cut the corner of a ceiling plinth. Angles are measured using protractors and a marking pencil, with which we can calculate which side of the corner we need to apply the piece on. If we have a flat surface, we do this with a miter box at small angles, and then, using a stationery knife, we cut out the designated corners. If it is a plastic plinth, you need to draw an approximate diagram in order not to make a mistake in joining the elements. Circumcision must be done carefully 
How to cut a baseboard
In order to know how to cut a baseboard during installation, you need to have a miter box (for smooth surfaces) or a stationery knife, which is used for uneven corners. If you have a plastic product, it is best to use a special hacksaw for metal, then cutting will be much easier. It is necessary to trim the baseboards carefully, without pressing hard on the knife or saw, so as not to cut your hand instead of the corner of the baseboard. The miter box is used only for flat surfaces. The product is most often cut at small angles, at a distance of up to about 90 degrees. A stationery knife is a universal solution. When cutting, it is advisable to avoid places with cracks. 
What is a miter box for ceiling plinth
A miter box for ceiling plinths is the most important tool for processing plinths in the ceiling. It is distinguished by the presence of cutting tips on both sides under different angles from 45 to 90 degrees, which are located, as a rule, on the left and right sides. Using these tips, the plinth is clamped on both sides and sawed off cutting tool. In order to attach the parts of the plinth, you need to use a pencil to draw the necessary corners for joining. The marked product is inserted into the miter box so that it stands stably on its surface. The plinth is held with one hand, and with the other, from another angle, you need to cut the material. 
How to glue ceiling plinth
In order to know how to glue ceiling plinths, you need to follow several rules:
- always start from the corners of the room, they are the easiest, and then you can proceed to the rest of the room (you need to glue the corners so that no gaps form);
- For plastic plinths, finishing putty is used for stucco moldings.
Places for fastening are moistened with soil or plain water. After the putty has dried, it is recommended to seal the cracks on the surface. To seal them, sealants of various contents are used, but it is best to take an acrylic-based substance. For small room One package is enough. Installation with sealant is similar to putty. 
good design decoration The room is distinguished from others by the compliance of all elements with the chosen style, the harmonious fit of decorative items, smooth visual transitions of the floor, walls and ceiling. One of the smoothing options is represented by gluing the baseboard (fillets, baguettes). Before self-installation, it is useful to know what fillets are made of, the procedure for performing the work, and how to cut a corner on the ceiling plinth during installation.
Skirting options
The shelves of home improvement stores are filled with a variety of baseboard options. They differ in materials of manufacture, color and texture solutions, and preferred conditions of use. The main product groups are presented:
- Polyurethane. It is characterized by resistance to impact loads and good elasticity, which allows it to be used in complex structures. The disadvantage is represented by sensitivity to change temperature conditions in the presence of high humidity.
- Polyvinyl chloride (PVC). Aesthetic material, resistant to conditions of high humidity and temperature changes. Recommended for decorating bathrooms, toilets, open verandas(loggias). Increased electrical static is noted, but given the height of placement, it does not affect user characteristics.
- Polystyrene (foam plastic). Comfortable, lightweight material. The products have a variety of shapes, textures and patterns. Moisture resistant. Despite all the advantages, it is brittle and requires increased care during installation.
- Tree. The natural texture of natural material allows it to be used in almost all rooms of an apartment or house. But as time goes by high humidity, even with special treatment, provokes changes in shape. When installing, take into account the relatively heavy weight of the product.
Photos of options, as well as collections of ceiling borders, can be easily found by visiting the websites of domestic and foreign manufacturers.
Advice! When choosing suitable fillets, you should take into account the type of finishing of the ceiling and walls, the size of the room, and the design style of the house. A baguette is needed to smooth out the transition between planes, hide flaws, but not draw attention to itself.
Tools and improvised means
Before starting work, the following should be prepared in advance:
- accessories for measuring and marking – construction tape, stationery(pencil, protractor, ruler, marker);
- tool for “dissolving” – a saw for wood or metal with a fine tooth, one of the variants of knives (construction, office or sharpened household);
- container for preparing the adhesive composition;
- putty knife;
- rags.
Attention! The correct formation of corners when installing the molding will be facilitated by the use of a special device - a miter box.
Features of the device
A miter box is a simple carpentry device in the form of a reverse channel with counter-cut channels at common mounting angles. The professional device is equipped with a rotating part that allows you to set any angular values. Can be made of metal, plastic or wood.

Before cutting the corners of the ceiling plinth, mark the workpiece. After this, it is placed inside the miter box, marked with a cut point opposite the angled channels. By inserting the tool into the slots of the miter box, they cut wooden, foam or PVC blanks. In this case, care should be taken to avoid crumbling the edge of the workpiece. Repeating the procedure with the joined element in an opposite order guarantees the accuracy of the final assembly, since the ceiling plinths must be joined tightly in the corners.
DIY miter box
If it is not possible to purchase a factory-made miter box, then after spending a little time, make it yourself. For this you will need: three thirty-centimeter boards, screws or nails, a hammer, a hacksaw with a thin cutting part, a plane, sandpaper. The assembly is presented as follows:
- the planes of the boards, which are subsequently located inside the structure, are leveled with a plane and leveled with fine-grained sandpaper;
- It is more convenient to fasten the side boards to the central one with self-tapping screws (it is easier to maintain a position of 900 degrees, but if they are absent, you can fasten them with nails of a suitable size;
- on a sheet of paper with a width that allows it to be placed in a “U”-shaped structure, determine the center, and using a protractor on the edge of the sheet, mark position 450;
- The marked pattern is placed in the frame of a homemade miter box, and both sides are cut according to the marks.
Advice! The width of the side cuts should not be excessive, since the opposite will cause “walking” of the cutting part of the saw, and the ability to accurately adjust the angles will become doubtful.
Work without a miter box
When carrying out renovations in small spaces, purchasing or self-production miter boxes are not profitable - a ready-made device costs money, homemade blanks also have their own price. Methods for cutting out the corner of ceiling plinths with your own hands are presented as follows:
- Using a sheet of cardboard with markings applied using a school protractor.
- While holding the product on the line, the excess is separated. The operation will be repeated for the counter workpiece.
- When marking a sheet, the use of paper from school notebooks “in a box” eliminates the need for a protractor.
- When marking corner lines, they are guided by typographic markings.
- Marking on site is no less effective than the previously listed methods. To do this, at the junction, with an assistant, place both blanks with an overlay on top of each other. Mark the height and width of the plinth. On the table or somewhere else convenient location, separate unnecessary parts by marks.
Attention! The experience of carrying out such work indicates that an accurate fit “the first time” can only be achieved with the help of a miter box. But errors in measurements, which manifest themselves in unwanted gaps between baseboards, can easily be repaired with putty or adhesive.
Adjusting corners
Precise fitting of the molding minimizes further measures to eliminate work flaws, namely, puttying unforeseen gaps. To exclude unintentional defects, you need to familiarize yourself with how to join ceiling plinths in corners of different directions.

Inner corner mode
Before making the inner corner of the ceiling plinth, you should take into account that the texture and triangular section may well be misleading when determining the side of the cut. Using the following procedure will help prevent errors:
- The plinth is pressed to the planned installation location and a contour is drawn on the ceiling plane.
- The procedure is repeated for the opposite part of the second plinth. The marking allows you to get a docking point.
- Return to the first plinth. Pressing tightly to the installation site, transfer the docking point to it. top part. The line from this mark to the opposite part will be the first side of the cut, and the second is represented by the beginning of the baseboard. The counter part is marked in the same way.
- Using one of the above options, cut the baseboard according to the markings. In order not to confuse the directions of the cuts, the workpieces should be placed in front of you in the gluing position.
- The cut skirting boards are tried on at the gluing site, and if no defects are identified during joining, the adhesive is applied and installed.
Attention! You should not cut workpieces at an angle of 45 degrees without trying them on site. There are rare cases when the wall and ceiling planes are actually paired correctly; in other cases, the values differ from 900 by 1-3 degrees.
Cutting out the outer corner
Forming external corners makes it easier to apply markings directly to the baguette. Before cutting the corners of the ceiling plinths from the outside, hire an assistant - you will have to work in an inconvenient place and extra hands will not interfere. The sequence of actions is presented:
- The dumbbells are applied simultaneously, in contrast to marking the internal one, with one side end to end, marking a point (external mark);
- transfer the point of contact with the beginning of the wall (internal mark);
- the operation is repeated for the counter molding;
- pruning is done with or without a miter box.
Advice! If during the installation of the baguette there is a small distance left to the corner, then to form the corner you should use a workpiece with a reserve - no one is immune from errors in calculations or execution of the corner.
Features of the formation of the angle of a textured plinth
It is worth paying special attention to how to glue skirting boards to the ceiling in the corners if they have a relief shape. Many manufacturers complement product collections with decorative corner elements. They can be textured, made to fit a specific baguette, and can also be separate products suitable for many types of moldings. Installation rules are presented:
- mandatory preliminary fitting of the joints of all elements at the installation site;
- adjustment is carried out using a stationery knife, with wooden products - a saw with a fine tooth;
- special attention is paid to the quality of application of the adhesive composition - two end joints are formed in a short area.
Attention! After installation, excess adhesive should be removed immediately. If you can fix mistakes when adjusting corners with putty, then removing glue from the wallpaper will require time and effort.
- If House master does not know how to correctly cut a corner on ceiling plinths, for example, made of wood, then you should choose another molding that is easier to process.
- The fillet should be applied after full preparation. In addition to cutting corners, some materials require additional leveling, which should be carried out before installation in the planned location.
- When calculating the required amount of material, a small reserve should be provided. It is necessary in cases of errors when fitting joints, achieving precise transitions of texture or patterns on straight sections.
- If a significant reserve has been prepared, then installation should begin from the corners of the room, and subsequently straight sections are filled.
The presented video material shows one of the options for adjusting the corners when installing ceiling moldings:
Conclusion
Having figured out how to properly cut the corners of ceiling plinths, even your first installation experience will be crowned with success. The room will acquire a holistic, harmonious appearance, which will emphasize the aesthetic taste of the owners and will become the envy of the guests. But the main thing is to gain experience in home renovations, which will subsequently save the family money when creating new interiors.
Upon completion of any renovation, installing ceiling and floor skirting boards is usually the final touch. And while gluing a plinth plank onto a straight section of the wall is not difficult, many people often have problems with how to decorate a corner with a ceiling plinth.
In fact, modern polyurethane and polystyrene foam skirting boards are easy to join into corners, since they are easy to process and quite light in weight (see).
Let's figure out how to glue the inner corner using a ceiling plinth, as well as the outer one, so that it does not look foreign against the background of the overall beauty of the renovation.
Features and methods of forming the corners of ceiling plinths
You need to understand that corners in rooms are not only internal, but also external, which, in fact, is the main difficulty of our task.
However, the problem is completely solvable and can be solved in several ways.:
- Firstly, it is possible to avoid cutting the material altogether by purchasing special fittings. Corner elements for ceiling plinths are both internal and external corners attached to the corners of the room. The ends of the outer skirting strips are inserted into this corner for the plinth.. This option is the simplest and does not require any special skills.

- Well, the second option is to trim the edges of the baseboards at a certain angle, which will ensure a tight and even fit of the baseboard strips to each other. Cutting, in turn, can be carried out in two ways:
- using a special template tool called a miter box;
- manually according to markings made using a certain method.
Performing an angle using a miter box
Such carpentry tool like a miter box specifically designed for cutting various materials, which are planned to be subsequently mounted at right angles. Its design, or rather appearance may be different, but the principle remains the same.
There are variations of the tool with the ability to manually adjust the cutting angle, but the simplest miter box looks like a wooden tray with vertical slots in the walls to allow insertion of a hacksaw (see a). It allows you to perform vertical cutting at an angle of 45 or 90 degrees. If you wish, you can make something similar to such a tool yourself.
There is also a more complex tool with which you can make a corner of the ceiling plinth. It is presented in the form of a plastic tray with similar slots in the side walls for a hacksaw, but, in addition to angles of 45 and 90 degrees, there is also a slot of 60 degrees, as well as the possibility of not only vertical cutting of the material, but also with an inclination of the hacksaw blade of 45 degrees.

As for professionals, they usually use a miter box with a rotating mechanism, which allows them to fix the hacksaw at almost any angle relative to the workpiece (see). If the first two types of tools are suitable only in cases where there are even angles in the room (90 degrees), then the third is effective regardless of the size of the angles.
Instructions for cutting skirting boards for arranging a corner
How to make corners on the baseboard using a miter box when there are right angles in the room?
Simple enough:
- To do this, first insert one strip of plinth into the miter box, insert a hacksaw into the holes in the cutting tool at an angle of 45 degrees and make the cut.
- Then a second strip is inserted into the miter box to be joined to the first one, and in a similar way, only using opposite holes in the miter box, also at an angle of 45 degrees, cutting is carried out.
Note! As a result, when the joining parts of the plinth are combined, a right angle should form between them. If this happens, it means that the cutting was done correctly and the planks can be glued.
Moreover, it is of decisive importance whether you need to arrange an internal or external corner.
The cutting direction should be selected according to the following rules:
- To arrange the outer corner:

- Mounted to the left relative to the corner, the plinth strip is applied to the wall of the miter box closest to you, with the bottom side facing up. The hacksaw is inserted into the groove closest to you on the left and into the groove on the far right.
- The plank installed to the right of the corner is applied in a similar way, but the hacksaw is inserted into the near right and far left grooves.
- To glue the inner corner, cut the ceiling plinth as follows:
- The plinth strip, mounted on the left, is applied to the near side of the miter box, also with the bottom side up. The hacksaw is inserted into the near right groove and the far left one.
- The part of the plinth installed to the right of the corner is applied in the same way, only the hacksaw for cutting must be inserted into the near left groove and the far right one.
Forming the corner of a ceiling plinth without using a miter box
Now let's look at how to make a corner of a ceiling plinth if the tool is unavailable for some reason. For this purpose, a marking method is used, according to which further cutting is carried out..

The tools you will need to prepare are a ruler, a stationery knife and a corner.
So, let's figure out how to make a corner from a ceiling plinth manually:
- The corner of the room is measured, for which the corner is applied in the corner compartment to the ceiling surface. The indicator should usually be 90 degrees or so (see). If the value is higher or lower, this means that the corners in the room are uneven, and accordingly it will be more difficult to make high-quality corners of the ceiling plinth.
- Apply a ruler to the plinth at an angle of 45 degrees and, with a careful but bold movement, cut off the excess part of the plinth along the ruler using a stationery knife. If the plinth is made of durable materials, such as wood, the cutting line must first be marked with a pencil, and then the cut must be made with a hacksaw or jigsaw.
- Before gluing the ceiling plinth in the corners, you need to make sure that the cutting was done correctly by applying them to the corner in the place of subsequent dislocation.
- If the angle is not right, you will need to accurately measure its degree, then divide the resulting value in half and obtain the required angle for marking the cut of the plinth. For example, if the angle is 80 degrees, then the angles for the baseboard according to which cutting will be done should be 40 degrees.

You will need to carefully double-check the quality of the joint before gluing the ceiling plinth in the corners - a video about this procedure is recommended for viewing for a clearer understanding.
Advice! If the joining still turns out to be of insufficient quality, the plinth strips should be further trimmed, or their edges should be treated with sandpaper to an acceptable condition, and then the corner joint should be tried on again.
Thus, we figured out how to glue corners on ceiling plinths, what are the features of internal and external plinth corners. In practice, the process of arranging corners looks much simpler than in the description, and certainly will not pose insurmountable problems even for a person without experience in repairs.
You just need to show some patience and attentiveness. And before gluing the ceiling plinth in the corners, a video about which you can find on our portal will once again give you the opportunity to check the quality of the future corner joint.
The quality of the ceiling finish greatly affects the appearance of the room. That’s why they try to do everything perfectly, or very close to it. The finishing touch to the design is the ceiling plinth. They give the finish a finished and holistic look. The planks themselves are easy to install on flat surfaces: using special glue white, but problems arise with the design of corners. Without knowing how to make the corner of a ceiling plinth correctly, a lot of material is spoiled. We’ll tell you how and with what to cut it in the corners.
What is it made of and what is it called?
The very first plinths on the ceiling were made of plaster. They were cast in special molds, then installed on the ceiling using mortar. Such figured decorations were called fillets. Today you can rarely see them: they are expensive, but in appearance they are almost no different from cheaper options. And this name is almost lost.
The most popular ceiling plinths today are made of polyurethane or polystyrene. They are inexpensive, look great, are easy to install, and have a wide range of profiles and drawings. The width can be from 5 mm to 250 mm. They are used in almost any room, decorated in any style. Exception - Wooden products are most often used here - style dictates its own conditions.
There is also a similar plastic finish. It is mainly installed in bathrooms. But even in damp rooms you can safely install polyurethane strips - they are not afraid of dampness.
You need to cut ceiling plinths in corners from any material using one of the methods described below. The only exception is plastic skirting boards: You can create such a corner only using ready-made corners.
What and how to cut
Working with skirting boards from different materials involves the use of different cutting tools. When working with wooden ceiling plinths, it is more convenient to use a wood saw. All others, including plastic, foam and other polymers, are better cut with a metal blade. The result is a more even cut, less burr. Saws are usually used when working with a miter box.

When working with foam baseboards without special tools, cut them with a good stationery knife. Its blade is quite thin and even, the cut is smooth and not wrinkled. If you work with polyurethane or polystyrene with a saw, do not press hard: you can dent it.
In general, to get a little used to the tool and material, take a piece and practice on it: cutting, sawing, trimming. This way there will be fewer problems during work.
How to get the right angle
The most problems when working with ceiling skirting boards arise when decorating the corners. Since the surface of the products is complex, simply cutting at the desired angle will not work: it is also necessary to trim so that they fit together and, preferably, without large gaps. In fact, there are several ways to make the corner of the ceiling plinth ideal (or almost).
Using a miter box
If the corners and walls in the room are smooth, you can use a special carpentry tool - a miter box. This is a gutter in the shape of an inverted letter “P”, in which lines are marked for cutting at an angle of 90° and 45°. The part to be cut is placed inside, and a saw is inserted into the guides. The part is held in place and cut at the required angle.

In the case of baseboards, not everything is so simple: they must simultaneously adhere to two surfaces, so they need to be pressed against one or the other wall of the miter box. When working with ceiling ones, they are pressed against the side closest to you.
The sequence of actions when finishing the outer corner is to make a cut at an angle of 45 degrees. Place the miter box in front of you. You try on how the plinth will be positioned, determining which part of it will be attached to the ceiling. In order not to get confused and to cut the ceiling plinth correctly, place the plank that will be located on the right on the right, and the one on the left on the left.

Press the part that ends up on the ceiling to the bottom of the miter box. The second side is closer to you and raised. You rest it on the wall of the device so that it does not wobble when cutting. That is, the front part of the plinth turns away from you. Make the cutting direction as shown in the photo below. By putting the two cut pieces together, you get a protruding corner - an outer or outer corner.

How to make an outer corner of a ceiling plinth using a chair
First place the sawn parts in place “dry”, without applying glue. If the geometry of the corner turns out to be not so ideal, you can correct it a little with a knife. It is easier to cover up small errors with special putty.
The situation with the inner corner of the ceiling plinth is very similar. First, try on which side will be on the ceiling, press this part to the bottom of the miter box, rest the second part on the wall closest to you and make cuts as shown in the photo below.

And again, first try it on without applying glue, and if necessary, adjust it slightly. Then apply a thin bead of glue to both surfaces that will be attached to the wall or ceiling.
Your version of how to use a miter box correctly is shown in the video.
How to make a corner of a ceiling plinth without a miter box
Few apartments or houses have angles exactly 90°. Small deviations can be easily corrected after trying on. But not always. Then you have to mark everything “in place” - under the ceiling.
You will need a finely outlined pencil (hard - it is not so visible on the ceiling, but leaves fairly clear marks close up), a small piece of plinth, a ruler and a good stationery knife if you are working with polyurethane (polystyrene) baguettes or a metal saw for working with other materials.
Place the plinth against the corner and draw along the outer edge with a pencil. Apply to the other side of the corner and also mark. You have a cross on the ceiling, the center of which marks the place where the ceiling plinth strips should meet (look at the photo). Having placed a piece of plinth in the corner that will be glued there and resting its end against the wall, transfer the mark to it.

How to make corners on ceiling plinths without using special tools
Now take a ruler and connect the edge of the baseboard with the marked mark. If you simply put the plinth on the table and cut it along the line, the two parts in the corner will still not fit together: the inner part will get in the way. It can be trimmed later by trying it on the ceiling. The second way is to install the piece that needs to be cut on the table with the part that will be on the ceiling. And cut along the line, but holding the knife at an angle of about 45°. You will still need to make adjustments, but much less (and less likely to make mistakes).
Repeat the same operation with the second bar. Place it against the desired wall, rest the end against the adjacent wall, mark the place where the cross is drawn, draw a line and then cut it off. Adjustment is carried out “dry” without applying glue.
You repeat exactly the same steps for the outer (protruding) corner. Now you know another way to make a corner of a ceiling plinth, without a chisel or other special devices.
Using decorative corners
There is another, easiest way. For skirting boards made of polyurethane or polystyrene, use ready-made, factory-made decorative corners. They are installed in a corner, and the strips are glued tightly to them. Trimming them if necessary is very simple: a few millimeters with an ordinary stationery knife.

How to join in corners
If the installation of the first corner is completed, you can assume that you have already learned how to do almost everything. “Almost”, because you still need to learn how to connect the corners and cut the planks to length. When some part has already been glued and there is a small distance left to the corner, how can you not make a mistake with the length? The answer is simple: leave a reserve.
At first, you can cut a piece 10-15 cm longer: you will have the opportunity to redo it several times if something doesn’t work out right away. Then you make an angle in the manner described above, try it on dry, adjust everything so that the result suits you. Only after this can you place the already cut strip in the corner and mark the place to which it can be shortened. You need to cut exactly 90°. It is not necessary to use a miter box. Just try to place the knife (hacksaw) perpendicular to the surface.
 How to recognize a witch - signs that warn of evil
 Dream interpretation dreamed of shit
 How to squeeze a lemon: tips and methods How to squeeze juice from a lemon at home
 Employment agreement (contract) How to correctly draw up an employment contract with an employee
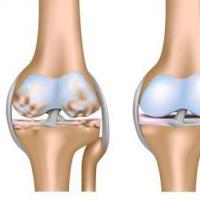 DOA of the knee joints: stages, symptoms and treatment
 Dimexide - detailed description and use at home Dimexide if it enters the stomach
 Andrey Stygar: How to make inventory profitable?