We make a lampshade with our own hands: an analysis of examples from various materials. Do-it-yourself ceiling lamps for chandeliers: original ideas and master classes in decor Lampshade with your own hands from improvised means
The lampshade of a table lamp, chandelier or floor lamp was created in order to dim the light of the lamp. However, this accessory can wear out over time, losing its aesthetic appearance. In this regard, many owners have a dilemma, throw away the working lamp or try to restore the lampshade using the old frame. There are many ways to remedy the situation with a little imagination.

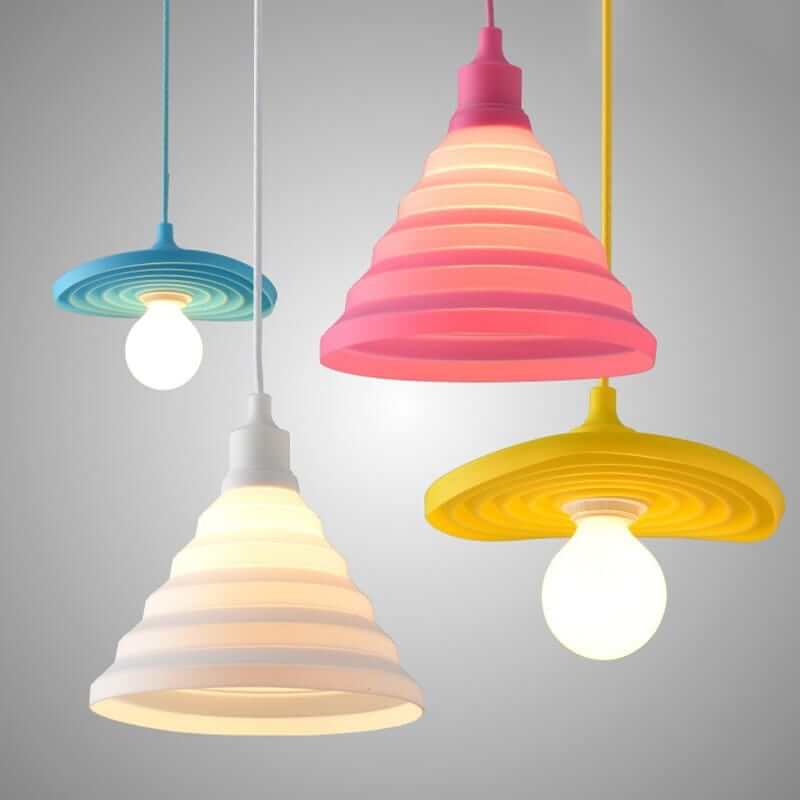
Lampshade decor with flowers

Original lampshade decor

Lampshade decoration idea

Chandelier decor: we create comfort with our own hands
Products handmade are very popular today. You can create a new lampshade for a chandelier or floor lamp from any material at hand or purchase some components at a needlework store. The simplest and most affordable materials for creativity are paper, plastic, thread or fabric. You can also create original decoration for a lamp made of old discs, natural materials - vines, shells, stones or broken glass. Fabric lampshades made of jeans, burlap, linen ribbon also look original. As additional decorative elements, you can use beads, buttons, satin or rep ribbons. This article contains interesting and unusual workshops on self-design lamps from different materials.
Below is a table showing some types of handmade chandeliers, and what materials are needed to make them.
|
Luminaire type |
Basic materials |
Short description |
Degree of difficulty |
|
Tetra chandelier |
Empty tetra bags |
From empty Tetra Pak packs, strips of 21mm and 19mm are cut out, from which hexagons and pentagons are made. The lamp is assembled using the origami technique |
|
|
Wire chandeliers |
Stainless knitting Steel and copper wire |
The easiest way is to wire the template for the lampshade in the form of a spiral. It can be a bucket or a flower pot. |
|
|
Plafond from plastic dishes |
Empty 5 liter plastic bottle Disposable plastic spoons Thermal gun |
The bottom of the bottle is cut off. The handles of the spoons are broken off, and the main parts are glued to the bottle, imitating fish scales. For this, a thermal gun is used. If desired, spoons can be painted with acrylic or spray paint. |
|
|
Disc light |
laser discs Wooden round base with a diameter slightly larger than the disk 3 metal racks Long fluorescent lamp |
A hole is drilled in a wooden base for a starter with a switch and a lamp is mounted. It is also necessary to install metal racks on which the disks will be strung. Holes are drilled on the disks for the racks, and then strung on them. |
|
|
Hanger chandelier |
wooden coat hanger 2 metal round bases of different diameters |
The smaller base will serve top chandeliers. Hangers attached to both bases different angles vertically, forming a trapezoidal shape of the lampshade. |

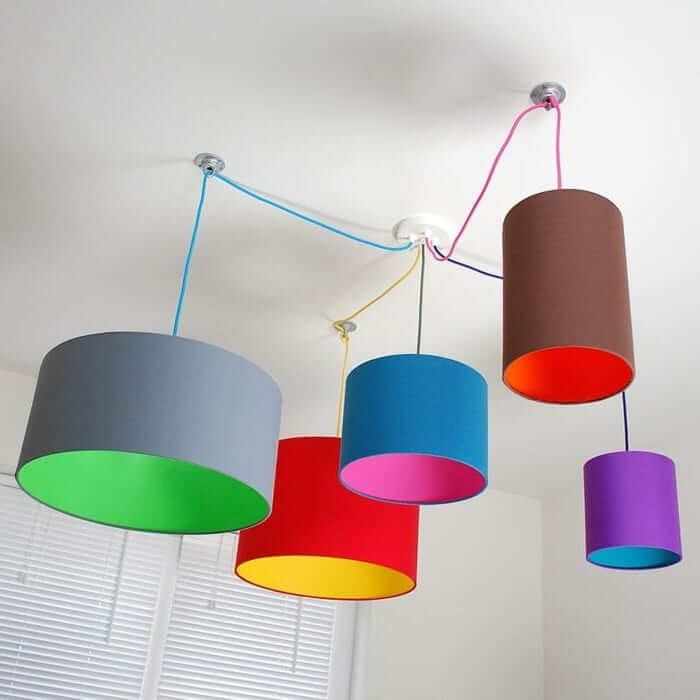
Decorating the lampshade with ribbons and beads

Lampshade decor with flowers

Original lampshade decor

Lampshade decoration idea

Lampshade decoration with accessories
Ideas and their implementation
Creating a paper lampshade is the easiest and most affordable way. Its disadvantage is the fragility of the material. For a longer service life of such a chandelier, you can use cardboard. Below are a few examples of how to create a lampshade using paper.
Ceiling-mobile
To make such a decor, you will need the following materials:
- PVA glue;
- scissors;
- thread (it is better to use nylon thread, it is much stronger than usual);
- beads;
- colored paper;
- plastic or wooden round base (diameter is selected individually).
The essence of creating a lampshade is to string various decorative elements on a thread and fasten it to the base. To do this, it is necessary to cut out various details from colored paper. They can be shaped like butterflies, hearts, birds, animals, ballerinas. Such parts are attached to the thread with glue, and several beads of different diameters are strung between them. To create a three-dimensional element, such as a heart, you need to take 3 identical blanks and glue them together.

Decorating the lampshade with ribbons and beads

Lampshade decor with flowers

Original lampshade decor

Lampshade decoration idea

Lampshade decoration with accessories
Butterfly chandelier
Materials needed for work:
- scissors or stationery knife;
- plain cardboard;
- glue gun;
- wire;
- fishing line or thin twine.
If you do not have a heat gun, you can use silicone rods for it. You can melt them over an ordinary candle.
The wire is needed to create the frame of the chandelier ceiling. To do this, take a piece of wire and roll it into a circle, securing the ends with pliers or round nose pliers. The line will act as a hanging element. It must be cut into 3 identical pieces, the length of which depends on the desired height of the fixture. The fishing line must be attached to the wire base at the same distance from each other.

Decorating the lampshade with ribbons and beads

Lampshade decor with flowers

Original lampshade decor

Lampshade decoration idea

Lampshade decoration with accessories
Next, on a piece of cardboard, you need to draw and carefully cut out butterflies of various sizes. The lower part of the ceiling can be processed with curly scissors. The cardboard itself is folded into a conical shape, and the joint is glued or fastened with a stapler. Its upper part is attached to the frame. Those butterflies that have been cut out can be strung on additional pieces of fishing line, alternating them with various beads, and fixed inside the ceiling. After turning on such a lamp, images of fluttering butterflies will appear on the walls.
Another simple decor idea is to create a chandelier from thick thread or yarn. From the materials for such a handmade you will need:
- ball with threads;
- balloon;
- baby cream;
- PVA glue.

Decorating the lampshade with ribbons and beads

Lampshade decor with flowers

Original lampshade decor

Lampshade decoration idea

Lampshade decoration with accessories
Initially, it is necessary to inflate the balloon to the maximum round shape and lubricate it with a thin layer. baby cream. This is done so that the threads do not stick to the rubber surface of the ball. Next, the thread is wetted in glue and wrapped around the ball. The winding is done over the entire surface of the balloon, leaving a small part in order to later put it on the base with the lamp. After the thread is completely dry, you can blow off or burst the ball, and you will have the original in your hands. round lampshade from threads.
A more detailed and visual performance of a lampshade for a chandelier with your own hands can be seen in the video of the master class.
Video: DIY lampshade decor
When bad weather rages outside the windows or on a long winter evening, or perhaps just in moments of solitude, you want to sit in a soft comfortable armchair with your favorite book, drink a cup of sweet tea with a pleasant companion or arrange a romantic date with your lover. At such moments, a familiar and homely interior element such as a floor lamp, a chandelier or a lamp, but always with a beautiful lampshade, will come in handy.
As a rule, floor options are located near armchairs, beds or soft sofa, and a lamp with a beautiful lampshade can be placed above the dining table or in the bedroom.

The lampshade is easy enough to make your own with my own hands, while you can be proud of its exclusivity, originality and style. Interiors with lampshades fill the atmosphere of the room with sensuality and romance, create comfort and attractiveness.

The lampshade is easy to make from any available materials, textiles, paper and decorative things (beads, rhinestones, ribbons, etc.) are quite suitable for this.
 You can improve or modernize an old lampshade using the power of your imagination and diligence. At the same time, the interior design will be filled with individualism and become truly homely. Varied Options we recommend using the lampshade in our photos.


Frame and base preparation
First you need to decide for which lamps you need to make or update the lampshade. If for the old one, then the frame should be removed and freed from unnecessary parts, if it is missing, then you should buy it ready-made in a building supermarket.

It is easy to make it yourself, with pliers and wire on hand. Frame configuration may vary. It is most convenient to make a lampshade for the base in the form of a cylinder or cone.

The choice of fabric for the lampshade
For the future product, you can use fabrics of different textures: light, hard or dense. Even wool is suitable, the main thing is the harmony of the combination with the entire interior solution as a whole. For example, a table-top version of a lampshade for a lamp is suitable for a classic bedroom, i.e. small size And white color appropriate style.


A frame made of ordinary wire is best hidden behind an opaque material. For example, cotton, taffeta or dark silk.

An important point is the choice of fabric color, as it can be warm (yellow, orange, red, etc.) or cold (blue, green, etc.).

Auxiliary materials
Fabric lampshades can be created in a variety of ways. For example, a new lampshade, which is fixed to the old one, does not require any preparation for the main process. A hand-made frame requires coating with paint and wrapping with a cotton tape.


An iron, a pencil, a ruler, fabric, pins, threads to match the fabric, strong paper, universal glue - this is what you may need when working.

How to make a lampshade with your own hands using fabric
To make a lampshade with your own hands, they mainly use: linen, silk, denim and other fabrics.


In the production process, a whole cut or material cut into strips is useful. Their width can be different. The prepared frame can be easily covered with a plain fabric with a pattern.

However, it is necessary to immediately decide on the future location of the lampshade, because it must match its surroundings, and not stand out as a white crow.

Design professionals recommend using the frame of the old one to create a new lampshade model for a floor lamp. Although it is not at all difficult to build it with your own hands from hard wire. Use light bulbs that save energy to avoid fires.

To create a masterpiece hanging lampshade on your own, you need:
- Prepare the frame of the future product (use the design of the old lamp or do it yourself).
- Choose a suitable fabric, cut into even strips about 5 cm wide, in the amount of 25 pcs.
- Check the evenness of the edges of the strips.
- It is good to iron them with an iron.
- Wrap the ring on top with the edge of the tape and fix (sew).
- Take the tape down and wrap its edge around the ring at the bottom, then go back and wrap the top around.
- Wrap the rings until the tape ends, then fasten its edge.
- Take the next strip and continue wrapping.
- When the frame is completely covered with ribbons, you need to prepare the belts for the edges.
- Take two small pieces of fabric of a different color and cut out 2 strips of a certain size, iron them, bending along the edge of the tape 2.5 cm inward.
- Fold the strip in half.
- Stick double-sided tape on the frame rings, and a fabric strip on top of it, making light cuts along the edge so that it lies as evenly as possible.
- Bend the other edge inside the base and also stick adhesive tape.
- Decorate the upper and lower tiers of the frame with belts.


For edging, you can use crocheted ribbons or well-known ruffles.


Use of textile and plastic materials for the lampshade
This manufacturing option is made of textile and plastic material To update a worn product or improve a new one:
- measure the diameters of the rings at the top and bottom, the height frame base, adding to them 2 cm to each edge for seams,
- we take a thin plastic plate of a rectangular or trapezoidal shape, cut off the excess to the desired size, and use it as a base for a fabric lampshade,
- we cut the fabric in accordance with the required parameters and fix it to the table surface with double-sided tape,
- glue the fabric to the plastic,
- with the resulting element we bend around the base and fix the edges with clamps,
- mark the place of the seams on the fabric,
- remove the paper clips and strengthen according to the basting with glue, press and leave to dry,
- glue the lampshade from the inside,
- glue the place of joining of the rings with the frame,
- if the product is dry, the clamps are removed,
- fasten paper tapes at the top and bottom so that one edge is below the location of the rim of the ring,
- fold the free edge inward and fix it with glue,
- we take a fabric strip of a different color with a length equal to the height of the frame, and a width of 5 cm, bend it in two, bend the edges and iron it,
- we coat the inside of the tape with glue and fix it,
- fix the strip with glue over the seam of the lampshade,
- prepare paper ribbons 5 cm wide,
- glue to the upper and lower edges of the lampshade, fasten with clips,
- Glue a fabric strip on top of the paper.

The process of making this version of the lampshade with your own hands is completed.

Other manufacturing options
In addition to the above options for manufacturing, they use: paper, threads, various tubes, twine, yarn, etc.

DIY lampshade photo


If a person loves creative experiments and wants to spend a day off with benefit, you can make a new beautiful lampshade.
This craft will decorate your home. And only at first glance it seems that it is too expensive to make lampshades for table lamps with your own hands. There are ready-made proven schemes with dimensions. All you need is some wire, fabric and thread (or fabric glue). This is easy to do, and simple improvised materials are suitable for crafts. Such an element of the interior as a lampshade will bring a new motive to the usual interior of the room or will be a wonderful gift for acquaintances and friends.
How to make a lampshade for a table lamp with your own hands?
What is a living room without a beautiful lampshade? Masters of handmade art have in their arsenal a lot of advice on how to create a beautiful lampshade for an old lamp from the time of your grandmother's youth. Most practical option- this is to make a round lampshade frame for a table lamp from wire. And stretch the fabric over the wire and fasten it.
There are ready-made proven schemes with dimensions. By doing everything according to the instructions, a beginner will avoid many mistakes. Let's give an example of the most common classic lampshade frame scheme. We also make a pattern for fabric according to these sizes, but with an allowance.
The best fabric for a lampshade is felt or cotton. Felt allows you to make a multilayer unusual craft. And on plain cotton, before fixing the fabric on the frame, you can apply a pattern with an iron. To fix the fabric correctly and evenly, it is convenient to use transparent textile glue. You can easily find it in a decoupage store. The result is an excellent lamp.

How is the drawing applied? There is no special trick in this either. You need to find special paper for thermal transfer of photos. A suitable pattern is printed on it, and then you need to take a heated iron and iron every millimeter of paper well. Nothing more needs to be done. When the pattern cools down, the fabric is securely fixed to the frame. Just do not forget to make a small gap when cutting out fabric shreds, so that the edges (top and bottom) can be folded over and carefully glued from the inside out. Or use ordinary colored tape for these purposes.
Frame Options
DIY lampshades for table lamps are in any case nicer than bought factory ones. Everything that the author's imagination is enough for is possible. But for a round shape, it is easiest to choose a pattern that is glued to the fabric.
If you don’t want to mess around with drawings, it’s enough to take an ordinary plain chintz fabric and make patterns suitable for the shape of the wire frame. The main elements of crafts are fantasy and the ability to work with your hands. Therefore, the wire frame of the lampshade for a table lamp is made by anyone with your own hands.
Unusual lamps for a new interior
When the new room is renovated and you want to complement the image of the living room with some exclusive detail, you can put one lamp with unusual design to a small coffee table. Or on the dressing table in the bedroom. This will be an excellent solution. After all, even when decor costs are minimal, creative taste is always appreciated.
To find unusual ideas for a lamp, and, in particular, a new lampshade, it is possible at exhibitions of handicrafts, or simply by applying maximum imagination. Rice paper lampshades of various shapes are now popular. Many people love colored things and decorate the frame with decorative colored beads.

The main thing in creative experiments is to choose the right shade of small decor elements. When the right style, color scheme and shape are chosen, even the simplest things will look elegant in your room.
Stylish cardboard lampshade
You can make a lampshade for a table lamp with your own hands from cardboard. It will be completely different from others. The material for crafts needs to be selected durable, but thin. The advantage of this option is that it is an incredibly easy way to create a lampshade from scratch.
The sequence of actions is as follows:
- 4 identical frames are cut out of cardboard. The same frames in which they put photos.
- A piece of fabric is glued to the back of each frame.
- On the side, carefully make a few holes with a gypsy needle and sew the frames with laces. You need to get a small flashlight. The cardboard is pre-glued. It is stitched in order to make the craft look more beautiful.
The advantage of this option is that it is a completely simple way to create a lampshade from scratch. In addition, this "flashlight" is a very light object. And it is possible to repaint it in any color, but it is desirable to match the selected fabric. It looks unusual and fits in style for elegant interiors.
DIY lampshades for table lamps for a nursery
An interesting lamp in the nursery will be very useful. Make a better lampshade for your child together. Trust his personal taste. After all, the main thing for a child is the process, not the result. You can use denser materials that do not transmit light well, such as plastic pasted over with paper. With a lampshade-cap made of plastic, the lamp dimly illuminates the room, it acts as a night light.
Maybe the child will want to see their favorite cartoon character on such a night light. Using the cotton print idea, this can be done.
Lampshade for a cozy bedroom
But for the women's bedroom, a lampshade with a knitted pattern is more suitable. Some stores sell simple knitted doilies as decorations for tables or shelves. These wipes are great. If a woman knows how to crochet, she can make such a napkin herself.

When the napkins need to be shaped into a ball, you need to put a few pieces on a baby ball, cover them completely with glue and let them dry a little. Remove unnecessary details in advance. Then the fabric is removed and hung on a prepared circle of wire lampshade.
A self-knitted napkin already has right size, it does not need to be adjusted to the dimensions of the frame. The napkin is sewn to the edge of the frame with ordinary threads. Making a do-it-yourself lampshade for a table lamp with a crochet is as easy as shelling pears.
A ball of thread as a lampshade
A very popular method is a glued ball of thin threads. All you need is a skein of thread, PVA glue and a balloon. Threads can be taken and thick.

What to do?
- A balloon is inflated, smeared with glue.
- On fresh glue on the ball, layer by layer, wind the threads in any order.
- At the bottom there is a place so that you can then twist the light bulb.
- When a ball is obtained, a layer of PVA is again smeared on top of the thread chaos.
- This ball is left to dry for 12 hours.
After that, the balloon is pierced with a needle and pulled out. Now the lampshade is ready to be installed on the lamp. Do-it-yourself lampshades for table lamps made using this technique do not have to be round. Instead of a ball, it is convenient to take a plastic 5-liter bottle or other square-shaped object, and apply the same "scheme". You get a wonderful lampshade if you take an inverted plastic flower pot instead of a shape.
New life for an old lampshade
What to do when there are lamps with a lampshade, but the old glass cover is broken? How to repair the lampshade of a table lamp with your own hands? Sometimes you don’t want to say goodbye to old favorite things, even though they age and fade with time. What can be done to keep them going? They can be ennobled, return them a beautiful stylish look. But how to update the lampshade of a table lamp with your own hands?
Of course, the old frame must be repainted, repaired if it cracked somewhere. Now many types of glue for the restoration of such things are sold.

Then consider what base you will choose for your craft. If you are new to handmade, ask someone more familiar with the details of this hobby for advice. But still, the best basis for the lampshade will be a classic fabric.
Taking on the arrangement of the interior space, it is important to think through every little thing. After all, we all subconsciously strive for comfort and it is the smallest details that can create a special atmosphere, convey the general idea, mood and character of the room. Professional designers claim, and the interiors clearly prove that right choice Chandeliers can not only decorate the interior of the room, but also make life brighter, more fun. Beautiful plafonds for chandeliers with original design. About how to make them with your own hands and what materials it is better to use for this, you can find in this article. Detailed, step by step master class, as well as a visual photo, will be a great help to you in this exciting process.
Material selection
In the manufacture of a chandelier, it is difficult to single out any one material that would meet all the requirements. Each of them has its own individual characteristics and features. For example, paper, which is the most simple and affordable material, lends itself well to transformation.
Lamps made of glass fragments and strips of metal have a dazzling brilliance and a beautiful appearance. Wood and fabric add warmth and comfort to the interior. Lace lampshades are distinguished by their special beauty, captivating everyone at first sight.
In a word, you can make a chandelier with your own hands from anything, the main thing is to be smart in time and turn on your imagination.


A paper napkin chandelier is a bold enough but justified experiment.
We will describe in detail in this article how in an ordinary object you can see its creative potential for creating an exclusive decor element.
Step-by-step instructions, with a description of each action, will help you make incredibly beautiful and unique lamps from improvised means that will be a great addition to your favorite interior.
What you need to pay attention to before making a chandelier
Many are interested in how to properly make a chandelier in, and other rooms. After all, I want this element of the interior to be not only beautiful, but also functional.
On the one hand, a chandelier is a lighting fixture that can provide the proper level of lighting in an apartment. After all, a lot depends on the choice of light in the room, including the safety of the eyes. On the other hand, I want the ceiling structure to complement the interior design, creating a special atmosphere of warmth and comfort.
When making a chandelier, the first thing to consider is the height of the ceiling. For example, a chandelier with a bar mount is suitable for low ones. So, the ceiling will look visually higher. If the ceilings are high - 3 m and above, then it is better to make your choice in favor of a pendant lamp with a hook mount.


Lamp selection
For any room you need to individually approach the intensity of its lighting.
For a small bathroom, 80-100 watts will be required.
Kitchens need a lamp power of at least 120-150 watts.
The living room and the hall cannot do without light bulbs in the range of 150-300 watts.
The number and power of lamps is calculated based on established standards- 20 watts are required per 1 m². electricity. It is also necessary to take into account the parameters of the room, its dimensions and reflective properties.

Edison designer lamps - look beautiful and unusual
Plafond design
The appearance, decor and design of the ceiling occupies an important place in the design of the chandelier. It is selected for the interior of the room, depending on the style. Crystal for classics, metal and glass for, wood will fit perfectly into country or chalet style, fabric and silk will perfectly suit Provence style.
To illuminate a room on several levels, you can additionally make wall sconces or floor lamps.


Step-by-step master class on making
To make a beautiful ceiling decoration, it is not necessary to start everything from scratch. Take a look around, you probably have something in your house that you have not used for a long time. And who knows, maybe it will become the main subject in the manufacture of the original lamp. Moreover, there are more than enough ideas and inspiration for creativity on the Internet.
Important! It is best to start searching for the necessary things from the kitchen or balcony. It is there that we store all sorts of rubbish that was once so necessary for us and which, as often happens, is so difficult to part with later.
Spectacular chandelier from mugs
No matter how strange it may sound, it is from dishes and other kitchen utensils that the most unusual and interesting models of lamps are obtained. For example, tea mugs are ideal material to make a spectacular lamp.
For work we need:
- Mugs
- Saucers
- Drill
- Porcelain drill with special hole

Mastering quickly and easily
- At the bottom of the mug, with a drill, we make a small hole for the wire, fasten the electric chuck and bring the wire out. It is desirable to seal the hole with a gypsum mixture.
- Next, the mug must be glued to the saucer, where there should also be a hole, insert a light bulb and hang the newly made lamp in the right place.
As you can see, original and fashionable design can be obtained from completely ordinary items.


Fascinating yarn chandelier
Since this is a fairly simple product, for its manufacture we need a minimum of things, namely:
- Wire with a section of 4-5 mm.
- wire cutters
- Fine thread
- colorful yarn
Manufacturing instructions:
- A ring is made of wire, the diameter of which will correspond to the future size of our chandelier. To get a perfectly even circle, it can be wound on some object that has a cylindrical shape.
- We bite off the excess wire with wire cutters, leaving 2-3 cm in reserve on each side. We tie the ends with a thin thread.
- It remains to decorate our chandelier beautifully and brightly. To do this, we cut the threads of yarn in such a way that the length of each segment is twice the height of the ceiling.
- Alternately, on a knot, we tie the resulting threads until we hang the whole ring with them. From the same yarn, we make a hook mount.
You can use such a lampshade both in the form of a chandelier and in the form decorative element decorating the interior of the room.


By combining the skills of macrame and papier-mâché, you can get a stylish chandelier for the bedroom
Important! To make such a lamp, instead of woolen yarn, you can use any other thread. The main thing is that it harmoniously fits your interior.
Unusual teapot lamp
You will learn how to make a chandelier from an ordinary teapot yourself from this master class. Here's what we need for this man-made masterpiece:
- Kettle
- The wire
- Electrochuck
- metal chain
Step by step guide to making
- First of all, the bottom of the teapot is cut out. This is done in such a way that the resulting cutting edge is not sharp, otherwise you can get hurt on it.
- Next, an electric cartridge is fixed to the lid of the kettle, the wire of which is led out through a small hole drilled at the top.
- A chain is attached to the handle of the kettle, through the links of which a wire is threaded. The lamp is ready.


Breathe new life into bottles
Glass bottles, especially if they have beautiful shapes, can be used to make a wonderful chandelier. Required material:
- thin rope
- Flammable liquid (alcohol or gasoline)
- Glass bottles (preferably colored)
- Edison lamps (having a beautiful spiral)
- Wire and electric cartridge
Do it yourself
- We wind the rope on the bottom of the bottle, after wetting it in a flammable liquid. Then we set fire to it and let it break, and we begin to slowly rotate the bottle around its axis until the rope burns to the end. After that, we lower the bottle into a container with cold water, wrap it with a towel and, with a little effort, break off the bottom.
- So that the cut edge is not sharp, it must be sanded. To do this, it will be enough to twist the bottle in sand or small gravel for a couple of minutes.
- It remains to properly mount the electric cartridge, stick the wire through the neck, screw in the light bulb. From the remaining bottles, the rest of the shades are made in a similar way.
This chandelier will perfectly fit into the interior made in any, especially if you hang it over the bar counter.


Can decor
No less beautiful are lamps made from cans. They are made in the same way as from bottles. The only difference is that the bottom of the jar does not need to be cut off, as clear glass is usually used for shades.
We need:
- Beautiful thick-walled jars (preferably with a relief pattern)
- Hammer and nails
- Wire, electric chuck
- Paint can
- Edison lamp
How to do it right
- To begin with, using a nail and a hammer, holes are stuffed in a circle in the lid, after which the inside is gently squeezed out. The diameter of the circle must match the diameter of the socket in the chuck.
- We insert the cartridge into the cover, mount the wire.
- Next, paint the lid along with the cartridge in the color we have chosen. Metallic paint with a golden tint will look best.
- It remains to screw the light bulb, close the lid and install the lamp in its place.


We all know what a globe is, but not everyone knows what amazing things can be done from it. For example - a nice lampshade for a chandelier that will perfectly fit into the interior of a children's room.
Here is everything we need:
- globe
- Bulb
- Electric chuck with holding element
Step by step master class
- Usually the design of the globe is not solid, so in order for us to get the desired element, we need to divide it into equal two parts (hemispheres).
- Next, at the top of the hemisphere, you need to make a hole for the cartridge. For this, it is best to use a drill with a crown.
- The electric chuck is put into place and securely fixed by the retaining element. Congratulations, your chandelier is ready!


Suspended antler structure
Making a unique lighting device from deer antlers is quite simple, the main thing is to have the necessary material at hand.
Such designs are famous for their special sophisticated look and are best suited for rooms with high. Such chandeliers are used in many interiors, but they look especially attractive in country, chalet or rustic style.
As a rule, the shades of such chandeliers have various shapes, and only natural material is used for their manufacture.
We will need:
- Antler
- Rope
- Copper wire
- Electric chuck and wire
- Bulb
Make a chandelier like this
- Observing the precautionary rules, according to the diagram, we connect the wire to the electric cartridge.
- Next, the wire must be beautifully wrapped with a decorative rope. For better fixation, you can use a universal transparent glue.
- With the help of copper wire, horns are attached to the lower part of the resulting rope, placing them 2 cm above the cartridge.
- We repeat a similar procedure with the rest of the shades, then combining them into a single composition.


Ideas for making beautiful lamps (photo, video)

We hope that helpful tips and the photos presented in the article will help you not only make beautiful ceiling lamps for chandeliers with your own hands, but also save the family budget.
Each person tries to decorate his home as comfortable as possible, using modern design solutions. A lampshade turns a room with poor and depressing light into a cozy place, but choosing the option that suits the design and wishes is troublesome. It is often difficult to find what you need, and if you can, then for an unreasonably high price. At this moment, any creative housewife will say: “I will sew it myself!” For the possibility of embodying all creative ideas, we will consider how to sew or glue any suitable product.
One of the most popular subjects of needlework is the decoration of lighting fixtures. Everyone wants a bright light to break through an unusual lamp shade, made in combination with the overall design of the room. And it can be not only a chandelier - all kinds of wall and table lamps will give your home comfort and beauty. How to make a lampshade with your own hands? After spending a little time, you can make a unique decor element for the chandelier and its frame from improvised means.
What materials can be used?
Suitable raw materials can be absolutely anything. The chosen material largely depends on the experience of the person in needlework, as well as the availability at the moment, its cost and compliance with the overall interior of the room.
Can be used:
- paper, cardboard;
- the cloth;
- plastic;
- threads;
- metal (frame for lampshade);
- finished products - bottles, spoons, forks.
The material for the chandelier is limited only by your imagination and what a person can do with his own hands. You can practice for a start on cheap and available materials- white paper or cardboard; use old fabric (if there is a lot of it). After you understand what and where to fasten, you can move on to more expensive and rare materials for your sconce.
What will we need?
In addition to the raw materials themselves, you also need tools to fix and shape the finished product:
- needles, scissors, pins;
- glue;
- pliers (for metal frames);
- wire (base for lampshade);
- soldering iron.
Keep in mind that the finished product must have a weight that will easily be held on the selected mount, and be safe enough when light bulbs are working next to it.
Paper products
One of the simplest options is to use stiff wire to create a spherical frame on which paper of any color can be glued on top. There will be enough space for the light bulb, the lamp will look both simple and stylish at the same time. Usually this is how you can make a lampshade for a floor lamp with your own hands.
In addition to ball different shapes, you can prepare the frame of a cylinder, rectangle or square, as well as an elementary cone. A simple master class - take several wires of different lengths, bend them into a circle and secure with a soft piece. Having made about 15 of these rings, you will get an excellent frame for the lamp - what a chandelier requires.


Any patterns can be cut out on the surface of glued paper, cardboard with scissors or a clerical knife. It can be geometric figures, drawings of animals, letters, snowflakes, leaves - anything that fits into the interior of the room and helps to update the lampshade. Do not rush to throw out the cut out parts - they can be glued to a long thread, and the thread itself can be attached to the frame. Thus, we get beautifully hanging patterns, the chandelier will turn out to be very unusual, the decoration will be definitely unique. Such a handmade chandelier lampshade will look good in a nursery.
 Cut patterns on the threads
 Cut soft paper or fabric into long strips with different ends, which are attached to a round rigid wire frame. Do not make the design too dense if you plan to use a powerful bulb for your sconce - too much heat can cause it to break or even catch fire. This is an ideal way for low-power evening lights in the hallway, decorate them also in the summer kitchen or in the hallway.

Fabric Options
Here, much more potential is already opening up due to the characteristics that different materials have. This is both density and pattern, and the ability to create very complex shapes by gluing and stitching all kinds of elements; decorate with literally anything good way make a lampshade for your favorite floor lamp.
A fabric lampshade adds cosiness and warmth to lighting fixtures in kitchens, children's rooms, living rooms, and bedrooms. The soft light that breaks through such products is more intended for additional lighting (for example, sconces).
A strong frame made of rigid wire is mandatory, which must withstand sufficient weight in case of using dense types of fabric.

Is it possible to independently update existing lampshades or chandelier shades? Do not get hung up on one fabric, pattern or color - with the help of glue and threads, you can attach to the surface of any lampshade a large number of various elements corresponding to the idea of the interior. It can be multi-colored stripes, patterns, edging and dividers, bows and ruffles - everything from which a lampshade can be sewn. And if earlier a seamstress sewed ruffles with a base with a hidden seam, a modern original decor element can also be sewn with an open seam with a bright silk thread in contrast to the main color, it can be decorated with anything on top.
The fabric is a strong enough material that can withstand glued bead and plastic products, even glass decorations will look very good in this case. A great option for making a table lamp shade.


How to make a lampshade for a table lamp? On a white fabric, you can write a poem or an excerpt from your favorite book in beautiful handwriting so that the light, penetrating through a beautiful lampshade, reminds you of good work. Ideal for updating your bra.
Thread or very thin strips of fabric
A finished wire frame (or you can use any other voluminous object, for example, a five-liter plastic bottle) wrap in several layers with a thick thread or strip of fabric. Such lampshades look very good in kitchens or dining rooms, hanging over a dining table or bar.
 A ball of thread impregnated with glue
  Using thread to create the surface of the ceiling
 On the surface of the finished ceiling, you can stick different figures and patterns by analogy with paper versions, creating a beautiful table lamp for reading.
 Plafond of threads or plastic wire with figures
 An interesting option for creating a spherical shape is to use a regular balloon. The final shape of the lampshade depends on the shape of the inflated balloon.


Plastic products
Let's go to the most difficult options. You'll have to be patient, material and glue. It is rather difficult to obtain products with smooth bends from hard plastic, therefore, in most cases, a strict product is made. It is also possible to arrange from various parts of different shapes and colors, a soldering iron or glue is used for fastening.
How to make a plafond? From plastic, you can assemble lampshades of cubic, conical shapes, as well as fasten various parts together and get a very complex and practical product that will find application in absolutely any room.

How to make a frame for a lampshade? If you glue a plastic five-liter bottle with various details, you will get amazing lampshades in the form of fish scales or exotic fruits. Using multi-colored varnish or spray paint, you can paint the finished product as you like. Not suitable for a sconce, because it has a rather large size in the end.

Beads
Instead of threads and wire, finished frames can be wrapped with beads or glass beads can be used. So you can make a lampshade for a table lamp with your own hands. It turns out a multi-colored surface, which, under powerful lighting, beautifully plays with colors and shimmers with gloss, creating glare on the walls and ceiling of the room. Due to the frequent compactness, a beaded lampshade is well suited for table sconces.

Conclusion
To create lampshades with your own hands, you can use absolutely any material. The variety of colors and shapes that are available from scrap items will allow you to move away from the relatively limited range of modern stores. A homemade lampshade will definitely please your guests. This is an ideal option - for any lamp, create a lampshade with your own hands, which will very accurately fit the interior of your home. Sew anything from anything, apply alterations to all the designs that are already there.
The decor of the table lamp can be made of both plastic and paper. It is better to use light materials for bright light. Manufacturing beautiful lampshades do it yourself - a simple matter even for those who have never done it.
 Hairpin interpretation of the dream book Why dream of buying a hairpin
 Win competitions Why dream of acrobatic competitions
 Dream interpretation sparrow looks out the window
 Divination by Tarot Etteila - Horoscope of Life Collection of free divinations
 The meaning of tarot cards in divination
 What does it mean to see yourself from the side in a dream?
 Social movements and their types