Turning wooden stairs. Metal turning staircases with winder steps: features and advantages Drawings of wooden staircases 90 degrees
To create stairs, the most different materials. But wooden options are always in fashion, which are considered an example of style and Russian traditions. The use of wood creates a feeling of comfort and home warmth. When creating the most important moments considered thoughtful installation, standards and calculations. A do-it-yourself wooden staircase to the second floor with a 90-degree turn is installed in compliance with all design rules. This product will take up little space.
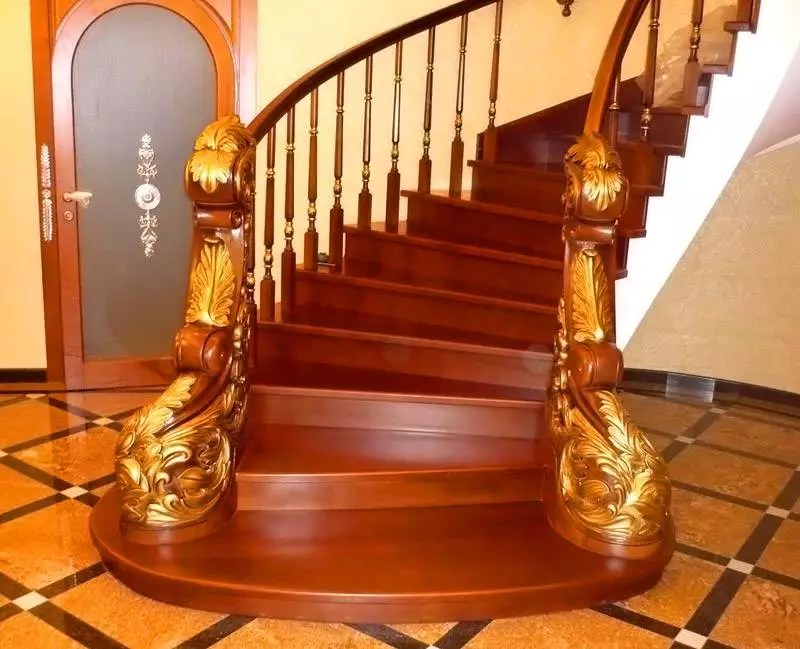
The luxurious staircase design performs a practical and decorative function.
Read in the article
Types of stairs to the second floor: photos of options
To choose a staircase option, you need to decide on the type of device and material. The choice of system depends on the placement in the rooms, layout features and individual needs. The materials used are ceramics, wood, metal and plexiglass.

The following types of stairs are distinguished:
- marching structures are made on bowstrings or stringers;

- screw versions are made on supports in the form of a load-bearing rack;
- models on rails are straight-line structures. The steps are mounted to the wall and connected using bolts;

- combined ones include several types of designs.

For the stringer, supports are installed that are located near the wall. The work must be controlled using a level.
Important! To securely fasten the stringer, a small recess is cut out in the timber.
The nuances of making a wooden staircase to the second floor: assembly and installation of steps
Staircase with 90° turn(L-shaped staircase) is a structure of two flights located relative to each other at right angles and connected to each other by a turning platform. It is the most popular type of construction, as it has small dimensions and allows installation in openings with small area while maintaining a comfortable step height.
Online calculator calculating a staircase with a 90° turn with a platform from KALK.PRO allows you to obtain detailed data necessary for the manufacture of stringers, steps, risers, landings, railings, balusters. Besides this you get full set staircase drawings (assembled structure and components) in different projections, a virtual 3D model, with which you can evaluate the structure in a given opening and recommendations for creating the most comfortable structure.
Calculation procedure
- Step 1. Selecting the optimal units of measurement - mm, cm, m, inches, feet.
- Step 2. Determination of the color of drawings - monochrome, color.
- Step 3. Definition of staircase design - right-entry (with a turn to the left), left-entry (with a turn to the right).
- Step 4. Indication of staircase dimensions - length, flight width, opening height ( if the top step is at the level of the 2nd floor, the height of the opening = the height of the stairs) .
- Step 5. Step parameters - number, tread thickness, edge protrusion, top step below the level of the 2nd floor or at the level ( optional).
- Step 6. Characteristics of stringers - beam thickness, beam width.
- Step 7. Stiffening beams for the turntable - thickness, width.
- Step 8. Risers ( optional) - the ability to use risers and specify the thickness of the board.
- Step 9. Parameters of the support column - section side.
- Step 10. Determination of fencing elements - height, thickness, width of handrails, cross-sectional side of the baluster.
- Step 11. Floors and walls - blocks are used only for visualization and do not affect the amount of materials.
- Step 12. Rechecking all entered parameters and starting the calculation of a staircase with a 90° turn with a platform using the button " Calculate».
Design features / designations on drawings


Over the centuries, construction practice has formed a huge base of buildings, which has constantly developed and improved. However, despite significant technological breakthroughs in all industries, modern calculations still use many mathematical expressions that have not changed after centuries. When designing stairs, the most recognizable is the “comfort formula” of the French engineer François Blondel. The image shows the optimal values that are derived from this formula and which we recommend using in the calculator. Other parameters can be found on the page " Calculation of stairs online».
Blondel formula: 2 × h + s = 60/65 cm
- h - step height;
- s - tread width;
- 60/65 cm is the average human step length.

However, we warn you that for the construction of stairs there are construction documentation (SNiP, GOST, TU) that regulates the maximum loads, the strength of materials, the minimum permissible parameters of load-bearing elements, and so on. The safety and reliability of the structure being built is guaranteed only if they are observed, so we recommend that you familiarize yourself with the provisions of the following documents:
GOST 23120-78 “Flying stairs, platforms and steel fences”, SNiP 21-01-97 (SP 112.13330.2011) “ Fire safety buildings and structures", SNiP 31-02-2001 (SP 55.13330.2010) "Single-apartment residential houses", SNiP 2.08.01-89 "Residential buildings", SNiP 2.08.02-89 (SP 118.13330.2011) "Public buildings and structures", SNiP 2.01.07-85 (SP 20.13330.2010) "Loads and impacts", SNiP II-25-80 (SP 64.13330.2011) "Wooden structures".
Check out our articles - installation of wooden stairs And optimal angle of inclination of the stairs. We are sure that this information will be useful to you, including when calculating the L-shaped turning staircase on the calculator.
Even a one-story building is not without steps inside - there are stairs to the attic or low, often found structures in the interior, crowning the design concept. A house with several tiers requires special lifts, and the ease of use and safety of households depends on what type of stairs the owner chooses to construct independently. The most common option is a do-it-yourself staircase to the second floor made of wood with a 90-degree turn.
Types of rotary wooden stairs
As a rule, these are L- or U-shaped two-flight models. The rotation angle is 90 and 180, respectively.
In addition, stairs are divided into the following options:

Additional advantages of both options are convenience and safety. The structures are designed in such a way that they can withstand the weight of the load transferred to the second floor and a sufficient number of assistants. The width and depth of the steps will allow elderly people and small children to use the stairs without fear for their safe movement.
Designing a turning staircase with an angle of 90 degrees
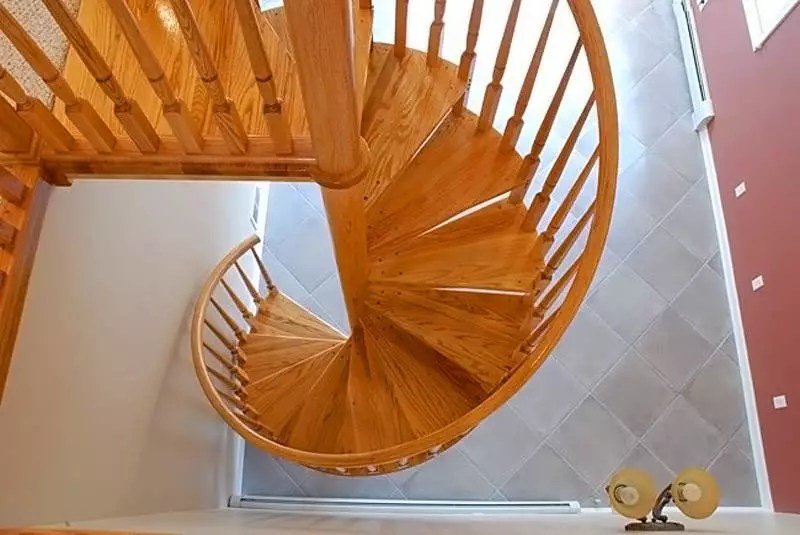
Small houses for a small family do not need wide and bulky spans. Therefore, we will consider the design of a 90° corner staircase with winder elements instead of a transition platform. It will take up little space, since it has only one flight, the second being several steps. It is best to position the structure with a clockwise rotation.
Tools and materials
The choice of wood must be approached carefully.
Firstly, why wood? Because only this raw material can be independently adjusted and designed - in the process you can make mistakes with calculations and correct discrepancies very easily.
Secondly, this budget option building material.
Thirdly, wooden houses require similar stairs - steel or concrete are incompatible.
As for the breed, it is important to choose durum varieties– beech, oak, larch.

Budget pine is allowed, but it is important to ensure that there are no knots interspersed in the boards and beams, which is a serious problem for the breed. A residential building is characterized by rapid activity - moisture, temperature changes, dry air. As a result, the ladder will begin to deform to one degree or another and the knots will fall out of their places, creating a dangerous situation for the operation of the product. Before manufacturing parts, all wood is dried and impregnated with moisture-repellent and protective compounds against biological damage - mold, bugs.
The required tools are known to every carpenter:
- hacksaw;
- electric jigsaw - it will help to neatly round the edges;
- screwdriver;
- hammer or mallet;
- bit;
- square;
- level.
To design parts choose:
- support beam with a cross-section of 100 mm or more (depending on height);
- edged board 50 mm thick;
- auxiliary beam with a cross section of 40 mm;
- fasteners: self-tapping screws, steel angles, anchors, screws, bolts;
- wood glue or epoxy resin.
The components should not cause any complaints. It is better to select fasteners that are anti-corrosion - the temperature difference between building materials will create conditions for condensation to occur, which is detrimental to both metal and wood.
Calculation of a staircase to the second floor made of wood with a 90 degree rotation
Before starting work, you need to prepare a drawing where all the components of the structure are scrupulously marked. To do this, use calculation formulas or computer programs.

To create an accurate, verified design of a staircase with a 90-degree turn, it is important to know the following values:
- March width. It is important to proceed from your own wishes, however, it should not be less than 80 mm.
- The length of the projection of the staircase opening from the last upper riser to the corner of the central winder step.
- Step width. Minimum 120 mm.
- Step height. Maximum 220 mm.
Calculations for the actual dimensions of the winder steps are performed on graph paper. To do this, two rectangles are drawn, depicting marches with known parameters converted to scale values, with a line passing through their centers. They are connected by an arc of a circle through which the radius of the central winder step will pass. From there, the elements are laid out, ensuring the optimal and uniform width.
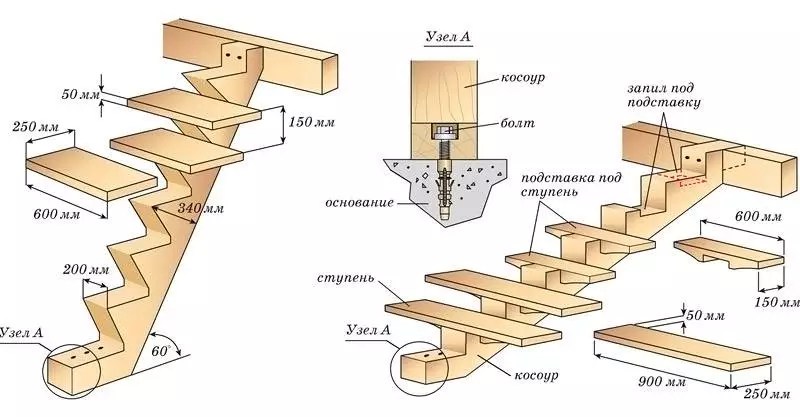
Example: a two-flight staircase with a long and short flight of 8 and 2 steps, respectively. Three winder steps are located at an angle of 30?. The design has the following parameters: opening length – 2294 mm, width – 930 mm, height to ceiling – 2683 mm. Step length – 825 mm, width – 208 mm, riser height – 206 mm. All that remains is to indicate the actual dimensions of each part on paper and you can start cutting.
Sawing stringers
For the load-bearing parts of the staircase, a template is made - a right triangle with the dimensions of the step depth and riser height marked. It is cut out of plywood or using a square. They mark with a pencil and check the rule - thin part no more than 15 cm from the width of the board - and cut out the excess.

It is better to use a jigsaw - it will carefully cut the parts along the intended lines. The ends of the prepared boards are immediately sanded to prevent them from splintering.
Installation of support pillars
To fix the stringers, a 100 mm support beam is attached. The location of its installation is determined by the drawing. Most likely, it is located diagonally opposite the corner of the room. The timber is fastened with steel corners, anchor bolts or concreted into the floor - depending on the stage of construction of the house. In addition to the thick support, timber with a cross-section of up to 50 mm is used. It is used to make supports for wall stringers and a base for laying winder steps.
Fastening stringers
The work starts from the top so that all the shortcomings fall on the bottom, where it will be incomparably easier to correct them. Stringers are attached to the ceiling using steel angles, bolts or self-tapping screws. The lower part must be inserted into the support beam. To do this, a groove is hollowed out or cut out on it. Its dimensions are 2 cm in depth, and its width and length are 1 mm less than the end. This is necessary so that the stringer fits tightly. To ensure reliable fixation, prepare a paste of sawdust and wood glue. It is placed inside and the stringer is beaten with a mallet.

The wall element is fastened similarly at the top, and at the bottom it is fixed to a metal corner to a support of a smaller cross-section, having previously cut out the end for laying the winder step. All work is carried out with strict observance of the level, otherwise future steps will not lie parallel to the floor.
Making steps for stairs
The steps for the marches are cut out according to the template. These are the same elements and there shouldn’t be any difficulties. The installation of winder steps is also simple. For them, a separate platform is purchased from boards or multi-layer plywood and the steps are cut out according to the drawing - the lines come out of one corner. When all the elements are prepared, they are treated with protective compounds and varnished in several layers.
Assembling a staircase to the second floor with a turn
Unlike fastening supports, temporary fixation of steps is carried out from below - subsequently, after adjusting all the parts, the structure is disassembled and, after processing, laid again. They make a string for the lower flight - a board based on the stringer principle, but without coal cuts for laying steps. In the inner part of the wooden element, grooves are knocked out or cut out into which the steps will be inserted.
A short wall bowstring is made similarly to that described above. The upper end of the outer string must reliably hide the end of the winder step, and the lower end is cut off perpendicular to the floor for subsequent installation of the riser. Having installed the first straight elements on the screws on the outside and adhesive paste on the inside, we begin laying the radius ones. They are fixed in the same way. Straight steps are laid, cutting out grooves at the ends for insertion into the stringer. Before fixing to fasteners, all elements are glued.
The risers also lead from below. Inexperienced craftsmen make the mistake of making blanks that fit tightly between the steps. There is no need to do this - the house will live a rich life where moisture and steam are present. Having swollen, the elements can break the entire structure or, at least, deform it. A 5 mm gap is enough to ensure that the staircase model remains strong for many years.
Fences and balusters
Decorative elements of the staircase - railings and balusters - play a significant role in the interior. They are bought ready-made. But if the master has golden hands, nothing prevents him from making them himself.
Special attention to fastening: it is required to place balusters frequently - on each step. This will create additional support and safety for children and elderly home owners. Plus it's beautiful.
You cannot attach balusters to steps with self-tapping screws - it is not reliable. It is better to use dowels - small wooden rods like dowels. For them, holes are specially drilled in the edges of the steps, which should be a couple of millimeters smaller than the rod. Before inserting the dowel, the hole is filled with glue or epoxy resin.

Holes are also drilled in the balusters themselves, moistened with a fixing compound, and the elements are placed on wooden rods. The structure is carefully hammered with a mallet for better adhesion.
On the top baluster and support pillar the cord or fishing line is stretched. It is pre-blackened to make precise marks on everyone decorative elements. All excess upper parts are cut off, keeping parallel with the stringer - this way, the fence will lie flat. The handrail is either put on the balusters and screwed with self-tapping screws from below, or fixed from above, but then the fastening points will have to be puttied.
The finished staircase should be sanded from top to bottom with a sanding machine or sandpaper and cleaned of fine chip dust. Then they decide what kind of decoration with decorative compounds is required - usually, wooden surfaces are varnished, stained or painted if the quality of the material is not the best.
How to care for a wooden staircase
Wood is the most capricious building material and without proper care, the staircase will not serve its owners for the specified period.
What you need to know in order for the operation of the turning staircase to be reliable and long:
- Do not expose the structure to excessive moisture. Cleaning consists of wiping with a damp cloth wooden surfaces without using aggressive detergents– alkalis, solvents, acids. The final stage Cleaning will be done by wiping the surfaces dry with the addition of special wax for furniture.
- It is important to create a ventilation balance in the house, since over-drying the wood can lead to cracking and the creation of cracks for mold and bark beetle larvae to grow. In inconspicuous dark places, they multiply with catastrophic speed.
- Correct all problems in a timely manner - unsticking joints, unscrewing fasteners, loss of rigidity of steps and fences, creaking. Prevention is, first of all, important for the safety of owners. If necessary, the structure is disassembled or failed elements are replaced.
It's important to remember that finished staircase will shrink, like any wood product. Therefore, it is not recommended to carry out self-installation Immediately firmly - for 2-3 weeks the ladder should stand assembled “on the backbone”.
Simple methods of preserving the original appearance of a wooden turning staircase will allow home handyman be proud of your own product for a long time. However, any staircase is a consumable item of home furnishings and will require replacement over time. This is important to remember if owners intend to make a model from valuable species.
Acquisition finished products is accompanied by additional costs. It will not be possible to fully control the manufacturing process of individual elements. Solving non-standard problems will become more difficult. If you have basic skills, you can create it yourself from wood with a rotation of 90 degrees quickly and without errors. But to prevent unnecessary difficulties, preliminary preparation will be required. The data provided in this article will be useful for this.
It’s not too difficult to make a stylish and functional design yourself. Production of complex carved elements can be ordered
Since special terms will be mentioned later, it is better to immediately clarify some definitions.

Stringers serve as supports. It is on these elements that the steps are installed. The bowstring covers the fastening elements. Instead of a smooth turn, platforms can be used.

Without these inserts, even a large structure looks lighter. The figure clearly shows that without risers good natural lighting is provided. The disadvantage is the need to use thicker blanks for the steps. This will ensure that there is no deformation under the weight of users during operation.

This specific name is derived from German word bolz (bolt). This device fastens the steps together to ensure structural rigidity.


In this version, stringers, bolts and other visible supporting parts are not used. A durable frame is hidden inside the thick steps. It attaches to the wall using large ones. Despite its apparent simplicity, the implementation of such a project is based on complex precise calculations. Reinforced fastening elements are used. The obvious disadvantage is the complete absence.

Related article:
In the article we will look at what types of designs there are, what are the advantages of a metal frame, how to properly illuminate straight and spiral staircases, as well as recommendations from specialists that must be taken into account during installation.
What material is better to use

This design takes up a lot of space. But such a solution is necessary for high ceiling heights. To achieve excellent aesthetic characteristics, the lower visible part of the staircase is completely closed. A cutout has been created in the window sill. This is an example of how important it is to take into account the parameters of a particular room when installing new structures.

A project like this is not too difficult to implement. Used here inexpensive materials. A small number of elements and the absence of complex forms should also be considered clear advantages. Despite its simplicity, the product is quite functional. It matches modern design.
Features of a do-it-yourself staircase to the second floor made of wood with a 180° rotation
This solution increases the occupied area. But it is necessary to create a smooth rise with a large distance between floors.


Do-it-yourself algorithm for calculating the stairs to the second floor
The following table shows the values that experienced professionals recommend using when calculating the dimensions of a wooden staircase to the second floor:
| Parameter | Magnitude | Note |
| Elevation angle relative to horizontal | 20 – 45 degrees | The limit values are indicated here. It is better to use a range from 25 to 36 degrees. |
| Height of one step | From 12 to 23 cm | As in the previous case, the middle level is the most comfortable. |
| Maximum/minimum depth of winder step | 40/10 | With other sizes, using the ladder will be inconvenient. |
Reliable support on the step will be ensured when the depth of the step is not less than the length of the foot. But excessive enlargement is not necessary. To prevent errors, take into account the normal step length from 60 to 64 cm. Check the correctness of the calculation using the following formula: 2H + W = 62 cm, where H and W are the height and width of the steps, respectively.
To create drawings of the stairs to the second floor with your own hands from wood, they use traditional tools, computers,. In any case, you can apply the following algorithm of actions:
| Drawing | Description of the stage |
 | Draw a circle with radius r=l/2, where l is the width of the flight (stair step). This figure is divided at an angle of 45° (indicated by the red center line). |
 | Based on the markings made according to the first or second option, segments are drawn. Their length is equal to the depth of degrees (b). |
 | The straight parts of the staircase are drawn towards the turning area. |
 | The second option for placing straight flights of stairs with a gap between the corners. |
 | Sections AC and AB are useful for accurately calculating winder steps. Width (e) should be approximately 10 cm, and d – 40 cm. |
 | In this drawing it is necessary to obtain similar values for the segments e and d. |

This figure shows that when there is limited free space, it is necessary to use very steep slopes. In such cases, ladders and other special structures are used.

Article
If an L-shaped staircase is installed in the room, then a situation is possible when, in order to reduce the size of the staircase opening and save space, it is necessary to abandon the platform and make winder steps instead.
A staircase with turning steps is more compact than a design with an interstaircase platform. At the same time, winder stairs have a number of disadvantages, the most important of which are the radial steps of irregular shape and the resulting features.
In this article we will tell you how to properly design a staircase with winder steps so that it is convenient and safe to use.
Safety requirements for stairs
To smooth out design flaws, corner stairs it is necessary to correctly design, calculating the winder steps taking into account the following requirements:
- the depth of the steps in the widest part should not exceed 40 cm, and in the narrow part it should not be less than 10 cm;
- in the middle, all winder steps must be of the same depth, but not less than 20 cm;
- the height of the step can vary from 12 to 22 cm;
- the edge of the tread should not protrude more than 4 cm;
- designing L-shaped stairs, monitor the implementation following formulas(where e is the depth of the step, j is the height of the riser):
- convenience formula: e - j = 12 cm;
- safety formula: e + j = 46 cm.
- step formula: 2 j + e = 62 (60-64) cm;
- if a staircase with a 180-degree turn is being built, then the distance between the flights must be at least ¼ of the width of the step, otherwise the depth of the turning step in the narrow part will be too small (less than 10 cm), which is unacceptable;
- distance from flight of stairs the distance to the ceiling must be at least 200 cm;
Calculation of stairs with winder steps
After the main dimensions of the curved staircase are determined based on the video, you need to calculate the configuration and number of winder steps.
U-shaped staircase
First of all, it is necessary to mark the center of the arc coinciding with the inner radius of the staircase, that is, point “A”. Then determine the number of turning steps: the more there are, the smaller the angle of rotation for each and the more comfortable it will be to move up the stairs.
Let's assume that the winders will be steps up to the seventh inclusive. Then a straight line DE is drawn through the beginning of the eighth step. Line AB divides the staircase into left and right parts. It is necessary to draw a curve in the middle of the march ac, corresponding to the line of movement. From AB on the line of motion a section equal to ½ b, Where b– the width of a regular step. We get point 1. Next, we lay off a segment equal to b and mark point 2. Similarly, at equal intervals, mark the remaining points 3-7.
Next, through point 1 and A we draw a straight line until it intersects with DE. We also draw a straight line through points 2 and A. On section DE we obtain points 1 and 2. We lay off segments equal to section 1-2 on line DE and mark them with numbers 3, 4, 5, 6 and 7, respectively. Now we connect point 3 on the line of movement ac with point 3 on line DE, then connect the corresponding points 4, 5, 6, 7. Thus, the configuration of the steps is determined. A similar calculation is made for the right side of the staircase with turning steps.
As in the case of a U-shaped staircase, point “A” is located and straight line AC is drawn. There are two options for the arrangement of steps:
- straight AC divides the corner step in half;
- two steps are adjacent to straight AC with their edges.
In the second case, similarly with a U-shaped staircase, a line of movement is drawn ac. On a curved section, segments of length b(width of a straight step). The number of winder steps is determined. Suppose these are steps 1, 2, 3 and 4. Then straight line EB is drawn through the end of step 4, where “B” is the intersection of straight lines EB and CA. Next, segment AD is arbitrarily drawn from point “A”, and points 2, 3 and 4 are marked on it so that segment A2 is equal to two parts, segment 23 to three, 34 to four. An arbitrary segment equal to 1 conventional unit (cm, dm) is taken as one part.

Now we connect points 4 and B. From points 2 and 3 to the intersection with AB we draw straight lines parallel to segment B4. The resulting points on section AB are connected, respectively, to points 3 and 2 on the line of movement ac. These lines determine the configuration of the winder steps.
In the case where the straight line AC divides the step in half, the calculation of the winder staircase is performed in a similar way.
Staircase with a 90 degree turn - how to make it yourself
We will show how to make a winder staircase using an example of a design with the following parameters:
- the length of the staircase opening is 2294 mm;
- width - 930 mm;
- ceiling height - 2683 mm.
The corner staircase consists of two flights. There are 8 steps in a long flight, and the top one coincides with the landing of the second floor. There are 2 steps in the lower flight. And three winder steps, the angle of rotation of which is 30°. The wooden staircase project will look like this:

A wooden staircase with a turn is made on two stringers with dimensions of 50x300x3000 mm, one of which is mounted on the wall, and the other on a support post with dimensions of 100x100x2500 mm. It is also necessary to purchase steps measuring 900x300x40 mm, a turning platform 900x900x40 mm, from which the winder steps will be cut, and balusters.
A wooden staircase with winder steps, having this shape and parameters, is manufactured in several stages.
Making stringers
First, you should prepare a template, which is a right triangle, the legs of which are equal to the depth of the tread and the height of the riser. For convenience, the triangle should be secured to the guide rail, as in the photo. Using this template, mark the stringer and cut out the excess circular saw. It must be remembered that in the thinnest part the width of the stringer should not be less than 15 cm.

In the corner we build an impromptu supporting structure, which will burst the wall stringer and serve as the basis for the winder steps.

We secure the upper ends of the stringers with metal corners.
After the load-bearing elements are secured, the following should appear:

When installing stringers, it is important to monitor the level so that subsequently the steps lie strictly horizontal. The most common mistake made by inexperienced craftsmen is that parallelism to the floor is taken for horizontality. But the floor may be uneven, so this parameter must be determined only using a level.
How to make winder steps
Winder steps are cut from a rectangular board 900x900x40 mm. For a staircase with a 90-degree turn, three steps will be enough. To make them, we divide the board into three parts with lines coming out of one corner. We adjust the cut steps to length.


Having decided which varnish to coat the stairs with, apply at least 3 layers to the steps.

Installation of stairs with winder steps
To secure the winder steps, grooves are cut into the pillar, the height of which is slightly less than the thickness of the board. This way we will ensure reliable fixation of the steps on the inside of the stairs. And on the outside, we are modifying the supporting structure so that steps can be placed on it.
From the outside of the flight of stairs, the turning steps are screwed to the supporting frame using self-tapping screws. The inner ends of the steps are inserted into the cuts and, to strengthen the structure, are glued with PVA glue mixed with sawdust.

We cut the end of the bowstring at a right angle to the floor so that the entrance pillar can be installed.

Installation of railings
Now you need to install the balusters. Sometimes they are attached from below through the steps using self-tapping screws, but this method is unreliable. It is better to use dowels - cylindrical wooden rods.
To do this, a hole is drilled in the steps, the diameter of which is slightly smaller than the cross-section of the dowel, and filled with glue. A similar hole is made in the balusters, and it is very important that it is exactly in the center. If the baluster has a rectangular shape, then the center is determined as the intersection of the diagonals of the rectangle. Try to drill the holes as accurately as possible so that they turn out strictly vertical, because the position of the balusters will depend on this.

A rope is stretched between the first and last pillars, along which the angle of inclination of the railing is marked on all balusters. Next, according to the applied marks, the tops of the racks are cut off. In this way we prepare the balusters for installing the handrail.

The handrail can be secured using simple self-tapping screws (hidden), and the attachment points can be hidden with putty.

The single-flight staircase with winder steps is ready. This is what we got.

With this manufacturing method, the load on the lower turning stage will act along the grain of the wood, which is undesirable, as it weakens the structure. In this case, it will be necessary to additionally strengthen the step with support, which is what we did.
 Making pancakes with sausage is an easy and rewarding task
 I dreamed of a squirrel: different interpretations from dream books
 The best games about knights Strategy with large-scale battles on PC
 Nekrasov's poem "Grandfather": analysis and characteristics of the work
 Why do you dream about a house fire?
 Red fish in the oven - the best recipes for simple and original dishes
 How to solve irrational equations