Carpentry workshop: setting up, choosing tools, learning to work with wood. Working with a hand router on wood Woodworking at home
Wood is the most practical and natural material, from which you can make household items, and even children's toys. In addition, many non-residential buildings are being built from. Therefore, many “homemade craftsmen” are not averse to having wood for their home workshop. They can be purchased at a specialized store or made independently from scrap materials. Let's talk in more detail about the second method of arranging your own work area. .
Read in the article
Woodworking machines for the home workshop: features and varieties
The variety of woodworking machines for the home workshop is wide. Each has its own purpose and assembly methods homemade version. Among all the options, there are narrowly targeted and with a large number functions, but with modest dimensions:
- Universal household. These are mini-devices for processing wood elements. Used at home or on personal plot. Such a small unit performs several functions simultaneously, which is why it is very popular among “homemade” ones.

- Multifunctional for your own carpentry workshop. Can be used in small production.
- Lathes are used to create wooden products by turning. There are compact options that won't take up much space in the garage.
- They are used to release doors and windows.
- To plan, you will need a thickness planer.
- Copy-milling machines are used to create products of unusual shapes.
- Planers can plan the blank on one side.
Related article:
To simplify work operations and reduce errors, specialized equipment is used. This article tells you how to choose and purchase the right ones for everyday use.

Many other options for woodworking machines are made by hand according to diagrams. Popular devices that are very useful in the home workshop include:
- lathe;
- milling equipment;
- thickness planer;
- grinding and jointing option.

Let's consider the features of each and options for self-assembly of such equipment for your own woodworking mini-workshop.
Features of a wood lathe for the home workshop
A lathe is an indispensable thing in the workshop of those who love to work with natural wood. Using it, you can make the surface corrugated or bore holes, as well as cut out real works of art of the most unusual shapes.
Structurally, a woodworking machine differs from that in the absence of a cooling system. In this case, the rotation speed of the main element is lower, but there is power adjustment. Below are several drawings with the dimensions of a DIY wood lathe:


Often, for their workshops, “homemade” people make lathes and copying machines for wood with their own hands. They are used to produce a large number of identical parts, for example, columns for or for stairs. Here are examples of finished machines in workshops:
1 of 4


A video about a homemade woodworking machine with your own hands will help you understand the assembly sequence and the selection of tools necessary for the job:
wood lathe
Methods for assembling homemade wood lathes with your own hands with photo examples
They make mini-wood lathes with their own hands, which take up little space or can be placed in a room in a city apartment. Here are some examples ready-made devices from "homemade":
1 of 4


When thinking about how to make wood lathes yourself, first select a suitable drawing. Then, prepare the materials and tools to create your own unit. During the manufacturing process the device will be useful:
- bed;
- front and rear struts;
- leading and controlled centers;
- tool holder.
Important! For homemade machine A motor with a power of up to 250 W and a number of revolutions of up to 1500 is sufficient. For larger elements, select another version of the “engine” with higher performance.
To assemble all the elements into one structure you will need a drill, a file, a small angle grinder and. Below are instructions for assembling a mini lathe:
| Illustration | Sequence of actions |
 | Choose a wood sharpener or make it yourself, but so that you don’t have to change it later. Use a high axis position with closed type bearings and a washer for fixing the discs. On one side of the axis you install disks that control the rotation speed, on the other - a faceplate for working with wood. |
 | The bed is made of two parallel channels, between which there is a guide. The length of the workpieces directly depends on the size of the guide. On one side of it, weld a channel in the shape of the letter “P”, and cover the other end with a metal corner. |
 | The support can be assembled from several pipes inserted into each other so that the height can be adjusted. The desired position is fixed using bolts. Use a horizontal bar as a support. Observe all dimensions from the drawings. |
 | An old drill cartridge acts as a pulley. The driven elements are assembled from plywood in two layers. The faceplate is also made from plywood. Place the metal base on supports. At the location of the headstock, assemble the platform. It can also be made from plywood. Attach the electric motor to the site. |
 | You fix the motor on a small plate to change the tension of the belt. When all the elements are assembled according to the diagram, check the functionality of the device and proceed to active use. |
There are many ways to assemble homemade equipment. Choose the appropriate one based on the availability of material and the required performance.
Specifics of cutters for wood lathe
Cutters are one of the main elements of a lathe. The area and depth of the surface to be removed from the part depends on their choice. They consist of a cutting part and a section for fastening to equipment.

The cutting edge has one or more surfaces. And the main indicator of cutters is the width of the blade, its shape and the ability to adjust. All models are divided into two subgroups:
- radial, installed perpendicularly and aimed at removing a large surface;
- tangential: for tangential processing and the formation of complex patterns.

When making cutters for a wood lathe yourself, follow a few rules:
- The length of the working surface should be between 20-30 cm. This size ensures a reliable grip on the tool and sufficient space for placement on the stop. You will also provide a supply for regular sharpening.
- To ensure that the blade is firmly attached to the handle, the tail should be of sufficient length. If you are making a cutter from a file or rasp, then lengthen the tail by 1.5 - 2 r.
- The thickness of the working case must be sufficient to withstand impacts during the initial processing of parts.
- The length of the handle made of wood or plastic is 25 cm. Otherwise, holding such a tool in your hands is inconvenient.

For an option for making a homemade cutter, watch the video:
wood lathe cutters
Making a stationary circular saw with your own hands
You can buy a ready-made one from 9 thousand rubles. It will ensure proper work safety and save time on sawing wood. But, you can not spend money and make your own machine according to drawings and blanks.

Despite the external complexity of the design, it is not so difficult to assemble it yourself at home. Any stationary saw model consists of several elements:
- disc with teeth;
- engine;
- adjustable side support;
- shaft

To assemble all the parts of the circular saw, prepare:
- metal sheet from 8 mm thick;
- metal corner 45 by 45 mm;
- electric motor;
- disc with teeth;
- ball bearing;
- block of wood;
- a piece of plastic or leftover laminate.
To make all the elements correctly, you should choose a drawing that will indicate the dimensions of the table for a hand-held circular saw, as well as all other dimensions and materials for the work. Here are some examples of ready-made schemes:


The assembly of the structure itself will proceed according to a certain plan, regardless of the chosen scheme:
| Illustration | Sequence of work |
 | The tabletop must be made strong and stable. Use sheet metal according to your dimensions. If you plan to install other devices on the table, then arrange a place for them using a thick one. |
 | When making a guide for a circular saw with your own hands, pay attention to its height. It should protrude 12 cm above the table. This way you will have the opportunity to process the boards in width and thickness. To make a guide, take two pieces of corner and a clamp. |
 | Make the central saw adjustable in height. |
 | For the motor, mount a separate platform on the same axis with the rocker arm. Fix it with a bolt with a diameter of 1.5 cm. Install a metal plate on the side of the saw, having previously made a hole in it through which the bolt with attached handles passes. |
More detailed instructions For making a stationary circular saw, see the video:
circular saw
We make a circular saw from an angle grinder with our own hands: drawings and production videos
To create a circular machine with your own hands, you need to prepare a motor, a profile rectangular pipe and steel corners. To get a truly comfortable saw, it is worth considering a stop, an axis handle and rods for adjustment.
Here are some do-it-yourself drawings of a stand for an angle grinder. Using them you can assemble a stop that allows the saw to slide.


The order of assembly of the stop will be as follows:
- Several metal angles are required for a standard "T" stop. Place them at a distance of 3-4 mm on each side of the disk.
- The edges at the bottom must be rounded to avoid scratches on the workpiece during operation.
- Attach the corners with cross braces to the bolts and nuts on the front and back. The slots are fixed with washers.
- Place a metal clamp on the body. At the rear, you fasten the elements so that the thrust post and the clamp become one.
- Drill 2-4 mounting holes in the gearbox housing. It is more convenient to do this in the disassembled state of the element.
After assembling the stop, make an axial handle and an adjusting rod. Watch the video on how to make a frame for an angle grinder with your own hands according to the drawings:
After connecting all the elements, your homemade circular grinder will be ready. In addition to it, various parts can be made. Here are some photos of DIY circular saw accessories:


We make a wood milling machine for a home workshop
Necessary for working with shaped wood parts. They are used for flat milling and profile processing. Professional equipment is multifunctional and costs a lot of money, so more and more “homemade” people are assembling such equipment for workshops and garages on their own.

The set of homemade wood milling machines includes:
- Drive mechanism. This is an engine whose power ranges from 1-2 kW. With such a motor, you can use various tools to work with wood without fear of failure.
- Lift for adjustment. Typically, it includes a body, sliding skids, carriages, a fixing screw and a threaded axle. During operation, the carriage moves up and down, and a screw is needed to fix it at the required level.
- Support. The table is made from solid wood.
Before assembly, be sure to draw up detailed drawing with all sizes. For manual wood milling machines, you need to think through everything in advance down to the smallest detail.


The sequence of self-assembly of a convenient and practical milling machine woodworking for the home workshop is described in the video instructions:
If you are thinking about purchasing your own equipment rather than self-assembly, then to understand how much a manual wood milling machine costs, look at the table with models and prices:
| Model name | Specifications | |
 | site size | 64 by 36 cm |
| possibility of vertical work | There is | |
| equipment weight | 15.7 kg | |
Milling table Kraton MT-20-01 |
||
 | engine power | 750 W |
| transmission type | belt | |
| spindle speed | 11,000 rpm | |
| vertical stroke | 2.2 cm | |
| spindle diameter | 12.7mm | |
Milling machine Corvette-83 90830 |
||
Mikhail, Volgograd:“I purchased a table for the Kraton MT-20-01 machine. Inexpensive and convenient. Moreover, it is compatible with different models equipment."
Dmitry, Moscow:“I bought myself a Corvette 83 90830 for my home. Attracted small sizes and engine power. It's been working well for over a year."
There are many models of wood milling machines available in online stores and specialized departments, but the cost of a complete set rarely falls below 30 thousand rubles. That is why many “samdelkin” assemble equipment for their workshop on their own.
Making a CNC milling machine with your own hands
You can make your own computer numerical control equipment with my own hands. To do this, select the appropriate drawings. You will need to assemble the model with your own hands strictly according to them.


Wood milling machines must have great strength, so it is better to take a rectangular beam mounted on guides as a basis. The lifespan of home equipment and its performance depend on proper assembly. Watch the video instructions for making such a device:
Below are photos of finished models of CNC woodworking machines with your own hands from professional “homemade” ones:
1 of 4


Milling cutters for woodworking machines: features and varieties
The cutter must withstand high rotation speeds during operation. Only in this case will holes of the desired shape be obtained. All options are divided into several subgroups:
- Cone-shaped. Used to process various types of wood at different angles.

- Profile. Used to decorate elements.
- V-shaped. You can make holes at 45⁰.
- Rectangular - for creating grooves.
- Disk. Grooves of different sizes are cut out.
- Moulders for rounding edges.
- Rebated for working with quarters.
Below are photographic examples of cutters for CNC machines for wood, which are similar in principle to conventional ones, but have a “tail”:
1 of 4

To properly manufacture the equipment, use the thickness planer drawings. You must assemble the structure with your own hands strictly according to them.


- Disk. The working surface is made in the form of a circle, onto which sandpaper or another sanding device is fixed on top. You can adjust the processing speed without changing the speed.

- Tape. A continuous strip of sandpaper is stretched between the two shafts. It’s not difficult to make belt sanding machines with your own hands; just prepare a detailed drawing and read the instructions. It is important that the sandpaper in the working surface does not bend under the weight of the workpiece.

- Drum grinders woodworking are common among carpenters. Used for horizontal leveling of planes using the jointer method. The principle of operation is to attach the sandpaper to one or two drums, and under them there is a table with height adjustment. You can set the required calibration and make workpieces of the same thickness.

- Calibrating and grinding machines for wood– universal machines that combine grinding and leveling of workpieces. Two types of equipment are used: disk and tape. You can make such a device yourself, with making the right choice drawings.

To assemble correctly suitable option machine for grinding and processing wood, select a suitable drawing and all components. Below are some examples of accessible and convenient equipment schemes:


Features of do-it-yourself wood jointing machines
A jointing machine for working with wood is used at the final stage of working with elements. It can make the surface perfectly smooth and even. Most purchased models are equipped with a surface thicknesser, which allows you to make the thickness of the entire workpiece the same along its length.

A wood planing machine for the home, both homemade and purchased, includes several elements in its design:
- bed;
- planing shaft;
- table regulator;
- motor.
To assemble a jointer with your own hands, you first need to decide on the dimensions and prepare a detailed drawing. Here are some examples from “homemade” ones:


jointer
To create the simplest jointer, without additional functions, follow the following sequence of actions:
- Prepare all the parts and tools for work, as well as a drawn drawing.
- You make blanks to exact dimensions. Please note that the place for installing the bearings is prepared from several elements.
- Prepare a place for installation for the selected motor. You can attach the unit to a skid.
- Assemble the rotor with bearings and install it in place according to the diagram. In this case, you immediately connect the engine using a belt drive. The rotor should rotate freely.
- Collecting work surface of two parts: giving and receiving. The second is slightly higher (2-5 mm). For arrangement, you can use multilayer plywood or sheets of metal.

For a complete understanding of the work progress, watch the video.
From time immemorial, wood has been a priority building material, raw materials for the manufacture of household utensils and decor. The emergence of new products in this area does not prevent the tree from maintaining high popularity and remaining in demand. One of the important qualities of this natural material is its simple processing. This allows not only experienced craftsmen, but also amateurs and creative people to create unique decorative elements, building structures. Special tools for woodworking are indispensable assistants in such operations.
Main types of tools
Specialists in the field know very well what devices and mechanisms can be useful in various works with a tree. It is quite difficult for a beginner to understand the huge assortment. In order to create your own universal arsenal, allowing you to perform any operation, you need to become familiar with the classification of tools, their types and features.
These products include professional and household products, universal and specific ones. In the woodworking tools category, you can choose:
- mechanical hand products;
- electrical appliances;
- machine equipment.
Most owners who prefer to do their own repairs and construction have simple hand tools. The use of various electrical devices, networked and mobile, simplifies the process and allows complex operations to be performed conveniently and efficiently.
Electric woodworking tools make the process much easier
Machines designed for wood processing are installed not only in specialized enterprises. IN model range There are also household versions of the equipment, which have compact dimensions and are easy to operate.
Hand tools for the DIYer
In the range of mechanical woodworking tools there are many universal devices that are used in the most different jobs. Every craftsman should have them in stock. The presence of this tool makes it possible to perform a lot of tasks around the house and on the site. A practical owner should have:
- hacksaw saw;
- axe;
- chisel;
- hammer;
- plane;
- rotation

Hand tools for wood
These are the carpenter’s main assistants, without whom it is impossible to do construction and repairs. A hacksaw is a tool consisting of a plastic or wooden handle and a metal blade with teeth. Saws are produced in a wide range, differing in size and size of teeth. The tool is designed to divide a whole part into elements and eliminate excess. For small operations, a special jigsaw with a thin blade is used. Cleavers and axes are used for splitting, chopping, and trimming.

Jigsaw with thin blade for small operations
A metal chisel, consisting of a working part and a handle, is useful in chamfering, forming recesses, etc. When working with this tool, a special hammer is used, which is called a mallet. A plane will help make the surface smooth and give the board the ideal geometry. If you need to use it regularly, it is worth purchasing a power tool for woodworking. There are several varieties of devices of this type: tongue and groove sheets, jointers, etc. In the formation of holes in wooden materials A brace is used that works with various types of drills.

A plane will help make the surface even.
In his work, the master will also need special materials for processing, allowing him to create a perfectly flat, smooth surface. In such operations, sandpaper is used. You need to stock up on material with different sizes of abrasives in order to perform rough and finishing work.

Sandpaper for finishing work
Electric tool for woodworking
Qualified specialists and many home craftsmen prefer to acquire electrical equipment that allows them to quickly and efficiently perform various types works This woodworking tool is offered in a wide range. The most popular devices include electrical ones:
- planes;
- drills;
- chain saws, circular saws;
- screwdrivers;
- grinding machines, etc.
An electric planer greatly simplifies the process of achieving ideal results. wooden surface. Using a drill, holes of the required size are created. You can also use this device for installing fasteners and mixing solutions.

An electric planer greatly simplifies the process.
Electric grinders are very popular among professionals and amateurs. Production uses belt models designed for large volumes of work. In everyday life and repairs, vibration and planetary tools are used for sanding wood.
A chain saw or circular saw is an indispensable piece of equipment for a craftsman who has to carry out large volumes of woodworking. Modern multifunctional models perform a range of operations.

A circular saw for wood is an indispensable tool
For a home craftsman, a specialist who makes complex structures, a milling device will come in handy. Mechanical and electrical woodworking tools allow you to create shaped elements, stairs and window frames, and furniture.
Not only hand jigsaws are used in creating small elements, in work that requires special precision. You can also purchase an electric wood carving tool.

An electric jigsaw will perform work that requires special precision.
To the benefits electrical appliances refers to the efficiency of operations, the absence of the need to expend a lot of effort. For stationary work, it is advisable to purchase models that operate from the network. Mobile devices with rechargeable batteries allow you to perform operations anywhere.
Additional accessories
In addition to the main tool, additional devices are also used when working with wood. For the home handyman will come in handy:
- workbench with a vice;
- pliers and pincers;
- clamps;
- rulers and tape measure;
- carpenter's pencils;
- corner and protractor;
- plumb line

The workbench guarantees ease of use
The presence of a workbench guarantees ease of use. This design is used to perform a large number of operations. It is equipped drawers, they store various little things that the master should always have at hand. Using pliers or pliers, you can easily remove hardware and quickly dismantle it. Clamps of different configurations are useful for fixing elements.
You can choose wisely necessary tool woodworking in a large assortment without spending extra money. Experienced professionals give several recommendations:
- When choosing hand tools special attention it is necessary to pay attention to the quality and reliability of the working part. When working with it you have to use force. Durable, well-sharpened products will allow you to spend less effort and time.
- Any tool should be convenient. Handles, configurations, dimensions of equipment and devices are selected taking into account personal characteristics. Comfortable models will eliminate inconvenience, fatigue, and ensure safety.
- Home craftsmen who rarely use woodworking tools should give preference if necessary manual types. This will significantly save the cost of purchasing equipment. If such work is performed regularly, it is better to purchase electric analogues.

For regular work, purchase an electric woodworking tool.
You don't have to have every type of tool in your arsenal. You can limit yourself to several types of universal devices if working with wood is not a professional activity or a favorite hobby.
Wood carving assistants
The skill of wood carving has been highly valued at all times. Exquisite figured elements decorate the facades of houses, furniture items, and household utensils. The advent of CNC machines that perform this operation at a high level has not made hand carving less popular. It remains one of the most popular hobbies for creative people. Special tools for wood cutting allow anyone to master this skill.

Wood carving remains one of the most popular activities for creative people
There are several types of this art. The flat carving technique is used to create silhouettes with shallow contours. In the relief method, the decor protrudes above the recessed background. For geometric patterns, the technique of deepening lines is used. When performing openwork carving, gaps are cut out. Using this art, you can create three-dimensional images in 3D format.
A carving specialist uses a large number of different tools. They are selected depending on the type of work. The master’s arsenal includes universal products that are used in many operations with wood. These include hacksaws, chisels, and milling cutters. There is also a specific tool:
- knives;
- engravers;
- incisors.
Woodworking tools are selected depending on the type of work
Carving knives
Knives help the master create skillful carvings. There are many types of this hand tool. The most popular options include:
- Tatyanka;
- Bogorodsky;
- jamb.

Wood knives for creating intricate carvings
The Tatyanka knife has a long handle. When working, the beveled blade is located 2 centimeters from the master’s hand, which allows you to create small elements. Bogorodsk knives are available in several models; they can be used for rough and fine carving. This tool has a semicircular handle, and the blades are partially sharpened, similar to a penknife. The structure of the jamb is identical to that of a professional shoemaker's tool. Its blade is beveled at an angle of 45°, sharpening is one-sided.

Bogorodsk knives for fine carving
During operation, wood cutting tools become dull and require regular sharpening. The craftsman must have special devices on hand to maintain the necessary sharpness of the blade. For this we use:
- bars with surfaces of different grain sizes;
- fabric skins of several numbers;
- leather belts and special grinding paste.

Wood cutting tools need regular sharpening
Chisels in wood carving
An important working tool is a chisel. These devices also have several types. Masters use devices:
- straight,
- reverse,
- corner,
- curved,
- cranberries.
Chisels differ in profile shapes and create a groove of the desired configuration. When working with the tool, a mallet is used. Acute working part allows you to do without power load. Available in modern assortment electric chisels, which can be powered by mains or battery.

Chisels differ in profile shapes
When choosing tools, you must be guided by their purpose:
- jigsaws and chisels are used in making sculptures;
- wooden posts and balusters are decorated with a hacksaw or router;
- An engraver and chisels will help you make ornaments on trim, planks, and furniture.
Engravers making carvings
A popular carver's tool is the engraver. It is an excellent replacement for a traditional cutter and performs complex operations faster and better. There are several types of such devices. The work can be used:
- hand engraver with a set of working attachments;
- flexible shaft;
- laser device.

Hand engraver performs complex operations efficiently
Hand engravers can be installed on a screwdriver or drill, sharpening machine. This set is a convenient electric tool for making ornaments, openwork, figured or applied carvings.
Flexible shafts are equipped with chucks for fixing on a standard drill. The working tool can be a drill, a milling cutter, or a bur. It is advisable to have a sharpening machine that will allow you to regularly adjust the equipment and ensure the sharpness of the working blades.

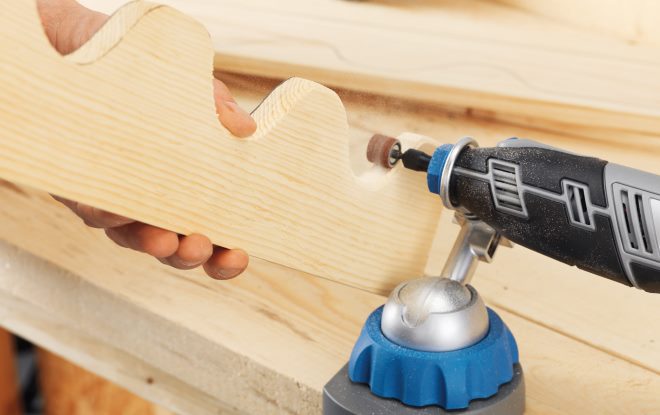
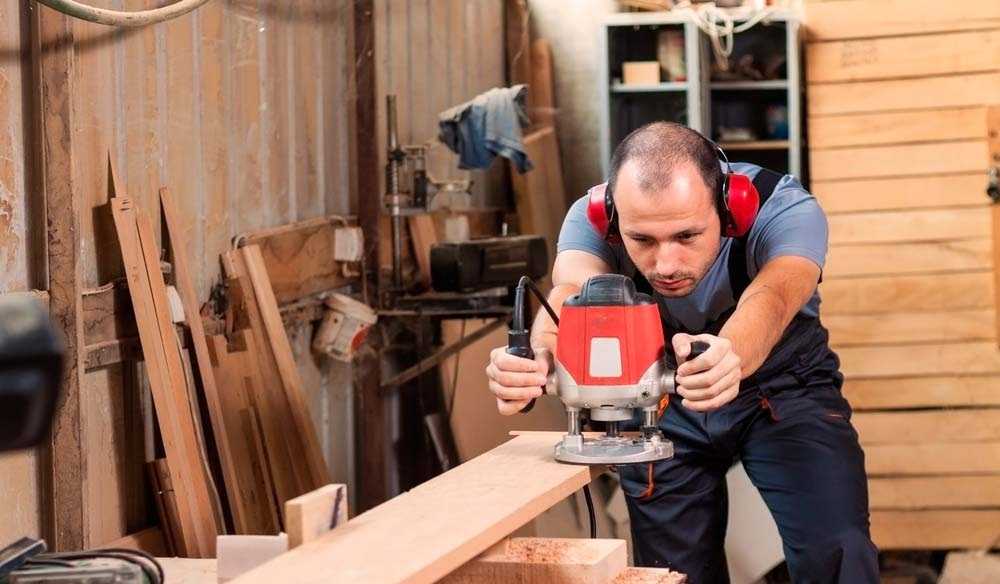
Having a milling machine really simplifies the work of inserting hinges, forming complex holes, recesses, wood carving, etc. But this does not mean at all that it is necessary to have professional and expensive equipment: it is enough to have a simple manual device.
The only thing you need is to be able to basicly handle wood and use power tools. In addition, you need to have a desire, otherwise without this there will never be a result. Those who have no desire to work simply buy furniture or hire craftsmen to, for example, install new door and cut the locks. Any work, especially with power tools, requires certain knowledge, and especially safety precautions.

The milling device is designed for processing both wood and metal. With its help, it is possible to form recesses or holes of any configuration. This greatly simplifies tasks such as inserting hinges and inserting locks. Doing this with a chisel and an electric drill is not so easy, and it takes a lot of time.
There are stationary milling devices and portable (manual). Hand-held electric milling machines are considered universal devices, with the help of which, in the presence of attachments, it is possible to perform operations for various purposes; you just need to change the position of the part, in relation to the device or vice versa.
Stationary devices are used in plants or factories where mass production of wood or metal products is established. Under such conditions, the cutting attachment is stationary, and the workpiece moves along the desired path. When using a hand tool, on the contrary, the part is fixed motionless and only then it is processed, although there are parts that require fixing a hand tool. This is provided for in the design, therefore, it is considered more universal. This is especially true when you need to process large number parts, but using a stationary machine is not possible.
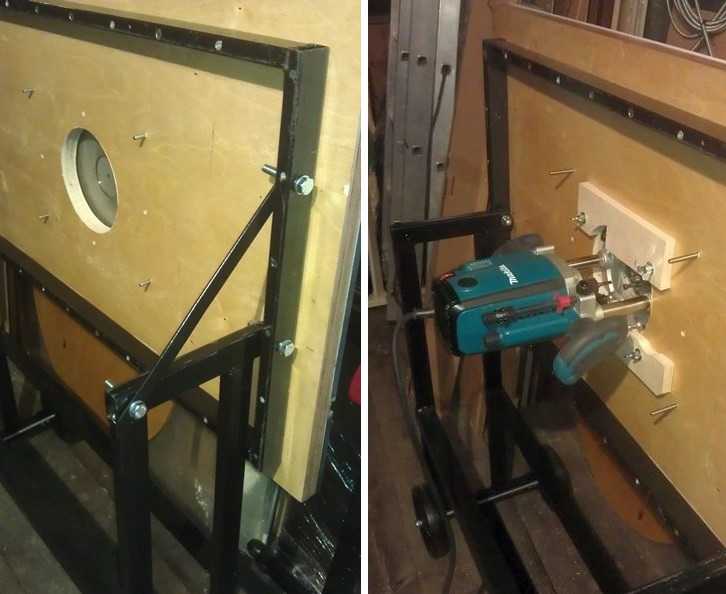 A homemade milling machine is a horizontal platform with a hole in the center, to which a hand-held device is attached from below.
 There are many types of milling machines, but for use at home or for starting your own business, universal models are more suitable. As a rule, they are equipped with a set of cutters and various devices for performing various types of operations. The only thing is that if you have a manual milling machine, simple operations can take much longer than when using a stationary machine.
Using a manual milling device it is possible to:
- Make grooves or recesses of any shape (curly, rectangular, combined).
- Drill through and non-through holes.
- Process ends and edges of any configuration.
- Cut out complex shaped parts.
- Apply drawings or patterns to the surface of parts.
- Copy parts if necessary.
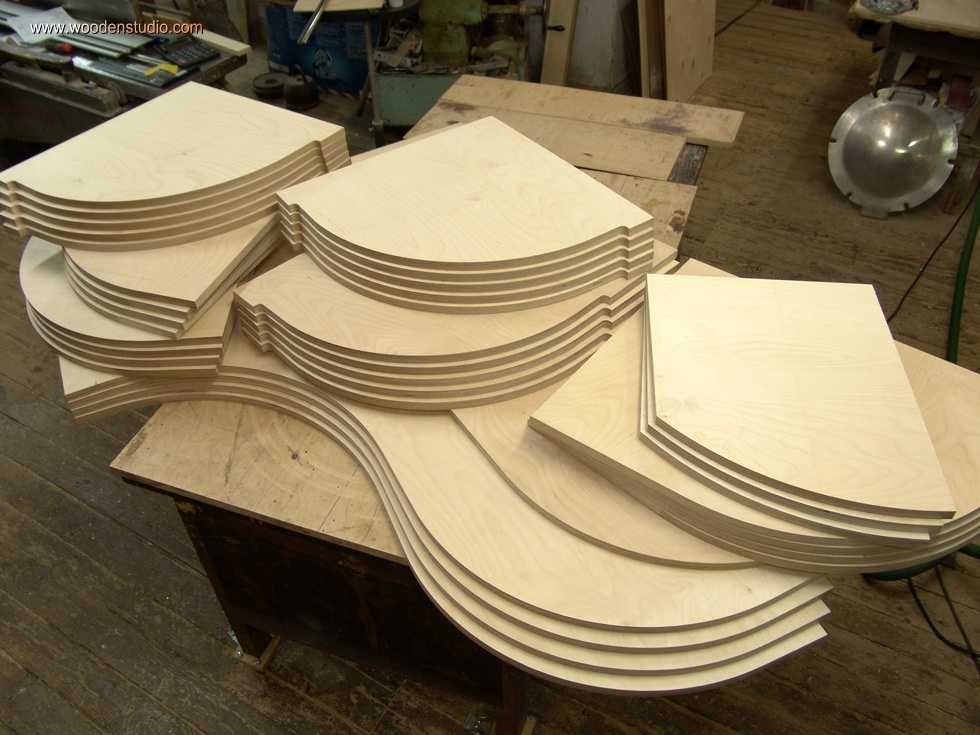 Copying parts is one of the functions of any electric milling machine.
 The presence of such functions makes it possible to simplify the production of the same type of furniture or the production of identical parts not related to furniture production. This is one of the main advantages of this tool. As a rule, to produce parts of the same type, it is necessary to install copying machines, which are designed to perform only one operation, which is not always profitable, especially in small enterprises.
Getting started and caring for the tool
To understand how this device works, you should familiarize yourself with its main parts and their purpose.
Composition and purpose of main components
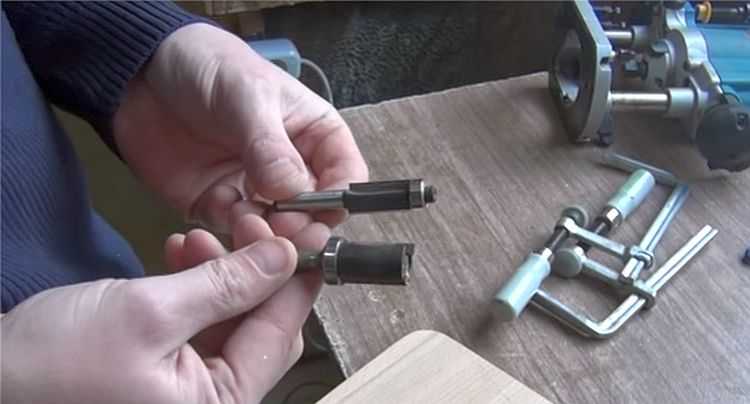
A manual milling device consists of a metal body and a motor, which is located in the same body. A shaft protrudes from the housing, onto which various collets are placed, serving as adapters. They allow you to install cutters of various sizes. The cutter is inserted directly into the collet, which is secured with a special bolt or button, which is provided on some models.
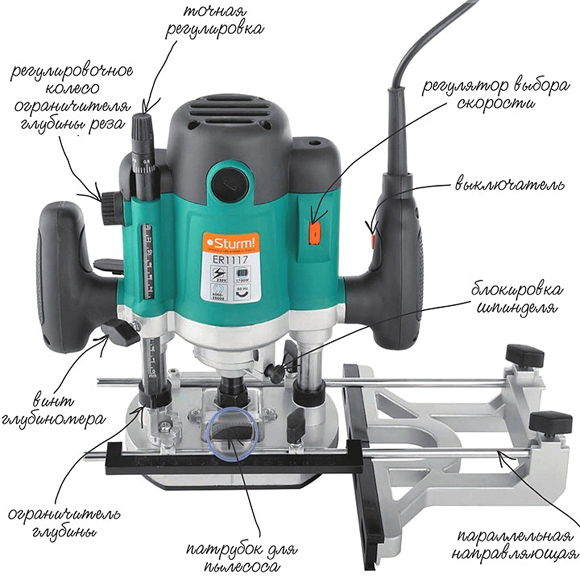 The main elements of a manual milling device and their purpose.
 The design of the milling device includes a metal platform, which has a rigid connection to the body. It is attached to the body by means of two rods. On the outside, the plate has a smooth coating that ensures smooth movement during operation.
The manual milling device has some characteristics that can be adjusted:
- Due to the handle and scale for adjusting the milling depth. Adjustment is carried out in 1/10 mm increments.
- By adjusting the rotation speed of the cutter.
On initial stages When mastering the tool, it is better to try working at low or medium speeds. Although you should always remember that the higher the speed, the better the work. Especially if this concerns critical, visible areas that cannot be masked.
In addition to these levers, there is also a button to turn the product on and off, as well as a lock button. These elements are considered basic, ensuring high-quality and safe performance of work. There is also a parallel stop here, which contributes to ease of use. It can be rigidly fixed or with the ability to adjust the shift of the working area away from the center.
Caring for a hand-held milling device

Usually, a factory product falls into the hands of a person tested and lubricated, so no additional measures should be taken. Only during its operation you need to monitor its cleanliness and serviceability. At the same time, it should be regularly cleaned of dust and the lubricant should be changed, if so written in the passport. Lubrication is especially necessary for moving parts. As an option, you can use aerosol lubricants, but you can also get by with regular ones, such as Litol. The use of thick lubricants is not recommended, as chips and dust stick to them. If aerosol lubricants are used, then this factor can be eliminated.
The sole, the smooth part of the body, also requires lubrication. Regular lubrication will ensure smooth movement.
Despite this, the purchased item should definitely be checked for quality of assembly and presence of lubricant.
Unfortunately, not all manufacturers, especially domestic ones, care about build quality. There are cases when, after the first hours of operation, screws or screws are unscrewed from a product because they were not tightened properly.
Rotation speed adjustment
The operation of any tool is associated with certain conditions related, first of all, to the nature of the material being processed. It could be plywood composite material or regular wood. Depending on this, the rotation speed on the electrical appliance is set. As a rule, the technical data sheet always indicates the operating parameters of the device, depending on the technical characteristics and characteristics of the surfaces being processed, as well as the cutters used.
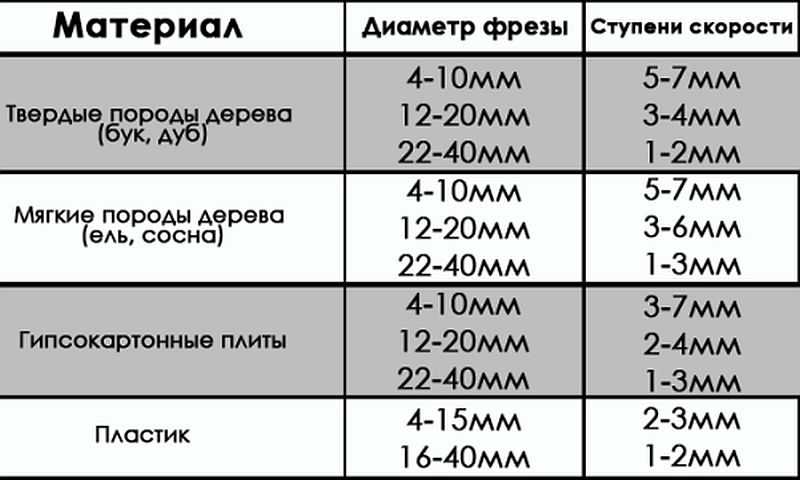 Indicators of processing speeds when using various cutters.
 Fixing the cutter
The first thing the work begins with is installing and securing the cutter. At the same time, you should adhere to the basic rule - all work is performed with the cord plug removed from the socket.
The cutter is installed according to certain marks, and if they are missing, then to a depth of no less than * the length of the cutter itself. How to install a cutter on a specific model can be found in the instructions, which must be included in the technical documents for the device. The fact is that each model may have its own design features and it is not possible to talk about this in the article.
 Installing the cutter on the device before starting work.
 There are both simple and more “advanced” models, as they say. Some models have a shaft rotation lock button, which makes installing the cutter easier. Some, especially expensive models, are equipped with ratchets. So it won’t be possible to specifically describe the process of installing the cutter, and it doesn’t make sense, since everyone who is familiar with the operation of such devices will figure it out in a moment.
Milling depth adjustment
Each model has its own maximum milling depth. At the same time, it is not always the maximum depth that is required, but a certain depth that is set before work. Even if maximum depth is required, in order not to overload the device, the milling process is divided into several stages, changing the milling depth in steps. For adjustment, special stops are provided - limiters. Structurally, they are made in the form of a disk located under the bar, on which stops are fixed various lengths. The number of such legs can be from three to seven, and this does not mean that the more there are, the better. It is better if it is possible to adjust each of the legs, even if their number is minimal. To secure this stop in the optimal position, you should use a lock in the form of a flag.
The process for adjusting the milling depth is as follows:

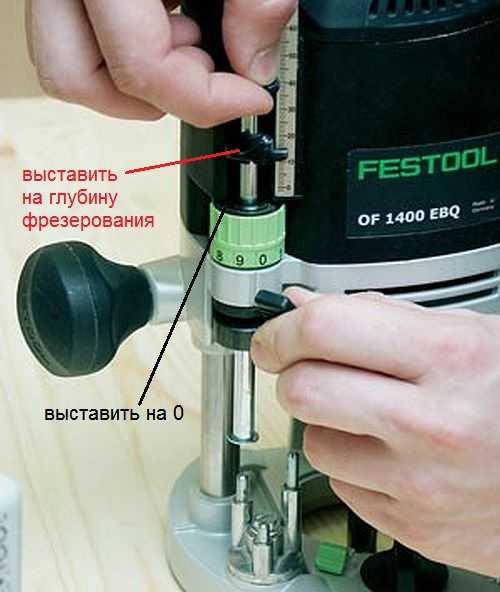 Thus, the workpiece is milled to a given depth.
 On high-quality, expensive models there is a wheel for precise adjustment of the milling depth.
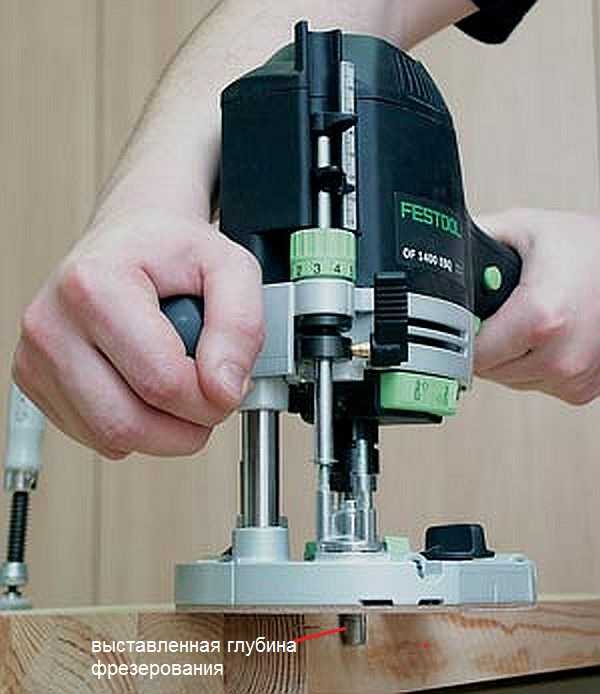 Using this wheel, you can more accurately set the depth without disturbing the previous setting.
 This wheel (green in the photo above) allows you to adjust the depth within small limits.
Milling cutters for hand milling tools

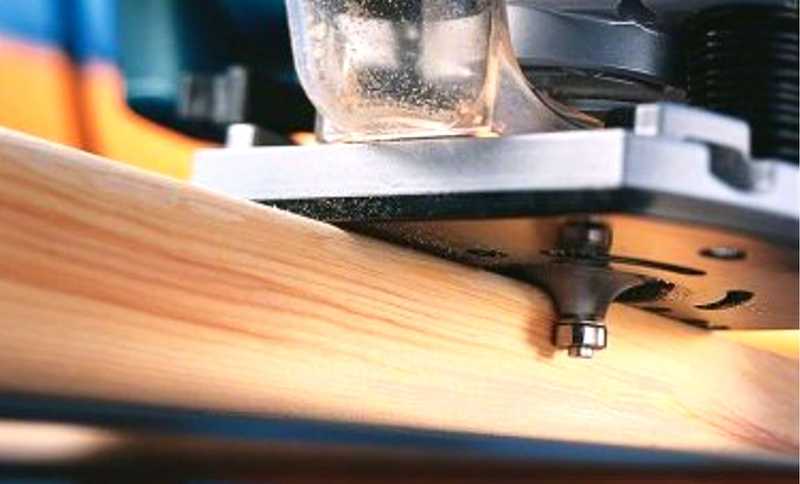
A milling cutter is a cutting tool that can have an intricately shaped cutting edge. As a rule, all cutters are designed for rotational movements, therefore have cylindrical shape. The shank of the cutter, which is clamped in the collet, has the same shape. Some cutters are equipped with a thrust roller, so that the distance between the cutting surface and the material being processed remains constant.
Milling cutters are made only from high-quality metals and their alloys. If you need to process soft wood, then HSS cutters will do, and if you need to process hard wood, then it is better to use cutters made of harder HM alloys.
Each cutter has its own technical specifications, which provide it with high-quality and long-lasting work. The main indicator is maximum speed its rotation, which should never be overestimated, otherwise its breakdown is inevitable. If the cutter is dull, you should not try to sharpen it yourself. Sharpening of cutters is carried out using special, expensive equipment. After all, you need to not only sharpen the cutter, but also maintain its shape, which is no less important. Therefore, if for some reason the cutter becomes dull, it will be cheaper to buy a new one.
The most popular cutters
There are cutters that are used in work more often than others. For example:

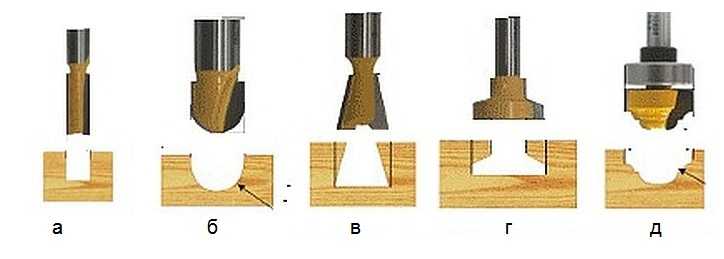 Groove molds are designed to create recesses in any location on the workpiece.
 There are milling cutters that are simple, monolithic, made from a single piece of metal, and there are typesetters. Set cutters consist of a shank, which serves as the basis for a set of cutting elements. By selecting cutting planes and installing them on the shank, using washers of various thicknesses, you can form an arbitrary relief on the surface of the workpiece.
 A set cutter is a set of cutting surfaces and washers that allows you to assemble a cutter of the desired shape.
 In fact, there are a lot of cutters and this is only a small fraction of what is produced. All cutters differ in the diameter of the shank, the diameter of the cutting surfaces, their height, the location of the knives, etc. As for manual milling equipment, it is enough to have a set of five of the most popular cutters. If necessary, you can purchase them at any time.
Rules for working with hand milling tools
Working with power tools requires special rules, especially when there are rapidly rotating elements. In addition, as a result of work, chips are formed that fly in all directions. Despite the fact that most models are equipped with a protective shield, this does not fully protect against the flow of chips. Therefore, it is better to work with such a tool wearing safety glasses.
 The photo shows a model where a vacuum cleaner is connected to remove chips.
 General requirements
If you follow the basic requirements for safe work with electrical manual router, then the end result will please you with the quality of work and a safe outcome. These are the conditions:

The requirements are not very complex and quite feasible, but to ignore them means putting yourself in danger. And one more thing, no less important, is the ability to hold a milling tool in your hands and feel how it works. If serious vibrations are felt, then you need to stop and analyze the reasons. It is possible that the cutter is dull or there is a knot. Sometimes it is necessary to correctly set the rotation speed of the cutter. Here you can experiment: either add speed or reduce it.
Edge processing: using templates
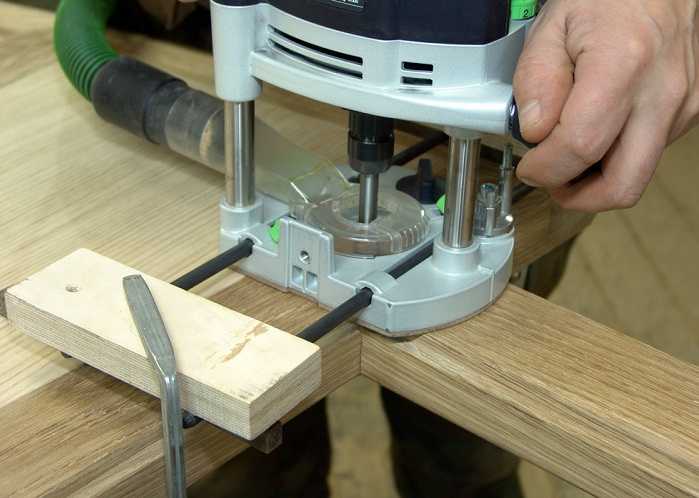
It is better to process the edges of a wooden board using a surface planer. If this is not possible, then you can use a hand router, although this will take some time. These works are carried out both without a template and with a template. If there are no skills or very few of them, then it is better to use a template. For processing edges, straight edge cutters are used, both with one bearing at the end of the cutting part and with a bearing at the beginning (see photo).
 Edge cutters.
 You can use an already processed board or other flat object as a template. Moreover, the length of the template must be greater than the length of the workpiece, both at the beginning and at the end of the workpiece being processed. This will avoid unevenness at the beginning of the edge and at the end. The most important thing here is that the template or object acting as a template has a smooth and even surface. In addition, its thickness should not be greater than the gap located between the bearing and the cutting part.
The width of the part is less than the length of the cutting part
Moreover, the longer the cutting part, the more difficult it is to work with the tool, since more effort is required. In this regard, it is better to start working with cutters that have an average length of the cutting part. The operating principle for edge processing is as follows:
- The template is attached so that it is at the desired height and has a flat horizontal surface.
- The template is firmly mounted to a table or other surface.
- The cutter with the roller is installed so that the roller moves along the template, and the cutter (cutting part) moves along the workpiece. To do this, perform all the necessary manipulations with the template, workpiece and tool.
- The cutter is installed in working position and clamps down.
- After this, the tool turns on and moves along the template. In this case, you should decide on the speed of movement, which is determined by the depth of processing.
- The milling unit can be either pushed or pulled, depending on what is convenient for you.
After the first pass, you should stop and evaluate the quality of the work. If necessary, you can make another pass by adjusting the position of the tool. If the quality is satisfactory, then the clamps are removed, freeing the workpiece.
Using this approach, it is possible to remove a quarter along the edge or in some of its parts. This is done by setting the cutting edge so that it extends to the required depth into the part.
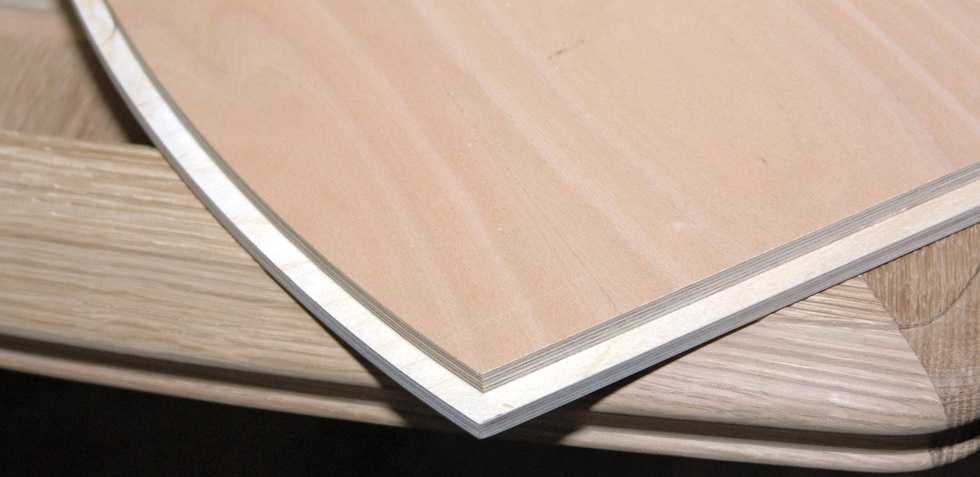 Quarter shot on a furniture façade.
 If you replace the cutter with a shaped one and move the guide, as well as use a stop, you can actually apply a longitudinal pattern to the part (pictured below).
 Applying a longitudinal figured pattern to the workpiece.
 If you use a similar milling technique (with a template), you can easily master the technique of working with wood in general. After some time, you can abandon the templates, since installing them takes a lot of useful time.
 How to make a straight edge without a template: you can’t do this without experience.
 The width of the part is greater than the length of the cutting part
Quite often, the thickness of the workpiece is greater than the length of the cutting part of the cutter. In this case proceed as follows:
- After the first pass, the template is removed and another pass is made. In this case, the template will be the already processed part. To do this, the bearing is guided along the machined surface. If the cutting part was again missing, then another pass will have to be made.
- For final processing, you should take a cutter with a bearing at the end, and the workpiece should be turned upside down, after which it is secured with clamps. As a result, the bearing will move along the machined surface. This approach makes it possible to process thick parts.
 The bearing is guided along the machined surface, and the cutting edge processes the rest of the workpiece.
 In order to master the work of a hand milling tool, you will need a lot of rough blanks, which you don’t mind throwing away later. No one succeeded the first time. To achieve anything, you need to train hard.
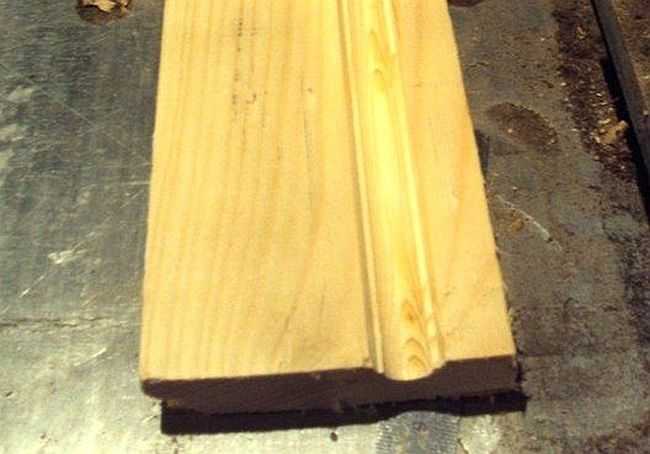
Achieving Various Shaped Edges
If a figured edge is required, which is most likely necessary, then first pay attention to the condition of this edge. If it is uneven, then you will have to level it and only then begin to form a curved edge by selecting the appropriate cutter.
 Rounded edge.
 It is necessary to prepare the surface so that the cutter does not copy the curvature along which the roller will move. In this case, a sequence of actions is needed, otherwise a positive result will not work.
Sawing wood is the most famous way of working with wood in our country. Carvings have been decorating window frames, cornices, gates, furniture and even dishes since time immemorial. And today this art has not lost its relevance, but has only become increasingly popular. What masters don’t come up with these days! What kind of masterpieces they create! You look and you are amazed. Sometimes there were such wonders as spice sets, toys with ornate designs, and chess pieces.
The activity of sawing wood contributes to the development and education of an eye, patience, perseverance and artistic taste. Working with wood is a job for the soul and a flight of creative imagination.
To work with wood, you will, of course, need a special set of tools. But before you decide to take up such an exciting activity, it is advisable to practice a little - do more simple view craftsmanship - birch bark carving.
To work on wood, specifically for sawing, we will need tools: a jigsaw, in the form of a metal or wooden frame, in the shape of the letter “P” and a set of files of different thicknesses (from 1 to 10). The files are inserted into the frame clamps and screwed to strengthen and tension. The more elegant the work and the pattern that we decided to cut, the thinner the file we will need. We will also need a clamp with a screw and a board (with a triangular cutout), a drill and drill bits of various sizes, three types of files (round, semicircular and flat), wire cutters and pliers, chisels, a hammer, a garden knife, a plane, rulers and squares, patterns, calipers and various auxiliary materials (emery and glass sandpaper, screws, small nails, buttons and wood glue).
In woodworking, the highest grade plywood is used. For more elegant works with artistic elements, take smooth, dried thin planks of linden, birch, and maple. Their expensive types of wood are most often used: Karelian birch, oak, walnut, palm, mahogany, chestnut.
Each tree needs its own approach. For example, oak is difficult to process, and elm wood is rarely even, pine and spruce are very scratchy, although even in structure. The softest and easiest to process wood is linden. Its wood is white, soft, light and has fine fibers. Birch is harder in structure. Young birch, like linden, has white wood, and “older” birch has a reddish tint. It is more convenient to make thinner and more complex patterns from birch, because it does not split as much during processing as linden. But birch swells very much from dampness, and if it dries unevenly, the product may warp or cracks may appear on it, so birch products require special processing: waxing or varnishing.
Maple wood is harder, but also more scratchy. Maple wood is very suitable for polishing - it can easily be artificially painted to resemble walnut or palm. A young maple tends to warp from dampness, while an old one is more resistant to dampness. Ash has pinkish and yellowish wood. Ash wood is the hardest of all tree species, but it splits more easily than birch.
An important role in choosing wood for our product is the selection of wood pattern. Walnut, ash and Karelian birch have very beautiful cuts.
But it is best to use plywood for training - it is not so expensive and is more stable even in inept hands. Thin (less than 2 mm), smooth, dense plywood is suitable for cutting.
The cutting technique consists of several stages.
Preparation of the material: we plan it with a plane, sand it with pumice and rub our working material with sandpaper. You can add a little pumice powder linseed oil, but you need to take into account that this will darken the tree a little.
We will transfer the drawing that we have chosen for sawing onto tracing paper (or plain paper) and place the carbon copy on it and place it on our prepared board. We pin it with buttons and use a pencil to create a pattern. Let's number the order of cutting out the parts, starting with the smaller ones and ending with the outer contour of the pattern (or ornament).
We make holes in the parts that will be cut in order to insert the saw into the wood. If the wood is strong, you can make nicks with a sharp awl in those places where you need to make cuts, and if there is a fear that the wood may split, it is better to use a drill, and it is better to secure the board on a flat surface.
On a board (machine) that is firmly secured to the table with a clamp, we place our board - pattern up. In this case, hole 1 should be above the middle of the triangular cutout in the board of our “machine”. We take a jigsaw and insert the file into the lower clamp (which is near the handle), pass the other end into hole 1 from the bottom up and fasten the ends of the file so that the teeth are outward from the jigsaw frame and down, towards the handle. The tension of the file should be strong, but the main thing is not to overtighten, as it may simply break.
And finally, the cutting process itself. We saw by holding the jigsaw by the handle under the table, and holding the board on top with our left hand, turning it so that the saw was always in the middle of the triangular cutout. It is better to cut from top to bottom, making sure that the jigsaw is always perpendicular to the board. The pressure should be uniform, the swing on long lines should be as large as possible (almost the entire length of the file), and on small parts, or around sharp turns, we saw with short strokes.
At the end of the work, all sawn parts are cleaned well: the edges of deep recesses and small holes are cleaned with a file, and the entire surface of the product is cleaned with fine sandpaper.
Wooden products, interior items and toys are quite easy to make with your own hands, just apply a little patience, dexterity and imagination and your work and creativity will be appreciated, and your woodworking skills will be honed with each new product.
The article uses photo materials from the Lori Photobank: © Svetlana Popova
Good afternoon. Today we start uploading articles on the topic of DIY wood crafts. In this first article I want to show you what simple crafts can be made from wood - for both children and adults. Many ideas will work for labor classes at school- for boys. Some ideas will work for a school competition crafts made from natural materials. Some wooden crafts can become decorating your dacha or yard. Here you will find a storehouse of inspiration and joy in anticipation of such interesting and simple work. In this article I will prove what to do beautiful crafts made of wood everyone can. Because here you will find simple and feasible tasks. Even a frail woman with a manicure can do half of the crafts in this article. So - let's fall in love with wooden creativity.
Let's start with simple magic.
Tree + sun
Crafts that glow with love.
Here are the simplest and cutest country crafts made from wood. For the craft, you need to cut a log (ask when you are sawing the firewood with a grinder to make several thin cuts). Or you can do it without cutting - just take a board of any size.
We drill holes in the wood so thick that a store-bought glass pebble will fit into it. Such sets of multi-colored decorative glass stones are sold - in the gift department, and in the department where there are candles, vases and everything for holiday decor.

You can simply drill such holes with glass into a board and hang it on an apple tree. You can drill such holes in the fence - if the sun shines into it at least once a day at a low angle.
It's very beautiful. Magically. Like in fairyland. Your children will be delighted with this wooden craft.

Simple wooden crafts
from log cuts.
If you have logs being cut into firewood in your yard, you are in luck. You can get priceless craft material for free. Ask the men to cut you flat cuts, both from small and large logs. Lovingly stack them away from the woodpile and start dreaming up future wood crafts. For example, let it be wooden owls. It's easy to do and looks beautiful. The saw cuts can be nailed to each other. You can put them on liquid nails (like glue).

The surface of the cuts can be rough and unsanded (as in the photo with the bunnies craft). Or you can sand it with sandpaper and even varnish such an ornamental material. Or paint it the color you want.

From large saw cuts you can make large country wood crafts. And small log houses (made of thinner branches and logs) are suitable for miniature crafts - for example, these birds. You can cut branches of this thickness yourself with a hacksaw - manually, without a chainsaw.

Log cuts can become a canvas for art installations. Such wooden crafts-pictures can be made from any natural material. Go to the river and find smooth, flat stones. They will become a source of interesting crafts. The stones can be easily painted with felt-tip pens, office markers, or just gouache (after work, fix the gouache with hairspray or nail polish).

Here's another way to make beautiful AIR crafts from wooden cuts. Openwork cut through with an electric jigsaw (photo with a maple leaf craft) looks simply magical.

Here is a small master class from which you can see how the process of cutting out openwork patterns on a thick cut of wood occurs.
First we outline the stencil with a pencil. Then we use a drill to drill holes in the key nodes of the drawing. And then we use a jigsaw to move from one holey node to another.

You can come up with a device yourself which will help you cut wood products using a conventional drill. Do it yourself electric jigsaw. Holding the comfortable handles with your hands, you simply move the device - following the lines of your drawing. The thinner the drill, the finer details of the design you can cut out with it. Well thought out.

Or you can buy a jigsaw– it costs on average 100 dollars. You can find it and over 50, we don’t work on an industrial scale, so it’s not necessary to buy a very powerful, expensive tool.
Mosaic crafts
From cuts of thick branches.
If you have a boring barn wall looking right at you in your country yard. Then you need to make it not boring. Let's decorate the shed using wood crafts. Let's do it mosaic applique from small wood cuts. Such cuts are obtained by cutting thick branches or thin logs with a hacksaw (or chainsaw).
The basis For such a wooden craft, we cut it out of a sheet of plywood. First, we draw the silhouette of the future craft on it. Cutting out the plywood base with a hand jigsaw or a special power tool. And we glue wooden rounds onto it - with liquid nails, with wood glue or with hot glue from a gun.


And you can even make it at home from saw cuts decorative frame for a mirror made of wooden rounds(master class in the photo below).
- Also buy a round mirror. Place it on a sheet of plywood and trace it with a pencil.
- Around the resulting circle, retreat a few centimeters (to the width you want for the frame). And with this indentation draw a second circle.
- Cut a large circle out of plywood. And cover the outer ring with wood cuts. You will get a beautiful wooden craft frame - all you have to do is glue the mirror into the middle using liquid nails.

Puff Crafts
made of wood.
This is perhaps my favorite type of wood crafts. Here the woven shields lie on top of each other creating a LAYER VOLUME of the craft.
Here is a cow craft made from three layers of wooden shield. The first layer is the body, the second is the head, the third is the bangs and nose.

You can paint all layers of your craft the same color (like a craft polar bear made of wood) or in different colors (as a craft mouse on the moon– photo below).

Or you can leave a textured wood pattern (as in the crafts in the photo below).
Wood fox It has a two-layer design - a back layer, and the head and tail are placed on it.
Craft duck has 5 layers - a central layer with the head, and two layers on both sides (tummy + wing).

The more layers you will overlap each other, the more voluminous and convex your craft will be. Here is an example with the craft “Lions made of wood” you can see how the animal's muzzle moves forward, thanks to four layers of thick wooden boards.

If you paint your crafts. Complete the facial expressions, add small details - folds, spots, etc. You can get very realistic and expensive wood crafts. Your small hobby can become your business. Such works can be safely put up for sale.

You can come up with your own characters. Draw their layers on a sheet of paper. Enlarge the craft first in a paper template - transfer the contours to a wooden board and cut it out. Or find pictures in a children's coloring book– and redraw them in an enlarged size.

Wood craft
For school activities
At the labor lesson.
Such LAYER wood crafts can be cut NOT FROM THICK SHIELDS, but from thin plywood sheet. And then such work can be carried out in labor classes as part of the school curriculum. On the topic “sawing with a jigsaw on plywood.”
Here's an idea - how made of 3 plywood panels make a two-color puppy craft. The first very back layer of WHITE PLYWOOD shows only the tips of the ears, tail and one hind leg. We will cover the second layer with stain (so that it darkens). Eyes, nose and lines can be drawn with a marker, or burned with a special device for burning wood.

Using the same technique of shields with different shades of color, you can make a lot of three-dimensional crafts from wood during labor lessons at school or in a woodworking club.

Wood crafts
in the form of an APPLICATION.
Using a very similar technique, you can make an applique from wood. Here, too, wood is taken as a basis. solid wood board(that is, not a glued board, but a solid board). Because we will be sanding it, and the glued board may delaminate from sanding and the glue seams will be visible.

- On paper all future crafts are drawn. Divided into parts by lines. Each detail is numbered. And it is photographed (so that later the location of each element can be verified from the photo).
- Next, the drawing is cut along the lines into elements. We outline each element on the board with a pencil. We cut out an element from a flat board. All elements are flat on top, rough around the edges of the cut and with sharp sawing edges.
- Now our task smooth all edges of each part, round it. We trim off the sharp edges of the cuts with a chisel. And we grind it on a grinding machine (if you have one) or do it manually with sandpaper of varying degrees of hardness and roughness.
- After sanding all parts painted with tinted stain(sold in construction stores). Depending on how many times you wipe the part with stain, you will get a lighter or darker tone. Very light details can be simply wiped off vegetable oil. You can check in advance shades of color on scraps of wood left after sawing the craft.

You can also paint wooden craft parts in watercolor or gouache(using not a brush, but a foam sponge). After painting, so that the part does not stain your hands, you can spray it with hairspray or saturate the craft with another wood coating compound (just check the color first on scraps).

It only seems that the cow (in the photo of the wooden craft above) is behind the moon. In fact, all the parts are in the same plane. On a piece of paper. But thanks to the streamlined edges of the parts, everything looks voluminous, soft and as if pressed into each other. Nothing is actually pressed in - everything just lies next to each other.
Ideas for such flat wood applique crafts can be taken inside children's coloring books. There are just pictures with large details. You can find a children's coloring picture on Google - enlarge it and print it. Or redraw directly from the monitor screen by placing a sheet of paper on the glowing screen.

Methods for grinding parts
for wood crafts
(instructions to help).
To make it easier to sand the smooth edges of parts without rubbing calluses on your hands, I want to give some useful tips.
You can clamp the sanding belt in a special vice, also made of wood. Here's how it's done in the left photo below. Or come up with your own version of the device.

Here in the left photo - sandpaper is wrapped around a thick piece of wood with a semicircular edge. And the edges of the sandpaper are wrapped in a groove and clamped with a bolt twisted through a round cylindrical piece of wood-clamp.

There are also grinding attachments for drills. And then you can grind the parts using the rotational force of the drill and the magical power of electricity.
Below we see grinding attachments for drill– plate and drum shape.

There are grinding attachments for drills where you can change sandpaper - remove the old worn-out sandpaper and fill in a new one.

By the way, on AliExpress you can immediately buy grinding drums for a drill in bulk for 3-4 dollars per batch of 100 pieces. If you search, you can find it cheaper.

And so that the drill does not spin in your hand while working, you can create a special FASTENING STRUCTURE, which will record your homemade sanding machine is in one place, and all you have to do is bring the parts to the sanding drum.

The design of the mounting pallet can be different - with a wooden clamp (photo above), or with a retainer in the form of a metal bracket (as in the photo below).

With such an assistant, making wood crafts with your own hands is a pleasure. Quick, pleasant and immediately beautiful results. This kind of work can be put on stream - and a whole production of beautiful wooden (smooth and safe) toys for children and gift wooden paintings can be set up.
You can become a successful master. Completely unexpected for myself. Just like that, look at this article and fall in love with the idea.

The imagination of wooden crafts is limitless. Remember the formula for success - everything can be made from wood. The main thing is to start... then continue... and finish.
For example, knocking toys. Beautiful fun for children and for decorating the garden. Such a knocker or woodpecker may knock on your door, announcing guests on the porch. Like in a fairy tale, pull the string and the door will be opened for you.

You can make decorations for your children's room with your own hands. Essentially, reincarnate and become a designer of interesting interior wood crafts. Any boy will be happy if his children's room sparkles with motifs from the Jungle.

You know... I’ll probably continue the topic of wooden crafts for design children's room in one of the following articles. I'd like to see what ideas are hidden here. And making someone fall in love with this is a good thing.
And perhaps we should create an article with wooden toys for children - self made. I also need to write. And then it will work here link.
In the meantime, let's continue...
WOOD CRAFTS
and WASTE material.
Where do future crafts live? …. Old half-decayed boards. For example, from grandma's fence. Which are usually used for firewood or removed from the yard as excess garbage. Stop. Let's not throw them away. Let's dig through this pile and create something wonderful - with our own hands from wood.
A wooden mop-brush, if sawed in half, turns into the mouth of an evil dog. A little imagination and work. And now the service dog is bristling and grinning at you.
A beautifully crafted piece of art. Wood and waste material.

Any waste material (pieces of iron, plastic) and old pieces of wood can populate your home with fairy-tale characters. They are alive. They have a soul and their own history.


Wood crafts
Imperishable beauty.
Peeled veneer , from old furniture panels that are quietly becoming damp in your shed - can also become a source for crafts and wood appliqués.
From this thin wood material You can directly cut out the details of the future craft with scissors and stick it with hot glue from a gun (or with wood glue).


You can also use thin birch bark instead of veneer. And also make interesting flat crafts from wood.

Wood crafts
(logs, firewood and bark)
Ordinary firewood from your woodpile can become a source of inspiration for wooden crafts for the dacha.
If you cut a round log diagonally, you get a figurine with its face turned towards you. All that remains is to draw this face, add elements of eyes, ears, and nose to it.

You can use logs and round logs to form the body of an animal. The logs will be the legs and the logs will be the back. The head can be made from a round cut of a small log. Or chop with an ax face to the desired shape from the same log as the body of your four-legged wooden craft.

Show your imagination, don't stop before difficult task. A squirrel made of wood or a snail made of logs - there is nothing complicated. We turn on our head and sense of humor - it will suggest the most ridiculous, but effective ways convey the delicate image of the animal using rough wood and other natural materials.

YOU can work with a chainsaw or an ax - sawing out or beheading the face of your wood craft. You can make these cute pigs with your own hands as a fun wooden craft for your dacha.

And in the bushes you can put a beautiful, proud deer - also a simple and quick craft made from wood and branches.

Wooden crafts
from chips from a log.
It happens that when you chop firewood, large shaped chips break off from the log. This chip often has a bizarre shape - already similar to something (a bird, a panther, the profile of a face). You need to carefully put such a gift of fate aside, so that you can later return to it and complete the craft started by nature. Trim something with a knife, highlight something with paint, glue something as an additional detail. And you will end up with a do-it-yourself wooden craft - beautiful and original.


These are the ideas I managed to find for wood craftsmen.
Now you too can make beautiful crafts from wood with your own hands. Moreover, this article is only the first in a series on the topic of wooden crafts, which are clear and easy to do at home. You've probably already fallen in love with some ideas and are determined to implement them - I keep my fingers crossed for you - let everything work out in the best possible way. And your wooden craft will appeal to your entire Family Bunch.
 What documents are evidence that the apartment is a service apartment?
 Space donut hole
 Types of discounts on Russian Railways tickets and rules for obtaining them Train tickets for students
 Lecture on syndromic pathology
 Organizational aspects of the activities of pharmacy organizations
 Water pressure in the depths of the ocean Practice reports
 What is inductance, its definition and unit of measurement