Artificial pond in the countryside by hand. Do-it-yourself pond at the dacha: let’s look at how to make a decorative pond step by step with photos. How to make a big pond
The idea to dig a pond on my property came to me several years ago. But, since this work is labor-intensive and difficult in terms of a creative approach, its beginning was delayed for a long time. Finally, during my next vacation, I decided to get down to business and follow step by step all the steps necessary to create a pond. It was decided to make the pond film, with a geotextile lining. Plant it with plants and get some fish. Install an aerator for fish. Water circulation is also planned through a small waterfall with three cascades. It was made initially, even before digging a pit for a pond, from a pile of stones laid on a man-made clay hill. Water will circulate in a closed circle from the pond to the waterfall using an inexpensive bottom pump.
That's all the initial data. Now I will proceed directly to the story about the construction of the pond, trying not to miss the details.
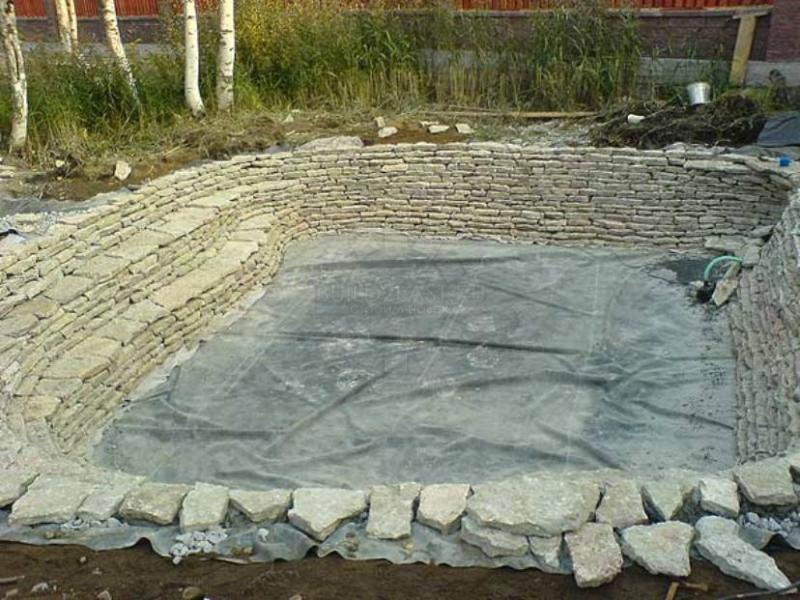
First of all, I took a shovel and dug a pit with dimensions in plan of 3x4 m. I tried to make the shape natural, round, without sharp corners. After all, in nature, coastlines are always smooth, without straight lines; these should also be followed when creating an artificial pond. At its deepest point, the pit reached 1.6 m below ground level. It would be possible to do less, but in my case it involves breeding wintering fish, which requires a minimum of 1.5-1.6 m.
There are 3 terraces on the rise of the pit. The first (shallow water) is at a depth of 0.3 m, the second is 0.7 m, the third is 1 m. All are 40 cm wide, so that it is possible to install pots with plants on them. Terracing is performed for a more natural look of the water surface. And also for placing aquatic plants, the type of which will determine the number of terraces and their depth. You need to think about this in advance. For planting cattails, for example, a depth of 0.1-0.4 m is needed, for nymphs - 0.8-1.5 m.
The pit for the pond should be multi-level, with several terraces
Stage #2 – laying geotextiles
The pit was dug, stones and roots were selected from the bottom and walls. Of course, you can immediately start laying the film, but this option seemed too risky to me. Firstly, seasonal movements of the soil can lead to the fact that the pebbles that were in the thickness of the soil change their position and break through the film with sharp edges. The same thing will happen if the roots of trees or shrubs growing nearby reach the film. And the last factor - on our site there are mice that dig underground passages and, if desired, can easily get to the film. Need protection. Namely, geotextiles. It will prevent rodents, roots and other unpleasant factors from damaging the film.
I bought geotextile 150 g/m2, carefully laid it out and brought the edges slightly to the shore (about 10-15 cm - as it turned out). Temporarily secured with stones.

Geotextiles are laid with edges facing the shore
Stage #3 – waterproofing
Perhaps the most important stage is the creation of waterproofing. It can be neglected if the hydrogeological conditions of your site allow the creation of natural reservoirs. But such cases are very rare and it is better not to risk it, so that you don’t have to redo everything later.
So, waterproofing is needed. In my case, it is a dense butyl rubber film specially designed for ponds and reservoirs.
Initially, I want to dissuade you from using plastic films, sold in ordinary hardware stores and used for upholstering greenhouses. Especially if your pond is large enough. This insulation will last for 1-2 years, then, most likely, it will leak and everything will have to be redone. Extra headaches and expenses are guaranteed. You need a special film, for ponds - made of PVC or butyl rubber. The last option is the highest quality; the strength of the butyl rubber film will last for 40-50 years for sure, and maybe even more. The advantage of rubber waterproofing is that it stretches well. The water pressure in the pond will sooner or later lead to subsidence of the soil. In this case, the film is stretched. The PVC may crack or come apart at the seams. Butyl rubber will simply stretch, like rubber, it can withstand significant stretching without consequences.
I calculated the dimensions of the film required for my pond as follows: the length is equal to the length of the pond (4 m) + double the maximum depth (2.8 m) + 0.5 m. The width is determined in the same way.
I spread the film over the geotextile, bringing 30 cm of the edges to the shore. I tried to smooth out the wrinkles on the bottom and walls, but I wasn’t particularly successful. I decided to leave it as is. Moreover, the folds will compensate for temperature changes and there is no need to pull it too tightly.

A pit covered with butyl rubber film will hold water in the pond
After laying out, it is necessary to fix the edges of the film. It is impossible to leave them open on the ground, since water will get between the film and the walls of the pit. The appearance of water bubbles is inevitable, due to which the film will have to be removed. And this is very difficult, especially with large pond sizes.
I decided to dig in the edges of the film and thereby secure them firmly. At a distance of 10 cm from the edges of the pond, I dug a ditch, 15 cm deep. I laid the edges of the film inside and covered them with earth. I covered the whole thing with turf on top. It turned out to be a real coastline, overgrown with grass!
Stage #4 – starting the water
Now you can start the water. I threw a hose into the pit and pumped water from the well. The water took several hours to collect. As the film was filled, the folds became confused and had to be straightened. But in the end the tension turned out to be quite uniform.

A pond filled with water must settle for some time to establish a biobalance
And another one important detail, which is worth mentioning. Along with clean water from the well, I poured a bucket of water from a natural reservoir into the pond. This is necessary to accelerate the formation of biobalance. In other words, water from a reservoir with an existing biosphere will help to quickly install the same one in a new pond. There will be no balance, the water will become cloudy and green in a matter of days. And soon it will resemble not a pond, but a swamp with greenish slurry. Activation of the biosystem will also be facilitated by plants planted in water on the bottom.
I immersed the pump to a depth of 0.5 m; it supplies water to the upper cascade of the waterfall and to a small garden fountain. The water division is adjusted directly on the pump.

Water circulation in the pond occurs due to a fountain and a waterfall
Stage #5 – planting plants and launching fish
Plants are a separate topic. I wanted to plant a lot of things so that the pond would immediately, from the first days, create the appearance of a natural, natural reservoir. So I went to the market and picked up marsh irises, whitewings, water hyacinths, and several nymphs. To landscape the shore, I took a couple of lobelia bushes, loosestrife, and white calla bulbs.
Upon arrival, this seemed to me not enough, so I made a foray to the nearest pond (from which I drew water for biobalance) and dug up several bushes of young cattail. It will grow and purify the water. It's a pity that there is nothing else suitable in this pond. Otherwise you wouldn’t have to buy anything. Perhaps you will be luckier and in a nearby pond you will find all the plants you need to garden your own pond. After all, almost all aquatic plants grow in our natural reservoirs. With some luck, you can find and pick sedge, cattail, yellow irises, calamus, loosestrife, yellow egg pods and much more.
On the upper terrace I placed balcony boxes and baskets with planted cattails, whitewings, water hyacinths, and marsh irises. I planted it in heavy fertile soil and covered it with pebbles on top so that the fish wouldn’t drag the soil away and tear out the roots.
I planted nymphs in baskets - I have 4 of them. I also covered it with pebbles on top. I placed the baskets on the middle terrace, the one that is 0.7 m deep. Then, as the stem grows, I will lower the basket lower until I install it permanently 1-1.5 m above the water level.

Aquatic plants are planted in baskets and boxes in shallow water

Nymphea flowers last only a few days, then close and sink under water
I planted lobelia and loosestrife along the coastline. I also dug calla lily bulbs there. The loosestrife very quickly began to lower its branches directly into the pond. Soon the film will no longer be visible on the rise! Everything will be overgrown with grass, loosestrife, calligraphy and other planted plants.
At first, the water in the pond was as clear as a tear. I thought that would be the case. But after 3 days I noticed that the water had become cloudy and the bottom was no longer visible. And then, a week later, she became clean again - a biological balance was established. I waited another two weeks and decided that it was time to introduce the fish - all the conditions for its living had been created.
I went to the bird market and bought several suitable specimens of comets (almost a goldfish) and crucian carp - gold and silver. Only 40 fish! He let everyone out. Now they are frolicking near the fountain.

The pond with running fish looks magical!
For a comfortable stay for the fish, an aerator was connected. The compressor is 6 W, so it works constantly and does not consume electricity. In winter, an aerator is especially useful. Saturation of water with oxygen and polynyas will be ensured.
This concludes the master class. I think it turned out very well. The most important indicator of this is clean water. As such, I do not have mechanical filtration. The balance is regulated by a variety of plants, an aerator, water circulation through a waterfall and a fountain using a pump.
As for finances, most of the funds went to butyl rubber film. I dug the pit myself; if you hire an excavator or a team of diggers, you will have to pay, but the hole will be dug quickly. Plants are not too expensive (and if you take them from a natural pond, then they are generally free), and neither are fish.
So everything is real. If you are not afraid of significant labor costs (especially for digging a pit) and the need for a creative approach, go ahead. As a last resort, if you are unlucky with a design streak, look through photographs of ponds in magazines or on the pages of specialized websites. Find what you like and try to make something similar for yourself. And then – enjoy the result and your own pond on the site.
Ivan Petrovich
And a pond. Even a small body of water attracts those around you like a magnet. Water is fascinating even in small quantities... Moreover, you can build a pond with your own hands in a few hours. But this is a small artificial reservoir. Building a large one will require both money and time.
Where to dig
Small artificial reservoirs are best viewed from above. Therefore, if there is a corresponding depression on the site, it is best to do it here. There is, however, a negative side to this: you will have to raise the edges of the bowl higher in order to rainwater didn't get inside. The second option is to come up with a water drainage system (make a drainage system above the reservoir).
If there is a key somewhere on the site, it is logical to make a natural pond by digging or deepening the existing bowl, lining its borders with cobblestones or stones, and planting plants. The stream, which is sure to exist in this case, can also be improved by lining its edges with cobblestones, drowning them in the soggy soil, you will give greater strength to the bank, and you can plant moisture-loving plants between them.
Even a small waterfall is a magical sight. How to dam a pond if there is a natural stream on your site - dig a pit, cover it with stones and direct the stream into it
Not everyone has such a luxury on their property as a stream or a spring. We have to make artificial reservoirs. When properly designed, they look no worse than natural ones.
How to make an artificial pond with a bowl (without film)
The simplest and quick way to make an artificial pond at the dacha - bury the finished bowl in the ground, shaping and decorating its edges. There are plastic bowls - ready-made different forms, sizes and colors (mostly blue, green and black).

Setting up a plastic garden or country pond is not a difficult task. Here are the step-by-step instructions:
- It is necessary to dig a pit in the shape of a bowl. If the shape is very non-standard, you can turn it upside down at the installation site and outline the outline with something (even dig it with a shovel). The bowl is taken to the side and a pit is dug. It should be a little larger in size - a little wider, but not deeper. The edges should either be flush with the ground or protrude slightly. If you can raise the edges a little, it will be even better: when it rains, dirty water will not flow in.
- After the required depth is reached, the bottom is leveled to the horizon: it is first leveled with a shovel, then compacted and the excess is removed with an even bar. The surface must be smooth and hard: the plastic must have good support. If the ground is poorly leveled (clay), you can pour 5-10 cm of sand, wet it and compact it.
- The next stage is installing the bowl in the pit. If the bottom has been made level, the edges of the bowl will be level with the horizon. Now the space that remains between the wall of the bowl and the pit must be filled with soil or sand and compacted well.
- Now it’s time for the design: the installation is complete, you can fill in the water.
How to use this technology to build a pond in the courtyard with lighting, see in this photo report (you can scroll through the photo gallery yourself by clicking on the thumbnails below).
We are digging a pit. We decided that the sides would be 1-2 cm higher than the level of the path - there would be less debris inside, and we would decorate the edges with stones. On this side, just below the maximum level, we cut a pipe into the bowl so that excess water would drain. She was taken to the sewer
But it is not always and not everywhere possible to constantly add and remove water to the pond. Then you will have to either plant plants that will clean it, or change it periodically.
Pond from an old bathroom
You don't have to buy a bowl at all. Any container can be used. Even old bath. It turns out very well. All the steps are the same, the pit is dug first, a bathtub is placed in it, what goes next, see the series of following photos. In them, a pond from an old bathtub is transformed into a truly charming corner.
The platform was also entangled with wire - so that the clay did not float and the platform did not sag. This is already a month later, such beauty - a garden pond built with my own hands makes me happy
Pond from a car tire (with film)
A mini-pond can be made from an old car tire, or rather from a tire. The larger it is, the larger the reservoir. The most difficult thing in this matter is to cut off one side part. If the resulting edges are sharp, they need to be sanded. The second most difficult task is to dig a hole of the appropriate size. The difficulties ended there. The rest is quite easy.
The cut tire is installed in the hole, covered with earth on the sides, and compacted well. Also, earth or sand is poured inside and the bottom is leveled. Take a piece of thick plastic film, maybe folded in half, and cover the resulting tank. Don’t try too hard: just pour water, it will straighten the film itself.
Instead of polyethylene, you can take banner film (available from advertising companies that produce outdoor advertising) or a piece special for swimming pools and ponds. They are much stronger (but more expensive).
The protruding ends of the film are tucked around the walls of your pond and decorated with stones. The construction of the pond is completed, next comes decoration and planting. See how to make a pond from a tire in the photo report.
The next stage of making a mini-pond for a summer residence is decorating the edges with stones
There is certainly nothing complicated about such a device. Anyone can build such a pond at their dacha with their own hands, and the investment is minimal.
In general, mini-ponds are made from tanks, barrels, pans, even flower pots. The main thing is that there is a body, and designing it is not very difficult: experience gradually comes. They are placed in the garden, at the dacha, near the house. It is possible to supply water, make a stream, it can be placed under trees, for example, or shrubs. Both beauty and benefit at the same time.
Making a pond with film
By creating this artificial pond from film, you almost exactly repeat the work described above, only without installing a bowl:
- mark the shape of the future pond;
- dig a pit, forming ledges if necessary;
- clean the bottom of any sharp objects: roots, stones, etc.;
- level the banks of your pond;
- spread the waterproofing film;
- fill the pond with water;
- fix the edges of the film;
- decorate.
A country pond created using this technology can be of a more substantial size. Important point: on loose soil, simply making a pit and laying down a film will not work. We will have to come up with some measures to strengthen the banks. In this case, you will have to either install a bowl, or make a more serious structure - from brick or concrete. Next, let's look at examples of how to inexpensively make a pond from film.
First project: sides flush with the ground
Eight simple steps and your pond at the dacha is built. How to dig and arrange a pond at your dacha and make it look natural, see the photo report.
Second project: raised sides
The second version of a homemade pond in the first stages is built in almost the same way as the first. Only after the pit reached the design depth were the sides raised, lined with bricks along the edges and concreted. The result was a pond with raised sides. A water circulation system has also been made. It is shown in the figure below.

As you can see, this pond is more multi-layered and its displacement is more serious. If you want to have a pond of at least medium size and not build a serious bowl, you can do as shown in the figure: fill the created pit with sand, cover it, and only lay the film on top. Geotextiles evenly distribute the load and do not allow plants to grow. This is especially true if you are building a pond in the garden and there are shrubs or trees nearby.
Serious projects: brick and concrete
If you want to have a large pond in your country house, and you want to build it yourself, you will have to study the topic of building swimming pools. Firstly, the construction of the bowls repeats all the stages one by one. Even the forms are sometimes made stepped. True, the banks are not decorated with plants, and they are not planted in the pool itself... But the construction process itself, with reinforcement, plaster, and waterproofing is the same. Moreover, the water supply and water treatment system is also similar. Except that chemical cleaning methods are not used in ponds, but filters, screamers and ultraviolet light can be used.
In general, a large pond is not a cheap pleasure. Moreover, it requires expenses not only for construction, but also for maintaining a large reservoir in normal condition: filters need to be regularly cleaned and cartridges or backfill replaced. But of course the pleasure is great...
Not the largest pond, but it required 10 bags of cement, 30 bags of sand (20 coarse and 10 fine), a hydrophobic additive - 5 bags to make the concrete water-repellent. Plastered on a mesh fixed in the ground
Pond Plants
When shaping or choosing a bowl, consider not only its shape and depth. If you want plants to grow in your pond, a marshy riparian area is necessary. If you form a pond using film, you can make a profile approximately like the one in the picture.

It is more convenient to do this if you fill the pit with a layer of sand at least 15 cm thick. With its help you can make the relief the way you like. To make the work easier and the film not torn, lay geotextiles on the sand. This thin membrane is very tear-resistant. You can do whatever you want without breaking it. Having formed the desired bottom topography with its help, you can line the film and lay stones on it, fill it with water and plant plants for the pond at different levels.
To ensure there is enough oxygen in the water, you can plant Canadian elodea, hornwort and swampweed. They are in the photo below. Planted in water, these are aquatic plants.

From this article you will learn:
- How to choose the right place for an artificial pond in your country house
- What size should an artificial pond be?
- How to make an artificial pond on your own site
- How to decorate an artificial pond at the dacha
Many owners of dachas or houses outside the city would like to equip an artificial pond on their site - after all, it will look much more attractive this way! Until relatively recently, realizing such a dream was quite difficult, including financially. But today, an artificial pond in a dacha is no longer something unusual: many can afford it.
As a rule, most summer cottages are limited to 6 acres. In such conditions, owners do not have much opportunity to place a large pond on their property. But in general, if you act wisely, it is quite possible to build an artificial reservoir yourself.
Do not rush to start construction on a grand scale, first decide for what purpose it is being started.
Depending on what function the artificial reservoir will have to perform, it can be:
A small pond. Such an artificial pond will become an element of the landscape composition, its purpose is to decorate the site as a whole and delight others beautiful view. Of course, you won’t be able to actively relax near such a pond.
Decorative pond. This is a deeper reservoir, which is equipped with decor in the form of a bridge, fountain, and lighting. Most often it is located next to the house or gazebo; benches, sun loungers and canopies of various types are installed nearby. Near such an artificial reservoir, dacha owners often arrange pleasant gatherings with family or friends.
An artificial reservoir where fish are bred. Not only fishermen dream of having an artificial lake for personal use with fish swimming in it. Contemplating bright fish will be a pleasant experience for every family member while relaxing in the lap of nature.
Swimming pools. In addition to the fact that such a pond will decorate the territory of the dacha, it will also provide its owners and their guests with the opportunity to freshen up and, if the size of the pool allows, even swim.
Having decided on the function of the reservoir and indicating the limit of financial capabilities, you can begin to choose the location of the pond and its shape.
The garden pond can be presented in two versions, with many modifications:
- Formal (regular) body of water.
It is a structure with a clearly defined shape.
When arranging a site in classic style, as well as modern, minimalism and hi-tech styles good choice the geometrically correct shape of the reservoir will become.
The formal type of pond, in addition to rectangular ones, includes designs in the form of a circle or square, as well as broken (symmetrical or asymmetrical) shapes.
This option is in great demand among consumers due to its natural outline. An irregular coastline creates the illusion of a natural body of water, and the imagination of the creators in this case is not limited by any boundaries.
Advice: the owners determine the outlines of an artificial pond for their dacha themselves, but the more complex the coastline, the more difficult it will be to subsequently lay the film.

When choosing a pond style, it is important to pay attention to the terrain. If there is a flat surface, it will be possible to equip an artificial pond of any configuration. If there are unevenness and changes, it is better to give preference to a reservoir with a waterfall or a cascade of ponds - they look most organic in such conditions. A bridge or artificial slide will also fit well into the composition.
The pond can be raised above ground level on your own. Technologically, the work will differ only in the construction of the foundation, which will prevent the distortion of the concrete bowl of the artificial lake.
A high pond minimizes excavation work, is easier to maintain, and is suitable for families with small children (the edge is equipped with a fence with railings). Such a pond can be arranged near a covered terrace, then it will not only decorate the landscape of the dacha, but also become a place of relaxation.
Advice: if you plan to make an artificial pond with a fountain on the site, it is better to give preference to a high pond.
The pond should be placed in a place where it will be visible from anywhere on the site. To make a good choice, you need to consider certain factors.
- Land area. This criterion determines the size of the reservoir and its shape.
- Illumination. It is better to arrange an artificial pond in a shaded place. It is important that the exposure of this area to direct sunlight does not exceed 5–6 hours a day, otherwise the water will simply evaporate. In addition, the presence of constant sunlight activates biological activity in the reservoir and will lead it to an improper appearance. Therefore, having decided on the location, it is necessary to monitor the solar regime that operates in this territory for several days.
- Relief. This criterion dictates the shape of the artificial reservoir and additional decorative elements (for example, the presence of a certain type of relief will significantly simplify the installation of fountains, etc.).
- Layer level groundwater, soil composition. Such factors determine the depth of the future reservoir, also make it possible to assess the complexity of the upcoming work and budget for additional costs for their implementation in the proper amount.
- Possibility of expansion. Do not forget that in the future the reservoir can be expanded, so it is better to leave free space on one side.
- Visibility. It is necessary to place the artificial lake in such a place that it can be seen from the house and recreation areas.
- Electricity supply. If you want to additionally equip the fountain or add lighting, you need to think about electrification in advance. It is better to lay wires underground already at the project development stage, while ensuring their protection with reliable corrugation. There must be small hatches for access at the connection points.
- Reflection. The reservoir will have a much more attractive appearance if the sky or beautiful buildings(but not utility buildings!).
- Landscaping. It is better to avoid the temptation to plant any trees or shrubs near an artificial lake. Sure, it looks nice, but falling leaves will pollute the water and create silt. In addition, tree root systems can damage the waterproofing layer.
- Compatibility with the overall design and other objects.
It is better to start work in the spring - then there will be enough time for the reservoir to “take root” on the site.

The optimal size of an artificial pond in the country
Are there any absolutely optimal sizes artificial reservoir and its shape? No. The same shape can look different in different areas. First of all, when choosing the right option, you should start from the technical requirements. For example, the size of a minimum reservoir should be no less than 3 x 2 m, because only with such parameters can a biodynamic balance be established, when the water can purify itself. If the size of the plot allows you to equip such a pond, then you need to pay attention to other parameters:
- Dimensions. Depends on the location of the reservoir. It is believed that the pond should occupy no more than 3–10% of the area of the entire territory of the dacha site. There are no clear restrictions; everything is determined by the customer’s preferences.
- Lenght and width. These parameters depend on the size of the plot, the functions of the reservoir and the capabilities of the owners, who can dig a small pit on their own, and hire special equipment for a large one.
- Depth. The larger the pond, the deeper it can be made. If the depth of a small reservoir is several tens of centimeters, then the depth of a swimming pool is several meters.
- Zoning. This parameter is important for large reservoirs. Landscape designers recommend dividing the pond into three zones. The coastal zone is characterized by a depth of 10–40 cm; ornamental plants can be planted here. Shallow water zone - from 40 cm to 1 meter, in this part a winter-hardy water lily or nymph is already planted. If you plan to use a pond at your dacha for swimming, then this area will provide an opportunity to go into the water; children can swim in this part. The third, deep-sea zone is more than 1 meter deep. Adults swim here, and you can also raise fish.
- Biodynamic balance. If the reservoir will be inhabited by various kinds of living creatures, it is necessary to create such a balance so that the artificial lake can clean itself. It is not possible to purify the water in a pond with fish or plants using bleach; this is strictly prohibited.
- Care. Generally, the larger the pond, the easier it will be to clean. It is imperative to think through ways to care for the structure and the fish and plants in it.

What is the best thing to do - build a pond or buy an artificial pond for your dacha? There is no clear answer. The choice is determined by the purpose for which it is planned to equip the reservoir, to what extent its future owner has time and funds.
IN finished form The design of a pond for a summer residence is a plastic form that is dug into the ground or installed on a special frame. What are the pros and cons of such a purchase?

- prepare a foundation pit;
- set the form according to the level and fix it;
- fill with water;
- decorate.

This option is suitable when you need to make a small pond for your garden quickly, but you want its maintenance to not take much time. But the main disadvantage of such structures is their fragility.
Such forms are made, laying down the necessary margin of safety, but the threat of damaging them still exists. It is possible to repair the cracks that have appeared, but to do this the mold will need to be dug up and moved to the workshop and back, which will require a lot of effort and financial expenses.
When building a reservoir for a summer residence, its shape can be either a complex concrete structure or an ordinary hole dug in the ground and lined with pebbles or a special butyl rubber film for waterproofing purposes.
The advantages of such an artificial pond:
- a huge selection of shapes, depths, sizes;
- the effect of a natural zone is created;
- wide possibilities for decoration.
This option for building an artificial pond at the dacha has its drawbacks. The main one is time: it will take much more than digging a finished plastic mold into the ground.
To carry out such work you need experience and tools. Will have to purchase necessary materials and pay for the work of craftsmen, which will ultimately lead to high costs for arranging an artificial reservoir for a summer residence.
The amount of equipment required is determined by how complex in shape and filling the artificial reservoir is planned to be created at the dacha. For construction simple option you will need:
- Shovel.
- Ground trolley.
- Building level.
- Cord for marking.
- Pegs.
- Water supply hose.
- Film for waterproofing a pond or any other base.
To build a more complex artificial pond for a summer residence, you need additional equipment:
- Filter for water purification. Needed if you want to create a pond for fish breeding.
- Water pump. A similar device is used to pump and pump out water, to ensure the operation of filters, fountains and waterfalls.
- Sterilizer. Serves as a guarantee clean water in an artificial reservoir.
- Aerator (compressor). Enriches the water for an artificial pond at the dacha with oxygen. We need a model specifically for a pond; analogues for aquariums are not powerful enough. Additionally, an excavator may be required to dig the pond.

An artificial pond at the dacha should be erected following clear instructions. In this case, it will be possible to properly dig out the boiler and line it with waterproofing. Step-by-step construction of a pond using PVC film looks like this:
- Work begins with a plan. It is necessary to select the desired scale and draw all the details of the project, including the depth of each zone. At this stage, it is recommended to think about decorating the reservoir (especially if the construction of an artificial lake with a waterfall is planned at the dacha). A detailed plan will help you avoid many mistakes. In search of ideas, you can turn to the Internet - there are many photos of artificial ponds in the country.
- The next step is marking the future pit. It is done using a rope stretched over pegs, a rubber hose or even sand (the outline is drawn with it). It is important to ensure that the banks are located at the same height. The pit should be dug in accordance with the plan, periodically checking the level of the banks.
- Next comes the excavation stage. It is necessary to dig a hole, the depth of which will correspond to the depth of the coastal zone. Then make markings and fix the burial line. Next, a second tier is built and a line is made for digging an artificial pond in its deepest part. It’s better to work together with someone, and to build a large reservoir at your dacha, hire an excavator.
- At the dug hole, you need to measure the dimensions and depth using a cord. Add 50 cm to the obtained values on each side of the pit - this way you will know how much PVC film you will need to buy.
- The pit is tightly covered with film. It is recommended to lay geotextiles underneath so that over time root system trees were not damaged by waterproofing. The structure can also be strengthened with roofing felt or linoleum. You can also strengthen the shore and bottom with sand compacted tightly. It is better to carry out the work in sunny weather - the heated film will lie firmly on all the bends of the pit.
- The edges of the film sheet are tucked into a previously prepared trench around the perimeter of the pond, which is then filled with crushed stone or other stone. This way you can securely fasten the film.
- To prevent the earth from subsequently crumbling, the edge of the artificial pond for the dacha should be strengthened. This is done using stone blocks or plastic pipes, nailed to pegs. It is recommended to lay out the edge natural stones, complementing the overall picture with large boulders.
- Plants for decorating a pond at the dacha are placed in special baskets and installed in the right places, focusing on the plan. The bottom is laid out with small stones or gravel.
- At this stage, the pit is filled with water. A hose is the best way to do this, since carrying water in buckets is inconvenient. Standing water can cause certain problems, including bad smell. To ensure that the water mass in the artificial reservoir at the dacha does not stagnate, you need to make the pond a stream. To do this, the source is raised just above the level of the pond, and water is supplied to it by a pump from the bowl itself. Such a device will deprive pond owners of unnecessary hassle.
- Finally, the source of the stream is connected submersible pump, install the filter. It is better to use a pressure filter - it is more effective for water purification.
One of the most popular materials for arranging an artificial pond is PVC film. This is due to its low cost and good performance properties. In addition, for self-construction A garden pond using PVC film does not require any special skills or knowledge.

For artificial reservoirs in the countryside, films with a thickness of 0.5 mm or more are used, but for a really deep pit it is better to use the thickest film.
The advantages of this material are the variety of colors that allow you to achieve different optical effects. Thus, a black film coating will make the bottom of an artificial reservoir for a summer residence mirror-like - nearby trees and buildings will be effectively reflected in it. A brown film will imitate a soil bottom, a light blue or cream film will make the pond as transparent as possible, which will make it possible to see everything that happens in it.
The film is cut with a margin - so that after lining the bottom and walls of the reservoir, about a meter of film remains. The cut pieces are connected with special glue or adhesive tape.


As a design element for an artificial pond at your dacha, you can install a decorative fountain in the pond. You can build it yourself or purchase it ready-made. Often the pond is equipped with bridges and decorated with garden figurines along the banks. Flowers and plants planted in an artificial pond at the dacha require special care. There are deep-water and shallow-water plants.
The first ones are pre-planted at the bottom in baskets intended for this purpose. Such plants should occupy no more than 30% total area reservoir, otherwise the artificial lake at the dacha will turn into a swamp. In addition, exceeding the number of plants can lead to the death of other inhabitants of the reservoir, in particular fish. On the coast, flowers also need to be planted carefully, remembering that over time they tend to grow.

First, nymphs are planted in a pond at the dacha, then the bottom is filled decorative stone in the direction from the deepest zone. Susak, calamus, marsh whitewing, sedge and chastuha are planted on the terrace. On the surface of the water you can place hyacinth, bagel, pistia or swampweed.
The coastline is decorated various types iris, reed, aruncus, miscanthus, buzulnik. The composition can be diluted with perennials: hostas, primroses, buttercups, astilbes or swimsuits.
An artificial pond at the dacha can be populated with different fauna, for example, ducks and even swans, it all depends on the capabilities of the owners. As a rule, fish most often live in reservoirs at the dacha. Their choice must be approached extremely responsibly and carefully. Most often among the inhabitants: crucian carp, goldfish, carp. It must be taken into account that one fish up to 15 cm in size requires about 50 liters of water space.

Great idea for landscape design the dacha will become a fairy garden. The paths can be laid out with colored slabs. In this version, an artificial pond is designed as a magical place: plants with irregularly shaped leaves are planted, colorful fish are released into the pond, boulders along the banks of the pond are painted with bright colors. You can also actively use decorative lighting or lanterns to achieve a spectacular result.
If the artificial pond at the dacha is intended for swimming, then the perimeter zone can be designed in the form sunny beach. A certain space is separated from the rest of the area using a fence; inside the fence you can lay out sand, put sun loungers, a table and umbrellas.
Where to buy an artificial pond for your dacha
The Sportstyle company was founded in 1992 and has been successfully presenting its products and services in the markets of Russia and neighboring countries for more than 25 years.
One of the main activities of the company is the production of frame-awning structures, sports equipment, and recreational goods. Our products are very popular and in demand, including:
Swimming pools. Resistant to household influences chemicals, sealed with sealed seams and a special film that is safe for health.
Waterproofing. Industrial waterproofing, as well as for roofing and foundations.
Cover awnings. Protective awnings, covering canopies of any size made of PVC fabric or tarpaulin complete with fastening fittings. Pool covers protect the water from contamination.
Pond bowls. We can make bowls for ponds of any shape and size.
Curtains for gazebos, verandas. Protective curtains with the ability to open in good weather and close in bad weather.
How pleasant it is to spend a few hours by a shady pond or lake in the hot summer! Of course, it's great if there is one in the neighborhood. However, most often we spend our free summer days at the dacha, and not everyone has the funds for a large Vacation home and landscape designer services. In this case, there is nothing left but to make a pond with your own hands, especially since it is not so difficult.
It all depends on your imagination, the size of the area and what you have on hand. If you put in a little effort and Money, then the country pond will not only delight you, but also cause burning envy among your neighbors.
The size and shape of yours primarily depend on the area of the plot allocated for these purposes. But the larger the pond area, the easier it is to care for - a small one needs to be cleaned more often. If you plan to have fish and plant a lot of aquatic plants, then a small pond will not suit you either, because it is very difficult to maintain the correct eco-balance in it.
The most best place for a home pond there will be an open part of the site, at the same time protected from strong winds. You should not place the pond in a well-lit place: the location should be such that the sun's rays do not fall into the water for more than 6 hours in a row, otherwise it will bloom and only frogs will be able to live there. A dubious prospect, right? At the same time, if the lighting is insufficient, the plants will develop slowly, and you won’t get a beautiful place to relax.
If you decide to build a small fountain, you will definitely need a pond diagram in order to properly connect the pump and other equipment. With a little effort, you can draw up a plan yourself. Of course, you will also need to consider the proximity of the power supply network.
You should not locate your home pond under the canopy of trees. Firstly, this will lead to additional contamination of the water with fallen leaves, and the pond will have to be cleaned much more often, and secondly, the roots of the tree can damage the bed of the tank, and it will quickly dry out.

And, of course, the whole idea will become useless if you cannot enjoy the beautiful view from the window or from the terrace, so when planning to make a pond on the site with your own hands, do not forget about the aesthetic side of the issue.
Home pond on a rigid base
If you are a supporter of solid, durable construction, then you can approach the process on a grand scale: dig a foundation pit of sufficient size and, using metal reinforcement and cement, cast a reinforced concrete bowl for the pond. Such a design will certainly cost a lot, but it will last for many years (at least 30). If you are not a follower of the global approach, you can get by with a simpler and cheaper option.
So, how to do it One of the most basic ways to make your dream come true is a ready-made “bowl”, which can be purchased in a store. Perhaps the main disadvantage of this option is that you will not be able to come up with your own original shape for the reservoir; you will have to be content with the offered assortment.
The most inexpensive solution is a small plastic pond, from 4 to 8 m2. Of course, there are larger molds, but they already belong to the category of pools and are much more expensive. When choosing a container, you should definitely pay attention to its depth - it should be at least 0.8-1 meters. In summer, the water in such a pond will warm up completely, and all its inhabitants will be comfortable, but in winter, such a pond will not freeze to the bottom, which is also very important.

If you decide to organize a pond on your site with your own hands and want to use a ready-made base for this, then first of all you need to study the materials from which the forms are made - there are also several nuances here.
The simplest and cheapest option may be a regular plastic container, but it has its drawbacks. First of all, you need to be very careful when transporting and installing - such a tank can crack even with slight bending. Plastic also tends to break down from sunlight, which means that the service life of such a product is not too long - 5-10 years.
If you want your pond to last longer, choose forms made of special reinforced plastic - they have a much longer service life (up to 20 years). Such tanks are more flexible and less susceptible to ultraviolet radiation.
The highest quality and, of course, most expensive are products made from fiberglass on a rubber base. This form is resistant to temperature changes, does not deteriorate from exposure to sunlight and does not release harmful substances into the water, which is very important for the inhabitants of the reservoir. Such a tank will last more than 30 years, in addition, it can be repaired, which extends the time of use for an almost unlimited period.
Constructing ponds from a fiberglass bathtub is a simple process, and the result is quite aesthetic, since these forms come in different colors, and some are even coated with a coating that imitates stones, sand or small pebbles. This allows you to beautifully disguise the edges of the pond and give it the most natural look.
We build it ourselves
So, in order to build a pond on the site with your own hands, first of all you need to decide on the location and shape of the reservoir. Have you decided? Let's start construction work:
- First, we mark the outline of the pit. This is very simple to do - place the shape in the desired place and outline its silhouette using a regular bayonet shovel, pressing the handle tightly against the edge of the bath.
- Add about 20 cm to the resulting outline to fill the plastic pond with sand.
- If you purchased a form with ledges, then each level needs to be marked and dug separately, from largest to smallest, and do not forget to add 10-15 cm on each floor for a sand base.
- When the pit is ready, its edges should be thoroughly leveled and compacted, all glass, stones and tree roots should be removed. If this is not done, the mold may be damaged. Then you need to pour and carefully compact sand in a layer of at least 10 cm - this will protect your pond from subsidence.
- Install plastic mold and make sure that it is level, you can use the rule for this. Then carefully fill the pond by about a third with water, being careful not to move it.
- Carefully fill the gaps between the edge of the pit and the mold with sand. In this case, you need to make sure that there are no voids left. Why periodically water the soil with water, but try not to let the pressure be too strong.
During the week after installation, regularly water the soil around the pond and add sand as needed. After the soil subsidence stops, you can completely fill the reservoir, decorate the edges of the pond bowl with stones, flagstone and plant ornamental plants.

Country pond made of flexible materials
Now let's talk about how to make a pond on your site if it is not possible to purchase a ready-made container or you want to arrange a large pond of a bizarre shape.
The most budget option in this case, the use of ordinary polyethylene with a thickness of at least 500 microns will be used. However, despite the fact that it is quite inexpensive, this coating has quite a lot of disadvantages. The fact is that polyethylene is a fairly thin material, it is very easy to damage, and under the influence of sunlight it becomes brittle and quickly collapses. A pond on a polyethylene backing will last you a maximum of 2-3 years.
PVC film for a pond is also not a very expensive material, but much more durable; such a coating can withstand 8-10 years. Polyvinyl chloride coating can be regular or two-layer, in which a woven mesh is laid for strength. Of course, PVC has the same disadvantages as polyethylene - it is destroyed by ultraviolet radiation, it is easily cut and torn, but, unlike the latter, it can be repaired. Special kits are sold for this. In addition, PVC has better stretch, and after filling the pond with water, most folds will stretch and straighten over time.
The most expensive, but at the same time the highest quality coating is made from butyl rubber: the service life of such material is about 50 years, and it does not mind the sun's rays. In addition, butyl rubber is resistant to low temperatures, so you don't have to drain the pond water into winter time. This is a very flexible and plastic material that can withstand significant loads, so if you decide to arrange a spacious pond of an unusual shape, you simply cannot do without it.
Marking the pit
To build a pond on your site with your own hands, you will need:
- pegs;
- rope;
- film coating;
- geotextile or felt;
- sand;
- crushed stone or large pebbles;
- shovel;
- special kit for film coating repair;
- bricks;
- garden hose for watering;

Using twine and pegs, you need to mark the desired shape of the pit and begin earthworks. If you plan to create a fairly large pond, you can use an excavator. During the work, it is necessary to ensure that ledges and slopes alternate; this will make the banks of the pond more stable. It is also necessary to provide terraces (at least 30 cm wide) for planting. Descents from one level to another must be made fairly flat, with an inclination angle of up to 45˚.
It is worth remembering that the depth of the pond should not be less than 80 cm, otherwise in winter the water in it will freeze to the bottom and its inhabitants will die. Thus, you need to dig a pit approximately 15-20 centimeters larger than the expected size of the reservoir. This is necessary in order to be able to fill the terraces and the bottom of the pond with sand, in order to avoid subsidence and damage to the film. The sand cushion must be carefully leveled and compacted, after removing all pebbles, sharp sticks and plant roots from the bottom.
Drainage and waterproofing
When the sand drainage pad is ready, we move on to the next stage of work. In order for the pond film to remain intact for as long as possible, you need to lay geotextiles on a layer of sand, preferably in 2 layers. Next, we straighten the film itself and secure it to the banks using bricks or large stones. Don’t try to necessarily straighten and spread out all the folds - let the water do it for you.

We place the flexible one so that its end is in the center of the future reservoir, and we begin to supply water, making sure that the pressure is not too strong. As the pond fills with water, partially release the edges of the film and spread it along the slopes of the pit. After the reservoir is filled to the brim, leave it for 1-2 days. During this time, under the weight of water, the film will expand and fill all the voids.
After it has completely subsided, you need to cut off the excess parts, leaving at least 40-50 cm for arranging the banks. The edges are secured with pegs or special metal arches, and then masked with flagstone, large stones and pebbles. It's time to install the pump, decorate the hoses from the fountains and start planting plants.
Pond above ground at the dacha
When there are kids in the family, one of the main problems when building a pond is how to make the pond safe. It is best if such a reservoir is slightly raised above the soil surface. Firstly, this makes caring for it much easier, and secondly, the risk of small children or pets accidentally falling into it is significantly reduced.

In this case, you cannot do without reinforced concrete foundation. Dig a pit for the pond in its deepest part, form terraces for plants, just as in the previous case. Along the banks of the reservoir, using wooden formwork, pour a concrete foundation of the required height; it can be reinforced for strength metal mesh. After the foundation has completely dried and settled (this will take at least two days), the formwork can be removed and the inner walls can be plastered until smooth. This will help prevent the film from tearing. We line the bottom of the pit with it and fill the bowl with water. In this case, we secure the edges of the material so that they are behind the concrete fence. After the pond is filled, let the water settle, cut off the excess film, secure it and decorate the edges of the bowl.
Inventory: what you will need
Of course, building ponds is not an easy task, but what can you do for your loved one, because if everything is organized correctly, the result will please the eye for many years.
However, it is not enough to build a home pond - you also need to take care of it. Here are some technical devices that will be very useful to you:

Rules for caring for a country pond
A pond in the garden is, of course, very beautiful, but if you do not want to become the happy owner of a personal swamp in which frogs croak in the evenings, then you need to properly care for it. First of all, you need to make sure that the water in it does not bloom. Of course, it is best to purchase a special cleansing system, but, unfortunately, this is not a cheap pleasure. However, there is something else, more accessible remedy: take a canvas bag and fill it. Place this “surprise” under water, and there will be practically no algae left at the bottom of the pond.
It is also necessary to carefully monitor the cleanliness of the reservoir - regularly remove debris from the surface and add water as it evaporates. If your pond has small sizes, then in the winter it is recommended to completely drain it, and for large tanks it is necessary to completely clean it at least 2-3 times a year, and the water must be completely pumped out.
From what's at hand
But what should those whose plot size does not allow them to place even a small pond? Don’t be upset: a small pond can also be arranged in the front garden by using a cut-off metal barrel or just a large basin for this purpose. Such a mini-pond can even be placed on the balcony of a city apartment by decorating the container with glued pebbles or mosaics. Of course, you won’t hear the gurgling of a fountain near such a “reservoir,” but you are guaranteed coolness and lush greenery of aquatic plants.
Please answer one simple question: what object is capable of transforming country cottage area beyond recognition? Hint: this is not a garden or a gazebo.
The answer is simple - this is an artificial decorative pond in the country, made with your own hands. Construction of a swimming pool can be problematic: large area and volumes of water, the construction process is expensive and painstaking. It’s another matter if you build it in the country small pond. Absolutely anyone can afford such a pond. Moreover, a pond in the garden does not require the help of specialists - all work is carried out alone. Your desire and hard work will help you achieve a good result!
You can build a structure of any shape, decorate it with beautiful marsh plants, or plant bright Japanese ones inside.
What you should definitely know about decorative ponds?
Haven't decided on a location for your future pond yet? We recommend doing this first. Little secret: choose it in such a way that the pond in the garden with your own hands is not exposed to direct sunlight for more than 6 hours. Prolonged exposure to the sun promotes the proliferation of bacteria, the growth of algae, and an unpleasant odor appears.
On the other hand, building ponds in the garden next to trees is also not recommended. Dry branches and leaves will constantly float in the water; trees standing nearby can destroy the structure with their roots.
From the perspective of the oriental art of Feng Shui, decorative ponds are always placed on the south or east side of the site. This way the water can provide energy benefits. But the area is densely planted fruit trees, it is better not to use it at all. It is desirable that the area of the structure does not occupy more than 3% of the territory.
The next fact that you definitely didn’t know concerns the size of the pond. It turns out that the larger the pond, the easier it is to care for. This is due to the fact that substantial volumes of water and area contribute to the creation of a stable ecosystem between the animal and plant worlds.
The basis for the reservoir is a ready-made container: a huge cast-iron bath, a reinforced concrete bowl, a film of butyl rubber, polyvinyl chloride. Some craftsmen make a home pond from a tire with their own hands. When there is a ready-made container, construction is simplified. You simply dig a hole and place this container in it. Although building a large reservoir will be problematic.
The most convenient and at the same time economical option is film. In addition, it allows you to adjust the shape and depth. It is better to refrain from using ordinary polyethylene. Due to the short period of operation, it will leak in 2-3 years.
What does the construction process look like?
Now you will see that building it with your own hands step by step is almost an elementary task. We attach photos and detailed description construction:
- Bottom preparation. Dig a hole in the ground of at least a meter, with an area of 3-4 square meters. m. The pit must be perfectly flat, without any roots and stones, as well as protrusions. You don't want to damage the film that will become the base, right?
- Drainage. Putting down the film is only half the battle. To immediately prevent shrinkage, a layer of sand is placed on the bottom. Of course, you can make a great pond bottom if you fill it with concrete and line it with granite. This is a significant financial investment, so it is better to get by with more simple methods. The geotextile layer provides excellent protection against rodents.
To achieve maximum elasticity of the film, installation is best done on a bright, sunny day. Under the influence of high temperature, it stretches much better and easily bends around the protrusions of the pit.
- Laying the film and filling with water. The edges of the film are fixed along the shore line. To strengthen a decorative pond, as in the photo, use heavier stones and fill the edges with gravel or regular river pebbles. Ready-made ones have proven themselves well plastic containers, in which there are places for landing.
After filling the artificial container with water, do not rush to cut the film. Wait a day for the polyvinyl chloride material to reach its final volume.
After this, you can cut the film and lay the edges in the previously made trench. They are carefully tucked in and covered with crushed stone. If the width is not enough, you can connect several pieces together using soldering.
- Decor. Much will depend on your imagination. These can be all kinds of figures on the shore of a pond, beautiful plants, jugs from which water supposedly flows, and so on. The bottom of the pond is lined with pebbles or crushed stone, and the plants are placed in containers.
- Pond care. Without proper care, artificial reservoirs quickly turn into swamps. To prevent this from happening, care should be taken to prevent water stagnation. Buy a filtration system or plant plants that can regularly absorb carbon dioxide, saturating the water with life-giving oxygen.
Don’t be afraid to experiment by actively combining several options at once.
In winter, the water is drained, the plants go to winter in home aquarium or a natural body of water located nearby. It is better to plant plants immediately in baskets that are placed at the bottom of the pond. You can use lilies, egg capsules, and water lilies as decoration. Can be carried out artificial lighting, additionally install a pump for high-quality water circulation. In the evening, the pond will delight you with beautiful lighting and a pleasant murmur.
DIY pond made from a bathtub
Let's look at the usage cast iron bath as a basis for a pond in more detail. Do not rush to sell it for scrap or throw it in a landfill. In a private home it can be used for various purposes, including creating a decorative pond.
Make a depression and, filling it with sand, apply a cement screed. Thanks to this simple method, The groundwater will never be able to blur the structure. The ratio of sand to cement should be approximately 10 cm to 3-4 cm.
After 5-7 days, pour twenty centimeters of gravel and lower the cast-iron bath. The side openings are also filled with gravel. Make sure that the edges of the vessel do not rise above the level of the shore. It will look very, very unnatural. Place pebbles around the perimeter - preferably flat.
A bathtub installed on a slope is reinforced with a large stone on one side and made to look like. That's all - you can fill in the water and plant the plants!
How should you care for an artificially created pond?
Building a reservoir is half the battle. Like any other object on the site, it requires careful and attentive care. Without it, even the most beautiful pond will quickly turn into a dirty, swampy place and begin to dry out, emitting an unpleasant odor. To avoid this, experts are ready to give some advice.
In the spring, you inspect the artificial reservoir with your own hands as soon as the ice melts. Usually this is mid or late March. You can't think of a better time - work in the garden has not yet begun, you can inspect the pond slowly and very thoroughly. Everything is taken into account, starting from appearance and ending with the shores. Are they still intact, what is the condition of the form?
Owners of deep reservoirs often leave fish in the pond for the winter. Be sure to check their condition, pay attention Special attention electric pumps, filters. It would be a good idea to check the bottom of the reservoir for integrity. If cracks or leaks appear, they must be repaired as quickly as possible, and the fish in the water must be temporarily resettled.
The end of March, the beginning of April is a great time to take care of plants. Are you 100% satisfied with last year's flora? Then drop her off in her original place. Do you want something new? Buy new plants. Don’t forget about the nearby flower beds, which create a special atmosphere.
Most likely, there will be a lot of leaves floating in the water that were blown in by the wind in the fall. In the spring, they are cleaned to prevent decay and not spoil the water. The walls of a small reservoir are cleaned with a regular brush, dirty water is pumped out, and new water is poured in instead.
In summer, the main concerns are related to maintaining water at the proper level. On too hot days, when the moisture evaporates before our eyes, additional water is pumped in. To saturate the liquid with oxygen, it is recommended to create artificial shade and turn on the compressors from time to time.
The plants that grow around the pond are trimmed in time, as shown in the photo. Any weeds that appear are promptly removed. This also applies to leftover food that remains after the fish eat. If it is not available, water quality may deteriorate.
With the onset of the first cold weather, the initial task of the summer resident is to minimize the entry of debris and leaves into the pond. Plants on the shore are trimmed and leaves are removed. You can hang a fine mesh over the pond to prevent leaves from falling into the water. Some representatives of the flora can be removed in warm room until spring. Feeding of fish can be increased - it should stock up on nutrients for the winter.
If the pond is shallow and freezes to the very bottom in winter, pump out the water completely and take the fish into a home aquarium until spring. There is no need to take fish from a deep reservoir. Make sure that the pond has wormwood to provide living creatures with oxygen.
 Why do you dream of being in a foreign city?
 Cutting off your own hair in a dream
 About the origin of the self-name of the Dargins - History and geography - My Dagestan - Dargo's Path
 What plants have stilted roots?
 See what “1960s” is in other dictionaries 60s 20
 See what “1960s” is in other dictionaries 60s of the 20th century in the USSR
 Folk remedies for nausea