DIY flower pots: ideas and detailed master classes. DIY hanging flower pots for home and garden How to make a hanging flower pot
It is difficult to imagine your favorite garden without flowers, as they are a stylish addition and an integral part. landscape design. Compositions planted in unusual, original pots for plants made by oneself look especially impressive. Creating beautiful flower pots with your own hands from improvised material is not only a useful, but also a very exciting process. Step by step master class making original planters with detailed description and a visual photo, later in our article.
What can you make a pot with your own hands
Today, specialized stores offer a wide range of various decor and decorations for the garden for every taste, including original flower pots. However, even with such an abundance of goods, it is not always possible to find what you need exactly. There is only one way out of this situation - to try to make a pots yourself.
Oddly enough, but the most unusual decorative flowerpots are obtained from ordinary material. You just need to be smart and give free rein to your wildest ideas and fantasies. Planters from household items will look most harmonious in the garden. It is they who give a real zest to your yard, creating the effect of grace and refined nobility.

The second life of old shoes
Surely in the country you have old shoes that you haven’t worn for a long time, but you didn’t dare to throw them away either. The perfect way to breathe into her new life- make an original flower garden out of it.
To do this, you need an unnecessary pair of old shoes, the help of skilled hands and a little free time.
Walkthrough
- Pour fertile soil (preferably black soil) into the bottom of the boot, then plant seeds or seedlings of your favorite plants in it;
- Pour the resulting decorative flower garden warm water and put it somewhere in visible side Houses;
- To prevent excess moisture from accumulating inside, several small holes can be made in the sole;
- To give the composition a more interesting look, the boots can be painted in any color you like.


Decorating a shoe with your favorite flowers and plants is a great idea for a creative gardener.


Absolutely any footwear can be used as a mosnov: rubber boots, sneakers, sneakers, sandals, galoshes, low shoes, sandals, cloaks. As for flowers, it is better to give preference to bright, unpretentious, undersized plants.
Important! Planters from old shoes should have holes to drain excess water. Otherwise, the roots may rot, which will lead to the death of the plants planted in them.


Flower pot made of cement, rags and burlap (photo)
A flower vase made of cement and rags looks very original and impressive. The method of manufacturing the product is quite simple and does not require special skills and tools. It is enough to have cement mortar and unnecessary textile waste on hand.
Important! Before drying, a rag soaked in a liquid cement mortar can take any shape, so such compositions can be made in any form.
So, for work we need:
- Cloths of rags of the required size. You can use ripped burlap from cereals or sugar;
- Components for the preparation of concrete (water, cement, seeded sand or fine gravel);
- Patterns made to your taste. You can use ready-made ones, such as a bucket, a saucepan, an old vase, etc.
Step-by-step master class for making planters
- Cook according to the required proportions. To make it easier to work with the material, the solution should have the consistency of liquid sour cream;
- Wrap the template around with a dry cloth. If the size is right, dip it in the solution and hold it there for about a minute;
- Throw a dampened rag over your workpiece and let it dry for 12 hours;
- After complete drying, remove the template. A cache-pot of cement and rags is ready.
Good to know! The setting and hardening time of cement in the sun is reduced to 2-3 hours.


If you don't like cold and grey colour concrete, or you are simply tired of it, dilute it with bright contrasting colors, so the planter will look more elegant and more fun.
Miniature garden from tin cans (photo)
One of the most popular materials for making flower pots are tin cans.
- Why are they so popular among art lovers? Everything is very simple. Metal cans have many colors, shapes and sizes, so you can create a great flower arrangement attracting admiring glances.
The indisputable advantage of making such floral decorations is the minimum return of effort and time while obtaining the most creative result.

To make a planter from tin cans, the following materials are usually required for work:
- Cans;
- Nails and hammer;
- colored acrylic paints, fly brush;
- Wooden base for fixing jars
Manufacturing guide
- To give the composition certain outlines, all cans are painted in bright colors;
- After complete drying, a hole is made in the bottom of the jar to drain excess moisture;
- It remains to fix the jars to the selected base, pour soil into them and plant flowers.


To add more expressiveness to the product, patterns can be applied to a slightly dried surface or decorated with various buttons, ribbons, beads or beads.


An unnecessary teapot as a flower garden
Found an old kettle in the garage? Don't rush to throw it away. From it you can make a beautiful decoration that will look original in your garden. In addition, the creation of crafts with your own hands will help not only realize your creative potential, but also save money.
Return the product to its original appearance a can of acrylic or spray paint will help. Using a stencil, various patterns can also be applied to the surface of the teapot.
Important! So that the paint does not swell over time, the surface must be well prepared before application.

The planter from the teapot is mobile, and if necessary, it can be moved to another place
- For those who do not want to bother with painting kettle, you can leave everything as it is. The shabby and tarnished shade of metal with a slight touch of time has its own special charm. The cold shine of polished metal looks no less advantageous.

Using an old teapot as a flowerpot is quite a bold and creative decision.

Vase from improvised means: a step-by-step master class
Today, craftsmen and Hand Made craftsmen make original planters with their own hands from almost any material that comes to hand. Ideas for creativity and inspiration can be drawn from anywhere, including the Internet.
The photo of beautiful planters placed in our article proves once again that there is no limit to a person’s imagination. Innovative solutions and unusual super ideas allow you to create real works of art.

- If wooden sticks glue together into a hollow cube, so that each new row forms a free space, and each subsequent one overlaps it, we get an unusual planter that is perfect for small plants. It can be placed anywhere, for example, on a windowsill or hung on a rope, after planting indoor flowers in it.

- Plastic bottles. Probably not a single garden craft or decoration can do without their participation. Working with this material is very convenient and simple, the main thing is to observe safety precautions. The simplest thing you can make out of is a hanging flower pot.
However, plastic bottles can be used not only for decorative purposes. Seedlings can be planted in them vegetable crops, so this material is also a favorite among amateurs.


- You can weave a flowerpot with your own hands from an ordinary rope. In this case, the shape of the product can be different: cylindrical, round or cone-shaped, the main thing is that the planted plant fits freely into it. As a material for weaving, some craftsmen use thin vine branches or artificial rattan threads.

- If you approach the creation of a decorative flower pot more thoroughly, you can make a more interesting and large-scale composition. Suspended old waste boiler over an impromptu fire of flowers and logs, you can get a very interesting result that will not go unnoticed by your guests.
Important! To highlight and emphasize the beauty of the composition you created, you can protect it with a border of ordinary stones, slightly drowning them in the ground.

Boxes for flowers and seedlings
- Summer residents are resourceful and thrifty people, so they never throw anything away, including cuttings from boards and other lumber. After all, they make excellent wooden boxes which can be used as flower pots.
In order to make planters from boards, you can get by with minimal carpenter skills, and only a hacksaw, nails and a hammer are needed as tools.


- Good to know! Wooden boxes can also be used for planting seedlings of various crops. Only for this, in the upper boards, it is advisable to make special holes for the hands so that they can be conveniently and safely carried.

Beautiful flower beds from old things
Oddly enough, but old bike, which has not been ridden for a long time, may still be useful to you as a decorative ornament. It is not necessary to violate the integrity of the structure. Just use it as a living flower bed. Additional contrasting elements in the form of flowers and plants will turn an old bicycle into a real masterpiece of art.

Planter from a bicycle - everything ingenious is simple
- Showing imagination, a unique hanging decoration with flowers can be obtained from the usual bird cages. Just place a pot or container with low plants in it and decorate with some decor.
Important! A planter from a cage will look more elegant and noble if you use a decorative vintage cage in the Provence style for it.

- For craftsmen with golden hands, make decorative planter for a summer residence with your own hands in the form of a cart, it will not be difficult. This will require a special tool and certain skills in handling wood and metal.
- To improve your mood and bring yourself a lot of positive emotions, you can quickly and efficiently make flower pots from ordinary trash cans made of shiny metal. For ease of movement, furniture wheels rotating in different directions can be screwed to the bins.


As you can see, having the right material at hand, it is very easy to make a flower pot for the garden with your own hands. For the manufacture of simple products, no skills are needed. Even a child can cope with this task. As for products more complicated, then you can’t do without the help of adults.
The creative process of creating a planter is not only creative, but also educational. Therefore, even the smallest children can be involved in this exciting activity.
Let's see how you can transform your favorite indoor flowers? For example, if you create a flower pot with your own hands, then such decor will please the eye and add zest to the interior. In addition, having equipped flower stands and / or shelves for flowers with your own hands, it will also become convenient for you to take care of your pets.
Pot design options for indoor flowers
What is the difference between a pot and a regular one flower pot? Translated from French cache-pot means "to hide the pot". Thus, the planter is a decorative "wrapper". Certainly, best home there will be a clay pot for flowers, but it quickly loses its attractive appearance, since ceramics let water through and stains appear on its surface that cannot be removed. Glaze is often used as a protective film, but it cracks and crumbles over time, and then the pot will either have to be replaced or decorated. In this case, a planter comes to the rescue - with its help you can easily hide unsightly places and create decor in the same style.
If you have a couple or three pots, then the easiest way is to arrange them beautifully on the windowsill. But if there are more than a dozen colors, then placement can be a problem. The most common way to hang a planter is to use ready-made hanging hooks or make holes for a rope. But you can make the mounting method creative.

You can organize a simple crossbar or build a whole structure under the ceiling, on which, for example, hang several.

The design of a one-piece planter does not provide for drainage holes, and openwork ones do not retain excess moisture, so this must be taken into account when watering.
Or here is such an idea of \u200b\u200bhanging a planter, even those who can’t do it can implement it:
If you need to small space place a lot flower pots then this idea is for you!

With the help of simple tricks from wooden blocks and a rope, you can make a whole shelf for flowers with your own hands by equipping hanging structures. More detailed instructions in this video:
Imagine, combine different ways The more flowers you can place, the cozier your home will be.
Making flower pots with your own hands from scratch: materials and master classes
In this section, we will consider options for independent "cases", which are made separately, and then a flower pot is "populated" in them. For indoor planters, the choice of materials is unlimited and correlates only with the overall design and your preferences. The most common and used for hand made:
- cardboard,
- paper tubes,
- felt,
- recyclables.
From felt
From simple materials for needlework and children's creativity wonderful things turn out, you just have to apply your imagination. Look, a charming planter from.


Do-it-yourself stands and shelves for pots
Making a planter or decorating a pot is not all. This beauty needs to be put somewhere! Here you can not do without special shelves and stands. You can build a structure on the wall.

And you can order a whole bookcase on the floor.

Or here is such a bookcase-ladder.

And it is not necessary to ask someone. If you buy blank parts sawn to size in a store, then even a gentle female hand can cope with the assembly. Like in this video:
But it is much more interesting to turn on the fantasy and adapt unusual objects under the shelves to place the flower pots. For example, pallets. Paint with a stain or dark paint and now - a great shelf is ready.

And in this tool trolley, various plants coexist perfectly, creating a mini-.

"Cross" will not advise bad! :)
Categories ,All photos from the article
Wooden flower pots can be a real decoration for your home, apartment or suburban area. Such structures are easily assembled with their own hands from the cheapest materials, they look great and serve for a long time, and if necessary, they can either be repaired with minimal labor or just as easily disposed of.
In the article we will tell you what advantages such products have, as well as give tips on making the simplest models.

Advantages of wooden flowerpots
Flowerpots made from wooden parts are a little less common than plastic or ceramic ones.
At the same time, these structures have a number of obvious advantages:
- The material is very easy to process, therefore, not only a professional carpenter, but also any of us, with a minimum set of tools and dexterity, can make a flowerpot or planter.
Note! The second aspect of this advantage is the wide range of design possibilities. Using a saw, a jigsaw and a hammer, you can make a flower pot of almost any shape and size.

- The price of products is quite low: neither expensive raw materials nor complex devices are required for work.. In principle, pots can be made literally from what is at hand, spending only on fasteners and decoration.
- If the technology is followed, a protective flowerpot can last up to ten years. At the same time, worn parts are replaced quite quickly and simply, so repair is also not difficult.
As for the cons, the main problem that we will have to face is the hygroscopicity of wood. Upon contact with wet soil, the walls of the flowerpot can either begin to deform or rot, so we will definitely include moisture-proof and decorative processing in the manufacturing algorithm.
Manufacturing of wooden structures
Option 1. From a log or stump
If you plan to grow flowers on the site, then a stump, log, half-deck and other fragments of a tree of this type will serve as an excellent preparation for a pot or flowerpot.
The appearance of such "pots" will perfectly fit into any site design, while the manufacturing instructions will be extremely simple.

- To begin with, we select a stump or a log of the diameter we need. The larger the plant that we plan to plant, the larger the flowerpot should be, otherwise root system will not be able to fully develop, and we will not wait for beautiful flowers.
Note! From thick trunks, you can make containers even for small flower beds - if only the diameter allows.
- Next, using a saw, cut off a part of the log of the desired length. As a rule, flowerpots for soil are made about 40 cm high, and for a high location - 1 - 1.2 m.
- Then we take a drill with a drill up to 25 cm long and about 20 mm in diameter. In the upper plane, we drill several holes at the same distance from the walls. Also, using a drill, we make a series of nests in the center of the deck, destroying the core.

- With the help of a chisel, we remove the wood, forming a container for the soil. We carefully align the edges, forming sufficiently thick and strong walls.
Now we can act in two ways:
- if there is a ceramic or plastic pot of the desired diameter, then we simply install it in a log flowerpot, protecting the wood from moisture;
- If there is no pot, then we carefully treat the inside of the stump with moisture-proof impregnations, then line it with polyethylene and only then fill up the drainage and soil mixture.
People are very fond of beauty and aesthetics. Coming to visit, the first thing that catches your eye besides repair is the plants that the owner of the apartment grows.
And if you have a private sector, then the basis of the aesthetics of the house are flowers and various decorative lamps, plaster gnomes, clay sculptures.
Buying the most ordinary pot is trite and not always very beautiful, and the phrase: “What wonderful flowers you have” often sounds like flattery, since the owner, who has the most ordinary pots, unfortunately, cannot show off originality.
Recently, do-it-yourself crafts are gaining more and more popularity, because a person first of all expresses his artistic abilities, and when they come to visit, instead of the usual compliments, such people hear: “Everything is so unusual, did you do it yourself?”.
There is more than enough pride after such words, but now let's get down to business and throw a couple of ideas for flowerpots under your favorite petunias (this flower is standard, beautiful and almost most people have it, so examples will be provided specifically for this variety).
materials

Do you have an extra wheel, block, or any other extra material? Do not rush to throw it away, you can make a wonderful decoration for flowers out of it.
But before that, you need to look at the pros and cons of the material:
- Wood. There is no need to care for the material, but it is necessary to pre-process it.
- Ceramics. Ideal for creating decorative designs: you can give the most various forms but the items are very heavy and fragile.
- Plastic. Cheap, lightweight and requires virtually no processing. The downside is that with frequent watering, the roots of plants can rot.
- Glass. "Like" all plants, but heavy and fragile.
- Handy materials. You can’t list all the materials, so this includes absolutely “any garbage”, from broken drywall to a punctured wheel. It all depends on your imagination.
Editorial tip: looking for suitable materials take a look at the dacha in the utility shed or in the attic of the house.
From simple to complex
It is best to start from simple to complex. You can make, as mentioned above, from anything. Do you have extra bricks left over from building a house or a garage? So, don't throw them away, paint them, and plant flowers in them.

Since childhood, many readers remember the flowerbeds of tire wheels, which were practically not even painted. But now, when any Decoration Materials are commercially available, it will not be difficult to decorate any tin can, car tire or box.

plaster pots

To create a masterpiece, you need water, gypsum, two plastic containers. The algorithm for creating a pot is as follows:
- Mix gypsum with water in a ratio of 2:1.
- Lubricate the large container with oil on the inside, and the smaller one on the outside.
- Place a smaller container in a larger one, leaving a gap between them, do not forget about the bottom part too.
- Pour the plaster gradually.
- Align the "vessels" inside to even out the walls of your pot.
- Wait 2 days.
- Once dry, peel off the plastic molds.
The result is the most ordinary white pots. Then it remains to paint, paste over with foil or make the finished product using the decoupage technique. Give free rein to your imagination!

Cache-pot from a piece of wood
From the most ordinary piece of sawn logs, you can also make an original flowerpot, which will look very nice on a stone path in front of your house. Alternatively, you can put it in pots and set it on stumps, or use the stumps as flower beds for growing petunias.


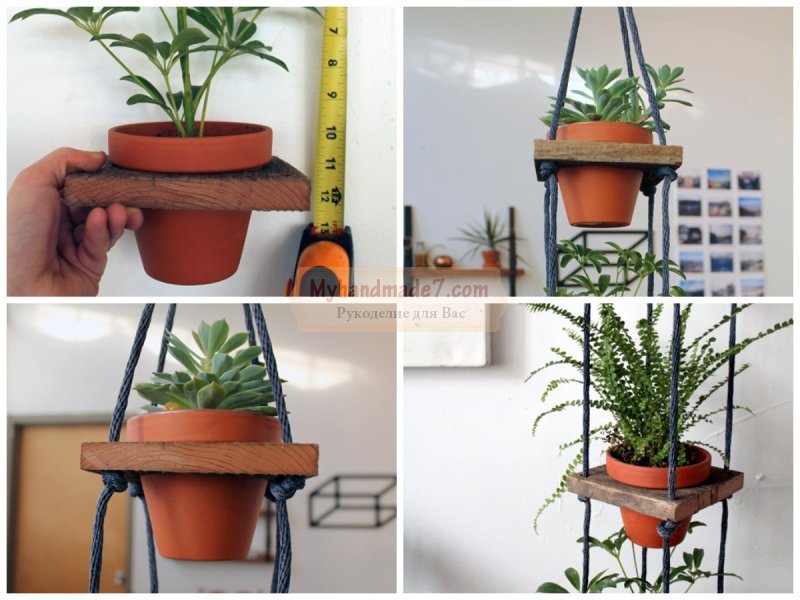
Hanging planter
So we got to the most complex and beautiful planter, whose appearance is able to arouse the admiration of neighbors in the country. First, you need to make the pot itself (we learned how to make it earlier). Later you will need the following materials:
- threads, twine or thin ropes;
- metal ring, eyelets with a diameter of 4-5 cm;
- wooden bead with a diameter of 2-3 cm;
- colored buttons (coat) 24 pcs.


And if you were fond of macrame as a child, you can perform it in this technique. 
The advantages of this type of pot are as follows:
- improvised materials are used for its manufacture, which means that the cost of the cache-pot is small;
- can be done even by a child;
- does not take up space on the windowsill;
- ampelous petunias will appreciate the new place of residence.
small bonus
If you have not found anything for yourself and you are missing any ideas, you are provided with a small photo bonus from various and unusual planters. 


We hope that now you have ideas for creating your own pot. To get started, dream up and create something similar, and in the course of creativity, ideas will appear by themselves.
See interesting video about how to make a planter and a pot of gypsum with your own hands:
Even the brightest flower beds need framing - "outfits" that will further emphasize their beauty. The most spectacular and at the same time simple “outfits” are considered to be street planters. Making them with your own hands will not be difficult. Do you want hanging planters from bottles, wicker from a vine or ground from a tree stump? No problems! Read the instructions on how to make a planter from these and other materials, as well as watch educational photos and videos - they will help you transform your garden beyond recognition.
We make pots from rags and cement
To make this pot, you will need:
- cement;
- old tablecloth;
- a vase, pot, or other vessel for form;
- water;
- bucket;
- "Mixer" - nozzle for a drill;
- dye.
The procedure for creating a pot is very simple. First you need to prepare a cement mixture. To accurately determine its volume, take a tablecloth, place it in a bucket and mark on the walls how much space it takes - follow this mark and pour water for the solution. Add cement to the water and mix them with a “mixer”. The result should be cement milk, reminiscent of the consistency of slightly watery sour cream.
Then, when the mixture is ready, place a tablecloth in it and leave it for a couple of minutes so that it is completely soaked. After that, remove the material and make sure that there are no dry spots left on it.
Next, take the prepared container for the form and hang a wet tablecloth on it. Gently spread the material and leave to dry. When the cement mortar has completely hardened, remove the product from the container-mould and paint. Use special paints for concrete - they are stronger and more durable. Once the paint has dried, you can use the planter for its intended purpose.
We make pots from plastic bottles with our own hands
Plastic container - universal material for flower pots, since several models of “outfits” can be built from it at once.
The first option is a classic planter. Take plastic bottle, two CDs, sandpaper, scissors, glue and paint. Cut the bottle with a wavy line into two equal parts. Sand both discs with sandpaper. Take the bottom of the bottle and glue it to the stripped first disc. Then take upper part: first unscrew the cap and glue it on the second disk, and once the glue is dry, screw the plastic part of the bottle back onto the cap. When finished, cover the blanks with paint.
The second option is a hanging planter. Here you will need: bottle, rope, paints, scissors. First, cut off the neck of the bottle - only the straight bottom of the container will be used in the work. Then cut small holes on the sides for the rope. Then decorate the design: paint, cut out patterns, draw an animal, cut off the top edge - everything you can do neatly. And then thread a rope into the holes, put a flower pot in a flower pot and hang the structure on strong nails.
We make wooden flower pots
The easiest way is to make a flower pot from a stump or a log. Take:
- wood;
- drill: drill length - at least 25 cm, diameter - at least 20 cm;
- chisel;
- protective impregnation for wood.
- Pick up a log or stump required diameter. Measure a part to the height of the flower pot or flowerpot and cut it off - this is again a planter.
- Drill a series of holes in the top plane of the wood to destroy the core.
- Remove the wood with a chisel - you should end up with an empty container. The edges need to be aligned.
- Treat the inner walls of the planter with a protective compound and place a pot of flowers in it.
Advice. The wooden planter itself can also act as a pot, but for this you need to put durable polyethylene in the container and fill it with drainage from above. And only after that you can put the soil mixture with a flower.
More difficult option- cache-pot from boards and timber. You will need:
- bars with a section of 25x25 mm;
- boards 15 m thick;
- self-tapping screws;
- wood glue;
- drill;
- protective impregnation for wood.
The algorithm for making pots is as follows:
- From the bars, assemble a frame in the shape of a cube.
- Cut out the details for the bottom and walls from the boards. Sand the panels on all sides.
- Drill a few holes in the bottom for drainage.
- Assemble the planter structure together: attach the side and bottom panels to the cubic frame using self-tapping screws. In order to give the product even greater reliability, carefully glue all the joints.
- Cover the surface finished construction protective composition.
Weave pots from the vine
Another simple but interesting option flower "outfit" - a flower pot made of vines. Prepare for work:
- flexible vine - it can be both fresh and dried;
- plywood sheet;
- moisture protective impregnation;
- drill;
- awl;
First, soak the vine in water to give it the extra flexibility needed for easy weaving. Cut out an oval or round bottom blank from a plywood sheet. Drill the same holes along the edge of the resulting bottom with a diameter slightly smaller than the diameter of the vine. All holes must be at the same distance from the edge of the bottom. Then insert a strong twig into each hole - this will be a blank for the planter frame.
The next step is direct weaving: lay the vine between the rods, gently pressing each new row with an awl. Wrap around the twigs until the product reaches the height you need. Laying methods can and even need to be changed through the row - this way you will achieve a different textured surface of the pots.
At the end of the weave, either cut the rods or weave them into the main rows of the vine. Then let the structure dry a little and get stronger. The last stage is the treatment of the cache-pot with moisture-proof impregnation and varnishing.
We carry out a cache-pot from plaster
To make such a planter, prepare:
- gypsum;
- wire;
- textile strips no more than 10 cm wide;
- paint;
- bucket;
- protective varnish.
The first step is to prepare the frame. Turn the bucket upside down and braid its surface with wire. Turn the edges over and hide. Carefully remove the finished frame from the bucket.
The second step is the dilution of the gypsum mortar. Take gypsum and mix it with water until the composition begins to resemble sour cream.
The third step is the construction of the "body" of the pots. Dip all textile strips into the gypsum solution and soak for 3 minutes. Then, one at a time, take out the tapes and put them on the frame layer by layer. The wall thickness should be at least 2 cm. Then carefully treat the walls of the structure with the remaining gypsum mortar. After this, the planter should dry completely - set it aside for 10-12 hours.
The fourth step is the design of the structure. The cache-pot can not only be painted, but also decorated with a variety of glass, beads, pebbles - any small details that you like.
Advice. After drying, the walls of the pots will not be completely even, so the paint will fall poorly. To avoid this, carefully clean the surface with sandpaper and treat the structure with a white water-based composition, and then apply the paint of the desired color on the planter with the second layer.
Now you know that you can make a beautiful flower pot from almost any material without spending a lot of time or a lot of money. The main thing is to turn on your imagination and be smart. So if you want to effectively decorate your garden, do not rush for store pots - take the initiative in your own hands and do not be afraid to experiment.
How to make a planter: video
Planters for the garden: photo


 The basics of prayer - entry into prayer - prayer - catalog of articles - Islam - the religion of peace and creation
 Blessed Day of Ashura History of Ashura Day
 Learning to read namaz correctly
 The daughter of the Russian oligarch Elen Manasir revealed the secrets of beauty and weight loss Guest marriage Viki Manasir with her husband
 The policeman revealed the bloody secret of the murder of Tupac: the killer was hired by P Diddy
 Media: Lukashenka's fortune reaches $12 billion Lukashenka's fortune is estimated by Forbes
 Gorovoy Alexander Vladimirovich