A table for a railroad model. Do it yourself railroad layout. Step by step work plan
And the construction of the sub-model began. I bought plywood 9 mm and 4 mm, aluminum profile and chrome legs, as many as 6 pieces for stability. Sawed, drilled, screwed.
The initial stage of construction of the model. Bought legs, plywood, aluminum profile.
We fasten the aluminum profile to the plywood with self-tapping screws and get a frame for the sub-model.
We strengthen, the place of connection of two sheets of plywood and the place of attachment of the legs.
We fasten the legs to the frame, reinforce the corners and get the actual sub-model. The weight of which was 12.1 kg.

This is how the mock-up looks like, very similar to a tennis table.
I'm looking forward to posting my future scheme movement, previously drawn on paper. Looking ahead a little, I want to say that in the future the traffic pattern will change a little. When you see it really in volume, and not on a flat paper diagram, then everything can turn out differently. Therefore, initially think over your scheme correctly, draw it if possible with a flatbed ruler or in the WinTrack program, and then there will be fewer errors.
We make the frame of the future slide turning into a bridge.

We continue to build our slide.
We continue to build, at the same time we are trying to fit the bridges bought in the store.

We are starting to build a railway descent. When building a slope, strictly adhere to the standards of descent in degrees, otherwise the train will not be able to climb your hill. Also keep in mind that different locomotives have different traction. If possible, experiment with locomotives. I put rails on sawn-out radius plywood blanks and drove different trains up and down, changing the angle of inclination of the blank in such a way that the weakest locomotive could calmly climb the hill. And only after that fixed the descent and ascent.
The locomotive is ready for the descent-ascent test.

Be sure to after applying PVA glue to wooden parts, firmly press them together, put a heavy load or clamps.
There have been changes in my traffic pattern. For some reason, the idea of a section of the railway came up, such as a light metro on concrete supports - pillars.
Bought in a model store: round sticks - future concrete supports, slats - future flanging, and in office supplies, wooden rulers were bought for the pedestal itself, on which plywood with rails will be laid.

Here it is the future section of the overpass, yet without sides.
The future silhouette of the model of the railway appeared.

We carry out sea trials of rolling stock.
Since I want to see at least some result as soon as possible, I started to form the relief of the mountains from papier-mache. Take paper, newspapers - cut into strips, grease with PVA glue and glue to plywood, layer by layer, letting the layers dry. Approximately 3-4 layers. When it all dries out, you will have a fairly solid base of the slope. (Although according to the rules, you must first finish everything preparatory work, and only then take on the finishing, but I can’t do that, so sometimes I will violate the sequence of construction - the result is important)

This is how the stages of applying layers of papier-mâché look like.

We glue the side to the overpass and paint it. At the same time we are preparing papier-mâché for grass stickers. We paint the paper slope with paint that matches the color of the grass, so that when gluing the grass, the paint hides our small mistakes.
This is what a refined monorail looks like. Rails glued, gravel poured.

Here you can see the wires for the future block of the site. Do not forget to put a dielectric (plastic) rail separator, in the photo it is black between two protruding wires, in the future the wires are carefully soldered to the rails.

We carefully solder the wires to the rails and paint the rails with dark brown matte paint, this gives them a non-toy look. Painting the rails is hard work, but it's worth it. In the background, unpainted rails are visible - the difference is obvious.
For greater realism, paint the railway bridge.

Made of special paper imitating brickwork, we make the support of our monorail.

We sow grass and add gravel to the railway bridge.
Add overgrown grass or a small shrub to the grass.

This is how the transition from the monorail to the embankment turned out.
Materials and tools for building a railroad model.

First of all, you can't do without glue to build a layout. Glue is needed a lot and different. I used three types of PVA glue. PVA JOINER is good for gluing the wooden parts of the layout, it dries quickly and holds tightly, one of its minuses is a yellowish tint. The second PVA SUPER glue is perfectly white, it also dries quickly, and when dried, it gives a glossy layer. The third PVA TEX glue dries for a long time (but sometimes it is very necessary) perfectly white, when dried it gives a transparent, matte layer.
Also, you can not do without special adhesives: glue for models, dichloritan, super moment, universal moment.

Various model paints are also needed, I used acrylic "Star"

You will also need brushes, both for applying glue and for painting models.

To simulate the embankment of the railway, branded gravel powder is used - pay attention to the scale, for each scale there is a different size of gravel.

Don't forget to buy weed, it happens different types and compositions. Simple grass is made from sawdust, the more natural grass is made from flock. And of course you will need a floccator, it can be electrostatic and simple. An electrostatic flokator is needed for gluing grass under static, from the received charge, the grass reaches for the flokator and sticks in this position, it turns out more naturally. But you can do without it in the lid of the jar, holes with a diameter of 4 mm are made, and by shaking out of the jar, sow grass. Cheap and cheerful.

To clean the rails, you will need a branded cleaning bar, it is necessary to clean the rails of paint, glue and dirt.

We buy different kinds trees, some will go to the fore, others to the background.

construction layout railroad
You can buy imitating paper various materials: brickwork, paving, etc.

We begin to glue houses, structures for our layout. When gluing houses Special attention pay attention to deburring, when photographing close-ups, they stand out especially. Well, be careful with glue when applying a large amount, it can remain on the model, and spoil the impression very much. I also recommend buying models of people, without them the layout becomes not so interesting.
We continue to build a model of the railway. Let's talk a little about the electrification of the layout.

An important part of any railway layout is electrification, signaling and control. The picture shows a two-color traffic light (red, green) on our layout, it will perform the function of permission - prohibition of the departure of the train from the block section if there is another train ahead. The traffic light is connected to the automation unit, which will give a command to brake or depart the train, with simultaneous switching of the traffic light signal.

Traffic lights have different mounts: built-in or on finished support. To whom it is more convenient: to put and fix, but the support is visible, or to drill a hole and carefully fix it. Do not forget that any electronic unit can break or burn out and you should consider the possible dismantling and replacement of this unit or traffic light.

Night lighting of buildings, lighting of streets and stations looks very nice. If you do this, then think over and prepare your layout in advance.

All buildings for layouts have the possibility of electrification, by attaching a house to a layout, outline its outline and drill or mill a hole so that you can insert a backlight.

Ready-made holes for lighting houses on the layout. Both incandescent lamps and LEDs can be inserted into the houses, paws give a large angle of illumination, but are less durable, LEDs give a smaller angle of illumination, but are more durable.

We are preparing the road.

We sow grass and shrubs, put houses and a railway crossing on the marked places. Attach trees and cars. Very important point When you plan block sections, be sure to take into account the length of your train, if you have different trains in length and you do not take this into account, then various problems are possible: a long train may not stop or stop where you planned.
The compositions and trains on your layout will be different, and later you will want to change the composition, so think over the length of the braking and acceleration section.

Locomotive at the crossing.
Electric locomotive at the crossing.
Well, it's just handsome - motor car BR 642
For greater beauty, we put passengers in our motor car BR 642

We glue the BUSCH material imitating the asphalt surface.

With asphalt, the layout began to look much more natural than the idea of expensive painted paint.

We glue the bushes, attach the trees, but do not fix them yet, in order to imagine the future picture of the layout. In the future, it is desirable to sprinkle the roots of the trees with grass, or simulate the hilling of a tree in order to hide the plastic roots of the trees.
Toy railroads are inherently associated with childhood. Many of us at a young age once had a plastic or iron prefabricated model railroad. And those who could boast of a foreign-made model were considered lucky.
In modern times, the hobby of toy railroads has grown into a major modeling industry. Moreover, this business is already more focused on an adult audience than on children.
Trees, houses, roads, cars, relief surroundings were added to the main attributes - a track and a locomotive with wagons. And a table with a full-fledged model of the railway, with many details and trifles, is already a real art.
Abroad, such products cost from 2 thousand dollars, but in this article I will tell you how to make a full-fledged model of a toy railway with your own hands.
Table
You will need space for the layout. Ideally, this should be a separate table, but you can get by with a small table, or just a fenced-off area on any suitable surface. It all depends on your desire and scope. I recommend starting with a small area, like part of a table, and then, if inspired, make a large layout. It is better to start small than to immediately take on a large amount of work and throw it halfway.
starter kit
The thing without which it will not be possible to make a model of the railway is the railway itself. Or rather, a set of rails, a train and a power system for it. Here, alas, there are no alternatives - it's all you need to buy. It's good that there are plenty to choose from in the market today.
sketch
To know what you are moving towards, you need to have a goal in front of your eyes. Make a rough sketch on paper - where what should be, and what it will be general form your layout. Surf the Internet, look at the numerous models of railways and take note of what you like - bridges, crossings, houses, stations. You can make a model of a station in the Wild West, or you can make a station in the center of a modern city. But be sure to decide before you get to work. And make markings on the table so as not to suddenly discover that the track goes beyond the boundaries of the table, or that the barrier will cling to a passing train.
The mountains
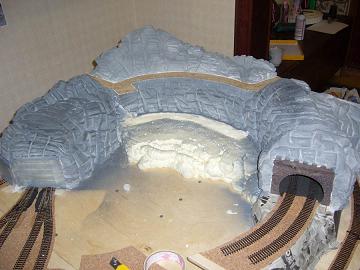
The presence of a mountain, with a tunnel through which the train will pass, will be the decoration of the layout. To create a small mountain you will need polyurethane foam, plywood, knife, alabaster and sandpaper.
First, think over and, if possible, draw a sketch of the future mountain. Then knock over the rails a small box of plywood or other suitable material. Make sure that the size of the box will allow your train to pass freely through the tunnel. Then start applying foam around the box, with pauses of one and a half to two hours, to allow the layers to dry and not sag under their weight. After you apply the foam of the desired volume, leave it to dry for a day, no less.
In a day, pick up a knife (more convenient - a clerical one), and start picking the mountain - cut off the extra pieces, giving it the shape you intended. Cut out hollows, crevices, try to make it as natural as possible.

Then you will need alabaster. Dilute it with water, and cover the entire mountain with a thin layer up to 3 mm. It dries quickly, so dilute it in small portions. Then again wait a few hours until everything hardens - it is better not to use a hair dryer.
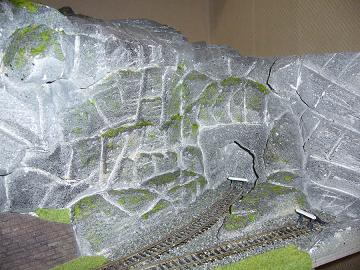
Now you need to paint over the mountain in gray. To do this, buy a can of primer in any auto shop, the color of a gray stone, and you can paint your mountain. Just test the paint on something else first to make sure it's the right color for you.
Next, use sandpaper and rub the mountain in places to remove layers of primer in some places. This will give the mountain a more naturalistic look, so that it is not a uniform color, but a shade from light to dark gray. You can repeat painting and sanding several times until you get something that suits you. You can also paint individual pieces of the mountain white or black for more believability.

Finally, take green paint and tint the pieces of the mountain also in the color of greenery - this way it will be even more naturalistic. Only the paint should be a believable, "mossy" color.
Your mountain (or slide) is ready. Congratulations, you've already done a lot of work. Next in line are the rest of the relief details.
Here everything depends on your imagination, the size of the free space and the suitable details that you have. Fill in the unoccupied tabletop with, for example, fake turf that is sold in stores. Toy houses, figures of people, transport, railway crossing, train station, bridge, trees - these are all the details that will decorate your layout. Many of them can be found in Lego bricks, or just individually in toy stores. Train modeling firms also sell great kits, but be prepared to spend a lot of money if that's the case.
You can make a layout on a large table, with lots of details, terrain, electric movement and a real miniature town. But you can also make a small model - a battery train, with a small piece of landscape and a few decorative elements.
Whatever option you choose, the model you made will be an adornment of any home and will be of interest to any company - both children and adults.
I want to say right away that this layout is not built by me. I'm just doing a translation and trying to put together, in my opinion, quite interesting material from a foreign forum, where the author of the Great Northern project covers the process of building his layout. The presentation of the material will go on behalf of the author. So, let's begin....
I have long been thinking about how to describe in detail in the blog all the stages of building a model of the railway, and now I finally decided to do it. Where did I start? First of all, with the choice of location for the layout. The best room was the attic. However, I turned it down because I'm not getting any younger and I suspect that climbing into the attic will become more difficult for me every year. In addition, the attic had some drawbacks - it is hot in summer and cold in winter. In the end, after long doubts, he was still rejected.
As a result, I found a truly ingenious solution - I removed one of the partitions in the house, I got an excellent room for placing a layout measuring 3 by 7.5 meters. Considering all the problems that I encountered in creating my previous layout, I decided in advance, before starting work, to carefully plan all the details. So my layout should have:
- Big potential.
- Main tracks with railway station.
- Path development.
- There should be at least 80 cm of free space next to the layout for the convenience of working with it.
As a result, all these parameters were met, although now I see that 80 cm of free space turned out to be a bit much, less would be enough. I got a scheme with a classic station and main tracks on the one hand and track development on the other. The layout was based on the Peterborough North railway station, which I had to slightly change, given the small size of the room.
I assembled the base of the layout from 9mm prefabricated plywood kits. Because quality foundation is one of the keys to creating a good layout, I chose the best I could afford.
From above, the finished frame was sewn up with plywood sheets. It turned out quite well, in my opinion. Further, in full accordance with the plan of the track scheme, I began to mark the location of the tracks.
After the final study of all elements of the track facilities, it is time to think about its electrification. And here I ran into a rather big problem - it turned out that working under the layout in the small cells formed by its frame is very inconvenient. It turned out to be simply impossible to solder the wires with a soldering iron, so I decided to use connectors. As a result, my layout acquired the following view from the bottom.
I fixed the electronic components with screws on the sides of the base. In general, it turned out quite successfully, and most importantly, firmly and reliably.
After the base of the electrical part was mounted, it became possible to see how the layout would look like with the soil simulator sheets laid and the ballast backfilled - so far in separate areas. What came out of it, you can see in the presented photos.
Unfortunately enough small room it's impossible to replicate Peterborough North as accurately as I would like. Therefore, willy-nilly, one has to make some compromises regarding the number of paths, their length, etc. However, in general, I managed to keep the main elements of the real station as of 1958.
The largest operating model of the railway in Moscow is located at the Rizhsky railway station. Natural landscapes and urban infrastructure facilities are recreated here in miniature, and railway communication in all its diversity is demonstrated against their background.
What has been seen goes far beyond children's entertainment; visiting a model of a railway in Moscow will be interesting for both children and adults. The size ratio of the layout elements is maintained on the same scale, creating the illusion of observing the real area, vehicles, people and other objects. The miniature occupies the main part of the hall area, along the perimeter of the room there are racks with models of railway equipment, maps of existing and planned highways. For those interested in the history of the development of railway transport, we recommend visiting Paveletsky railway station. If there is not enough time, you can at least read our article with the same title.
We examine the model of the railway in Moscow
Some passenger and freight trains are in constant motion, other elements of the exposition are launched by individual buttons. Train stops, loading and unloading operations on sidings, and moments of other activities are also demonstrated. The background for this is buildings and structures, forests and roads, other elements of nature and human activity.
A number of railway facilities, other highways and structures appear in the field of view immediately from the entrance turntable of the turnstile. In the far part there is a railway depot for maintenance and repair of locomotives and rolling stock. Various cars drive along the highway, under the embankment of the route there are tunnels for the passage of trains. A small park complex with a Ferris wheel is also shown, it can be launched independently.
Demonstrates the layout of the railway in Moscow and the relationship of railway transport with other means of communication. The aerodrome and the passenger terminal do not copy any air harbor, generalizing individual characteristics many such complexes. The express route is shown, delivering passengers from the city in the shortest possible time, and the approaching wheeled vehicles.

The airfield, which is symbolic in size, contains models of aircraft and auxiliary equipment of the airport. The tunnel under the hill allows long-distance transit traffic. This is followed by a display of cargo operations, where a wheel loader loads bulk material from a pile into cargo gondola cars. The buttons can be used to rearrange the composition and start loading. This is especially liked by kids, who are delighted when mechanisms and people come to life.
The model of the railway in Moscow reproduces in a reduced form both urban blocks of high-rise buildings, and rail routes and highways leaving the cities. There was enough space for the countryside, in particular, a glade of aeronautics lovers is depicted. Up close, you can even see figurines of flyers lighting a burner to heat the air before the balloon rises.

Grass, shrubs and trees are made quite recognizable, reflecting the variety of species and colors of the crown. The vegetation and copies of buildings of different architecture and purpose are not inferior. Factory buildings stand out, distinguished by ventilation devices on the roofs, church and high-rise buildings.
Detailed inspection
Religious buildings look very colorful and authentic, the white-stone cathedral in the center of the exposition stands out in particular. A carefully executed copy of an Orthodox cathedral is one of the examples of the high-quality work of the miniature creators. The religious building is located on a hill, this is how the place for the church was usually chosen. Location and design entrance groups, the orientation of the altar apse, the tiers somewhat decreasing in size - everything is authentic and clear.

Inside the temple fence are human figures, colorfully dressed tourists and priests in black robes. Near the path to the church there is a miniature model of a tractor with a mower, behind a copse there is a grazing herd of cows. This shot is clear because it was taken not through glass, but from inside the layout. The figures of those visiting the model of the railway in Moscow, on the contrary, are blurred due to the glass railing.
It would be superfluous to continue in the same spirit the descriptions of the rest of the shots, otherwise our readers will find their own trip boring. To see the model of the railway in Moscow with your own eyes, to show it to your children is much more attractive than the most top reviews. Small children use light and comfortable stepladders, and some use their father's shoulders. You will see in miniature everything that is found on the territory of the country during a railway or other journey.


Highways with ingenious interchanges, railway bridges over large rivers with metal fences, a fantastic bookcase with rails that go around many floors - all this can be found in the selection of photographs. There is also a sea port with cargo ships, access rails and trains, a container platform with a gantry crane-loader. The bypass circle closes at the already seen airfield, but I want to return to some fragments again.
Non-standard objects and serial machines

Samples of auxiliary railway machines are exhibited on the tracks. There are not only snow plows of several types, but also other mechanisms. They are indispensable in the construction, repair and maintenance of the track superstructure. These are rail layers, and crushed stone batching cars, and cranes on the railroad.
Railroad tracks cannot be laid over mountains, and ridges block the shortest paths. In such cases, it is necessary to punch tunnels through stone barriers, a model of a railway in Moscow is shown by a model of the Severomuysky tunnel. It stretches over the rock for more than 15 kilometers, and this is not a world record. The tunnel under the English Channel and between the Japanese islands of Hokkaido and Honshu is 50 kilometers long, and the longest is under the Saint Gotthard Pass in the Alps, which brought glory to Suvorov.

Tunneling in the rock used to have to be done manually, using the method of downhole driving. Now this is done by special mechanisms - tunneling machines for horizontal workings. A model of an outlandish iron mole demonstrates a mock-up of a railway in Moscow. The section shows the components of the mechanism and the earth's surface above the working. We placed this exhibit on the windowsill, against the backdrop of the urban landscape.
Racks along the perimeter of the walls were allocated by a mock-up of a railway in Moscow for an exhibition of models of serial equipment. Shelves start after the window sill with a tunnel and stretch to the corner of the room. Various types and modifications of locomotives are presented, from steam locomotives to diesel and electric locomotives, wagons different design and appointments.

Models of railway equipment are made indistinguishable from the originals, with elaboration to the smallest detail. However, very close, literally opposite, most of the cars can be seen in reality, on real rails. The Riga station has placed on its territory, the most representative in Russia.
Model of the railway in Moscow in a different guise
The organizers of the institution provided an opportunity to show visitors a model of the railway in Moscow at night. The hall is in twilight, only the information screens are lit, and the mock-up turns on street lighting, highlighting some objects and advertising lights. There is a complete illusion of a night-time environment.


Trains and cars are visible by the light of searchlights and headlights, lights are on in some rooms of houses. City avenues are illuminated by rows of lanterns, almost complete darkness reigns outside the city. At the terminal, the portholes of the aircraft cabin are lit, ready to take off. Flight lights are lit on the wings, and they will emit a pulsating light in the sky, indicating the position of the aircraft.
It's military time
In a special way, the layout of the railway in Moscow reflects the theme of the Great Patriotic War to which a separate exposition is dedicated. Spotlights of different colors illuminate separate objects, reflecting the realities of wartime on railway lines and bridges that were of strategic importance in the transfer of our troops.

The paths in the occupied territory became the scene of hostilities by partisan demolitionists, derailing enemy trains.

Railways in wartime became critically important objects, their damage became the primary goal of enemy aircraft. Close to roads and train stations the largest number destroyed buildings, the camouflage of the transport structure was given paramount attention.

Reinforcement soldiers and echelons of military equipment were escorted to the front with flags. At the end of hostilities, the stations became arenas for solemn meetings of the winners, with crowds of greeters and many banners.
Videos for the road
To complete the impression of the readers of the review, we suggest watching a short video. It depicts a model of a railway in Moscow with moving exhibits and visitors. Two minutes of demonstration is enough to significantly complement the impression of the exposition. In addition to moving trains, pay attention to the behavior of visitors, especially young ones. Interest is evident, this is the best campaign for a personal visit.
The model of the railway in Moscow, at the Rizhsky railway station, invites visitors of all ages on a tour. For toddlers, there are light, safe stepladders that children themselves can carry. Knowledge and transport accessibility, the close location of the museum of real railway equipment make this object especially attractive.
 Where are the boundaries between these categories of consumers?
 What is an asset directory
 Free programs for Windows free download
 Realtek Audio Driver (Realtek HD Audio)
 Realtek Audio Driver (Realtek HD Audio)
 RK account not found what to do
 Does ureaplasma pass by itself (can it pass on its own)?