Make a gravel path. DIY garden paths made of natural natural stone. Pros and cons of natural stone walkways
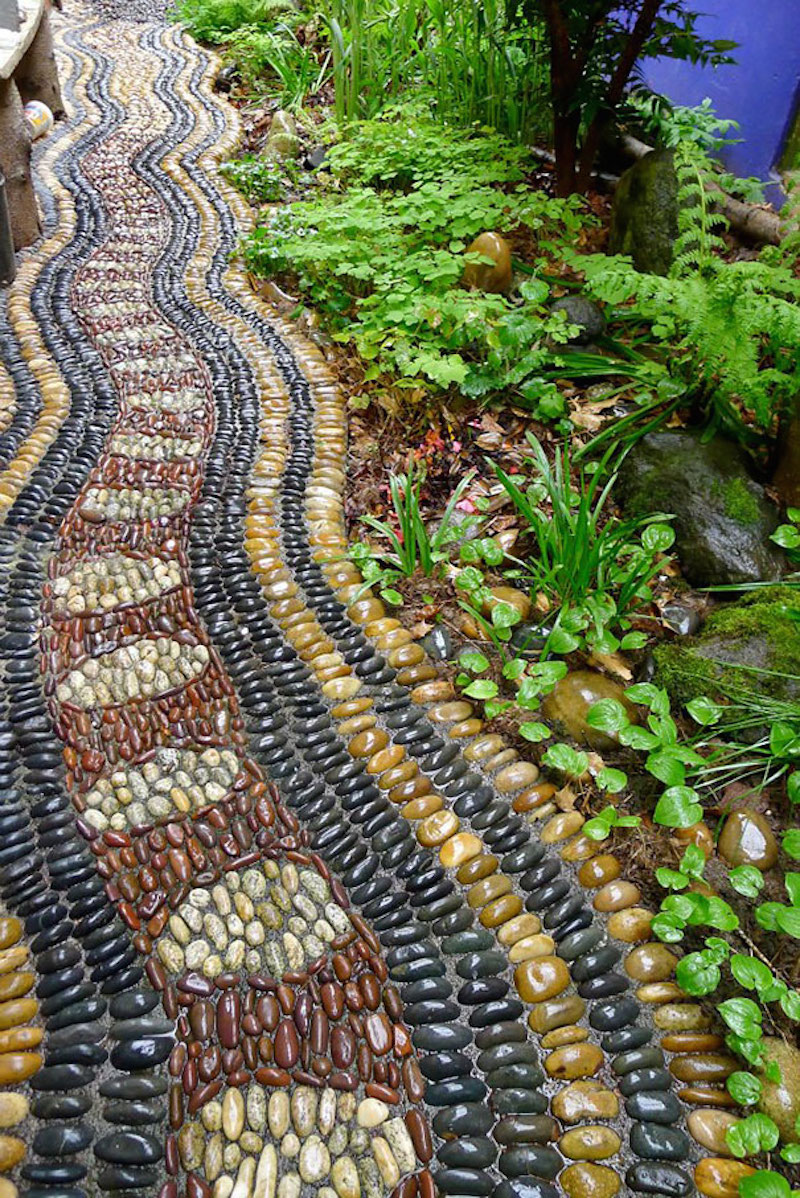
Stone paths perform several different functions at once - they make it easier to move around the garden and yard and transport inventory, zone and decorate the site. It is not difficult to pave them on your own, the main thing is to choose suitable material. Paths can be decorated by combining with each other different materials, and make it part of the garden by planting grass and flowers in the seams between pebbles, flagstone or paving stones. Learn how to make stone paths with your own hands according to all the rules and for many years to come.
naturalness and practicality
Which stone for paths is better
Stone for paths on the site and for garden paths may be natural or artificial. Each type has its own characteristics and properties, without knowing which it is difficult to choose the right material suitable for your purposes. The choice of coating for depends on aesthetic preferences, the conditions of its operation and the budget allocated for the purchase.

Lawn walk
Wild stone - an age-old tradition
The shapes and sizes of flagstone for wild stone paths are always different. Choose a surface and use one of three paving methods - arc, random or in-line paving.
Most often, the first method of laying is used, making scaly-arc or segment-arc patterns. The result is a practical and beautiful surface. The remaining methods are similar, flagstone is laid in any order they like, but only masters have a good result.

The shape of a wild stone is never perfect
For laying use several varieties of natural materials:
- granite;
- sandstone;
- slate;
Each has its own characteristics and advantages, but the arrangement of paths made of natural stone different type largely similar.

A simple solution
Granite tiles - a luxurious classic
The strongest material for garden alleys is granite. He is not afraid of water and sun. There are many styling patterns - pigtail, herringbone, arc, checkerboard pattern.
Luxurious alleys are laid out of granite with their own hands. The natural pattern and color can be very unusual, due to the different characteristics of the constituent element of granite - feldspar. Shades range from dark red to grey.
Granite stone walkways can be made from processed or unprocessed material. Chipped, sawn or sawn-chipped granite paving stones are often used.

Paving stones from granite
If you want to pave old-style sidewalks on the site, choose chipped paving stones. It is produced by splitting large layers of rock, so the surface is not very smooth, but strong. Such a sidewalk will cost relatively inexpensively compared to other options paved with granite.
For a perfectly flat surface, buy sawn pavers. During production, it is sawn, so it has smooth edges and there are practically no gaps when paving. Thanks to additional grinding with special compounds and heat treatment of sawn paving stones, it becomes smooth and does not slip.

Sawn granite pavement
Make walking paths from sawn-chopped paving stones, due to the processing technology of such a bar, two faces are chipped, and the remaining ones are sawn. This makes it possible to make the pavement either with a smooth surface and uneven joints, or perfectly joined and with a rough top.
Sandstone plates - maximum naturalness
Natural sand stone for paths comes in different colors, its color is uniform. Most often, layers of a light brown shade are used. There are also white, blue, red, ash, green and burgundy plates.
The texture, density and pattern of sandstone vary due to the ratio of its constituent quartz, ore, clay and feldspar.
In the process of sandstone mining, the edges of the stone plate are uneven, chips may appear on the surface. The thickness of the layer can be from a centimeter to six, when paving the sidewalk, you can use pieces of different sizes.
If you need material with natural shade, not absorbing water, rough and aesthetically pleasing, take a closer look at the sandstone, it has all these properties.

Sandstone plates on the site
Slate flagstone - natural originality
Slate slabs can be golden, yellow, brown, gray, burgundy, green, black and even purple. The texture created by nature of each piece of rock is unique. When mining, layers are obtained different thickness.
Slate has many advantages: resistance to frost, fire, water and sunlight, and high strength of the material. The sharp edges of the slabs can damage the soles of the shoes, so you need to carefully select paving elements. The appearance and properties of natural slate stone for paths make it possible to create unique paths in a country house or a suburban area.

Stacked multi-colored slate layers
Rocks - accessibility and practicality
When crushed stone is mined, fragments of rocks remain different shapes- tiled, torn, rounded, bedded or decorative. This is a wild rubble stone for paths. It is very durable, consists of different rocks - limestone, granite or sandstone.
The sizes of rubble cobblestones can be from 150 mm to 500 mm. When paving alleys, use medium-sized pieces and choose rounded or decorative rubble.
The properties of wild quarry depend on the rock of which it is composed, but the general ones are resistance to frost, rain and sunlight. Sidewalks made of rubble will last a long time and will be inexpensive - natural rubble cobblestones are mined almost everywhere.

Rubble alleys organically merge with the flora of the site
River pebbles - two laying options
Pebbles are often used for backfilling and paving country paths with their own hands. It can be different - mined on the banks of rivers, seas or lakes. River pebbles are best suited for garden paths, they are less smooth.
Pebble paths have a great advantage - if you later want to pave the sidewalk with tiles or other stone, you can lay the new pavement directly on the old one.
The disadvantage of alleys covered with pebbles is their ability to spread under pressure. This makes it difficult to move around the site. To improve the bearing capacity of pebble paths, fill it with a layer of no more than 7 cm. You can also mix it with crushed stone, but this will affect the aesthetics.
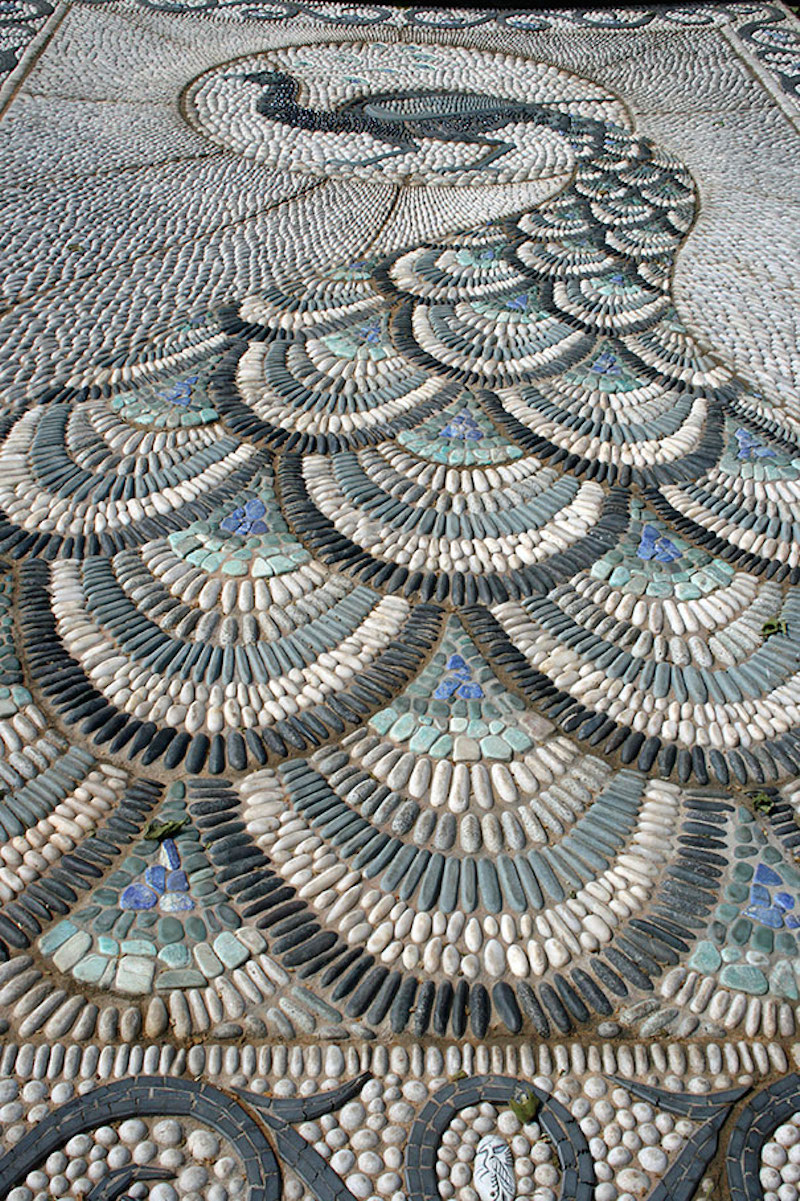
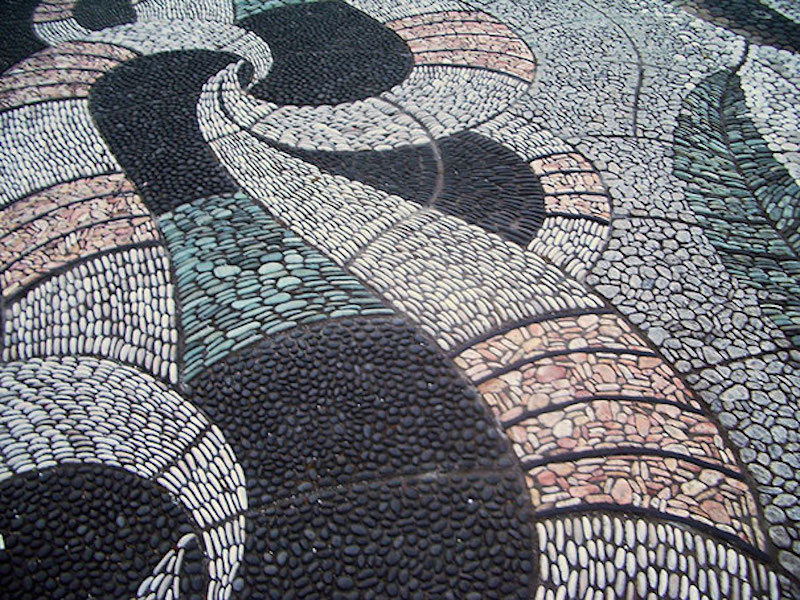
Monolithic pebble trails are highly durable and resistant to external influences. In addition, you will have the opportunity to create patterns of any shape and complexity. An example of an ornament that you can lay out from natural pebbles is shown in the photo.

Floral ornament made of pebbles
Decorative stone of artificial origin
If your budget is limited, then a decorative artificial stone is a substitute for natural. It has all the properties of natural - it tolerates temperature changes well, does not absorb water and withstands a significant load.
Outwardly, such material can look like anything - resemble raw rock, granite paving stones or even wood. Artificial tiles are cast in special molds and therefore have the same size.
Tracks from decorative stone it is easier to lay out than from natural, which has to be selected and pre-laid out before paving the sidewalk. Artificial tiles come in different sizes. To preserve the alleys for a long time, choose plates at least 2 cm thick.

Footpath from artificial stone
How to lay stone on paths
There are two options for laying a stone on a droshky - with and without cement mortar, but you need to decide how to lay a stone path with your own hands before starting work. When laying the topcoat, please note that the trails should be a couple of centimeters higher than the ground. So the water will not spread and stagnate on the surface.

Easy walking path
Stone path without cement
Paving paths with natural stone without the use of cement can be done if there is not much pressure on their surface. Simple walking or transporting a wheelbarrow with equipment will not cause much harm to the path in the country, but a car can seriously damage the laid out structure.

Sand laying
Do-it-yourself step-by-step paving technique:


- Periodically check the result of the work with a building level, put it on several nearby tiles at once, so the measurement will be more accurate. If necessary, correct the horizontal position of the layers with a mallet.
- Fix the elements of the garden path, sprinkle the joints and small cracks with dry sand, you can fill the large openings with decorative pebbles.
- Finish paving with curbs. They will protect the pavement from spreading across the width and add aesthetics.
Video: How to put a stone on the paths with your own hands
Paths made of concrete and stone
Flat stone pavements laid on a concrete base have a significant bearing capacity. Even before laying out natural stone paths, decide whether cars will drive on the paved surface. If there are, be sure to make a concrete base. When pouring, take into account the thickness of the stone for the paths so that the finished sidewalks rise above the ground.
It is also better to pre-concrete paths made of small stone, pebbles and similar materials do not hold the load well and fail. If you want to create a pebble ornament, it must be fixed, otherwise the pattern will disappear over time. The solution can fix any pebbles for paths in the country.

Paving on a concrete base
Step-by-step instruction:
- Clear the paths and mark the site by setting pegs and wrap them with a rope along the contour.
- Dig a pit 25-30 cm deep with a shovel.
- Make a gravel cushion by pouring crushed stone, pebbles or other similar material into the resulting earth trough. The layer thickness should be 10-15 cm.
- Compact the gravel, level the surface with sand, water it and repeat the compaction procedure.
- If there is a significant load on the surface of the garden paths, then reinforce it before pouring concrete.
- Prepare the concrete and pour it into the trench with a layer of 5-10 centimeters.
- Level the surface of the solution with a trowel or rule.
- Cover fresh concrete with a film and wait a few days until the final fixing of the screed.
- Lay the stone or brick finish over the cured concrete and mark the location of each element.
- According to the prepared scheme for cement mortar, lay a natural cut stone on the path, checking the horizontal level.
- Fill the joints flush with mortar.

Preliminary docking of layers on dry concrete
You can make paths from broken stone with your own hands in the country by gluing the pieces to the glue. At the same time, flagstone must be intact, it cannot have cracks and chips.
What to plant between the stones on the path
To make the suburban area original, decorate the paths made of flagstone, pebbles or other similar materials with natural greenery. There are many types of plants that can live in gaps.
Cushion-shaped plants, such as creeping thyme or noble navel, work well for pebbled sidewalks. Thyme forms a fluffy and flowering mat underfoot, and the navel forms a thick and fragrant cover. They need light and water to grow. Do not plant these plants in passage places, they do not like to be injured often.

natural style
If the seams on the path turned out to be wide, you can plant a bryozoan, but it needs frequent watering and protection from the sun. If the gaps between flagstones are small, and the alley is impassable, plant a cuff.
The seams between the tiles can be fastened with sprouted grass. To do this, a couple of days after the completion of the paving work, pour fertile soil into the joints and compact it a little. For sowing, use the seeds of low-growing lawn grass.
How to plant grass between path stones:
- Pour the seeds into a container with earth or sand, mix.
- Sprinkle the resulting mixture over the surface and spread it over the gaps with a brush.
- Compact the earth so that it is below the level of the slabs.
- Cover the resulting "bed" with wet burlap or similar material that retains moisture and water it daily.

Grass sprouted in the gaps between the layers
After three weeks, grass will appear in the gaps between the plates. It does not require special care, being content with natural precipitation, but during drought days you can water miniature plantings.
Decorate the pedestrian zones in your country house by making paths from pebbles, sandstone, granite or other wild stone with your own hands. Natural materials will complement the appearance of the site, and you will admire the result of the work for several decades.
Paths made of pebbles are an excellent decoration for the summer cottage and the courtyard of a private house. In addition to a purely practical purpose, stone paths in the garden perform a decorative function. They emphasize the style and originality of the arrangement. private territory. At all times, sea and river pebbles have made private property interesting and attractive. According to its operational characteristics, natural stone is much superior to asphalt, concrete and paving slabs. In addition, if you lay out a pebble path in the country with your own hands, you can save on building materials and pay for hired labor. Pebbles can be bought at a hardware store or assembled independently on the shore of a reservoir, in a quarry or at an abandoned construction site. Consider how to make a stone path and what you need for this.
In order for pebble garden paths to last for decades, it is necessary to take into account all the nuances of construction. The basis of success is right choice building materials. You need to buy and use only the highest quality raw materials in your work. The paths made of river pebbles are distinguished by the greatest reliability and durability. They are significantly superior to analogues lined with artificial stone. The pebble coating has a high resistance to abrasion, maintaining a presentable appearance for a long time. appearance.
In order to build a country path from pebbles, you will need the following tools and fixtures:
- roulette;
- oil level;
- rubber mallet;
- puncher with mixer;
- grinder with a disk on a stone;
- bayonet shovel;
- hammer;
- rake;
- paint brush.
At large volume works (several sites, hundreds of meters of tracks), it is advisable to buy or rent a concrete mixer.
To make a garden path from natural pebbles, you need to purchase the following materials:
- washed and sifted river sand;
- fine gravel;
- cement M400;
- oblong stones, polymer or concrete posts for the curb;
- a piece of board 1.5 m;
- dye for concrete;
- thick cellophane;
- geotextile.
Before purchasing building materials, it is necessary to complete the scheme of the future path. This will allow you to accurately calculate the need for the necessary property. The optimal width of the path is 80-120 cm. It is advisable to sort the acquired stone into fractions. So it will be much easier and more convenient to carry out its installation.
Stone laying technology

On the summer cottage, you can lay out monophonic and multi-colored paths made of stone. They can be decorated in a bright Mediterranean or discreet country style. However, the technology of laying decorative paths of different design is practically the same.
A do-it-yourself pebble path is made in the following sequence:
- The contours of the path are outlined. It is best to use wooden stakes and a cord for this. The top layer of soil is removed to a depth of 20 cm. Large stones, roots of trees, bushes and grass are removed from the pit. The earth is carefully rammed.
- Geotextile is laid at the bottom of the pit. The fabric is necessary in order to prevent the germination of grass and prevent the soil from washing out under the stones.
- A mixture of gravel and sand is poured onto the geotextile. The pillow is leveled and wetted with water. This technique prevents the pillow from absorbing cement milk from concrete.
- Borders are installed along the edges of the trenches. To fix them, cement mortar or steel pins driven into the ground are used.
- The solution is mixed. The optimal proportion of water, cement and sand is considered to be a ratio of 3:1:3. The solution is poured between the curbs. The fill level must match their height. The solution is leveled using a board and an oil level.
- Stones are being laid out. Pebbles are sunk to half their thickness so that there are as few gaps between the stones as possible. If it is planned to build a mosaic path, then it is advisable to lay the stones in a pattern next to the trench filled with mortar. After that, you need to lay them symmetrically to the laid out sketch.
- The laid out stone is leveled. This event is held with the help of flat board and mallets. The board is laid across the path, and light blows are applied to it. The quality of work is checked by an oil level.
The garden path is covered with polyethylene and left alone for a day so that the cement hardens. After that, a liquid cement mortar is prepared in the ratio of 5 parts of water, 3 parts of sand and 1 part of cement. Dye is added if necessary. The solution is poured onto the track and evenly distributed between the stones so that there are no voids and cracks left. The excess is collected with a paint brush and foam rubber. The path is again covered with cellophane and left alone for 15 days. After this period, you can walk on the canvas and roll carts.

Despite the fact that stone paths are quite durable structures, they need to be regularly maintained. Plants are the main enemy of the pebble bed. Their roots can easily destroy cement board. Based on this, it is necessary to cut down bushes in a timely manner and pull out large grass on the sides of the path.
Cement can lose its strength and become cracked from prolonged exposure to water. To prevent this, it is necessary to treat the canvas with special impregnations twice a year. This will not only protect it from moisture, but also improve its appearance. In addition, the cement will stop dusting and thinning.
If the pebbles fall out of the hole for any reason, they can be glued into place with synthetic glue or liquid nails. The crumbled edges of the hole are covered with cement mortar and treated with a deep penetration primer. The burst stone is glued together with thermal glue, the seam is rubbed and painted over. If necessary, you can paint the stone completely.
garden paths add to the site grooming, elegance and nobility. In addition to practical functions, they also have significant aesthetic value. On the one hand, uniting all the buildings, the paths form a common ensemble. On the other hand, they allow you to zone the site, highlighting functional areas: a vegetable garden, a flower garden, outbuildings, a recreation area. With proper organization, garden paths can correct some of the shortcomings and inaccuracies of landscape design.
Paths can be arranged by the most different ways, but the most surprising, perhaps, was the method of laying out pebbles and stones. Stones can be used, both natural and artificial.
When creating a composition, both river and sea stones are suitable. These stones look very impressive, because. very smooth, polished by waves. They can be of different colors or sizes, due to which tint paintings are often created. Flat rocks that do not have much smoothness can also be used. The most important thing when choosing a material is to accurately imagine how it will lie.
When planning to build garden paths from pebbles and stones with your own hands, you should definitely take into account several factors:
1. Planned load - it is important to consider for those cases if the track will be crossed (moved) by a car.
2. The walkway should be sloped to avoid rain water collecting on the track.
3. In a small area, the tracks should not be straight - turns and bends will optically add depth and space to the area.


To create a pebble garden path, you will need stones of various colors and sizes, screed cement and sand.

It is imperative that during construction it is necessary to take into account which climatic zone you live in, so for countries with a harsh climate, in particular for Russia with its frosty winters, you should not build long monolithic paths, it is more rational to create small sections of tiles, and then lay them in the path.
To create small fragments (which can decorate not only the garden path, but also borders, steps, flower beds), we decide on the ornament of the pattern that will decorate our tiles, select stones by color and size. It is not recommended to use pebbles smaller than 5-6 cm in diameter, as they do not hold well in cement and will surely fall off.
Moisten the pebbles with water, this will increase their adhesion to the cement mortar.
To reinforce our mosaic tile, reinforcement will be required, which should be drowned in cement mortar.
To prepare the site for the garden path, we need to make a pillow of sand with a layer of 5 - 6 cm, carefully tamp.

We knead the solution, put it on a small fragment of the track, level it and lay the pebbles in accordance with the intended pattern. In order to prevent the surface of the cement from cracking, it is necessary to moisten it with water and cover it with a film, this will slow down the process of solidification of the solution.

In order for the stones to lie evenly, you need to press them down with a wooden plate from above and knock them out with a rubber mallet.

When the path is completed, fill in the gaps between the stones with dry concrete mix, moisten with water and cover with a tarp or plastic bag for a few days so that the concrete is saturated and does not dry out. Let it stay that way for one day.
Open the path and make sure the stones are dry. Using a brush, hammer the concrete mixture between the stones so that no more than a third of the stones remain on the surface. The more you add mixture to the stones, the harder the track will wear out. In high traffic areas, fill the joints almost flush with the top of the stones.

Lightly moisten the mixture until it is saturated. (You can add more mixture if it has shrunk too much.) Leave it for 30-60 minutes to completely soak, do not cover or water, let it dry. Using a stiff brush, “tap” on the seams, shaping them.
Cover the mosaic with a plastic tarp to hold the moisture you gave it. Leave it on for 1-2 days. See if it's ready. Complete drying will be in 1-2 weeks.

When finished, wipe the stones with a rag so they are clean from the concrete.
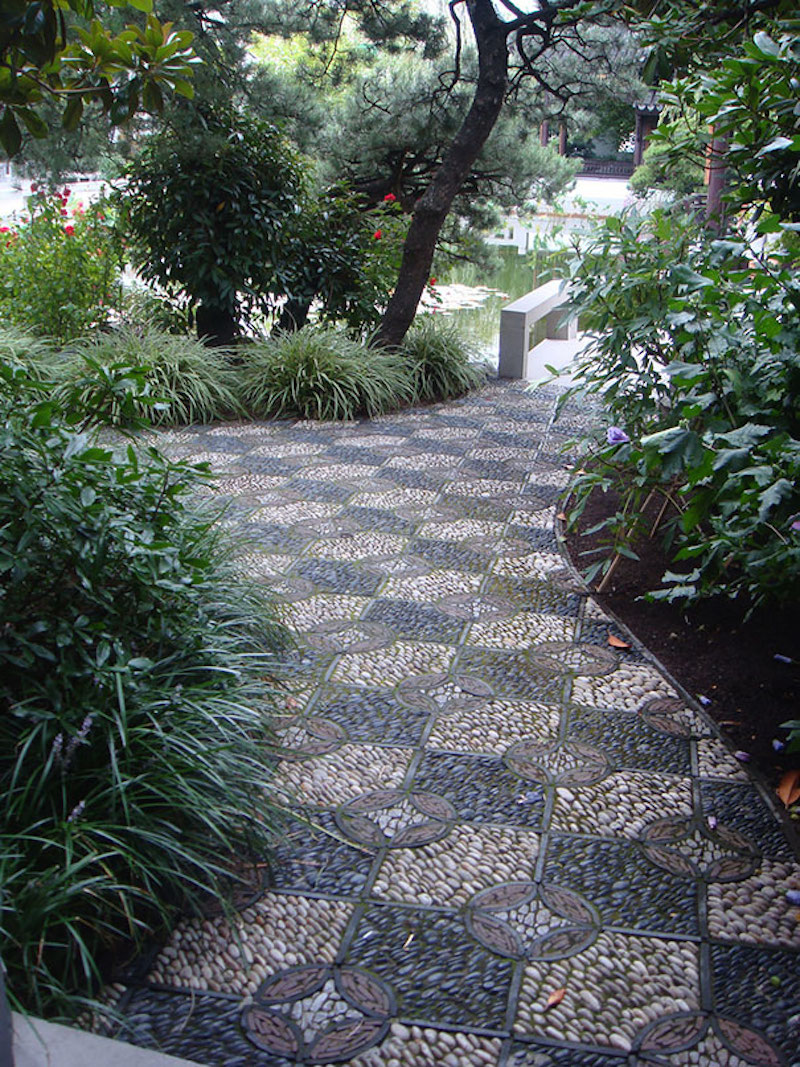
The most popular solution in recent times is molds for garden paths, do-it-yourself allowing you to get a canvas that imitates stone. Most often, these are special plastic molds(although you can make it yourself if you wish), representing several cells that have an arbitrary shape and are connected together. They form a certain pattern, while the shape is designed in such a way that it allows the plates to be joined together in any direction, to obtain tracks of the required width, and also to perform turns (bends), while the joints are completely indistinguishable.

Making garden paths with your own hands using molds has a number of advantages:
1. External attractiveness - separate (mosaic) blocks look more attractive than a concrete screed monolith. Additionally, concrete can be painted with special dyes, as well as supplemented, for example, with pebbles.
2. Relative cheapness - if we compare the total costs, then a do-it-yourself concrete garden path obtained using a mold will cost less than laying pebbles.
Garden paths look very interesting, in the form of leaves. Let's see how they can be made.


After spending some time and your work, a garden path made of pebbles, natural or artificial stone will be a wonderful decoration for your garden.
Habitual paving slabs It's interesting, but not very original. For finishing garden paths in the country, natural, natural materials. Today we will talk about how to make a pebble path with your own hands. Most often, this small stone is used to create mosaics. The options in the photo below seem complex, accessible only to artists, but this is not entirely true.

River pebble.
decorative possibilities
They are huge. small size stones and their diversity allows you to create real mosaic masterpieces. Pebbles can be used as the main material for the track, or complement other materials with it.
Pebble paving was used in ancient China, rounded stones, retaining the hardness of the material, but having a soft shape, symbolize the fusion of male and female energy. Such paths were also valued in terms of health benefits, walking barefoot along them is not only pleasant, but also acts as a kind of massage.
Photo of pebble paths:


Stages of making a track
The process of laying out a pebble path is quite laborious and will take time. Steps to create a track:
- Engineering and design.
- Digging a trench at the site of the future path, its depth is from 30-40 cm. No less.
- Creating a pillow: a layer of sand (10 cm), on top - crushed stone of a fine fraction.
- Creation of a concrete pad.
- Strengthening curbstones. They are leveled with a building level, poured with concrete.
- Laying out a mosaic, more about it below in the master class.
The pillow for the mosaic layout can be different, it all depends on the site itself. For example, an option might be:
- A layer of stone chips.
- Two layers of geotextile for weed control.
- 5 cm. sand.
- 5 cm dry mix (3 parts sand to 1 part cement, lightly moisten)
The contours of the future drawing are applied to the concrete mixture. They start laying out from the central elements (for example, if shells are shown, from their center). The stones are stacked vertically, deepening them by at least 1/3, and preferably by 2/3 of the part.
You will need a rubber construction hammer to level the stones.
The finished pebble mosaic is moistened with water, covered with a tarpaulin or any other waterproofing material - so it is left to dry completely. Then work with a brush or cloth to remove any remaining dust.
How to take care of gravel paths?
If the pebble path is done correctly (that is, there are all the necessary drainage layers, a layer of insulating material, elevation), then maintenance is not required. Otherwise, weeds or excess moisture will need to be removed.
Master class on making mosaics from pebbles
In this master class, purchased, polished stones 5-7 cm in size are used.
Step 1 - Sorting the stones.

Step 2 - Preliminary layout of the mosaic.
A beginner cannot do without this stage, because it will be impossible to fix something when making a mosaic. You should clearly imagine the composition and its layout in advance. It is convenient to do it on the sand. A layer of sand about 7-8 cm is laid out in a sandbox made of sheet plywood or tarpaulin. The sand is lightly moistened and compacted. Draw the lines of the future composition with a knife or any sharp object. Lay the stones tightly, so that the parallel laid ones touch each other in the middle. You should not put absolutely all the stones in parallel, this will make the composition less stable. Some must lie perpendicular. In our example, a spiral is created, with one row of stones perpendicular to the other (1 or 2 rows of stones). When the composition is ready, take a picture of it - this is an example of your future work.

Step 3. Preparing the bed for the mosaic.
The mosaic should be at or slightly above the level of the surrounding soil so that water does not collect in it. Designate an area at least 30 cm larger than the mosaic. Depth - 15-20 cm. This is enough to make good drainage and an edge around the mosaic. Then the substrate is laid out: 15 cm of crushed stone, 3 cm of stone chips, a layer of dry concrete mixture of 6-7 cm. Use a 2 * 4 beam to make the surface even.

Step 4. Wetting the concrete mixture.
Using a garden hose or a sprayer fitted with a fine mist nozzle, lightly dampen the concrete mix until its texture changes from loose powder to a plastic mass. 
Step 5. Marking out the contours of the mosaic.
For a spiral pattern, tie a large nail to both ends of thin, strong twine. The length of the twine is the radius of the future pattern. Insert one center into the nail, pull the rope and outline the general outline. For reliability, it is worth shortening the rope and delineating a second inner circle, or any other required amount.
One bag of concrete mix is enough to create a mosaic of about 1 sq. meters.

Step 6 Place the center stone.
To make the mosaic durable, the stones are placed one-third into the concrete mixture. But they don't push in. In the future, a thinner layer is added between the stones. You should start from the center. Use a garden shovel to dig a small hole. Place the stone in it and compact the concrete around, holding the stone with your fingers.

Sha 7. Laying out the stones.
Continuing to use the spatula, stones are laid out next to the central one. They are stacked flat sides barrel to barrel, with your fingers crush the concrete mix next to them.

Step 8: Filling in the Pattern
Working from the center to the edges, continue to lay out the stones in the same pattern. The distances between the stones should be well compacted, and the stones should touch each other with their centers. Try to keep the same height of the stones throughout the pattern, although this will not work perfectly by hand, but it is advisable to strive for this.

Step 9 Aligning the pattern.
When a small section is finished, you will need to level it with a beam. The beam must be taken more than for leveling the concrete mixture so that it does not bounce when struck. Smooth out the pattern with a rubber mallet. When the mosaic is complete, place stones, paving stones, or whatever material you choose to hold the pattern around, fill any large gaps with dry concrete, dampen well, and cover with a tarp. The pattern should be left overnight.

Step 9. Fixing the pattern.
Open cover and make sure the stones are well dried. Apply the dry mix of concrete to the stones, using a brush to fill even very small spaces with the mix. The degree of depth of the stones can be varied to your taste, but in order for them to hold well, the free height should be no more than 1/3.
If the location of the mosaic is high traffic and you know it will be subjected to high loads, add as much mixture as possible, almost to the tops of the stones.

Step 10. Fixing the mixture.
Wet the mixture, you can do this in several stages, because the mixture may sag. Let it soak up the water, then let it sit for 30-60 minutes. With a hard brush, work the surface, forming the distance between the stones to your liking.

Step 11. Final.
Cover the mosaic with a tarpaulin to retain moisture, allowing the mixture to dissolve. For better dissolution, periodically open the cover and spray the mosaic several times over the course of a day or two. After that, it is necessary to allow the mixture to gain a foothold - this will take about 2 weeks, the exact time depends on the weather. When you're done, wipe the surface of the mosaic with a damp cloth to remove any remaining concrete.

A selection of luxurious tracks on video
amazing beautiful options pebble paths - on the video from the Dachny Design channel.
Any country cottage area not without tracks. Along with a purely practical purpose, they serve as a kind of separators of the functional areas of the garden, mark the boundaries of lawns and flower beds. To make these elements of landscape design attractive and durable, you should choose durable, wear-resistant materials for their creation. A properly made pebble path in the country will last for more than one year due to the unique properties of the building material.
Natural material in landscape design
Rounded stones are often used in landscape design. The area, decorated with pebbles, looks natural and stylish. In addition, pebble paths can easily withstand considerable loads - you can safely walk along them and roll garden carts.
Pebble paths look especially good in a country house decorated in a Mediterranean or rustic style. In the first case, various mosaic patterns made of pebbles that differ in color and size will be appropriate. For a country-style garden, a simplified version is suitable, when plain pebbles are laid in a continuous canvas without unnecessary frills.
If rockeries, an alpine slide or a pond are located on the site, paved stone paths will become a logical addition to the overall landscape. A garden designed in this way will acquire a harmonious, complete look.

Path of large pebbles in the garden
Technology of paving garden paths
In order for pebble garden paths to serve for many years, it is important to take into account all the nuances, starting with the preparation and selection of stone.
What pebbles to choose for the paths
There are only two types of pebbles - natural, mined from a river or sea, and also made artificially. Stones of natural origin are superior in quality to their industrial counterparts. Therefore, if possible, it is better to purchase natural material so that the laid canvas does not lose its decorative and functional qualities longer.
As a rule, pebbles are sold in bulk. In stores, you can find ready-made pebble tiles or pebble mats on an elastic basis. It is much easier to pave paths from prepared pebbles with your own hands, but this material costs an order of magnitude more expensive. If there is a suitable reservoir nearby, you can simply pick up stones on the shore. This option will require a minimum of costs.

Combination of large stones and pebbles
What is required for work
In order to make a garden path out of pebbles, you will need the following tools and materials:
- pebbles;
- sand, crushed stone, screenings;
- cement;
- curb tiles or suitable stones for this;
- marking tools;
- building level;
- a piece of board along the width of the track, a hammer;
- shovel, rake, brush.
If you plan to lay out a complex pattern, you must first draw a sketch of it on paper. Before making a pebble path in the country, it is better to sort the stones by color and size, so the work will go much faster and easier.

An example of a complex pattern
Stages of creating a pebble path
Following step by step instructions, even a beginner can build a pebble garden path:
- Mark the contours of the future path. This can be done with pegs and rope, or simply mark the outlines directly on the ground. The width of the cover should not be less than 50 cm, otherwise it will be inconvenient to walk. The width of 90-150 cm is considered optimal.
- A layer of earth is removed over the entire marked area to a depth of 15–20 cm. The larger the paving stones, the deeper the trench should be.
- At the bottom of the ditch made, a layer of sand is poured, and on top - a layer of gravel. The trench should be filled to two-thirds of its depth. A sand and gravel cushion is necessary so that the path has a solid foundation and does not crack over time.
- Install curb tiles or any other curb material along the edges. Fill the entire area with cement mortar. To do this, mix 3-4 parts of sand with 1 part of cement and a sufficient amount of water. Concrete should not reach the edge of the curb a little. At this stage, be sure to check the horizontal orientation of the web using a level.
- While the cement is wet, begin to lay out the pebbles. If the track is without a pattern, everything is simple. Pebbles are placed close to each other, pressing them into the solution flat or edge to a third of the height. In the case when it is required to pave the path with a mosaic ornament, they do it a little differently. Pebbles are laid out on the ground next to the path according to the sketch. Then carefully transfer the pattern to the concrete. Circular ornaments begin to spread from the middle. When working with stones of different sizes, large elements are first fixed, and the rest of the space is filled with small ones.
- In order for the pebble to lie flat, it is upset with a board and a hammer. The board is selected according to the width of the canvas. They lay it across the path and tap it along the entire length with a hammer, leveling the pebble masonry in one plane. The quality of work is checked by the level.
- The paved canvas is left overnight, covered with a film, so that the concrete hardens a little. After that, a liquid cement mortar is made and poured over the entire surface so as to smooth the gaps between the pebbles. Excess solution is removed with a soft brush.
- The finished pebble track is again covered with a film, after which it is left to dry completely. You can walk on a fresh canvas only after 10-15 days, when the concrete has completely hardened.

Stunning pebble pattern
For real craftsmen it will not be difficult to make beautiful paths in the country with their own hands from pebbles - patterns require only painstaking and artistic taste. And the result will be the main decoration of the garden for many years.
 Basic technologies for obtaining nanomaterials
 How to tell the time in English?
 Introduction to Multivariate Statistical Analysis
 Presentation of the analytical report of the history teacher
 Presentation on the topic "atherosclerosis"
 History of number systems
 Apple in mythology and Russian folklore