How to make a bath ceiling. Ceiling in the bath - choose the optimal type of construction and build. Do-it-yourself ceiling insulation in the bath
A bathhouse is a complex functional structure, to which special requirements for operation are imposed. A well-arranged ceiling of the bath ensures the maintenance of optimal temperature regime indoors, protects from the negative effects of external factors.
To ensure a long service life of the ceiling, it is necessary to take into account its design features, as well as the choice of materials for construction and decoration.
Requirements
To ensure the durability and reliability of the entire structure, the ceiling in the bath must meet a number of important operational requirements:
- High thermal insulation characteristics. To reduce heat loss in bath rooms, the ceiling structure should have good thermal insulation. This will ensure the rapid accumulation of thermal energy, reduce the consumption of fuel material and prevent the rapid cooling of the steam room.
- Moisture resistance. As a rule, wood is used for the construction of baths, which requires additional protection against high humidity and hot steam. For these purposes, special antiseptic impregnations and varnishes are used. However, wood is not an absolutely hermetic material, therefore it is able to pass excess moisture to the heat-insulating layer. To protect the insulating base of the ceiling from moisture, it is necessary to install a vapor barrier.
- Mechanical strength and reliability. The ceiling structure must be of increased strength to ensure safe operation the entire building. When developing a bath project, weight should be taken into account finished construction, mass of insulation, finishing materials and, if an attic space is provided, the weight of the furniture and equipment that are located inside.
- Long service life. The bath is being built for decades, so the ceiling must be not only practical, but also durable, made of high-quality and safe materials.
materials
For the competent arrangement of the ceiling structure, an important step is the choice of building, finishing, heat and vapor barrier materials. In this case, what is the best thing to make a ceiling from in order to get a reliable and durable construction? Experts recommend giving preference to safe, environmentally friendly, practical and durable materials.
- For ceiling construction. The ceiling ceiling in the bath is erected from coniferous wood, resistant to decay and elevated temperatures. In addition, coniferous boards or timber are cheap materials that are easy to handle and install. Ceiling beams, draft ceiling and attic floor are built from softwood.
- For decorative finishes. Deciduous wood is used as finishing materials - alder, linden, aspen, larch, oak. The wooden finish of the ceiling in the bath is resistant to high temperatures, high humidity, easy to process and install.
- For thermal insulation. The thickness of the heat-insulating layer for the bath ceiling should be 30 cm, which allows you to keep heat in the steam room for a long time. fire-resistant and safe heaters are used - cotton wool on a mineral and basalt basis. They are resistant to burning, rotting, negative effects of moisture and steam. To maintain thermal insulation characteristics, it is recommended to use them in conjunction with waterproofing materials. To reduce the cost of construction, more affordable analogues are used - sawdust and natural clay. The finished clay mortar is laid in a thin layer on the rough flooring from the board in the attic, then covered with sawdust, shavings or sand.
- For waterproofing. Provide protection of a heater from the increased humidity and steam. The best way for waterproofing - double-sided foil membranes.
- For vapor barrier. They provide protection against the penetration of hot steam through the ceiling structure into the insulation layer or into the attic. Foamed polyethylene film, glassine and vapor barrier membranes are used as an insulator. The main requirement for the material is the ability to operate at an air heating temperature of up to 125 degrees.
- Fasteners. When arranging the ceiling, it is allowed to use galvanized, copper or brass fasteners.
For the construction and decoration of the ceiling structure, you can not use:
- plywood, chipboard and OSB;
- polystyrene and foam boards;
- mounting foam for sealing;
- polyethylene-based films;
- damaged or deformed wood.
Mounting methods
Floors and ceilings in the bath can be made one of three ways:
- Hemmed. The ceiling device provides for an attic room for storing bath fixtures and utensils. A distinctive characteristic of the design is the presence of a log ceiling, which is mounted on the last crown of the log house. Such a system is simple and available for self-installation.
- Flat . Suitable for small-sized bath buildings that are not equipped with an attic and do not have floor beams. Such a design is simple and easy to implement. The permissible span length should not exceed 2.5 meters.
- Panel. Technically complex structure, which is built from wooden boxes filled with insulating material. Installation of such a ceiling requires the involvement of outside help.
false ceiling
Installing a false ceiling in a bath with your own hands is technically difficult, but possible. Such a design is characterized by the high cost of building materials.
The erection of a false ceiling in a log cabin bath is carried out in the following order:
- Preparation of a ceiling frame from a beam with a section of 5 × 15 cm. Laying the beams at a distance of 55 to 95 cm for strapping. A special hole is made for a square-shaped chimney pipe, taking into account the diameter of the pipe. Wood is treated with antiseptic impregnation.
- Laying a vapor barrier material with an aluminum protective layer, with fixation from the inside of the room to the ceiling beams on metal brackets with an overlap of 10 cm. Gluing the joints with construction tape.
- Installation of the crate on the vapor barrier in compliance with technological gaps for natural ventilation.
- Installation of decorative lining made of hardwood. Thermal insulation and waterproofing of the ceiling in the attic. Works are being carried out on the laying of insulating and waterproofing material with an overlap with the processing of joints with construction tape. Fixing to the ceiling structure with metal brackets. Maintain an air gap of 3–5 cm.
- Installation of flooring - plywood or floorboards. wooden base carefully treated with antiseptics.
Important! To fix the main structural elements, galvanized nails with wide hats are used. They must be longer than thick wooden board twice. If necessary, nails can be replaced with self-tapping screws or clamps of the same size.
Decking ceiling
This is the fastest and most affordable way to arrange a ceiling structure, since its cost is much lower than that of a false ceiling. It can be used in a bath from boards, which does not provide for an attic.
Step by step guide to how to make a deck ceiling:
- As a basis for the ceiling, draft boards 40 cm thick are used, laid inside the bath room on the walls and fixed to each other with thin bars at a distance of 40–80 cm from each other. So collect the entire ceiling shield.
- On the installed ceiling frame is laid vapor barrier material to create a sealed layer. Fixing the material to the boards with metal staples.
- Next is the insulation flooring. It is easier to choose mineral or basalt wool, but if bulk materials are to be used - expanded clay, clay, sand or earth, the arrangement of enclosing wooden elements from the board will additionally be required.
- Waterproofing is laid on the heat-insulating layer to provide additional protection against moisture and steam.
- At the end is carried out decorative trim wooden lining.
panel ceiling
The main advantages of such a design are its cost-effectiveness and durability, because for its assembly, the remnants of lumber that have been preserved after the construction of the bath can be used.
To properly sheathe the ceiling with panel slabs, all work is performed in the following order:
- Preparation of two bars with a length equal to the width of the opening, with allowances of 5 cm on each side. The bars are installed on a flat surface parallel to each other with a step of 50 cm. The structure is lined with a board, the length of which exceeds the width of the opening by 10 cm. As a result, the plank floor is 5 cm wider than the base of the box on each side.
- From the inside, the ceiling panel is sheathed with a vapor barrier material.
- To prevent possible distortion of the panel, the connection of individual parts is carried out with temporary fixators.
- The finished ceiling panel is mounted to the upper rims of the log cabin of the supporting wall structure, taking into account additional installation truss system for the roof. Jute fiber is placed between the panels for insulation.
- After mounting the ceiling base, the inner base of the panel is filled with insulating material and sealed with waterproofing. To facilitate the design, wool on a fiberglass or basalt base up to 10 cm thick can be used as a heater.
- The upper part of the structure is sheathed with tightly laid boards.
Important! During the operation of the bath, condensation may form on the upper part of the ceiling sheathing. To prevent this phenomenon, the ceiling sheathing is performed at a slope of 6 degrees.
In conclusion, a few tips on the proper arrangement of the ceiling structure in the bath:
- If the bath project provides for the presence of an attic, then when installing the ceiling, it is additionally worth considering an entrance hatch with a retractable ladder.
- Decorative finishing of the ceiling surface is carried out after the preparation of the floor base. The final stage is wall cladding.
- To reduce or prevent possible heat loss in the room, it is necessary to take care of high-quality and reliable thermal insulation of the ceiling structure.
- To obtain a perfectly flat ceiling surface, the first floor boards must be laid in level. Otherwise, this will lead to deformation of the finished structure.
- For the construction and decoration of the ceiling, it is recommended to use environmentally safe materials which, under the influence of high temperatures, do not emit hazardous substances.
It is quite easy to build a reliable and durable ceiling in a bath building. For this, it is necessary to determine suitable option ceiling construction, a range of building and finishing materials. Due to the increased strength, durability and practicality, the most popular are hemmed and floor ceilings.
Based on information from various sources, as well as taking into account the practical experience of private property owners, many believe that the process of erecting a particular outbuilding is not difficult. In particular, this applies to the bath. In general, this conclusion is correct. However, at this or that stage of work there are some nuances that must be taken into account. Regarding the construction of the bath, it should be noted that in most cases, difficulties arise when installing the ceiling in it. Later in the article we will analyze how to avoid problems during this work.
Primary requirements
Are you looking for information on how to make a ceiling in a bath? First of all, you need to learn what properties this overlap should have. First of all, it should be noted that indoor humidity is almost constantly increased. This means that the ceiling in the bath (the photo of the ceiling can be seen in the article) must have high waterproofing characteristics. Equally important are the heat-saving properties of the structure. It is also necessary that the floor can withstand various weight loads. How to make it so that it meets all the listed requirements? More on this later.
Design features
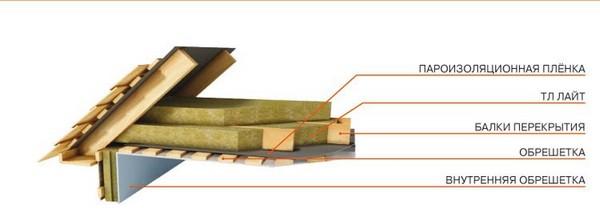
Speaking about how to make a ceiling in a bath, it must be said that the ceiling is arranged in several stages. The optimal height at which it should be located is 2.1-2.3 m. To prevent the negative effects of moisture and so that heat does not pass through the ceiling, you need to properly make the ceiling in the bath. This means that the design must be multi-layered:
- Boards (they trim the attic floor).
- Parchment or film (waterproofing layer).
- Expanded clay or cotton wool. These materials are used for laying a heat-insulating layer.
- Film or parchment (vapor barrier).
- Finishing.
This scheme of the ceiling device is used in all three options for its construction:
- in a binder;
- flooring;
- panels.

What is the ceiling in the bath made of?
The covering material must be natural. The ideal option is, of course, a tree. Most often, the ceiling is built in the bath of aspen and larch. All elements, of course, must be treated with protective compounds and not have defects (knots and cracks). Boards should be purchased dry, but not overdried. Next, we will analyze how you can build a ceiling in the bath with your own hands.
Hem construction: installation features
In this case, the ceiling in the bath with their own hands is fixed to the supporting frame. It, in turn, consists of floor beams. The remaining parts of the multilayer overlap are mounted to the frame. Grooved or edged boards are nailed to the supports from the inside of the room in a continuous row. A heater is also placed in the formed "pockets". From above, the structure is covered waterproofing film. The last step in the construction of the floor is sheathing with boards. upper parts beams in the attic.
Design Benefits
The ceiling constructed in this way in the bath with your own hands (a photo of this type of ceiling can be seen in the article) is optimally suited for construction with an attic. All work can be done independently, without attracting outside help. The scheme is quite simple. For its implementation, there is no need to use special equipment or have special knowledge.

Overlap Disadvantages
Among the minuses, it should be noted the high cost of such a ceiling. Most of the budget in this case will need to be spent on the acquisition of massive elements. In addition, you will need a lot of long boards.
Panel construction
This overlap is constructed from separate shields. They fit close to each other. Between them is placed an elastic gasket, which is a waterproof insulation. For the manufacture of each sector, a template is used, consisting of two bearing bars. A number of tongue-and-groove or edged boards are stuffed on them. A vapor barrier is laid in the formed "trough", then a heat insulator. A waterproof film is sewn on top. The construction is completed with a wooden flooring.
Design advantages
The main advantage of such an overlap is considered to be significant savings in lumber. In the manufacture of shields, "illiquid" raw materials are used. In particular, boards left after the construction of the bath itself can become the material. For sheathing, sixty-centimeter elements will be enough.

disadvantages
By cons panel construction carry a large weight of the shields. Therefore, before you make a ceiling of this type in the bath, you need to enlist someone's help. Some wizards install blank panels first. Then the rest of the materials are laid in place. However, it should be said that even this method requires the coordinated work of several people.
Flooring
This design consists of thick boards laid tightly end to end. The thickness of the elements is from 5 cm. The ends of the boards rest on the last crown of the structure. A vapor barrier film is laid on top of the ceiling. A heater is placed on it.
Design advantages
The main advantage of the overlap is the ease of installation. For the construction of such a structure, quite a few materials are required. This, in turn, will save money.

Overlap Disadvantages
The main disadvantage is the limitation in width. This design is optimal with a span of 2.5 m. In addition, with such an overlap it will not be possible to build an attic. Another disadvantage of the design should be considered the insecurity of the insulation. During preventive repair of the ceiling or truss system, the material will be damaged.
The need for thermal insulation
Speaking about how to properly make the ceiling of the bath, it is necessary to note the importance of insulation. The issue of arranging thermal insulation must be approached with all attention. This is due to the peculiarities of the microclimate in the room. It should be remembered that the higher the temperature, the more difficult it will be to keep the heat. The ideal option is to use several materials at once. Let's consider some of them.
mineral wool
This material is made on the basis of basalt. Fibrous is considered an ideal heat insulator. Its advantages include harmlessness, fire resistance, low thermal conductivity. However, mineral wool also has disadvantages. The main one is exposure to moisture. With high humidity, mineral wool begins to lose its beneficial features. Steam and hydraulic layers are used to protect the material. When laying mineral wool, remember that it must "breathe". To ensure ventilation, a gap is left between the insulation and the waterproofing.

Expanded clay
The material is a granule, which is obtained by swelling low-melting clay and subsequent heat treatment of the mass. Due to the cellular structure, the particles reliably retain heat. In connection with it is often used in construction. Among other things, this material is inexpensive. For effective insulation it is necessary to fill up a layer of 30 cm. Expanded clay should also be protected with hydro and vapor barrier.
Clay and sawdust
This is a fairly well-known and long-used method for solving a problem in a bath. From the side of the attic, floor boards are treated with a solution of sand and clay. After the coating dries, leaves (oak preferably), shavings and sawdust are poured onto the boards. From above, the layer is covered with a five-centimeter layer of earth (dry). I must say that this option is quite laborious. In addition, there will be a lot of dirt. But of all - this is the cheapest method.
How to make a ceiling in the bath?
The first stage includes the installation of load-bearing beams. The elements are fixed along the smallest span of the building box. The interval between the beams is 0.5-1 m. The width and height of the elements are selected depending on temporary and permanent loads, as well as the distance between bearing walls. Grooves are made in the upper crowns of the log house. Beams are inserted into them, pre-treated with an antiseptic. The depth of the installation nest must be at least 10 cm. The edges of the supports that rest on the outer walls must be burned and wrapped with roofing material in two layers. After installing the beams, a chimney hole is formed. To do this, perpendicular jumpers are inserted in the selected area. They cut into the beams at half the thickness. For reliability, the jumpers are fixed with nails.

vapor barrier
Before you make the ceiling in the bath from the inside, a vapor barrier layer should be attached to the beams. Fixation is carried out with staples and a stapler. When laying the material, it is necessary to leave an overlap on the walls. It will be 15-20 cm. Special membranes, which are reinforced with foil and a special mesh, can act as a vapor barrier. The material is laid with an overlap of 15-20 cm. The edges of the strip are glued with adhesive tape.
Boarding boards indoors
Elements are fixed with nails. Fastening is carried out to the beams. The starting bar is adjusted to the wall. As a rule, lining is used in the lining. It is laid with a mallet. The next element is fixed with a spike into the mounting hole of the previous one.
heat insulator
The insulation is laid directly on the vapor barrier film. It should be remembered that cotton materials should not be stored outdoors without a film, as they quickly absorb moisture. When laying the material (rolled or in the form of plates), the elements fit tightly to each other. There should be no gaps between them. It is more expedient when cutting to make the elements a little wider than the "nests" and compress the material. This is much better than if he "walks". In addition, the thermal protection will become more effective.
Waterproofing
This material is laid similarly to a vapor barrier film. Here, in the same way, it is necessary to sheathe with an overlap on the side walls. There must be a ventilation gap between the film and the fiber material. Thanks to even a minimum distance, ventilation of the heat-insulating coating will be ensured. This will prevent it from rotting and, as a result, loss of performance.
Arrangement of the attic
For the construction of the ceiling, edged boards are used. Their laying is carried out according to the same technology as on the surface from the inside of the bath. The elements are pressed against each other tightly. In this case, it is recommended to make a gap near the walls. It can be hidden afterwards with a plinth.
Finally
The technology described above is how to make a ceiling in a bath. In general, the work is not accompanied by any difficulties. As for the type of construction, experts recommend equipping a hemmed floor. Despite the fact that its cost is higher than others, such a ceiling will be reliable and durable.
One of the most crucial moments in the construction of a bath is the creation of a ceiling. Not only the comfort in this room, but also the service life of the entire building will depend on how correctly and efficiently you do it.
To create a ceiling needs to be correct, such an indicator as the height of the room is also important. Despite the fact that for the construction of the ceiling in the bath it is necessary to have certain knowledge and skills, anyone can do these works with their own hands. House master.
A feature of the washing and rest rooms in the bath is that although in these rooms and high humidity, but air temperature is low, compared with the steam room, so for finishing the ceiling, one of the most best options is a plastic lining.
Main advantages plastic lining:
- such panels do not require additional treatment with antiseptics;
- they have the correct geometric shape;
- light weight;
- there are various color solutions;
- after installing such a lining, it is not necessary to periodically paint it, as is the case with wooden materials;
- do not rot;
- low cost, which allows you to save money.
In case of use plastic panels, them installation is final stage finishing works.
In the washing room, water enters both the walls and the ceiling; plastic panels, due to their tight fit to each other, reliably protect against moisture.Installation of plastic lining on the ceiling of the washing carried out after the device and the draft ceiling, in the following sequence:
When using glossy panels, please note that they are very easily damaged, so The protective film must be removed from them at the very last moment.
To prevent sagging of plastic panels, the distance between the beams or laths of the crate should be no more than 60 cm.
Usually the length of the panels is 6 meters, which greatly complicates their transportation. Experts recommend immediately determining the required length and cutting the panels in the store.
 For a washing room and for a rest room in a bathhouse, it is better to choose seamless panels, since in the presence of a decorative seam, moisture and dirt will accumulate in it, which spoils appearance ceiling.
Caring for such a coating is very simple, but it is best to use gentle detergents. The color of the panels is recommended to choose a calm, this will allow you to better relax and unwind, it is better not to use contrasting solutions in the bath.
Plastic panels have good thermal insulation characteristics, as they have a cellular structure, in addition, a large number of partitions makes them strong enough.
Since plastic does not let steam through, it is necessary to provide good ventilation in the room so that the ceiling and walls can dry out normally.
The device of the ceiling in the steam room
The steam room is the smallest room in the bath, but due to the fact that it has high temperature and humidity, the requirements for the ceiling will be high. Making mistakes when creating the ceiling in the steam room not only reduces the comfort of visiting the bath, but can also lead to rapid damage to the building and you will have to make repairs.
The choice of material for sheathing
For sheathing the ceiling in the steam room used wooden lining . Usually the one made from conifers is not used, since when heated, resin can be released from it, so they use panels from alder, aspen, linden, but oak or ash is best suited.

Instead of lining, you can use grooved boards, since there is practically no difference between them. But still, it is better to use a lining that has a non-linear surface, and during its drying, a gap will not form on the ceiling, as when using boards.
The width of the lining should be 9-10 cm, if the slats are narrower, then they will take longer to mount, and if wider, then they warp and crack more.
If there is a rough floor in the attic, then the lining can be taken from 12 mm thick, if it is not, then its thickness should be from 18 mm. To create a flat ceiling, it is necessary to take a lining with a thickness of 25 mm, since it will be subjected to a large load. 
The differences between ordinary lining and the euro is that the latter has longitudinal grooves on the inside to improve ventilation, and its surface is smoother, so if funds allow, then it is better to buy eurolining for the ceiling in the bath.
 Since the cost of eurolining is higher, then the geometry of the strips must be strictly observed, there should be no knots on the panels, you should pay attention to this when buying it.
Well, when there is an opportunity in the warehouse to check if the lining has not led, for this you need to dock two planks, if this happens freely and without gaps, then everything is fine.
Mounting
There are three types of ceiling: floor, panel, hemmed. 
Consider how to make a log house in a hemmed way:
- Floor beams are treated with a protective compound.
- Given the location of the stove-heater, a metal passage box for the chimney is mounted between the beams.
- Attach foil or hydro-vapor barrier membrane to the underside of the beams with a construction stapler, leaving wall overlap 30 cm, between themselves, the foil is glued with aluminum tape.
- If the distance between the beams is large, then you need to additionally make a crate and already mount the lining on it, the crate is made with a beam of 20 by 40 mm in increments of 400 mm.
- Carry out the installation of lining, fastened with screws or nails, but kleimers can also be used. When using nails, they can be hammered into the front part, into a tenon or groove. In the first case, the hats will be visible, and in the second and third, the fastening is invisible.
- From the side of the attic between lags(mineral stone wool, expanded clay or clay with straw)
- We close the heater with a hydro-barrier (diffuse membrane), it will protect the insulation from moisture from above and freely release water vapor from the bottom.
- Laying attic floor boards.

When fixing the planks through the front part, the hats are visible, but the fastening is reliable, the fixation through the spike or groove is imperceptible, but a small part of the board is captured, therefore, when the lining is expanded, it is likely that it will turn out or tear off.
When fastening with nails, there is a possibility that the panel may burst, this is especially unpleasant when expensive material is used. To avoid this, it is recommended to first drill a hole, and then fix the bar with nails, although this is longer, but the material does not crack.
For fixing in the face, finishing nails are used, since they have a small hat. The attachment points are covered with putty, to which wood dust is added, and after it dries, this place is polished.
Required Tools
To finish the ceiling in the bath, you will need the following tools and materials:
- lining, which can be plastic or wooden;
- vapor barrier;
- insulation;
- waterproofing;
- stapler;
- electric drill;
- screwdriver;
- hammer;
- doboynik,
- mallet;
- wooden block;
- building level.
How to install a pipe in a bath through the ceiling?
The place where the pipe passes through the ceiling must be determined at the time of design. When marking the hole, it must be taken into account that it corresponds to the vertical axis of the pipe. From the edge of the pipe, the ceiling beams should be at least 130 mm.
 The gap that exists between chimney and ceiling, must be insulated, for this you can use asbestos, basalt wool or fiberglass.
The thickness of this layer should be not less than 50 mm so that the insulation does not fall, the bottom of the hole around the pipe is hemmed with a sheet of stainless metal.
It is not recommended to hem a hole around the pipe with galvanized iron, since when it is heated, harmful substances will be released.
If you are finishing the ceiling in the steam room, washing department and relaxation room with your own hands and doing it for the first time, then in order to get a good result, the following expert advice should be taken into account:
- all Finishing work in the bath you need to start from the floor, then make the ceiling and only then sheathe the walls;
- when creating a false ceiling, the attic space can be used for storing and drying brooms, but for this, provide for a hatch and a retractable ladder;
- when installing the first lining panel, you need to be very careful, since the laying of all other elements depends on it;
- in order not to damage the panels, it is necessary to use a mallet and a wooden block, which will help to evenly distribute the shock load created;
- if the distance between the beams is up to 60 cm, then you can attach the lining directly to them, in other cases you will have to make a crate.
Output
In the bath, the ceiling is the most vulnerable place, since the maximum amount of heat escapes through it. To prevent this, you need to properly for the steam room it is wooden, and for the washing and rest rooms it is plastic lining.
Everything installation work are performed carefully and carefully, then you can independently carry out high-quality thermal insulation of the ceiling and make it beautiful, safe and durable.
Useful video
Installation of lining in the steam room, video:
In contact with
In a room such as a bath, the ceilings should have high heat-saving properties. In addition, they must be protected from exposure to high humidity. Consider how to make the ceiling in the bath warm and durable, while spending a minimum of the family budget.
There are three main requirements for the ceiling of the bath:
- Structural strength
- Reliable thermal insulation
- Protection against water and steam (water condensate destroys metal and wood)
When the room box is erected, the question arises - how to properly make the ceiling in the bath. For a bath, three types of ceiling devices are used, however, they have certain limitations and differ in the price component:
- Shield or panel ceiling
- Decking ceiling
- false ceiling

It's important to know! It is recommended to use dry lumber made of coniferous wood for the installation of the bath ceiling. Beams and boards should contain a minimum of resin.
Shield or panel ceiling
For the device of a panel ceiling, pre-prepared shields from edged or tongue-and-groove boards are used. They are knocked down across them with two bars 40 x 40 mm or 60 x 60 mm. Along the perimeter of the shield, nails knock down a board with a width of at least 100 mm.

A layer of vapor barrier is laid on the shield (polyethylene film, roofing material, roofing felt, wax paper). A layer of heat insulator (glass wool or basalt wool) is laid on top. A layer of waterproofing (polyethylene film) is laid on the heat insulator.
It's important to know! When water gets on mineral wool, it loses its thermal insulation properties. Its fibers become brittle and break down. Therefore, vapor barrier and waterproofing are performed with great care.

From above, the shield is sewn up with a board with a thickness of at least 25 mm. The shields are laid on the floor beams, on which the lathing of the timber is pre-stuffed from below. The shields are tightly fitted to each other.
Between them, a heat insulator made of felt wrapped in polyethylene is necessarily inserted, or foil insulation is used. They lay on the shields floorboard or lay fiberboard or plywood with a thickness of at least 10 mm. From below, a vapor barrier layer is attached to the ceiling and the finishing work is completed.

You can also use ready-made Wall panels however they are expensive. In general, the shield ceiling is not a cheap and laborious pleasure.
Decking ceiling
The floor ceiling is carried out in small rooms or in rooms with a common partition. Everything is limited by the length of the ceiling board. When arranging such a ceiling, the boards are laid directly on the brick wall framing.
Important to remember! The thickness of the board for the floor ceiling must be at least 50 mm. The width of the span is limited to a length of no more than 2.5 m.
Such a ceiling does not have special strength, therefore it is used in cases where there is no attic room in the bath.

Edged boards are tightly fitted to each other, and along the perimeter of a bar or board, delaying sides are made. A layer of vapor barrier is placed on the board. It is fixed with a construction stapler or small nails. A heater is laid on the vapor barrier. In this case, the use of expanded clay or a mixture of clay and sawdust is recommended.
When using expanded clay as a heater, it is recommended to use a mixture of grains of different fractions. Large granules are mixed with the same amount of small granules. Small grains will wedge large ones and prevent shrinkage of the insulation.
In the case of using a mixture of clay and sawdust, two parts of clay and three parts of sawdust are mixed. Water is added to the dry mixture and mixed thoroughly. The finished solution is laid on top of a vapor barrier with a thickness of at least 100 mm.

The drying time of the clay is 30 days, after which all cracks on the surface are rubbed with a liquid solution of clay and sawdust. From above, the ceiling is covered with a board, roofing material, after which slate or tiles are laid. From the inside, a layer of vapor barrier is attached to the ceiling with a stapler or small nails and sewn up with wooden clapboard.
The advantages of such a ceiling include the use of inexpensive thermal insulation materials(clay, sawdust or straw). The disadvantages are the limitation on the size of the overlapped room.

false ceiling
The most common type of ceiling manufacturing for a bath is a hemmed ceiling. This method is characterized by the use of relatively inexpensive materials and moderate labor costs for its production.
Before performing work, all wooden parts of the future ceiling (board and beams) must be treated with an antiseptic composition. If it is not possible to buy such a composition, you can use the usual deep penetration primer or drying oil.
The technology for manufacturing a false ceiling is as follows: load-bearing beams are laid on the brick strapping of the bath. Do this in increments of not more than 1 m and not less than 0.5 m. Optimal size beams: thickness 50 mm, height 180 mm. The span can reach up to 5 m. The height of the ceiling in the bath should not exceed 2100 - 2200 mm.
From below, a rough ceiling is hemmed onto the beams. Length edged board depends on the spacing of the beams. The boards are fixed along the lower edge of the beam with 60 mm wood screws. Do this with a screwdriver, two screws on each side.
The boards fit tightly together. When the entire inter-beam space is covered with a draft ceiling, the vapor barrier of the bath ceiling is covered. It is laid out in strips between beams with an overlap on an adjacent beam of 10 cm.
It is necessary to walk on the vapor barrier very carefully so as not to damage the material with shoes or dropped tools. If this happens, seal the hole with wide tape.
Fastening is carried out with a stapler or small nails. Between the beams, mineral wool is laid. It is produced in the form of mats or rolls. The heat insulator is laid in such a way that 3-5 cm remain to the upper edge of the beam.
This gap is necessary for ventilation and evaporation of possible condensate. It can form due to temperature fluctuations. A layer of waterproofing of the bath ceiling is laid on top of the beams. Attach it in the same way as the vapor barrier.

Cover the ceiling with a floorboard or plywood 10 mm thick (can be fiberboard). After such preparation on the ceiling from the side of the attic, you can lay any flooring. From below, a vapor barrier film is attached to the ceiling of the bath with a stapler.
How to sheathe the ceiling in the bath? Usually the work is completed by finishing the ceiling with a clapboard. This environmentally friendly and natural material (pine) with bactericidal properties will create cozy atmosphere for visitors.
In this part, we will consider the installation of the ceiling in the bath. Which ceiling to choose, how to make a ceiling in wooden bath? These and other questions related to the construction of the ceiling in the bath with their own hands will be discussed in this article.
Types of ceilings for a bath
There are three main types of ceilings for a bath - hemming, flooring and panel ceiling.
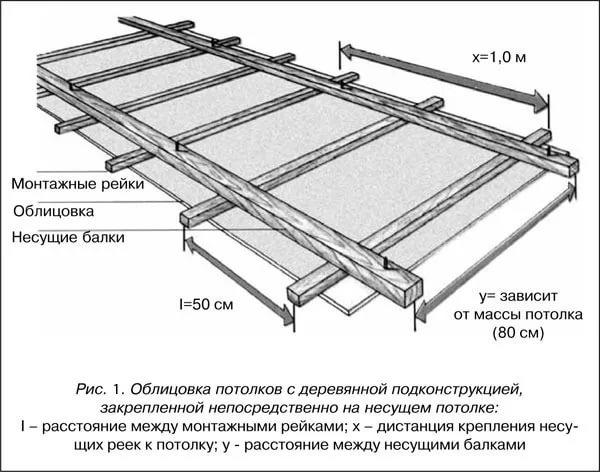
1. False ceiling.
Fig.1 False ceiling.
A false ceiling is obtained by sheathing the laid ceiling beams (A) with edged or tongue-and-groove boards (B) 30.40 mm thick. A vapor barrier (B) is laid on the board obtained from the boards, then a heater (G) - these can be sawdust or shavings, mineral wool, expanded clay, etc. From the side of the attic space, waterproofing material (D) is laid on the insulation, and after that the ceiling is sheathed with boards (E) - these can be both edged and unedged boards.
2. Floor ceiling.

Fig. 2 The ceiling is flat
The flooring in the bath is obtained by laying boards (A) on the walls of the bath, while the width of the span between the walls of the bath is not recommended to be more than 2.5 meters and the use of boards less than 50 mm thick. A layer of vapor barrier (B) and mineral wool insulation (C) are laid over the shield. Loose insulation for this type of ceiling requires additional fencing (G) along the entire perimeter of the attic space.
3. Panel ceiling.

Fig.3 Panel ceiling
A panel ceiling is a ceiling assembled from prefabricated panels. The shield consists of two bearing bars (A), inner lining (ceiling - B), vapor barrier (C), thermal insulation (D), waterproofing (D), external ladder (from the side of the attic - E).
It is desirable to use mineral wool or glass wool insulation as a heater when constructing shields, which lightens the weight of the shield and improves its heat-saving properties with a thickness of the insulation layer of not more than 10 cm.
A sealant (G) is placed between the shields to prevent heat loss between the joints of the shields. The seal must be moisture-proof and heat-saving, as a seal between the shields, you can lay a double-sided foil insulation or, for example, felt with a foil or polyethylene film lining.
If the frame of the boards is made of bars with a cross section of at least 50x100 mm, then such boards can be laid without ceiling beams, since these boards, due to the strong frame, can be laid in a bathhouse as a ceiling without auxiliary supports (ceiling beams).
Choosing a ceiling for your bath
A false ceiling is stronger than a flat ceiling and can be installed in baths with a span of more than 2.5 m along the length of the boards, this type of ceiling is less laborious to install, unlike a panel ceiling. Such a ceiling allows you to arrange an attic with the ability to move along the ceiling without fear of breaking the thermal and waterproofing layers of the ceiling, since the thermal and waterproofing layers are protected by flooring from boards from the side of the attic.
The floor ceiling is mainly arranged in small-sized baths, where the span between the walls does not exceed more than 2.5 m, as mentioned above in the description of the floor ceiling, or this type of ceiling is arranged in baths with a capital partition (not a shield partition), which has a base, like the main walls of the bath.
It is advisable to arrange this type of ceiling in baths that do not have an attic, since such a ceiling does not have sufficient support rigidity, and there is no flooring from boards from the side of the attic, which covers the heat-insulating layer.
If you decide to arrange such a ceiling with an attic in the bath and use it, for example, for drying and storing bath brooms, then moving along such a ceiling is highly undesirable, since there is a high probability of breaking the heat-insulating layer, there is an additional load on the boards when moving along them, which can lead to deformation of the ceiling shield and the quality of the vapor-thermal insulation properties will drop sharply.
The panel ceiling is more difficult to perform, hemmed (according to the complexity of the work during the device). Also, the installation of a panel ceiling requires additional involvement of labor (one person will not be able to lay the ceiling panels in place). Also required extra work for heat and vapor barrier at the junction of the shields with each other.
But a panel ceiling, unlike a flat and false ceiling, can be made from scraps of lumber (bottom and top panel sheathing, panel frame) that remain during construction, this saves on costs Money for the purchase of lumber.
Based personal experience, and comparisons of ceilings, I can advise you to opt for two types of ceilings for your bath - this is a hemmed and panel ceiling. Further in the article we will talk about the device of both types of ceilings, and which one to choose is up to you, dear readers.
The installation of a false ceiling in the bath
To install the ceiling in the bath, you need lining (or edged boards) with a thickness of 22 mm - 0.4 m3 or 38 lining boards with a width of 120 mm.
Note: ceiling beams already installed (see).
Chimney opening device

Fig.4 Chimney opening arrangement

Fig.5 Chimney passage size
In the transverse bars (B), make grooves in the center and lay the central floor beam (A). Fix the beams with nails L = 100 mm.
The perimeter of the opening for the chimney is 38x38 cm (these dimensions are taken for the passage through the ceiling of the chimney from a sandwich pipe with an outer diameter of not more than 180 mm).
Ceiling shield device

Fig. 6 Vapor barrier device for the ceiling in the bath
After the device of the opening for the chimney is completed, proceed to the device of the ceiling shield. The first thing to do is to make a vapor barrier device (A). Vapor barrier can be made, for example, from a polyethylene film (black or the one used in gardening when covering greenhouses).
The vapor barrier material is attached to the beams of the ceiling using a construction stapler, before that, the ends of the beams must be treated with an antiseptic, applying two to three layers of coating. The vapor barrier material must have an overlap on the walls (B) along the entire perimeter of at least 15-20 cm, which will later make it possible to make a hermetic connection of the vapor barrier at the junction of the walls and the ceiling shield (C).

Fig. 7 The device of the ceiling shield in the bath
When the vapor barrier material is fixed to the ceiling beams, proceed directly to the installation of the ceiling shield.
To do this, from the starting board (A1) it is necessary to use a planer (electric plane or on a woodworking machine) to cut off the spike and this end (A), install the board to the wall of the bath and attach it to the beams of the ceiling. Boards are fastened with nails L=60 mm.
Next, install the second board (B) with a spike (X) in the groove of the starting board (Y), you need to tap the second board with a mallet to ensure a tight connection of the boards according to the groove-spike principle. By the same principle, carry out the further installation of the ceiling shield. Boards fasten with nails L=60mm.
Insulation of the false ceiling in the bath
Upon completion of work on the installation of the ceiling, proceed to its insulation.

Fig. 8 Laying insulation on the ceiling
Lay insulation on top of the vapor barrier (A), lay waterproofing material on top of the insulation (B), while ceiling beams do not need to be covered with waterproofing material. When the insulation and waterproofing are laid, arrange the flooring (D) from the boards (slab or edged) on top, attaching it to the ceiling beams (C) with nails.
Panel ceiling device in the bath
The device of a ceiling panel ceiling begins with the device of the panels themselves. The panels can be laid on the bath already ready, but such a panel, due to its mass, is difficult to lift up the bath, so let's consider the option of partial production of panels outside the bath, followed by additional assembly of the already laid panels on the walls of the bath.
Panel arrangement

Fig.9 Preparation for work. Laying of bearing bars
For the installation of panels, you need to choose a flat area (A) near the bath, if there is no flat area, then you need to level the place where you will make the panels.
Lay a flat rail (B) on the ground surface, which will serve as a stop for the panel bars to be installed (C).
Install the bars at a distance of 50 cm from each other, the distance is indicated from the outer ends of the bars. To facilitate the work and control the distance between the bars, you can make templates (3 pieces), with the help of which you can quickly and accurately set the bars of the panels at the desired distance.

Fig. 10 Ceiling panel shield arrangement
On top of the bars (A), fasten the boards (B), the length of the boards should be 60 cm, since it is necessary to get the protrusion of the boards at the ends of the bars by 5 cm on each side, for subsequent laying in the gap between the vapor barrier and insulation boards.
Fasten the boards with nails or self-tapping screws (B), two on each side (4 pieces per board).
Vapor barrier device

Fig.11 Vapor barrier device of the ceiling panel
When all the boards are attached to the beams, turn the panel over with the boards down and attach the vapor barrier material (A) to it using thin rails or a construction stapler. Approximate attachment points (B) are indicated in the figure by red lines.
Installation of panels on the walls of the bath

Fig.12 Preparing the panel for moving to the sauna
In order to raise the semi-finished panel to the bath, it is necessary to fasten it with temporary braces (A), this will give the panel rigidity and when it is moved, the attachment points of the boards to the bars will not warp and lose the rigidity of the connection of the wooden shield with the supporting bars of the panel.

Fig. 13 Laying ceiling panels on the walls of the bath
Before laying the panels (A) on the walls of the bath, it is necessary to lay the sealant (B) on the surface of the upper beam at the place where the panels will be installed. Jute can be used as such a sealant.
The panel is laid with an overlap on the wall of 5 cm on each side, while leaving 10 cm of the surface of the timber, which will allow the installation of the rafters at the required angle, without making cuts, both in the rafters themselves and in the basques and panel sheathing boards.
Note:
When installing a panel ceiling, the roof device, as described in the article
, will have to be done with some modifications. What changes need to be made to the roof device, we will consider at the end of the article.

Fig. 14 Connecting and fixing the ceiling panels on the bath
Insulation laying
Having laid all the panels on the bath, proceed to laying the insulation (B) on the vapor barrier (A), lay the waterproofing material (C) on top of the insulation without overlapping the supporting bars of the panels.
At the junction of the panels (D), lay the vapor barrier material and insulation. At the same time, do not connect the panels to each other using screeds and do not fasten them to the upper beam of the log house - you connect the panels to each other using boards.
To do this, as a starting board, you will need a solid board (D), along the entire width of the stacked shields (if the width of the shields turned out to be 4 m, then the length of the board should also be 4 meters). Attach this board to the panel bars with self-tapping screws or capercaillie screws. Next, attach short boards (E) to the bars of the panel, after attaching several boards along the length of the panel (100-120 cm), fasten the whole board again (G), etc. Such an arrangement of the top shield of the panel will ensure reliable connection of the panels to each other.
The joints of the panel sheathing are closed with the help of an overlay board (З).
Features of the bath roof device with a panel ceiling
Now let's consider what structural changes it is desirable to make to the process of installing a bath roof with a panel ceiling. What is important when installing a roof in a bath? Free access to the ceiling is important for its repair, so that the rafter legs of the roof structure do not interfere with this process.
The roof construction method described earlier in the article under a false ceiling is not very convenient in this case. Since the base of the roof truss will interfere with the laying of the panels, additional vapor and waterproofing work will be required to isolate the base of the roof truss from the vapors that are inevitable during the operation of the bath. And this means that when the time comes to repair the ceiling, it will also be necessary to repair the roof trusses with the replacement of the base, and these are extra cash costs for the purchase of new lumber. So it would be better if you, having decided to make a panel ceiling in your bath, immediately make adjustments to the roof structure.
To do this, you need to do the following:

Fig.15 General description of the roof device
- you do not assemble roof trusses outside the bathhouse, such a roof is installed directly on the bathhouse from the installation of vertical racks (A) and the installation of a horizontal support jumper (B);
- after installing the vertical racks and the support jumper, you need to install the rafters (B) along the ends of the bath and install the crossbar (D) between the rafter legs - the spacer jumper, as shown in the figure.
Let's take a closer look at how to make changes to the roof device:

Fig.16 Installation of vertical racks
Make a groove (A) in the bar of the upper crown of the bath, in which you install a vertical stand (B) and fasten it with temporary braces to the frame.

Fig. 17 Installing a horizontal carrier jumper
A horizontal support jumper (B) 5 cm thick and 10 cm wide is attached to the vertical uprights (A), to connect the uprights and the jumper, it is necessary to make cuts and connect the drains and the jumper to each other using bolts or capercaillie screws (C).

Fig. 18 Installation and fastening of rafters on the upper crown of the walls of the bath
When installing the rafters on the upper crown of the log cabin of the bath, it is necessary to make a selection-support of which the rafter leg will be installed on the beam, in this place the rafter leg should be attached to the upper crown of the log house using a blind screw (B).

Fig. 19 Fastening the rafters to the horizontal carrier lintel
Before proceeding with fixing the rafter legs (A), it is necessary to pre-drill unloading holes for the capercaillie screw to enter:
- this, firstly, will facilitate its screwing into the timber;
- secondly, it will eliminate the possibility of cracking the rafters at the attachment point and ensure a secure connection of the two structural elements baths - rafter legs and walls of the bath.
Hole drilling procedure:
- Mark the places for making holes (B1) for the screw head.
- Drill not through hole(B2) under the head of the screw with a diameter equal to the diameter of the screw head. If, for example, the diameter of the screw head is 14 mm, then the diameter of the hole must be at least 14 mm, the depth of the hole is also equal to the height of the screw head.
- Next, make a markup inside the hole and drill a hole (B3) with a diameter less than the diameter of the screw along the top of the screw thread ridge. If, for example, the diameter of the screw along the thread ridge is 10 mm, then it is recommended to make a hole with a diameter of approximately 6 mm.
- Screw in the screw (B4) until the head is deepened flush with the surface of the rafter leg.

Fig. 20 Installing the crossbar
After installing the rafters in pre-made grooves, we install the crossbar (A) and fasten it with capercaillie screws to the vertical post (B) and to rafter leg(B) as shown in Figure 20.
Note: The device of grooves in the vertical rack (A) and in the rafter leg (B). The dimensions of the grooves are given taking into account the dimensions of the jumper (crossbar) 10 cm wide and 5 cm thick.

Fig. 21 Slot arrangement for bolt installation
Sheathing, sheathing of gables and laying roofing material carried out in the same way as described in the article. Further on the topic, an article will be written about installing a stove in a bath, about the installation of frame partitions inside the bath and interior decoration walls.
When installing the ceiling according to this project, it is necessary to remove the middle floor beam and make grooves (A) in the second and fourth beams for laying the crossbars for the chimney opening. To do this, grooves are cut with a distance from each other according to the size of the chimney being arranged (it depends on what kind of chimney you are making - brick or stainless steel sandwich pipe). In this case, the distance between the grooves must be at least 38 cm, as shown in Figure 5. The width of the groove in the ceiling beams must be at least 2 mm larger than the width of the notch in the cross beams. The dimensions are shown in the figure - the dimensions of the cuts in the transverse bars are marked in red, and in the beams of the ceiling in green.
 "Cox" has to get out
 The daughter of the Russian oligarch Elen Manasir revealed the secrets of beauty and weight loss Guest marriage Viki Manasir with her husband
 The policeman revealed the bloody secret of the murder of Tupac: the killer was hired by P Diddy
 Dream interpretation of many animals Why do many animals dream
 What to give a girl for christening
 How long does carnival last
 What is the difference between angels and archangels?