How to lay a brick chimney with your own hands - theory and practice. Chimney pipe laying
There is no oven without a chimney. The removal of carbon monoxide and smoke from the furnace is a necessary condition for the correct operation of the stove. What to make a pipe from and how to arrange it so that it serves for a long time and does not create additional problems? An experienced stove-maker will answer without hesitation - from the same material as the stove itself. This is related to the fact that various materials different coefficient of thermal expansion. And if brick and metal are simultaneously heated during the furnace, then a gap will form at the place of their connection over time. Smoke begins to seep through the gap, this disrupts the smooth operation of the stove, and also poses a serious threat to the life and health of households. So if you want to build a chimney for brick oven, you need to do this too from a brick.
What is a brick chimney and where is it used
Chimneys are used to remove gaseous products of combustion in stoves, fireplaces and heating boilers. Smoke, carbon monoxide and soot under the action of traction are taken out of the furnace into the pipe and brought out. As they move, they cool down, giving off heat to the walls of the chimney.

To remove combustion products from a brick oven, it is necessary to build a chimney from the same material, i.e. from brick
Unlike metal pipes, made of brick has:

But a brick chimney also has a rather significant minus. in country houses and country cottages no possibility to fold pipes cylindrical shape, which are ideal for the passage of hot gases. The internal section of a square or rectangular shape creates obstacles for the expiration of smoke. As a result, a layer of soot quickly forms on the inner walls, which reduces traction. Accordingly, they have to be cleaned more often than metal ones.
The design of the chimney and the principle of operation
The classic design of the chimney is a vertical tower, inside which is located through hole, connecting the furnace firebox with an open space outside the house. According to the laws of physics, air pressure decreases as you move away from the surface of the earth. As a result, a draft arises inside the pipe - the desire of the air mass to move from bottom to top. If air access from below is blocked, the thrust disappears. Therefore, a smoke damper or a view must be installed in the chimney, with which it is possible to regulate the draft.
With the help of a damper, you can adjust the size of the smoke channel, and therefore the draft
Since the pipe is operated in residential buildings, it should not pose a fire hazard, therefore, masonry is carried out taking into account maximum protection against possible fire. Among the stove-makers, a certain terminology has been established, which reflects the structure and functional purpose of the individual elements of the pipe.

In some cases, a combined pipe design is practiced. Brickwork ends in the attic and then a metal or asbestos pipe is mounted to it, which goes to the roof. In this case, there is no need for an otter, neck and head, which saves a lot of time and money. At the same time, we must not forget that the cross-sectional area of \u200b\u200ba metal pipe should not differ from the cross-section of a brick one in a smaller direction. The combination of a stainless steel pipe nested in an asbestos pipe has proven itself well.

In the upper part of the chimney, where the temperature of the flue gases is not so high, it is possible to make a transition from a brick pipe to a metal one.
In both cases, the upper hole must be closed with an umbrella (or deflector), which will prevent direct rain and snow from entering the pipe.
Calculation of the main parameters of the pipe
All calculations for the chimney must be carried out at the design stage of the furnace project. The project must be carried out by a qualified engineer or craftsman who is well versed in all the nuances of the furnace business. It is impossible to plan the dimensions of the pipe in isolation from the dimensions of the furnace and heat exchanger. Everything is interconnected and must correspond to one goal - the coordinated work of furnace equipment.
If during the construction of the fireplace there is no “body” of the stove, and the firebox is directly connected to the chimney, then in the Russian stove there are additional heating passages in the walls, and it is impossible not to make allowances for this. The presence of passages changes the draft and lengthens the path of the flue gases several times. Accordingly, the chimney must create a greater vacuum so that the movement of gases is accelerated, and soot does not settle inside the duct. A separate topic may be the calculation of the parameters of the chimney in the sauna stove. It is important here that the draft is not excessive, and the burning fuel has time to give off heat inside the steam room.
The task of the stove-maker is to take into account not only internal, but also external factors - the location of the pipe in relation to the roof, the characteristics of the local climate, and even the influence of the landscape.

Chimney draft can be affected by nearby tall buildings and trees, as well as the wrong choice of chimney height.
For gas heating systems due to their increased fire hazard, the calculation of the parameters of the chimney is carried out by specialists who develop the boiler. Dimensions are indicated in the technical data sheet and are mandatory.
In private construction, where the furnace is carried out mainly solid fuel(wood, coal, peat or fuel briquettes), you can adhere to the following rules that will ensure the correct operation of any furnace:
- internal cross-sectional area of a rectangular chimney in furnaces closed type should not exceed the cross-sectional area of the blower;
- the internal cross-sectional area of the pipe in open-type stoves and fireplaces is calculated in a ratio of 1:10 in relation to the firebox.
It is believed that if the chimney structure has a rectangular shape, the ratio of the short side to the long side should be 1:2. In this case, the minimum allowable size of the channel section is 14 x 14 cm.

The size of the wall of the brick chimney channel should not be less than 14 cm
An important factor is the height of the pipe. Correct calculation allows:
- optimize the operation of the chimney and achieve the best efficiency indicators for heat transfer;
- ensure the safe operation of the heater, eliminate the leakage of harmful gases due to weak draft;
- provide fire safety- with excessive draft, sparks and sheaves of flame can fly out of the pipe.
In the general case, the height is determined in accordance with SNiP 2.04.05–91:
- the minimum distance from the grate to the top of the chimney (excluding the protective umbrella) is 5 m;
- the optimal distance is 6 m.
Such parameters provide stable draft, i.e. the design of the chimney allows you to create a pressure drop sufficient to operate the stove at any time of the year. But in each particular case, you must also consider:

There is such an unpleasant phenomenon as reverse thrust. This term refers to the movement of smoke in the pipe in the opposite direction - from the chimney channel into the room. There may be several reasons for this, but the main one is the incorrect position of the chimney. As a rule - underestimated.

An error in choosing the height of the chimney often leads to back draft
Excess draft can always be eliminated by adjusting the air flow in the ash pan and flue dampers. Insufficient traction is exacerbated in several ways:
- Pipe extension.
- Cleaning the inner surface of the chimney channel.
- Installing a deflector.
The deflector not only increases draft, but also protects the chimney channel from moisture, debris and birds and bats.

According to experts, by installing a deflector on a chimney, traction can be increased by 15–20%
Video: how to calculate the height of the chimney
You will learn about which pipe is better to choose for a chimney, as well as the advantages and disadvantages of materials in our material:.
Making a brick chimney with your own hands
Knowing the features of the chimney device and having on hand finished project, you can start self-construction smoke channel.
Materials and tools needed for the construction of the chimney
For self-construction of a chimney, you will need the following tools:
- trowel and mason's hammer;
- hydraulic level, plumb (or building laser level);
- construction bucket for mixing mortar;
- building rule, stitching;
- electric mixer (you can use a conventional drill with a nozzle);
- measuring instruments - tape measure, ruler.

Building a chimney requires standard mason tools
In the process of masonry, smaller building elements need to be made from bricks - brick plates, a quarter of a brick, a half, etc. An experienced bricklayer copes with the task with one measured blow of a hammer. A novice stove-maker who does not have such skills can use a grinder with a diamond disc. With its help, cutting of any required shape becomes easily accessible, although accompanied by a large amount of dust.
Some stove makers successfully use a template made of wood or metal for masonry. The template allows you to strictly adhere to the dimensions, which is especially important for the inner hole of the pipe.
In addition, you will need materials:
- red brick (by no means white - silicate) solid, hollow, fireclay, clinker;
- cement mixture (can be ready-made or prepared independently from sand, cement and clay);
- a set of smoke dampers or views;
- sheet metal or roofing.
Preparatory work before making a chimney
Before the immediate start of work on laying a brick pipe, it is necessary to carry out certain preparatory work:

During operation, hands come into contact with chemically aggressive solutions - it is recommended to use protective gloves to protect them.
When performing work on the roof, personal safety measures must be observed, as well as the use of scaffolding and rope insurance.
There should always be a first aid kit on the construction site with first aid for injuries and bleeding. Sometimes the chimney is not located in the center of the room, but is in contact with bearing wall. This situation is often observed in the construction of fireplaces. In this case, you can use the wall structure of the chimney. It is pre-mounted during the construction of the main wall. It is appropriate to note here that among stove-makers, a classification of chimneys according to design features has been adopted:
- Brick overhead. Chimneys installed directly on the stove masonry.
- Brick indigenous. Pipes located separately from the furnace, standing on a separate foundation. They are in the form of a stand.
- Prefabricated. Individual blocks made of refractory concrete, which are stacked at the chimney installation site.
- Wall. Built into a load-bearing wall, significantly save space and volume of premises. However, it should be borne in mind that it is undesirable to mount wall pipes in external walls. Contact with cold outside air dramatically reduces the efficiency of such a chimney in terms of heat transfer.
V wooden houses the places where the pipe adjoins the combustible elements of the building are accompanied by a thickening of 1–1.5 bricks. To avoid ignition, the joints are additionally laid with asbestos or felt sheets. Felt is pre-soaked in a liquid clay solution.
Step-by-step instructions for building a brick chimney
The construction of the chimney consists in laying brickwork in strict accordance with the plan for the location of the material in each row - in order. This plan must be drawn up during the preparation of the project for the construction of a chimney channel.

Each row of chimney masonry has a strictly defined arrangement of bricks.
We can only add that for the best bonding of bricks with mortar, it is recommended to adhere to the following installation settings:
- The solution is applied in a layer of 1.5–2 cm, the brick is wetted and coated with a solution. After installation in place of the masonry, the brick is pressed down so that the final thickness of the seam is 1 cm.

When laying each brick, it is necessary to check its position horizontally and vertically, and also maintain a joint thickness of 1 cm
- In the course of laying (after 5-6 rows), it is recommended to do a mop - grouting between bricks inside the chimney channel. The smooth inner surface will ensure good passage of exhaust gases, reduce the risk of soot deposits. Grouting can be done with a damp cloth.

Internal seams are leveled and rubbed with mortar along the masonry
- The installation of the smoke damper is usually carried out between the second and third row of bricks. But this rule is not rigid - you can adjust the installation location according to the situation. Immediately after installation, the valve is closed so that the cement mortar does not fall into the furnace.

A separate valve is placed on each smoke channel
- In the outer masonry - on the roof - a mortar with increased strength and moisture resistance characteristics is used. To do this, the proportion of the batch is changed, increasing the content of cement (instead of 1/4 they make 1/3). Moreover, cement is selected grade M 500 or M 600. For the head, it is often not a cement-sand composition, but a cement-clay one. It is made by adding 1 liter of cement to 10 liters of sand-clay mortar, which is used for laying the furnace.

When using hollow bricks, the internal cavities are filled with cement mortar
- It is important to keep the solution clean. It is unacceptable to get garbage into it, especially of organic origin.
- Straight sections of the chimney are laid out on a plumb line. To do this, strong silk threads are pulled in each corner and aligned vertically. The right angle is controlled with a square every 4-5 rows.

It is convenient to control the vertical position of the chimney walls with the help of cords stretched in each of the four corners
Video: DIY fireplace chimney
Features of the operation of brick chimneys
After the construction of the chimney is completed and the pipe has been successfully put into operation, it is advisable to familiarize yourself with the features of using a brick stove. In order for the heating unit to serve for a long time and without accidents, simple but important rules must be observed.
- The main enemy of a brick is sudden changes in temperature. It is better to drown more often, but for short periods of time. For one furnace it is not recommended to make more than 2 bookmarks of fuel. This is especially true of coal, the combustion temperature of which exceeds 1000 degrees.
- Timely cleaning of the pipe from soot indefinitely extends the life of the chimney channel.
- If cracks appear on the furnace body and the chimney in particular, measures should be taken immediately to eliminate them. Launched cracks tend to progress rapidly and pose a threat not only to the integrity of the brickwork, but also to human health. Through small cracks, carbon monoxide penetrates into the living room, which is colorless and odorless, but is poisonous to all living things.
- The slightest malfunction in the doors of the firebox or blower (ash chamber) first significantly reduces the heat transfer of the furnace, and then leads to an avalanche-like accumulation of soot on the chimney channels. Having found a loosely closing door, view or valve, they should be repaired or replaced immediately.
- At least once a year it is necessary to carry out preventive maintenance of the furnace. It is best to do this at the end of summer, before the start heating season. The daily preventive procedure includes opening the blower door for 15–20 minutes. This simple action will allow you to briefly create maximum traction, which will pull the soot deposited on the walls into the external environment.
- The use of damp firewood adversely affects the cleanliness of smoky channels, especially in winter time. It is more rational to use fuel briquettes, the humidity of which is much lower. Firewood should be harvested ahead of time - drying wood in a natural way is a long process (from a year to two).
Chimney cleaning and repair
To clean the pipe, both traditional methods and modern ones, based on the achievements of technical progress, are used.
From time immemorial, people whose profession was called a chimney sweep were engaged in the maintenance of furnaces. Today, finding a professional chimney sweep is problematic. They were replaced chemicals, which, however, are also often called "Chimney sweep".

It is very difficult to find a professional chimney sweep today, this profession is a thing of the past
So, a tool called "Chimney Sweep Log" has proven itself well. It contains salts of copper sulfate and other active chemical compounds. Burning in the furnace, the vapors of these substances interact with the soot deposited on the walls of the pipe. Under the action of heat, the reaction continues for several weeks and leads to the fact that the solid structure of soot crumbles and, falling back into the furnace, burns out. According to manufacturers, the use of "miracle log" twice a year allows you to completely remove soot from the pipe. The consequence of this is good traction and a high percentage of heat transfer from the furnace.

Manufacturers of the Log Chimney Sweeper claim that its use twice a year allows you to completely clean the chimney of soot
From folk remedies one can note such effective ways prevention, such as burning salt or soda once every 2 months (approximately 0.5 kg per furnace). The powder is poured into the combustion chamber at the moment when the firewood is well flared up and the temperature is maximum. After that, you need to tightly close all the doors, as the reaction can be quite violent.
Dry aspen firewood helps to clean the chimney well. The fact is that the aspen burns with a large release of heat, the flames are long and penetrate deep into the passages.
If there is no aspen or soda, you can use potato peels. To do this, you need to accumulate about half a bucket of potato peel. When burned in a furnace, the released substances bind soot and cause it to burn to the end.

The combustion temperature of aspen firewood reaches 800 degrees, so the soot on the walls of the chimney burns out
When performing work on the installation of chimneys, especially at the site of installation of the neck, otter and head, safety standards should be carefully observed. If you work carefully and follow the necessary instructions and technologies, it is quite possible to fold a brick chimney with your own hands.
If you want to enjoy the warmth in your house and at the same time protect it from fire, try building a classic brick chimney, such a structure is relatively easy to build with your own hands. The main thing is to strictly adhere to the technology of its construction.
In any private dwelling where this or that autonomous system heating, a structure must be installed that removes the products of combustion of the fuel. Now there are a lot latest solutions allowing such a system to be set up. They involve the use of modern materials and technologies.
At the same time, brick chimneys, proven for centuries of stable operation, do not give up their positions. They, like many decades ago, are being built by the owners of small country houses and owners of luxury cottages. Brick chimneys have many operational advantages:
- The availability of material for construction and the relatively low cost of installation work.
- High resistance to elevated temperatures. Chimneys made of high-quality brick can withstand heating up to 900–1000 °C.
- Great looking design. This is of great importance for residential buildings that are built in some original style.
- Increased thermal conductivity. Due to this, the heating equipment installed in the house is characterized high rate useful action. Brick chimneys keep heat inside the home, counteracting its rapid outflow.
Brick chimney
The considered designs for the removal of combustion products also have disadvantages. Under the influence of temperature fluctuations and due to the impact of aggressive environments, the brick begins to collapse. There is no particular problem in this. A brick chimney can always be repaired by restoring its performance. The second disadvantage is that the walls of the described structures from the inside are quite difficult to make perfectly smooth. Because of this, soot collects on them, which causes a deterioration in chimney draft.
This phenomenon is due to a decrease in space (working) inside the structure. This problem is also solvable. You just need to regularly clean the brick chimney from soot. And then there will be no difficulties (really insoluble) with its operation.
The shape of the brick structure can be round or square. There is no fundamental difference in the operation of such chimneys. But home craftsmen usually equip square structures to remove soot. They are much easier and faster to build than round structures.
Also, chimneys made of bricks are usually divided into: mounted and indigenous. The mounted structure is an integral element (furnace), its continuation, without which the unit cannot be operated. But root-type chimneys are installed as autonomous structures. They are placed next to the stove and the soot outlet pipe is connected to the heating unit through a pipe. Chimneys of the indigenous type should be placed on a separate base from the stove and house. This, of course, complicates the work on its installation.

Brick building
Most often, such structures are used to remove smoke from heating units made of brick or cast iron.
An important nuance. It is allowed to connect more than one furnace to the root structure, but several at once. Moreover, it can be both, and a gas-powered unit. For the construction of chimneys of interest to us, hollow, porous and lightweight bricks cannot be used. Use only fireclay or solid red blocks that can withstand high temperatures without problems.
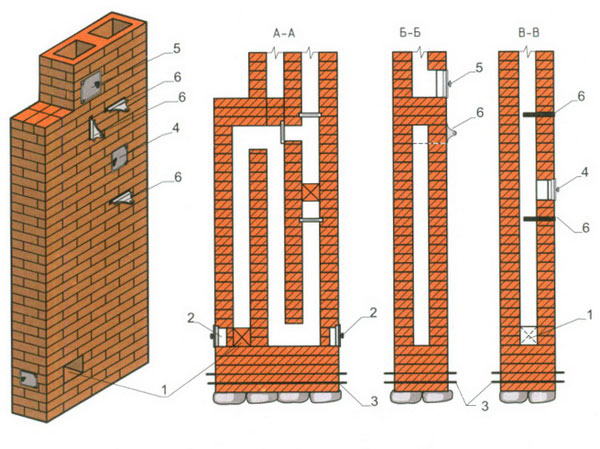
The overhead structure consists of several zones. For an ordinary person, their names may not sound quite ordinary. Next, we give the main parts of brick smoke exhaust structures and describe their features:
- Directly on the heating unit, the lower part of the chimney is mounted - the overhead pipe. Bricks during its installation are stacked with a special dressing.
- After the overhead pipe, there is fluffing (otherwise - cutting). This part is understood as the expansion of the chimney, which they begin to lay out for 5-6 brick rows from the ceiling between the floors of the house. There is one subtlety here. Only the outer part of the fluff is widened by 25–40 cm. But its inner diameter is similar to the cross section of the entire chimney. Fluff protects floors from elevated temperatures. It, in fact, performs the function of thermal insulation. That is why its walls are made so thick.
- The fluff has a neck. It is designed to install a special valve, which makes it possible to change the draft of the furnace by regulating the intensity of combustion of the fuel.
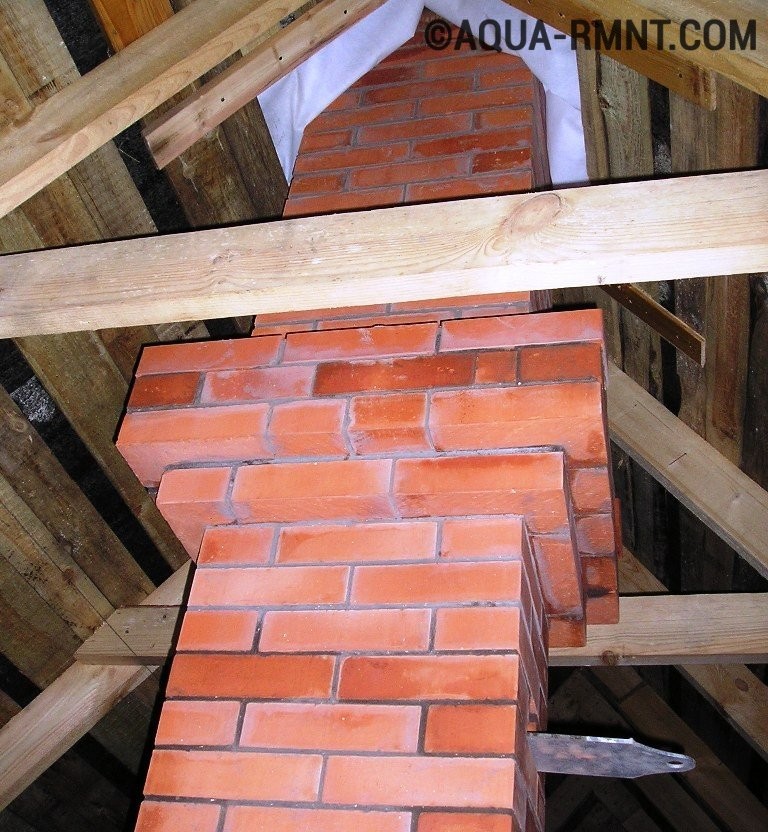
- A pillar of bricks with a smoke channel laid inside it is called a riser. Structurally, it is placed before the fluff and after it - in the attic floor. The riser is laid to the very roof of the building.
- An otter is mounted above the roof - an extension (about 10 cm on each side) of a special kind. It protects the attic from the penetration of precipitation into it.
- Above the otter is another neck. Its parameters are similar to the dimensions of the chimney.

The main parts of a brick smoke exhaust structure
The end of the smoke-removing structure is the head. It consists of an otter platform and a cap protruding above the neck. An umbrella, a deflector or a cap are installed on the head (or rather, on its cap), which prevent wind-borne debris and precipitation from getting into the pipe. Indigenous chimneys have a similar design. But, as was said, several heating units can be connected to them. Therefore, the structure will have several sections and risers.
First you need to decide on the scheme by which you will mount the chimney. It can be ordered from specialists or you can find a ready-made plan on the Internet on specialized sites. The scheme you like must be carefully studied. After that, you can start construction work.
Masonry is performed according to the following algorithm:
- First of all, the overhead pipe should be erected. Its lower part is installed on a layer of mortar consisting of clay and dry, clean building sand. The laying of the pipe is carried out by the ligation method (each row is shifted sideways by half a brick to ensure maximum adhesion). Before reaching the overlap of 5-6 lines, stop mounting the overhead pipe.
- Fluff laying is in progress. The standard value of the expansion along the outer perimeter of the chimney is 59x45 cm, along the inner perimeter - 14x27 cm. Pipe expansion is achieved by shifting the laid bricks along the edges of each row by about 4 cm. Important! When the fluff laying is completed, be sure to overlay the extension with 10 mm asbestos in sheets or any other non-combustible material.
- Now we make an otter. This stage requires home master particular care and attention. Each row of the otter should protrude 1/3 to the outside and form a kind of step. The laying of the first line is similar in size to the last row of the extension made earlier. Then lay out the second step and all subsequent ones.

Masonry brick pipe for smoke removal
The next step is the installation of the riser. Its laying is carried out in the attic. The riser must be built close to the roof structure of the house. It passes through the roof and exits 50–80 cm above the ridge of the building. The masonry is completed with the arrangement of the neck of the chimney. A cap is placed at its end, on which a protective device (cap, umbrella) is put on.
You can learn more about all the stages of laying a brick chimney in the video that we attach to this section. Carefully review it and you are guaranteed to be able to make a reliable chimney with your own hands.
Finally, I would like to give a few useful tips novice home craftsmen who do not have real experience in building chimneys. Please note the following:
- It is desirable to make masonry seams thin (no more than 1.5 cm). In this case, the smoke-removing structure will serve you for many decades.
- It is convenient to cut bricks with a grinding and cutting manual installation.
- When building an otter and butcher, you can mount metal bars into the brickwork to increase the reliability of the structure. At the same time, do not allow the reinforcing elements to block the smoke channel.
- All corners of the chimney must be straight, and the walls must be perfectly even. When laying out each structural element, use a plumb line and a building level.
- To increase the reliability and stability of the smoke exhaust structure, attach it to the wall every 0.3 m with steel anchors (of course, if the chimney is located directly at the wall surface).

Installation of metal bars in the brickwork of the chimney
Experienced specialists, in addition, advise laying fiberglass or asbestos material in the area where the chimney is connected to the roof and ceiling. So you almost completely eliminate the risk of fire.
The chimney is a mandatory element in the construction furnace heating. This design is needed to remove the products of combustion of wood, coal, gas and other materials burned in the furnace.
Exists different types chimneys, differing in pipe material and cross-sectional shape, but despite the emergence of new high-tech materials, the square (less often rectangular) brick chimney remains the most popular.
There are 3 types of chimney designs. They differ in the way they exit the furnace, the number of connected heaters, and so on.
Each type has its pros and cons in the application, as well as some installation features.
Wall-mounted chimneys
Wall-mounted chimneys are the most common type of construction. In this case, the pipe is simply an extension of the stove, going up through the roof. The advantages of such a system:
- Compact and rational use of space. In any case, the space above the stove would be empty (due to safety requirements), and the chimney is the only element allowed in this area.
- Ease of installation. The construction of a brick chimney is very simple and does not require any skills (the skill of laying bricks has probably already been obtained during the construction of the stove).

The disadvantage of a mounted chimney is that it is mounted for one particular appliance. If there are several stoves in the house, each will have to build its own chimney or use a different type of construction.
Indigenous chimneys
In this case, the chimney is a common riser, to which several heaters can be connected using metal pipes, and the stoves can be located both in different rooms and on different floors.
Of the disadvantages - additional space is required not only for installing a chimney, but also for supply pipes. Also, quite complex cross-sectional calculations for each element of such a design in order to ensure normal traction.
Wall chimneys
The chimney got its name because it is always located near the main wall (internal or external). If the chimney is located against an external wall, then most of its structure is on the outside of the house and requires an additional foundation. When installed indoors, the chimney must run inside the wall.
The advantage of a wall chimney is that several appliances can be connected to it on different floors, but they must be strictly one above the other.
Also, the internal wall chimney is a kind of additional source of heat, since the hot pipe gives off heat in all directions, including rooms adjacent to the main wall. True, the efficiency of such heating is minimal and is simply an additional advantage of a wall chimney.
The main disadvantage is the high cost of materials and the need for additional space.
How a brick chimney works
A brick chimney consists of several sections, some of which are indoors, and some are outdoors.
The design features are such that when passing through the attic floor, the pipe walls should be as thick as possible to reduce the risk of fire. truss system. At the same time, going beyond the roof, the structure of the chimney itself must cover the hole in the roof so that atmospheric precipitation does not penetrate into it.
- In most cases, the chimney pipe is a continuation of the stove, i.e. on top of it, the required number of rows of bricks is completed to the attic floor.
- The next element is fluff. In the fluff, the width of the pipe is 2-3 times its usual size while maintaining a constant internal section. The thick walls of the pipe are a kind of buffer that protects the flammable elements of the attic system from contact with the heat passing through the pipe. At this level, the air is still too hot due to the close proximity of the oven.
- Next comes the riser - a piece of pipe from the attic floor to the top of the roof. It is a brick pipe in its usual section.
- At the place where the pipe exits the roof, according to technology, there should be an “otter”, but it is often neglected. The element is similar to fluff, but is installed in such a way that a brick peak is formed above the roof, repeating the angle of the roof. An otter is needed in order to close the hole through which the pipe exits from precipitation. Usually, a special apron (metal or other material) is placed around the otter to provide better protection.
- Further, the neck of the pipe rises above the roof - the external analogue of the riser.
- The whole structure ends with a head, which is a small visor. It is rather a decorative traditional element of the pipe, since its protective functions are minimal. For this reason, the head is also often neglected.
- A metal cap is installed on top of the head, which protects the chimney from rain and debris getting inside.
The efficiency and safety of heating equipment - a furnace and a boiler - the principle of operation of which is based on fuel combustion, is determined by the state and technical parameters chimney. most wanted and robust design for private households and baths is a brick chimney. He is attractive appearance, good traction and easy operation.
High-quality construction of the chimney provides for strict adherence to all stages technological process, which is associated with brickwork.
General rules for the construction of brick chimneys
When building a chimney structure for a private house, it is important to consider a number of basic rules:
- Installation of chimney elements starts from the bottom up.
- The inner pipe is installed in the previous structural element, and outer part- mounted on top. This provides protection against the formation of condensate on the insulation layer, which is located in the inner part of the circuit.
- Clamp connectors are used to fix the chimney pipe with triple and branch elements.
- Connecting sections should not be located at the level of floors or roofing cake.
- The tee is mounted on a support bracket.
- Every 200 cm of the chimney pipe is fixed in the wall with reliable fasteners.
- When fixing the pipe to the wall surface, there should be no deflections or deformations of the chimney. This will result in reduced thrust in the finished system.
- The smoke channel should not come into contact with the main communications: electrical wiring, gas pipe, water pipes, ventilation.
- When exiting the chimney through ceilings and roofs, it is necessary to make a small indent of 15 cm for heat-insulated pipes and 30 cm for non-insulated pipes.
- The creation of horizontal sections of the flue system, the length of which exceeds 100 cm, should be avoided.
In addition, when arranging the chimney, the thermal expansion parameter of the system should be taken into account.
When using flammable materials for roof installation, the chimney is equipped with a special spark arrester made of metal fine mesh (mesh size 5 × 5 mm).
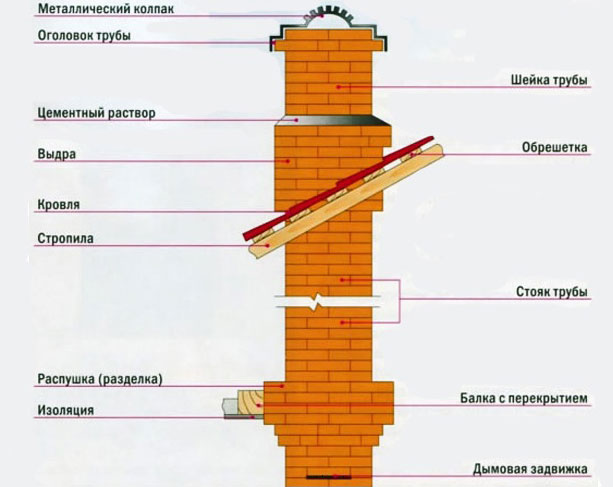
Structural elements
Structurally furnace chimneys consists of several sections, each of which has its own purpose and technical features. The design of the chimney is represented by the following elements:
- Beam with overlap.
- Fluff.
- Pipe stand.
- Rafters.
- roofing.
- Otter.
- crate.
- Cement mortar.
- Pipe neck.
- headline.
- Iron cap.
The main purpose of the chimney is to quickly and safely remove the products of combustion of the fuel material from the combustion chamber to the outside. To do this, the chimney pipe is connected to the internal channels that the furnace equipment is equipped with.
Fluff - a wide part of the chimney pipe, which is located at the site of its output through the ceiling of the attic. It is designed to protect floor beams from the negative effects of high temperatures. The wall thickness is from 32 to 40 cm, which ensures high-quality insulation up to 25 cm thick.
Otter is a technically complex section of the chimney system, which serves to protect the roofing material and pipes from the negative effects of precipitation and condensation. In addition, it provides the necessary space for laying the waterproofing material.
The neck of the chimney is a structural element that is equipped with a smoke valve to adjust the draft.
Riser - a straight piece of pipe, made with even masonry, which is located in the attic between the fluff and the otter.
Head - part of the chimney, which forms a special visor made of brickwork, providing the necessary protection of the pipe from external negative factors.
Iron cap - structural element in the form of an umbrella or cap, located above the head of the pipe. It is designed to protect the internal flue duct from clogging.
Calculation of the parameters of a brick chimney
For quality installation chimney system, a preliminary calculation of the main parameters is required - the height of the pipe and the cross section of the channel for the removal of gases. This will ensure excellent traction and safe operation of the structure.
Pipe height
This parameter is determined on the basis of technical requirements:
- The minimum allowable height difference between the grate and the head is 5 meters.
- If the roof is made of flammable materials, the height of the chimney head will be 150 cm; when laying a roof made of non-combustible material, the height will be 50 cm.
The presence of a parapet or ridge should not interfere with safe operation chimney. For this, the following rules are observed:
- When the pipe is located at a distance of 150 cm from the ridge or parapet, its elevation above them is 50 cm.
- When removing the chimney head from the parapet and the ridge at a distance of 150 to 300 cm, no additional elevation is required.
- When removing the head from the edge of the roof by 300 cm, it can be located below the ridge to a height along an inclined straight line with an angle of 12 degrees.
If a tall building is located on the site, the chimney should be 50 cm above its roof.
Channel section
If the chimney is equipped for a metal furnace or for a solid fuel boiler, then the calculation of a suitable section is carried out taking into account working capacity equipment:
- Power - up to 3.5 kW, cross section - 14 × 14 cm.
- Power - from 3.6 to 5.1 kW, cross section - 14 × 20 cm.
- Power - from 5.1 to 6.9 kW, cross section - 20 × 27 cm.
- Power - from 7.1 kW, cross section - 27 × 27 cm.
Data on the power of factory heating equipment are indicated in the technical data sheet. For homemade devices, a similar parameter is calculated by the formula:
W = V×0.63×0.8×E/t, where
W is the power of heating equipment (kW).
V is the volume of the furnace compartment (cubic meters).
0.63 - coefficient of average load of the furnace compartment.
0.8 is a coefficient that determines the part of the fuel material that burns completely.
E - thermal energy fuel material (kWh / m3).
T is the duration of burning of one load of fuel (hour).
Thermal energy depends on the type of wood and its moisture content.
Types of brick
The operation of a chimney made of refractory bricks is carried out in special conditions with temperature changes, therefore, for its construction, it is necessary to use construction material best quality. From right choice depends on the safety and reliability of the structure, the resistance of the structure to cracking and deformation, and the reduction of the risks of creating a fire hazard situation.
first class
Solid refractory bricks are made from high-quality clay by long-term firing at high temperatures. It is characterized by the following features:
- Density consumable, lack of porosity, foreign inclusions.
- Smooth and even surface without deformations, potholes, cracks and other visual defects.
- When tapped, a clear and pleasant sound appears.
- Possesses high frost resistance and durability.
- It has an attractive red color with a slight yellowish tint.
second rate
A brick is obtained with insufficient firing of clay, therefore it is characteristic of:
- Deaf and short sound when tapped.
- Porosity and slight density of the structure.
- The presence of various deformations and defects on the surface.
- Desaturated orange or ocher shade.
In addition, this material has a low heat capacity, frost resistance and durability.
third rate
Bricks of the third grade are of low quality and burnt structure. They have the following features:
- too tall and ringing sound when tapping.
- Porous structure with low density.
- The presence of significant visual defects and flaws.
- Intense red and brown.
Burnt blocks are not able to withstand significant mechanical loads, therefore they are prone to cracking and deformation. In addition, they do not tolerate excessive heating and cooling.
For the construction of the chimney, building material of the first grade of grades M 150 and 200 is used.
Mortar for masonry brick chimney
Since the brick pipe consists of separate sections, which are characterized by various weather, mechanical and temperature conditions operation, therefore, masonry mortars are used for them different.
- If a root chimney is provided, then for the first orders from the foundation, a cement-sand mixture is used - 1 part of cement and 4 parts of sand. To increase plasticity, ½ part of quicklime is added to the mixture.
- The following sections are the beginning of the chimney masonry from the furnace to the fluff. They must withstand extreme temperature loads up to 400 degrees, so a binder mixture based on clay and sand is used for laying bricks. When passing the fluff from the room through the ceiling to the attic brick order also performed on a clay-sand mixture.
- Next is a section that serves to insulate the chimney by installing a metal box. The box is fixed around the chimney at the point of its output through the ceiling. As a heat insulator, non-combustible materials can be used - asbestos, mineral wool, expanded clay and vermiculite.
- The last section is the pipe riser, flue neck and otter, which are subject to excessive wind loads. Therefore, a mixture based on lime is used for laying bricks. A similar composition is suitable for arranging the head.
For the preparation of masonry mortar, clay of medium fat content is used, without a strong odor and foreign impurities, which can lead to cracking of the surface.
For the preparation of a cement-sand mortar, it is better to use mountain sand or ground brick from fireclay or ceramic bricks.
Step-by-step instructions on how to lay out a chimney
The construction of a brick chimney is a technically complex process that requires high-quality masonry in order to obtain an airtight, safe and durable structure.
First you need to choose the appropriate installation schemes for the chimney system. They can be ordered from design offices or found in ready-made on specialized resources. The dimensions of the future chimney design are determined at the planning stage and the necessary calculations.
Brick chimney laying is as follows:
- The construction of an overhead pipe, the lower part of which is seated on a thin layer of a solution of clay and sand. If there are several channels in the chimney, then a three-channel pipe can be used. But the masonry algorithm is preserved for any type of construction. Masonry is performed by the dressing method, when each subsequent row has a shift to the side by 0.5 bricks. On the 5th row, not reaching the floor beams, the installation of the pipe is completed.
- Fluff is being laid. The outer expansion along the perimeter should be 590 × 450 mm, the internal one - 140 × 270 mm. The expansion is carried out by shifting the edge bricks by 5 cm. After the fluffing is completed, the expansion must be thermally insulated with 10 mm asbestos sheets or other selected material.
- Laying the otter requires scrupulousness and care, as the rows are laid outward with the creation of a special ledge. The first row is similar to the previous row of fluff expansion, then you need to lay out the second ledge and subsequent ones.
- Riser installation. Masonry is carried out in the attic close to the roofing system of the building. It must be brought out through the roof with an elevation above the ridge of the building to a height of up to 100 cm. The brickwork is completed by the organization of a chimney neck, at the end of which a cap is erected and a protective cap is installed.
Chimney on the roof
An important stage in the construction of the chimney is the waterproofing of the pipe during the passage of the roofing.
Often, for these purposes, a prefabricated metal box is used, the lower part of which is hemmed refractory material, and the internal space is filled with a heat and waterproofing layer.
Outside, the roof penetration is protected by waterproof waterproofing on an elastic basis. It has high flexibility and is able to take any given shape. Installation is carried out using bituminous mastic or roofing screws.
Subject to construction technology, you can get a safe, reliable and durable chimney. With the necessary knowledge and minimal experience with bricks, you can independently organize a high-quality chimney system without the involvement of third-party specialists.
In the last decade, there has been a sharp increase in the construction of dachas and country houses for heating which fireplaces and stoves are used. But such devices cannot work without a chimney. Previously, stoves and, accordingly, chimneys, were laid by experienced stove-makers, whose knowledge was passed down from generation to generation. Today, the experience of the old masters is almost completely forgotten, but thanks to the use of the latest materials and developments, the construction of a chimney is not a problem, especially since a high-quality sandwich pipe can be purchased at a store. However, many continue to build for fireplaces brick chimneys, considering them the most authentic and durable. How to build a correct and high-quality chimney for your heating equipment will be discussed in this publication.
Learning the Basics
Before you start laying a brick chimney, you should study SNiP 41-01-2003, which regulates the creation of heating systems in private homes. You should especially carefully read section 6.6 of this set of rules, which contains all the parameters of chimneys.
There are three main types of flue pipes:
Consider the elements of the most common mounted chimney. It consists of:
- Packed pipe, which is located on the ceiling of the furnace. The laying of this section of the chimney is done with the dressing of each brick in a row with bricks of the next row. The laying of this section is done almost to the ceiling, not reaching it 5 rows.
- Next comes the expansion of the masonry, without increasing the internal dimensions of the channel. This area is called "fluff". Fluff (cutting) is placed with expansion from row to row to the passage through the ceiling.
- A straight chimney is placed on the fluff (already in the attic) - a “riser”. This part chimney comes to the roof.
- To pass through the roof, an extension of the “riser” masonry is made, which is called the “otter”. It prevents moisture from entering the attic through the roof.
- A straight section of the chimney is laid, which is called the "neck" of the chimney.
- It, again, ends with an extension. An umbrella or deflector is mounted on the head to prevent debris, precipitation, etc. from entering the channel.
The figure below shows a standard type of chimney with an indication of all its elements. 
Choosing a chimney masonry scheme
A masonry scheme is a drawing of an ordinal brick laying, following which a chimney is created with certain parameters (the shape and section of the channel, the laying and dressing of each row of bricks). There are many masonry schemes, among which the most popular among our ancestors were chimneys:
- Direct.
- Vertical single-turn single-channel.
- Vertical single-turn multi-channel.
- Vertical multiturn.
- Straight cuts.
- Countercurrent with cuts.
When choosing one or another masonry scheme, one should focus on the purpose of the heated room, type and power heater, the type of fuel used, the required heat capacity of the chimney itself, the feasibility of a certain design and the material from which it is composed.
The cross-sectional area of the flue duct should be calculated: 0.08 m 2 of the cross-sectional area of the chimney should fall on 1 kW of heating equipment power.
Heat capacity should be considered in more detail.
As you know, the chimney serves not only to remove the products of combustion of fuel, but also as an additional source of space heating. Since the gases discharged into the pipe have a high temperature, why not use them for heating, for example, an attic space?
Single-turn multi-channel chimneys have the highest heat capacity with comparative ease of construction. The choice of such a scheme depends on the purpose of the room. For example, laying a chimney from three wells, experts recommend using in baths. The five-channel scheme is best used to remove gases from a residential building.
Brick, mortar and necessary tools
 For the construction of a brick smoke exhaust system, the required amount of brick and a specially prepared mortar will be required. The brick should be red, solid and burnt, with a flat surface and right angles. Cracked bricks are not allowed.
The use of high-quality, even-edged bricks will allow you to build a chimney with the same and thin seams.
Mortars for laying chimneys are simple, complex and mixed. A simple type of mortar includes a binder and an aggregate. Mixed and complex solutions include several types of binders and aggregates. As astringent components of the solution are usually used:
- clay.
- lime mixture.
- Gypsum mix.
- Cement.
The most commonly used aggregates are pure sifted sand. The solution, where clay is used as the main binder, is used for laying stoves and fireplaces and sections of chimneys up to the roof. The simplest and most “time-tested” clay mortar for laying chimneys consists of sand and clay in a 1:1 or 2:1 ratio. Mass fraction sand in the solution depends on the fat content of the clay. The volume of water should be equal to a quarter of the volume of clay used.
Determining the "fat content" of clay is quite simple: it is necessary to form a ball from clay, about 50 cm in diameter. After complete drying (about 3 days), look at the product. If there are cracks, then the clay is greasy. If, when a ball falls from a height of a meter, it does not break, then such clay can be used to prepare a solution.
The quality of the prepared clay mixture can be determined as follows: lower the trowel soaked in water into the solution (without aggregate). If clay sticks to it, then the composition is “fat” and sand should be added. If the mixture pushes out water, then it is “skinny” and you need to add clay.
It is better to start making a mortar for laying a chimney in a shallow and wide container. First, soak the required amount of clay. After a while, the clay must be shoveled, breaking up lumps. Add more water if necessary. When the clay is soaked, you should shift its layer to the flooring and moisten with water. Cut into plates with the blade of a shovel and shovel again. This procedure should be repeated 3-5 times until all lumps are completely broken and the solution turns into a plastic and homogeneous mass. If necessary, sand should be added to the solution. 
Now a few lines about the tool. To build a brick chimney, you must have the following tools:
- Master OK.
- Kirochka.
- Level.
- Roulette.
For sawing material, it is best to use a "grinder" with a set of cutting discs.
Instructions for self-laying the chimney
Consider the most a simple circuit wall-mounted chimney masonry with one straight channel.
The first thing to do is to prepare the clay solution. It should be prepared at the rate of 2.5 buckets per 100 pcs. bricks.
- The first row is laid out of five whole bricks. With this scheme, the cross section of the smoke channel will be 140 mm by 270 mm.
- For the fourth row of fluff, its outer dimensions should be 570 x 710 mm.

- The last row of fluff is laid out already in the attic.

- To pass through the roof, an otter is created, consisting of nine rows of bricks.

- The fifth row of this element should begin to bridge the gap between the chimney and the roof.

- The next two rows continue to form the pipe extension. The final part of the construction of the Otter is the ninth row, which should be the same size as the eighth.

- The neck of the chimney is laid out.
- The height of the neck masonry depends on the shape of the roof and the height of the ridge. If the pipe is from the ridge in the range from 1.5 to 3 m, then the neck is displayed to a height of 500 mm above the ridge. If the chimney is located at a distance of more than 3 m from the ridge, then the neck of the chimney is laid out with the ridge at the same level.

- The last step in the construction of a brick chimney is the creation of a cap. It is made of two or three rows of bricks.

Observing the dressing, the first section of the pipe is laid out, which ends 5 rows before the ceiling. 
Check your work with a level both horizontally and vertically.
We begin the formation of fluff. Watch the channel sizes. During the formation of the fluff, plates cut out of bricks with the help of a “grinder” should be inserted 
For each subsequent row of fluffing, the thickness of the plates should be increased, observing the dimensions of the channel 140 x 270 mm.
Next, the formation of the so-called riser begins. 
This element is erected so high that the structure is one row higher than the roof. 
The sixth row should completely cover the gap between roofing material and chimney.
Watch the channel size. It must not change over the entire length of the flue pipe.
Upon completion of the construction of the chimney, install a protective umbrella on its head to prevent debris and precipitation from entering.
 Basic technologies for obtaining nanomaterials
 How to tell the time in English?
 Introduction to Multivariate Statistical Analysis
 Presentation of the analytical report of the history teacher
 Presentation on the topic "atherosclerosis"
 History of number systems
 Apple in mythology and Russian folklore