Gable roof for a bath 4x4. Bath roof: types, designs, roofing materials, construction technologies. Installation of a gable truss system
The final process in the construction of the bath box is the overlapping of the roof. After that, you can already begin to finish the bath from the outside and from the inside, as well as purchase various equipment and accessories for relaxing in the bath. In order for the bath to serve for a long time, and its ceiling does not leak during rain, it is necessary to properly mount the roof, as well as provide it with good heat, steam and waterproofing. Next, we will consider in detail the process of building a bath roof with our own hands.
- Article
- Video
Before we move on to do-it-yourself roof construction technology, you need to understand the elements of the roof frame, as well as the basic terms that roofers use.

The main purpose of the frame is to support its own weight, the weight of the roofing material, as well as the weight of snow, rain and auxiliary equipment (for example, a module or a satellite dish). That is why the strength and stability of the frame are important indicators.
The roof frame of any building consists of a mauerlat, truss truss, battens and roofing material.
It is called a wooden beam, designed to connect the base of the building box (body) with the roof frame. It is with the creation of the Mauerlat that the installation of the bath roof frame begins. If the bath is made from a log house, the uppermost crown can serve as a Mauerlat, but if the bath is made of foam block or brick, the Mauerlat is laid on the material to be welded. The Mauerlat is fastened to the walls using long anchors. Before installing the Mauerlat on the walls of the building, it is necessary to cut special holes in it for attaching the rafter structure. The main requirement for installing a Mauerlat is its ideal horizontal position, because. the quality of fastening the roof frame to the body of the building will depend on this.
The next structural element of the roof frame - roof truss. The purpose of the truss truss is to evenly distribute loads over the entire roof. There are several forms of truss truss, we will talk about them a little later. The truss truss consists of wooden beams interconnected. The main element of the truss truss is the rafters, to which the auxiliary elements are attached. As for the latter, they include crossbars, ties, spacers and lintels, the purpose of which is to strengthen the structure of the truss truss.

Frame crate the roof of the bath is designed so that it would be possible to carry out high-quality fastening of the roofing material to the rafters. The crate is presented in the form of wooden bars and boards fastened into a grid. The number and size of the cells of this grid is calculated based on what material the roof will be covered with. For example, to cover the roof with roofing felt, there should be no empty space at all (maximum 1 centimeter slots), and in order to cover the roof of the bath with corrugated board, you can create a crate with cells 0.5 meters wide.

roofing material the roof of the bath is chosen according to the taste of the owner of the building. The most popular materials for the roof of the bath roof are corrugated board, metal tiles, slate and roofing material. Each of the listed materials has its own installation features and requirements for the angle of the roof. For example, a roof with an angle of 5 degrees is covered with roofing material, 8 with corrugated board, about 30 with metal tiles, and 20 with slate.


Most often, the installation of a gable roof for a bath is carried out if the owner is going to make an attic room in the bath.
There are two ways to install rafters when creating a gable roof:

The design of a gable roof is more popular than a single-pitched roof, because. in this case, the angle of inclination of the roof will be sharper, which will prevent the formation of snow marks on the roofing material. gable roof is a series of isosceles triangles, identical in size and shape, installed in the same place along the entire roof. The top of the wooden triangle of their rafters is usually called the ridge, and the transverse wooden beam under the top of the triangle is called the crossbar. The crossbar is designed to strengthen the structure of a gable roof. The smaller the installation step of the truss trusses, the more stable the construction of the bath roof will be. We draw your attention to the fact that roof trusses are assembled on the earth's surface, after which they are fed to the roof. The roof trusses are fixed to the body of the bath after the ceiling beams are installed (can be done later). To make it easier to create identical wooden triangles, roofers use special blanks.
Installation of a gable roof is carried out as follows:
- Mauerlat is attached to the wall of the bath
- A truss truss is being created
- Two roof trusses are installed at opposite ends of the roof. To fasten the rafters to the Mauerlat, wood grouse screws are used.
- To ensure the stability of the fixed roof trusses, the structures are additionally reinforced with special struts.
- A rope is pulled between the extreme rafters at the level of the ridge, which will show the exact installation location of the remaining truss trusses (so that the row runs smoothly, in one line)
- The rest of the roof trusses are installed along the rope in the same way.
Installation of a shed roof for a bath is a less popular event, because. in this case, the angle of inclination of the roof will be more gentle, which entails the formation of snow marks on the roof of the bath. Very often, under the weight of snow, roofs begin to deform and collapse.
You can see the design of a pitched roof on this project:


As you can see, the rafter supports of different heights rest on the walls of the bath and hold the entire roof frame. The greater the difference in height between the supports, the steeper will be the angle of incidence of a shed roof for a bath. We draw your attention to the fact that the installation of a sloping roof will cost an order of magnitude cheaper than the installation of a steeply dipping one.
As in the case of a gable roof, the frame of a shed roof for a bath is mounted on a Mauerlat. Fastening should be carried out using metal corners, as well as copper wire. The installation step of the truss trusses should be about 0.6 meters. In order to protect the outer walls of the bath from rain, it is recommended to take out the rafters outside the bath box at a distance of 0.3 to 0.5 meters.
You can see more details on the construction technology of a single-pitched and double-pitched bath roof with your own hands in the detailed video tutorials:
Shed roof construction technology
Construction of a gable roof bath
Installation truss system do-it-yourself baths
After the bath roof frame is mounted, it is necessary to carry out hydro, steam and thermal insulation of the roof.
Measures for waterproofing, vapor barrier and insulation of the roof of the bath
Roof steam and waterproofing


Initially, you should pay your attention to the fact that the roof frame must be made of well-dried lumber. In addition, wooden beams and boards must be manually opened, which will prevent the wood from rotting and increase its service life.
For steam and waterproofing of the roof of the bath, it is recommended to use roofing material (for waterproofing), as well as a membrane film. The roofing felt is attached to the rafters in 2 layers, this will provide a sufficiently high protection of the roof frame from atmospheric precipitation.
Concerning membrane film, it is a good heat-insulating and waterproofing material. In order for the film to function properly, it must be laid on the rafters and fixed with construction tape. Strips of membrane film must not be wider than 15 cm. Each new strip must overlap the previous one. We draw your attention to the fact that it is forbidden to stretch the film on the rafters, this can lead to damage as a result of lumber deformation (expansion, narrowing) during heating and cooling (hot summer).
Bath roof insulation


Speaking about the insulation of the roof of the bath, you need to pay attention to a few important nuances this event:
- It is recommended to insulate the bath roof with mineral wool. It does not burn, is durable and holds heat well.
- It is not recommended to use polystyrene foam to insulate the roof of the bath with your own hands, because. this material emits harmful substances when heated. Liked the article? Share this bookmark with your friends on social media. networks:
In private construction, the construction of a bath is special ritual, in which not only the desire to create a washing room is invested, but something more. The bath is a reflection of the soul of the house, a place for rest in spirit and body.
The construction of the bath is completed by the erection of a roof over it, which must immediately meet many quality and appearance criteria. Let's figure out how to do it gable roof in the bathhouse on our own, and also illuminate others possible options roofing structures applicable to cover the bath.
In this article
The choice and calculation of the design
Depending on the plans for the attic and aesthetic preferences, the roof for the bath can be made in two types:
Before you make a roof on the bath, you need to calculate it. Let us consider in detail the process of calculating and designing a gable structure, as the most popular and common:
- Structure measurement and level check. Design begins with the measurement of the bath. As a rule, baths are rectangular or square structures, convenient for the quick construction of a gable roof. The data obtained is transferred to paper in the form of a drawing.
Special attention it is necessary to pay attention to checking the level of the walls of the building - building codes allow a deviation from the horizontal level of no more than 1 cm per 5 linear meters. If the deviation is greater, this must be taken into account when laying the Mauerlat. - Calculation of the angles of inclination and height of the ridge. The calculation of these parameters is dependent on each other: the higher the ridge of the bath, the steeper the slopes and the more usable space in the attic.
Tilt angle
The angle of inclination depends on the weather conditions of the region - its choice is influenced by wind and snow loads. The steeper the roof, the better it gets rid of snow masses, but the worse it resists strong winds. The calculation of the snow and wind load of the roof is done according to the SNiP data and maps dividing the country into special natural zones.
The slope of the slopes also depends on the chosen roofing material, each of which assumes the presence of its own interval of the possible slope of the slopes. It is possible to get acquainted with these data in specialized tables or characteristics of roofing materials.

Thus, the choice of the angle of inclination and height cannot be made "at will", but must be the result of painstaking computational work.
Choice building materials. Design and calculations are important when choosing and purchasing building materials. Accurately made calculations make it possible to determine the required sections of the timber for the rafters, the need to create a sparse or continuous crate. These parameters are related to the obtained roof load data.
The amount of insulation, waterproofing film and roofing depends on the area of the planned roof. When buying building materials, you should always purchase 15-20% more materials for possible overruns due to overlapping or waste.
Having created a plan for the future roof, you can actually move on to the main issue - building a roof for a bath with your own hands.
Construction of a gable roof for a bath
Construction of the truss system
The roof structure is based on a truss system, which is a complex of wooden elements:
- Mauerlat - the base that supports the entire structure on the walls of the building;
- Rafter trusses - elements in the form of isosceles triangles, the legs of which are rafter legs. It is the shape of the triangle, as the most stable figure, that allows the gable roof to withstand large external loads;
- Lathing - a system of a sparse or solid nature, which allows you to attach roofing material to the rafters.

All wooden elements of the roof structure are made from dried wood with a moisture content of not more than 20% without knots and cracks. Before installation, the wood is processed by special means to prevent the formation of mold, fungus and wood damage by pests.
There are two ways to build a truss structure:

When calculating and choosing a material for the truss system, it is taken into account total load on it, which depends on its weight of the structure, snow load, etc. As a rule, rafters are made of wooden beam section 50*100 mm.
Consider how to properly make a truss system for a gable roof:
- Mauerlat is laid on walls insulated with a layer of roofing material and attached to them with anchor bolts, studs or twist. In a bath from a bar, the role of the Mauerlat is performed by the upper crowns, fastened with brackets;
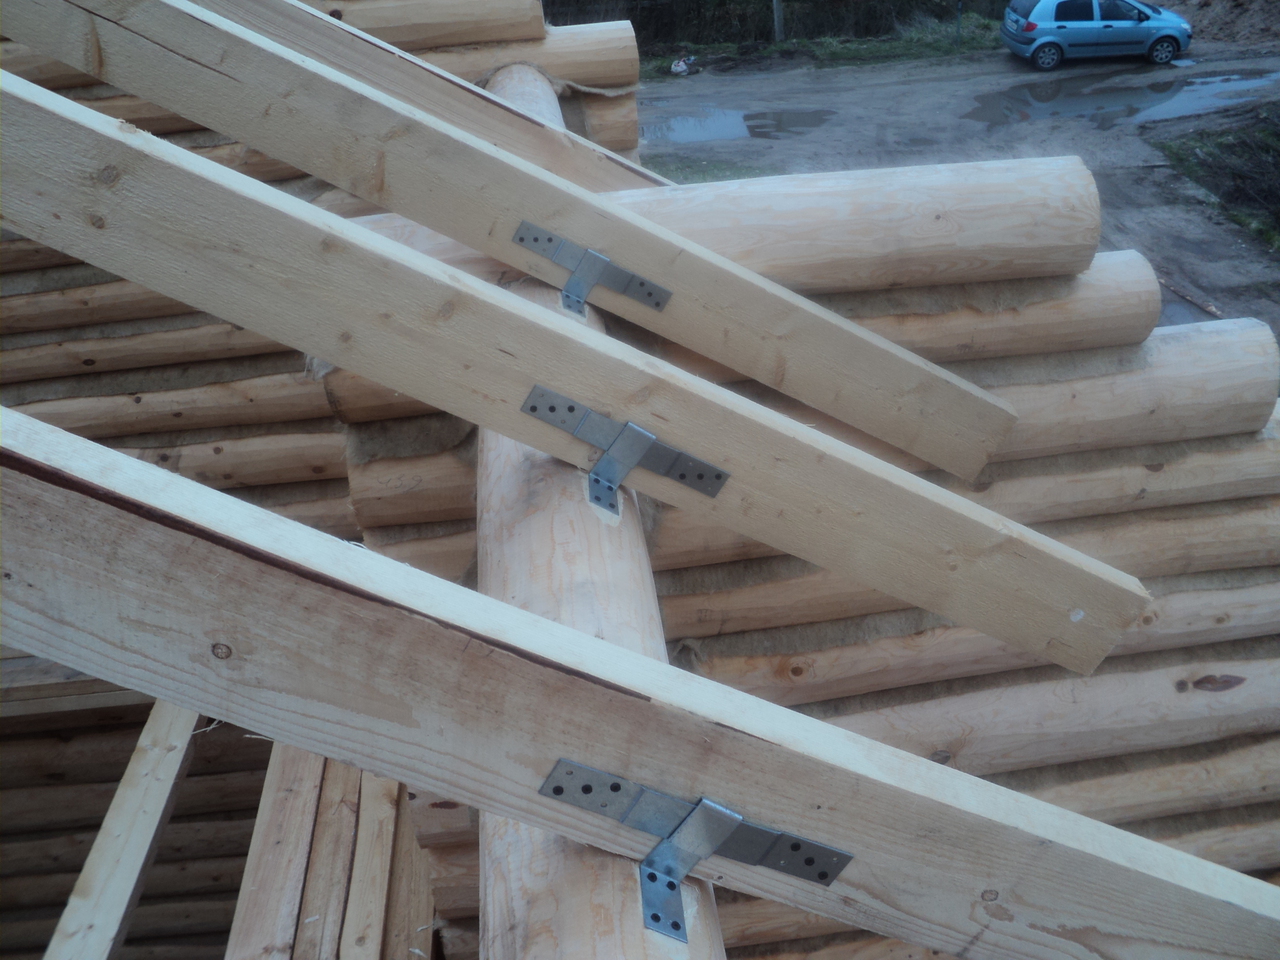
- Rafter trusses are fastened at the top with a metal plate. First of all, the extreme trusses are mounted, and then, according to the level set by them, the rest are set through a gap of approximately 60 cm. The rafter legs can be fastened to the Mauerlat by cutting or metal elements.

Roof decking and insulation
An important point in the construction of a roof structure is its vapor and waterproofing. The protective material is spread over the rafters with an overlap of up to 10-15 cm at the joints of the material and fixed with nails or staples. It is important to create ventilation gaps between the waterproofing and the roof. To do this, a counter-batten is created under the crate system.
Next, the crate is stuffed, the step of which depends on the selected roofing material. Under soft roofs a continuous crate is made of moisture-resistant plywood; for other materials, the step of the system can be increased to 40-50 cm, depending on the slope of the slopes.
If you wish to create warm roof a heater is used for the bath, which is laid from the side of the attic between the rafters and sewn up with a layer of vapor barrier material.

Installation of roofing material and pipe outlet
One of the finishing types of work is the installation of roofing material on the bath roof. Regardless of the chosen roof, the order of work will be as follows:
- Laying the first row of roofing along the cornice, maintaining the level and firmly fixing the first row of material;
- Installation of the following rows of roofing from the eaves up to the ridge. Each next row is overlapped with the previous one from 10-15 cm to avoid roof leaks;
- Lastly, the roof ridge is equipped, the options for which vary depending on the chosen roofing material.
An important point in the construction of the roof on the bath is the question: how to make a chimney? It is most advisable to bring the pipe in the bath through the roof 30-50 cm from the ridge with an elevation of 50 to 100 cm above the roof. The passage of the pipe through the roofing pie, the materials of which ignite easily and quickly, must be associated with the mandatory insulation of the pipe. To do this, a special manhole is made in the built roof, the walls of which do not allow the pipe to come into contact with combustible elements of the roof.
The final work is the installation drainage system, sewing roof overhangs and facing roof gables.

Other types of roofs for a bath: the main points of design and construction
To cover the bath, other types of roofs can also be used - shed or unequal. Compared to a gable, they are not so practical, but they have a number of reasons for building just above the bath. Consider their main features.
Shed roof
Consider how to make the roof of the bath in the form of a shed structure. This type of roof can be used if necessary to cover the bath enough small sizes or in the case when the bath is an extension to the main building. To use such a design, one of the walls of the building is made higher in order to obtain the required angle of inclination of the roof. It is recommended to observe the slope of the slope within at least 20° for less load on floors, and in regions with snowy winters, increase this figure to 45°.
Calculation and construction of a shed roof for a bath with their own hands, in principle, repeat all the points above for a gable construction. Let's dwell on some points that are typical for a roof with one slope:
- When calculating the angle of inclination pitched roof an indicator of the amount by which it is necessary to raise one of the walls of the building is taken into production. The larger it is, the steeper the erected roof will be and the less load on its truss system;
- The support points of the rafters are the Mauerlat, fixed on the walls of different levels.
The remaining operations for the construction of a shed roof are identical to the order of work for a gable roof described above.

Roof with unequal slopes
An interesting version of the roof for a bath is a design with two slopes. various lengths and angle of inclination. A longer and gentler slope in this case can be a canopy over the veranda adjacent to the bath. With seeming attractiveness, this type of roof for a bath has two drawbacks:
- Due to the small height of the roof above the bath, the dimensions of the veranda will turn out to be very small;
- The dimensions of the attic are very small and do not allow it to be fully used for storing household items.
Considering that the calculations and construction of an unequal roof are fraught with a lot of difficulties, the construction of such a roof over a bath is irrational.
Summing up
The erection of a roof over the bath as a whole follows the basic rules for the construction of roofs. The predominantly small size of the baths dictates special wishes for the roof being erected, which is most consistent with the gable roof. It allows you to create a durable, comfortable and outwardly attractive roof over a bath structure with the lowest economic and construction costs.
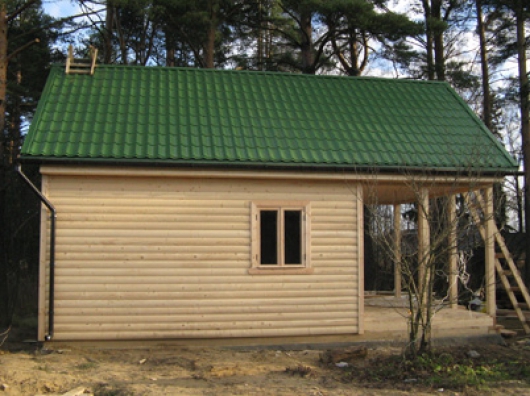
A bath is a sanitary and hygienic building, which is very popular among the population of Russia. It has become an obligatory part of leisure and recreation, a way of life of the Russian people, so not a single country or even garden house. If there is enough space on the site for construction, then a free-standing bathhouse with a gable roof the best option. It will be easy to maintain optimal temperature, the building will be a reflection of ancient traditions in architecture. This article will tell you how to build a gable roof that retains heat with your own hands.
The gable roof of the bath is formed by connecting two planes that are located at an angle to each other, called slopes. This is one of the easiest roofing structures to design and install with your own hands. In the frontal projection, it has the shape of an isosceles triangle, which is considered traditional for this type of building. The gable roof consists of the following parts:
- Rafter frame. This term refers to a set of elements that provide support for the roofing material. It includes: Mauerlat, rafters, tightening, ridge run, racks and struts. The truss frame is made of high quality wood coniferous trees. The composition and relative position of its parts is calculated in accordance with the expected load, which is influenced by the weight of the roofing material and the amount of precipitation in winter time. Rafters, like a supporting skeleton, give shape and rigidity to the structure, protecting it from destruction. For the construction of the roof of the bath, hanging or layered rafters are used.
- Roofing cake. This term refers to the roofing material and the waterproofing layer, which are laid on the crate, based on the rafters. As a waterproofing, roofing material is more often used, which has a greater margin of safety than polyethylene films and diffuse membranes. To cover the slopes of the bath, use corrugated board, metal tiles, ondulin or slate.
- Gables. The gable roof has two triangular pediments, which are a continuation of the end walls. The pediments are sewn up with lighter lumber or made of the same material as the facade of the building. Bathhouses made entirely of timber or logs have a better heat retention capacity, but they are more expensive due to the greater use of lumber and the difficulty of DIY assembly. To reduce fuel consumption to maintain the temperature, the pediments are insulated inside or outside, the gaps are closed and lined with decorative material.
Note! The microclimate, which is installed in the bath, is an aggressive environment for building materials. The difference between the internal and external air temperatures, heat and humidity have a detrimental effect on wood, so any instruction for building a roof for a bath with your own hands involves processing with antiseptic and moisture-proof compounds. The high risk of fire explains the need to use flame retardants to protect the rafters from fire.


Types of structures
A gable roof is the most rational and popular type of roofing structure used for building do-it-yourself baths. She wants the building to look like a traditional tower, making it not only functional, but also aesthetic. Experienced craftsmen talk about the possibility of arranging two types of gable roofs:

Important! If the bath is carried out as an extension to a residential building, then the most rational option for overlapping is a shed roof. It looks less presentable and has less energy efficiency, however, it costs much less and is built faster.
truss system
The set of wooden elements that support the shape of the roof is called the truss system. It consists of roof trusses, each of which has the shape of an equilateral triangle, its base is equal to the width of the bath, and the legs are rafters. Triangle - the most persistent geometric figure, so the roof frame can withstand significant loads. For the construction of a gable roof, two types of frames are used:

Note! When determining the composition of the rafter frame, its own weight, the mass of attic floors and seasonal snow load are taken into account. The thickness of the rafters is determined in accordance with the length of the slope, the width of the step between the legs and the type of roofing material. In order for the roof to last longer, a small reserve of strength should be left, which will prevent breakage in extreme weather conditions.
Installation
The construction of the roof is a technically complex process, therefore, when building with your own hands, it is important to thoroughly follow the recommended technology. Installation work perform in dry weather to keep the elements of the truss frame dry. From the tools you will need a grinder, a jigsaw, a screwdriver, a drill, a construction stapler. Assembly is performed in the following order:

Important! Since the bath implies the presence heater, then The final stage roof construction - removal of the chimney. It should be located at a distance of 30-50 cm from the ridge and rise above it by 50-100 cm.
Video instruction
Most owners of private houses build a bathhouse on their site. Laying the foundation and erecting the walls is only part of the job. It is also necessary to properly make the roof with your own hands, since it will depend on how much the building can withstand precipitation. Only a set of correctly performed works can guarantee you a high-quality result and comfortable conditions in the bath. This can be achieved by following step by step instructions for building with your own hands.
Bath roof designs
Before proceeding with the construction of the roof in the bath, you need to choose best option. It should be as simple as possible, but reliable, as it is needed to protect the building from rain and snow.
Most often, baths are:
- attic;
- unattractive.
The design of the roof itself depends on this. It also affects the frequency of the bath. For the one to be used all year round, it is best to choose a gable with an attic, as it is warmer. There you can equip a room for relaxation.
Summer baths are usually built without an attic, but designed to install a tank of water for heating under the sun. Such a roof is easier to build.
According to their shape, roofs can be:
- lean-to;
- gable;
- multi-slope.
Shed roofs are the simplest. Usually used when attaching a bath to the main house or other building. At the same time, the rafters firmly rest on opposite walls at a certain angle of inclination.
The optimal angle of inclination is 20–30 °, but if the bath is being built in areas with increased level precipitation, this parameter increases to 45 °.
Gable roofs are arranged on separate structures. They consist of two parts, connected to each other at an angle. For areas where a large amount of snow falls in winter, the connection angle should be quite sharp (from 45 to 80 °) so that precipitation can easily go off and not press on the roof from the outside. And in areas where frequent winds - minimum slope so that in case of strong gusts it does not fly off the bath.
Multi-pitched roofs are usually not built on small baths, as this is not entirely rational and convenient. But if a large bath complex is being built, then it will be appropriate here. She has a wonderful appearance, and allows you to arrange additional premises under your arches (rest rooms, billiard rooms, storerooms, etc.). The disadvantage of the roof is the complexity of its construction.
That is why masters often choose this option.
How to make a gable roof scheme
The best option for small bath is a gable roof. It is inclined and hanging. The first option for greater stability is equipped with additional wooden stops. Hanging systems rely only on Mauerlats or ceiling beams. At the top, the rafters are held on crossbars.
Installation preparation: dimensioning, drawings
For convenience, all calculations will be made for a bath with a side of 5 m. It is recommended to build it from sawn timber, and use the top row as a Mauerlat.
Before making rafters, it is necessary to make all necessary calculations and measurements, as well as determine the angle of the roof and the dimensions of the wooden elements.
Certain loads act on the roof system:
- the mass of rafters, lathing and the roofing material itself;
- weight of workers;
- the probability of natural disasters (they are not taken into account in our country, since they have a low percentage of the probability of their occurrence).
When calculating the thickness and width of the elements of the truss system, take into account the totality of all types of loads.
The lower elements of the rafters are placed on the Mauerlat, and they bear lateral and vertical loads. Horizontal ones are placed on crossbars. The ridge part of the rafters takes over the compression forces in the horizontal direction. Rafter spans are subject to the greatest degree of bending.
When calculating the load, it is necessary to use correction factors that depend on the height of the house.
There are also snow load values depending on the climatic zone.
Belonging to a certain climatic zone can be viewed on a special map.
The choice of material for the roof
The wood that is used to build the truss frame should have a minimum number of flaws (primarily knots and cracks).
Pine or spruce boards are most often chosen for the construction of the bath roof because of the high degree of strength. This wood is easy to work with. Experts recommend using grade I lumber, well treated with antiseptic and antifungal agents. But for a small bath, grade II or III material is suitable.
It is possible to use glued timber with a high degree of strength without signs of deformation. But this material is expensive.
- 20% (if the inside of the bath ceiling is completely sewn up with finishing materials);
- 23% (if some elements of the roof will be outside, for example, a canopy over a veranda or terrace).
Timber for roofing should be dried naturally (in a dry room at a low temperature) for 2–3 years or in special chambers at the highest possible temperature.
There are a large number of materials for roofing:
- ondulin;
- metal tile;
- soft tiles;
- ruberoid;
- slate;
- euroslate;
- metal profile.
most sought after and available materials are metal tiles and corrugated board, which are characterized by low price and long service life.
The corrugated board is made of galvanized steel with a special coating. Its main difference from a metal tile is the thickness of the metal. For example, profiled sheets with a thickness of more than 1 mm are not intended for roofing.
The advantages of this material:
- high performance;
- ease of installation (sheets are easy to pick up according to the exact size of the roof slope);
- light weight;
- affordable price.
There are also disadvantages, for example, low soundproofing characteristics, less attractive appearance compared to metal tiles, short service life (about 5 years).
Advantages of a metal tile:
- high degree of resistance to corrosion;
- excellent sound absorption, which provides multilayer material;
- long service life (about 50 years);
- beautiful appearance.
Despite the positive qualities, it is not suitable for the device shed roofs, since its laying is carried out only at an angle of at least 14 °. The corrugated board has no restrictions.
Ruberoid is an inexpensive, but short-lived material. It is easy to install, does not require much labor. For a budget roof covering for a bath, roofing material can be called a completely acceptable option.
Slate is an affordable roofing material that is suitable for a bath. It has a fairly long service life (about 40 years), does not require additional care. Installation of slate sheets is carried out quickly, which is very important in the final stages.
The disadvantage of this material can be called a high degree of water absorption, therefore, after 2-3 years, moss and various harmful lichens may appear on it - painting will help to avoid this. The large fragility of slate is also a significant disadvantage. Therefore, it is better to pre-drill holes into which fasteners will be driven in.
What material and tools are needed
In order to build a gable roof for a 5x5 m bath, you need:
- boards (pine or spruce) - 50x150 mm (the distance between the rafters is recommended to be 90 cm);
- unedged board for temporary fixation of rafters;
- edged board - 20x100 mm (length 3 m);
- metal corners;
- metal plates - thickness 2 mm;
- bars - 50x50 mm;
- bolts with washers and self-tapping screws;
- glued plywood, OSB or unedged board for lathing;
- slats - 20x50 mm;
- insulation, vapor barrier and waterproofing material;
- metal tile or corrugated board.
Tools:
- Bulgarian;
- electric jigsaw;
- stapler;
- hammer;
- tape measure - length not less than 10 m;
- sharp knife;
- electric screwdriver;
- antiseptics and impregnations.
Construction of the roof of the bath: step by step instructions
To install the roof, you need to follow the following plan:
- Check the parallel arrangement of the Mauerlat (the degree of run-up is not more than 2–3 cm). Fixation dowels must be laid at the required distances.
- For a 5x5 m bath, six pairs are enough roof structures. In order to mount a large number of identical parts, it is recommended to perform one common template, which will greatly speed up the work.
- To make a template, you need to take three-meter boards, knock them down with a nail at the top. Nail a piece of horizontal rail to one board, which will serve as a template for making the crossbar. Its distance from the ridge should be no more than 40–50 cm. Fix the crossbar on one board, and nail it to the second after determining the angle of inclination of the lines.
- Raise the template up, install in place of the rafters. Change the angle of inclination and the distance of the takeaway so that the future skate is exactly in the center of the bath. After finding the right place, nail the crossbar to the second board. Strengthen the boards and the ridge with two or three more nails.
- Put the template structure on the supporting Mauerlat, mark the point of the future place where the rafters will coincide. Connect these elements with a beam and steel corners. Fasten a wooden plank to the template at the point of contact with the supporting element.
- At the location of the gables, vertically nail the bars. Their height should be similar to the height of the lines. To check the verticality, pull a building cord between them. Check the template along the entire length of the bath structure. Take a step of about 1 m, and look at the angle of inclination. The ridge part should go strictly along the cord. All irregularities can be removed during the creation of the crate. If the error is more than 1 cm, then it is necessary to adjust the template so as to reach the average values.
- If everything is done correctly, you can carefully remove the template and lay it on the ground.
- Lay the template on a flat base and attach one leg of the rafters to it. Control the device of the ridge part. Cut knots. Overhanging excess elements of the rafters can be sawn off before installation or after installation.
- The rafters in the ridge can be connected in several ways. One of them is the connection at the ridge part in half a tree.
- It is best to connect the lines at a 90° angle. To prevent displacement on both sides, the assembly must be fixed with steel plates. Fasteners should be evenly spaced along the entire length of the rafters.
- Now you need to make marks at the top and bottom of the rafters. Saw off the top at an angle, as a butt joint will be performed. The cut point should match the top and bottom of the template. It is not recommended to saw off two legs of the sling at once. It is necessary to remove the drawing on each of them from a certain side separately. This node is connected by steel plates.
- According to the template, it is necessary to mark the point of emphasis of the rafter board in the Mauerlat, fasten the board in this place, which will rest against it. It can be fixed from the bottom of the sling to the edge of the board or from the side. This assembly will withstand significant shear loads, so heavy bolts are recommended for fastening.
- Place two rafter boards on a flat surface, and check the location of the knots using a template. Remove it and fix the crossbar in place.
- The upper elements of the slings must rest firmly against each other throughout the cut.
- Then we bolt the crossbar with an overlap to the legs of the slings. You will need 2 bolts for each sling.
- The bolt is subjected to compression - even slight fluctuations in the attachment points should not be allowed. To prevent the rafters from cracking when installing the bolts, it is recommended to drill holes for them slightly smaller than the diameter of the bolts by about 1 mm. The excess part of the bolt must be cut off with a grinder.
- In the same way, it is necessary to install all the other rafters: put them on top of each other, and check that all sizes match.
- After all the rafters are made, you can begin to assemble the roof frame. First you need to attach the extreme rafters, fix them with pieces of boards. Carefully install each rafter leg, and check the dimensions. Stretch the cord from the side parts at the outlet of the rafters to the ridge.
- Mark the attachment points of the remaining lines on the Mauerlat in increments of approximately 1 m.
- Lift each sling one by one, put it along the cords and secure it with boards. Nail them at a certain angle.
- When all the rafters are exposed, it is necessary to check the accuracy of their placement, then begin to fasten with steel corners and slats. The corners must be fixed on both sides of the rafters. The result is a stable and reliable system. Now you need to align the length of the slings from below along the cord so that they protrude outside the bath by about 30–40 cm.
- Under the extreme legs, install additional stops from the boards, which in the future will serve as a frame for sheathing the gables.
Creation of a crate
The crate can be rack or solid.
After the installation of the crate, it is necessary to close the end sides of the roof. If you plan to create an attic, then you need to leave room for installing doors and windows.
Warming from the inside
For insulation, you can use mineral wool 10 cm thick. First, it is laid on the rafter system vapor barrier material to protect against moisture from the interior of the bath.
A heater is laid on top of it, and then a waterproofing material that will prevent the penetration of moisture through the small cracks of the roof.
Protective hydro and vapor barrier films are overlapped about 15–20 cm, then glued together with construction tape.
How to properly cover a roof
Laying roofing material is no less important part of the roof structure than its construction. If you properly cover the bath with a metal tile or metal profile, then you can protect all wooden structural elements from precipitation, which will significantly extend their service life.
For laying metal tiles you will need:

Stages of installation of roofing material:
- The metal tile is lifted onto the roof frame using special belts. The first sheet is laid, carefully aligned along the end part and the cornice. It is fastened with self-tapping screws at the points of junction of the wave to the laths of the crate. They are screwed in a certain order.
- Laying is done from left to right. The edge of the second sheet is brought under the end of the first, and then they are carefully aligned. If the material will be laid from right to left, then the second piece should be placed with a slight overlap. All sheets are screwed in turn.
- The first sheet is placed on the lathing slats with a protrusion of about 40–50 mm, it is seized with a self-tapping screw at the very edge of the ridge and the lower part of the eaves.
- To mount the second sheet, two pieces of the profile are joined by the side overlap method, so that there are no gaps and distortions. They are interconnected by self-tapping screws under the transverse part of the wave. You need to start connecting from the eaves to the ridge. Thus, 3-4 profile sheets are fixed. A temporary self-tapping screw is unscrewed, the entire row of the metal profile is equal in relation to the eaves.
- The correctness of the removal on both sides of the block is measured. The sizes matched - everything is done correctly. Now the sheet is fixed with a self-tapping screw thoroughly. All other profiles are fastened at the joints with each other, screwed to the crate.
- After the work is completed, it is necessary to remove all chips from the metal tile with a soft brush, and slightly tint the drilling points with paint of the same color as the material itself.
- Then it is necessary to fix the ridge in such a way that the attic is ventilated. It is attached to the metal tile using self-tapping screws at the top of every second wave. The overlap should be about 10 cm in length.
- fastened eaves plank, which will protect the frontal board from external factors. To do this, they are laid with an overlap of approximately 50 mm. They are nailed every 30 cm.
- The end plank is placed on the side board and screwed with self-tapping screws (a step of about 1 m). It is attached to the laths of the crate through upper part roofing sheets with self-tapping screws in increments of 40–80 cm. The plank should overlap the upper edge of the wave.
- A special insulation is attached before mounting the ridge bar. To do this, the protective film is removed, glued from the edge of the ridge towards the center at a distance of about 25 mm. The ridge itself is attached to the roof in every third wave with an overlap of 10 cm.
Video: how to make a roof for a bath from a log house with your own hands
Only on condition correct device bath roofs, you can be sure that it will serve for many years and withstand any environmental conditions. Therefore, the construction of this element must be taken very seriously and responsibly, since it takes on heavy loads, which means it must be as strong and reliable as possible. And then you and your friends will be able to enjoy the rest in the steam room at any time of the year.
Foreword
Every land owner dreams of a bath. In such a building leading role plays warming. Particular attention should be paid to the roof of the bath, through which all the heat can escape.
The roof of the bath - what everyone should know
Depending on the type of structures, the roof may differ in its design and shape. The main feature of the bath roof is its light weight. Therefore, such a roof has a simple design.
Before you make the roof of the bath, you need to think about the type of building itself. Such a structure can be located on the land plot separately or be attached to the house. You also need to think about the type of roof, which can be either single-pitched or gable.
It is important to choose the slope of the roof. The angle of inclination of the slope depends on the weather conditions. The roof must withstand wind and snow. Therefore, the smaller the angle of inclination, the less heavy precipitation the roof can withstand.
Features of a pitched roof
This type of bath roof is the easiest to build, less labor-intensive and cheap in cost. A similar design lies in the fact that the beams are laid horizontally on opposite walls of the bath. The angle of inclination of the slope is provided due to the different heights of the walls of the structure.
A roof with one slope can be made with an attic or an attic room can be built there. From the point of view of thermophysical indicators, such baths have the best thermal insulation properties. Such rooms can be used to store bath equipment, stack firewood for a fireplace and stove there. It is possible to make a lounge there.
To save money, attic space is not made. In this case, the bath roof can be combined with the ceiling. With this option, building materials will require significantly less than for the construction of an attic or attic.
Bath roof construction - construction stages
Step 2: Mounting the support beams
Along the upper perimeter of the walls, it is necessary to lay boards that will support the entire truss system. During this process, it is imperative to monitor the evenness of the beams. Such control can be done using the usual level. At this stage, support posts will be required if the boards protrude more than 50 cm beyond the wall.
Step 3: Installing the truss system
At this stage, it is necessary to install the rafters on the supports in increments of 1–1.5 m. You can fix them with metal brackets.
Step 4: Building the crate
The crate is necessary so that the roofing materials have something to attach to. Depending on the roofing the crate can be either solid or with gaps. The first option is used for ondulin or roofing material. In this case, boards of 20 mm thickness will be required. Be sure to take into account that the joints of each row must be in different places. To achieve this, it is better to use different lengths of boards. In the case of using metal tiles or slate, a continuous cover of the crate is not required. To do this, you can fix the boards with a gap of 20-30 cm.
Step 5: Roof waterproofing
In order to avoid excess moisture and leakage during rain or snow melt, it is imperative to make a hydro-vapor barrier of the roof. To do this, the vapor barrier film is fixed with a stapler to the crate. A waterproofing material is laid on top of this film. Flooring, as a rule, is done along the roof, starting from the eaves. Waterproofing should be laid with an overlap of 5 cm on top of each other. You can also fasten this material with a construction stapler.
Step 6: Covering the roof with roofing material
The metal tile flooring starts from the lower corner of the bath roof. Sheets must be laid on top of each other with an overlap of 10–20 cm. Fastening is carried out using self-tapping screws with rubber gaskets in the area of the hat. This will prevent leakage when it rains. When the last sheets of the top row are fixed, you can proceed with the installation of the ridge. As a rule, galvanized metal is used for this procedure.
Step 7: Sheathing the end of the roof
For sewing the roof, you can use lining or ordinary boards that need to be fixed without gaps. Siding can also be used as end cladding. This material is easy to use, inexpensive and looks nice.
The ceiling in the bath - important properties
Structural elements of the ceiling should not contribute to the wetting of the insulation. Otherwise thermal insulation material may lose its heat-saving properties. As a result, the bath will quickly cool down, which is unacceptable for such buildings.
A significant role is played by the height of the ceiling of the bath. The ceiling should not be too high or too low. To calculate the optimal ceiling height, take into account the maximum height of people who will take bath procedures. The next criterion for calculating the height is the size and number of shelves.
Be sure to take into account the possibility of a comfortable swing with a broom. If a log bath is being built, then 10–20 cm must be added to the height of the ceilings for future shrinkage. As a rule, for people with a height of up to 190 cm, a ceiling with a height of 2.5 m is sufficient. and
Types of bath ceilings and their insulation
There are several common types of ceiling coverings. The first type can be attributed to the false ceiling. Its design consists of boards (cut or tongue-and-groove), which are attached to the ceiling beams. It is also required to lay a vapor barrier on top of the beams, spread waterproofing. On top of these layers, heat-insulating material is laid, which also needs to be covered with a layer of vapor and waterproofing. Foam plastic, mineral wool is used as a heater, or bulk material (expanded clay) is used.
The positive properties of this type of ceiling include simplicity in the device. A high level of thermal insulation, no doubt, is also a positive criterion for choosing which design. Because of a large number different layers, such a ceiling is very reliable and can last a long time. As for the negative factors, this includes the cost of erecting such a structure. The price is affected by the use of a thick beam for the ceiling beam.
The next type of ceiling is floor. Differs in simplicity of a design, it is constructed by means of a continuous flooring of the cut-off boards. Thermal insulation with a vapor barrier film is laid on top of them.
Basalt wool is most often used for insulation. Bulk materials can also be used as heat and vapor barrier. They fill all the cracks and cavities well, this results in a continuous layer of insulation. For bulk materials, it is necessary to make sides along the perimeter of the attic. When using this type of thermal insulation, it is impossible to use the attic, since bulk materials cannot withstand high loads.
Among the main disadvantages of this design is the impossibility of creating a ceiling with a height of more than 2.5 m.
This is due to the fact that the ceiling beam is not used. The negative factors of this type can also be attributed to the susceptibility of the insulation to moisture. insulating material will get wet quite often and will need to be replaced frequently.
The third type is the panel ceiling. This design consists of panels that are assembled separately. The main element is load-bearing beams. The box itself is assembled from boards. A pie made of hydro, steam and thermal insulation is laid inside such a trough. Boards must be laid on top of these materials. For this purpose, cut bars of any length can be used.
 Flexible removable dentures: design, features and benefits Varieties of soft dentures with photos
 Normal weight gain of a newborn during the year
 Norm of alcohol consumption
 What to do with alcohol poisoning at home
 Where are the boundaries between these categories of consumers?
 What is an asset directory
 Free programs for Windows free download