The device of a roof from a metal tile. Do-it-yourself installation of a metal tile We build a roof from a metal tile
good roof- this is a guarantee of warmth and dryness in the house. The service life of the structure and its reliability depend on how high-quality material you choose, and how well it is laid. One of the most popular materials on the market is metal roofing.
Technical characteristics of metal tiles
Firstly, this material is very easy to install. Secondly, it easily tolerates a variety of atmospheric influences. Thirdly, it is able to withstand mechanical deformations.
The standard sheet width is one meter and 18 centimeters. The length varies from half to eight meters. Interestingly, the useful width indicator is only 1.10 m. The thickness of the sheet is in the range from 0.4 to 0.5 mm.
Attention ! Sheets with a large thickness have an increased service life.
Average service life high-quality metal tiles on condition correct installation completely according to the instructions is about 60 years. However, you should take into account that auxiliary materials such as boards, sealant or insulation can become unusable much faster. Not surprisingly, the roof needs cosmetic repairs from time to time.
Roofing from a metal tile is not subject to combustion. Each sheet is lightweight, which greatly simplifies installation. Also worth noting is the versatility of the mounting system. It allows you to realize almost any design fantasy.

The color of the metal tile you choose will directly depend on the facade of the house. For example, brown tiles are well suited for red brick. At the same time, for comfortable installation, the roof slope can be only 14 degrees.
Attention ! Metal roofing is easy to repair. It can always be tinted or replaced with individual sheets. This will restore the integrity of the entire structure at minimal cost.
The unique properties of metal tiles in case of damage to a certain area make it possible to do without the installation of the entire structure. It is not surprising that most summer residents choose just such material for their roofs.
Usually the metal tile is made of galvanized steel. In some cases, a copper sheet is used. But in this case, the cost of the product increases several times. For the sake of objectivity, it is worth noting that the installation of both types is equally simple.
If we talk about the latest trends in this market segment, then more and more often aluminum zinc is used for the manufacture of metal tiles. This material is considered relatively new. More precisely, this is an ordinary metal sheet, which is coated with an alloy of aluminum, silicon and zinc. As a result, the performance of the product increases. And installation is still not particularly difficult.
The mass of one square meter of metal tiles ranges from 3.5 to 5 kilograms. This allows for quick installation and without much difficulty to lift the roof sheets even to a great height.
Mounting
Stages

Before you start such a responsible undertaking as installation, you need to know what you have to do and in what sequence. At the moment, it is best to carry out the installation of metal tiles by performing the following actions:
- Take accurate measurements.
- Calculate the amount of material needed for work. Do not forget to include insulation, insulation and fixing materials in the estimate.
- Carry out the installation of the truss system.
- Install the cornice board. Gutter hooks will subsequently be attached to it.
- Hem the roof overhang.
- Mount the front board, mounting hooks and gutter.
- Fasten the counter grilles.
- Lay down waterproofing.
- Fasten the battens around the additional elements along with reinforcing strips.
- Install the strips on which the cornice will subsequently be mounted.
- Take care of the apron around the chimney.
- Carry out the installation of metal tiles with your own hands. Install windows if desired.
- Make the end batten and top carpet, as well as the outside corners and ridge battens.
Don't forget about construction work either. You can not ignore the fences and footbridges. They will provide you with safety if you have to climb onto the roof in the future.

Increased attention should be paid to the drainage system. The safety of the foundation of the house depends on how competently you do everything. Not only that, if you do the piping and take care of the tanks, every rain will supply you with water for irrigation.
Important ! Roof grounding is done with a bus. At the same time, it goes separately from the lightning rod.
At the end of the installation of metal tiles, the roof surface is cleaned of dirt accumulated during work. There is also processing problem areas. For example, if the protective coating was scratched during operation, it can be easily restored.
In addition to external construction work, you still need to do interior decoration. Usually it consists of laying thermal insulation. You also need to take care of the installation of counter rails. In order to prevent condensation from forming inside, it is necessary to make a vapor barrier.
Instructions on how to make a calculation when installing a metal tile
Let's take standard galvanized sheets as an example. They have only one protective coating layer, which is able to protect the entire structure from a variety of atmospheric influences and mechanical damage.
A metal tile is a galvanized steel sheet with a protective coating. Full sheet width is always greater working surface by 80-120 mm, therefore, when choosing a coating, you need to know exactly the size of the platform on which the structure will be mounted.
When calculating, you need to take the length of the sheet and divide it by its width. Rounding is done up. Next, you need to measure the slope of the roof. The correct way to do this is from the bottom up. In the calculations, you need to take into account the cornice overhang, usually 0.05 m is enough. The overlap will be somewhere around 0.15 m for each row.
If you buy sheets directly from the factory, you can agree on individual sizes metal tile panels. In this case, the installation will be much easier and faster. True, you will have to pay extra for individual parameters. With this approach to installation, you can reduce the amount of waste. The fact is that sheets can have different sizes. This, in turn, allows them to be laid more efficiently in particularly difficult places.
Important ! It is believed that the most optimal size sheet of metal for installation 4-4.5 meters.
During installation, lay the sheets in such a way that the bevels are completely closed. Otherwise, rain moisture will penetrate into the structure, gradually destroying it. Heavy rains will cause constant leaks.
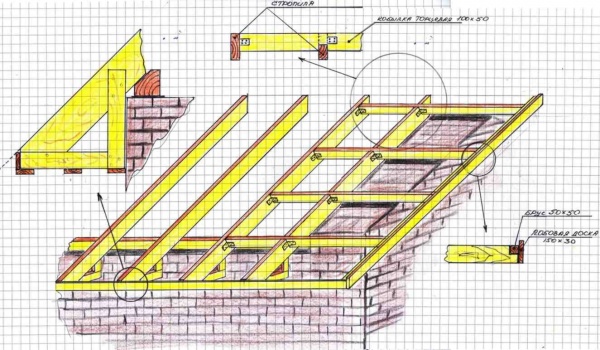
We make rafters

First you need to calculate the step. It is best to use beams with a section of 150 by 50 millimeters for the installation of metal tiles. This is the optimal size. The gap between each sheet is 70-80 centimeters. In case of its increase, it will be necessary to mount the crate.
Particular attention should be paid to the wood that you will use when installing the metal tile. Its humidity should not exceed 22%. Also do not forget about antiseptic and fire-fighting treatment. This will protect the roof from possible fire, fungus and insects.
Cornice board, filing hooks
When installing a metal tile, grooves are cut in the cornice board. A gutter hook will later be attached to this part of the roof. It will provide the entire structure with the necessary rigidity, thereby guaranteeing safety.
In order to hem the roof overhang and install the frontal board, you will need:
- rafter,
- sheet metal,
- waterproofing,
- cornice plank,
- front board.
By connecting all these elements, you can carry out further installation of the metal tile. The frontal board is best fixed with galvanized nails for greater reliability. It is attached to the ends of the rafters.

When installing metal tiles, you must take into account that the space under the roof must be ventilated. To make this possible, it is necessary to make ventilation slots. For filing, it is best to use or corrugated board.
The filing block is stuffed onto the wall at the same level as the lower part of the frontal board. Boards will need to be laid between them. The result of your work will be a crate.
Important ! Ventilation openings must be sealed. Otherwise, they will become a home for birds.
Hooks are needed in order to put gutters on them. The installation of these fixing elements is an important part of the installation of metal tiles. They need to be attached to the cornice board.
Grooves are made first. Only then is the installation of hooks. The distance between them is equal to the distance between the rafters. Self-tapping screws are at the heart of the fastening.
Installation of the crate under the metal tile

Installation of the crate includes the installation of reinforcement bars. Also, for high-quality support of metal tiles, you will need:
- rafter;
- waterproofing and vapor barrier film;
- counter rail;
- initial, vertical and horizontal crate;
- insulation.
The initial crate during the installation of the metal tile is mounted under the top of the sheet. Its cross section should exceed all other crates by the size of the wave height. Laying runs strictly parallel to the cornice
Important ! The distance between the two crates that are placed at the beginning should be 28 centimeters, between all the rest 35.
Before you carry out the installation of the crate to support the metal tile, you need to install fasteners for all additional structural elements. Otherwise, you will have to break the whole structure.
Particular attention when installing the crate under the metal tile should be given to the ridge bar. Two additional strips are nailed over the rafters. The distance between them should be 50 millimeters from each other.
Installation of snow guards on metal roofing
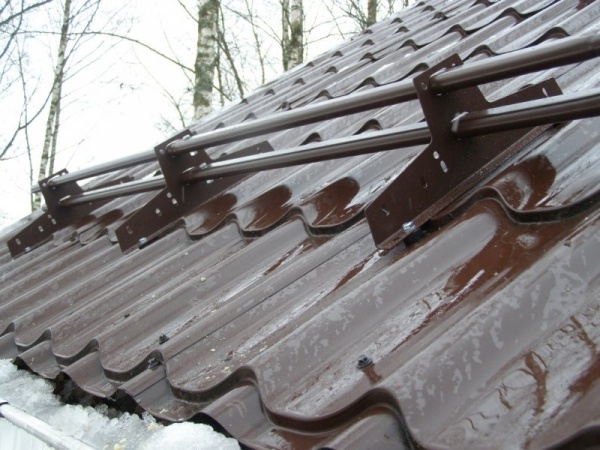
Tubular snow retainers are mounted using special supports around the tiles. Initially, these structures were made of wood. Now the main material is steel.
Install snow retainers on the metal tile parallel to the eaves. The distance between them should be 0.5-0.8 m. Place wooden bars at the attachment points.
Attention ! Some metal tiles are already equipped with special ledges.
Results
As you can see, installing a metal tile with your own hands is a completely feasible task for every person. It is enough to follow the steps described in the article and use high-quality materials. The most important thing is to make the calculations correctly so that later you don’t buy more sheets or waterproofing film.
A reliable roof, in which there is high-quality waterproofing and insulation along the slopes, is the dream of any cottage owner either country house. Today, such a dream is easily achievable if it is fulfilled.
Before it will be from a metal tile with your own hands, you will need to consider the issue of removal old roof in which there may be no waterproofing. In this case, everything will depend on the technology by which the roofing cake was made, and its condition.
List of items that will be needed in order to install a new roof to your house:
- hacksaw for metal;
- anti-condensation films;
- waterproofing;
- galvanized nails;
- self-tapping screws;
- sealing tape.
The process of performing control measurements with your own hands
After the installation of the rafters is completed, you will need to re-measure the dimensions of the roof slopes. This is due to the fact that during the construction there could well be any deviations. It is worth paying attention to the squareness of the roof, because due to the additional elements it will be possible to hide only small defects (no more than 10 mm).

It is worth knowing that during the roofing of the roof with metal tiles, the cutting of sheets must be carried out exclusively with the help of a hacksaw, a hand-held electric saw or special scissors.
It is worth noting that it is possible to use technology in which there is waterproofing only if the roof slope is at least 14 degrees.
The choice of the type of snow retainers for the roof will depend on what material the roof is made of and how much snow falls in a particular region. The main size that will determine the length of the sheets is the length of the slope. This is the distance from the roof ridge to the eaves, which must be set taking into account the overhang of the sheet from the eaves (up to 40 mm).
In the case where the slope is longer than 7 m, the sheets will need to be divided into two or more fragments that overlap (at least 150 mm). The disadvantage of long sheets, which have fewer joints, is that they are very inconvenient to work with.
It is worth knowing that during the cutting of sheets it is necessary to produce exclusively with the help of a hacksaw, a hand-held electric saw or special scissors. All places where bare metal remains must be treated with a special paint that protects the steel from corrosion. At the same time, it is not at all recommended to use a popular angle grinder with an abrasive wheel installed in order to cut sheets. Its use does not justify itself.
How to install the crate with your own hands
The space under the roof must necessarily have good ventilation, therefore, a crate and a counter-crate will be needed. Anti-condensate films will need to be placed between the rafters and sheets of metal. Waterproofing should be spread parallel to the eaves.

For soft roof from roll materials a full frame is required.
The material should sag a little between the rafters. A small slack in tension (1-2 cm) will be enough. Along the rafters on top of it you will need to nail the bars small sizes section from 40x25 mm. This will be a counter-lattice, on top of which it will be necessary to fix the flat bars of the crate. The distance is equal to the step of the wave at the metal tile. The board that will go to the cornice will need to be chosen 10-15 cm thicker than the rest.
It is worth noting that the bars for the crate and all other wooden elements must be treated with an antiseptic without fail. He is able to protect them from insects and rot.
The arrangement of a metal roof must necessarily include the use of special materials for waterproofing. There are 2 types of waterproofing, therefore, it is important not to make a mistake here. The first is intended to protect the insulation and rafters from any penetration of moisture vapor from inside the room. The second waterproofing is waterproofing films that protect against wind, moisture and condensation. They must be installed exclusively on top of the insulation. They pass water vapor, and therefore it does not accumulate in the insulation. The slope of the slopes does not allow moisture that flows from the metal tile to linger on the film for a long time.
Do-it-yourself installation of a valley and a cornice strip
Installation right roof from metal tiles requires protection not only from condensate, which forms on the reverse side of metal sheets, but also from precipitation. They can pose a danger to the lower edge of the crate, therefore, a cornice strip may be needed here. It consists of a number of boards that are nailed to the crate overlapping each other. In order to do the installation yourself, you should install galvanized nails in increments of no more than 30 cm.

Scheme of the roof valley.
Valleys should be used when the slopes are adjacent to each other. The lower edge of the valley should be laid on top of the completed eaves plank. It is necessary to use a porous sealant to get rid of the gap between the roof covering and the bottom bar of the valley.
The overlay of the valley can give the roof structure a complete look, it must be installed after the installation of the sheets. Its fixation occurs in the upper part of the wave, while the step is 30-50 cm.
It is necessary to install the end plate using self-tapping screws. In this case, the step between them should be no more than 40 cm. The strips themselves must be mounted with an overlap (10 cm) in length.
How is the arrangement of the roof of metal tiles with their own hands
The installation of the coating should begin at the end of one of the slopes after they are completed. preparatory work, which include the laying of an anti-condensate film and the installation of the crate.
If the installation starts from the left end, the second sheet must be installed under the last wave of the first. When work begins from the right end of the roof, a new sheet must be laid on top of the last wave of the previous one. In the case when there is a hipped roof, installation will need to start from the middle of the slope, after which the laying is carried out evenly in both directions.
Each of the sheets has a capillary groove along its edge. Such a groove should be covered by the edge of the next sheet. It is necessary to align the sheets of the coating along the cornice strip.

Self-tapping screws, with which the sheets are fixed, must be in the deflection of the wave.
The obvious fact is that it is not difficult, but there are some nuances that you need to know about. For example, self-tapping screws, with the help of which the sheets are fixed, must be in the deflection of the wave. It is necessary to use only those screws that have a special sealing washer. At the same time, they will need to be screwed in strictly perpendicular to the material of the crate. The average consumption of self-tapping screws is not at all large. It is up to 8 pieces per 1 sq. m.
If you screw in the screws at an angle, they will not be able to tightly press the sealing washer, therefore, there will be a potential leak in the roof.
An important issue is the movement on the roof in the process of construction or repair work. It is worth noting that it is recommended to avoid movement on the finished roof altogether, however, if all existing rules are followed, it can cause only minimal problems.
It is recommended to use shoes that have soft soles. It is allowed to step only on the wave deflection and only in the place where the crate will be under the metal layer. In no case should you step on the crest of the wave.
Mounting the skate with your own hands to ensure good ventilation
A properly installed ridge is a guarantee of good, high-quality ventilation of the space that is under the roof.
This element must be given Special attention at a time when a do-it-yourself metal roof is being installed.

Cover sheets should not converge to each other, while there should be enough space between their edges under the ridge bar. Fixation of the skate should be done using self-tapping screws that are screwed into the top of every second wave. You will need to paste over the edges of the sheets themselves with sealing tape.
If you need to make a semicircular ridge on a hipped roof, it would be best to use special elements such as Y-shaped linings.
Even if the person who performs repair work, will know that he may make a mistake when making a joint with a vertical surface such as a pipe or wall. In such cases, the contact zone will be isolated with the help of an abutment strip and a self-adhesive seal. Additional sealing can be easily created with a sealant.
The lower junction bars must be installed in a groove prepared on the surface (pipe or wall). To do this, strobe should be performed, after which it will be necessary to remove dust and rinse the strobe. The junction bar is cut, installed and fixed with self-tapping screws.
After the work is completed, you will get an internal apron, but you will also need to organize water drainage. To do this, use a flat sheet of metal, the edges of which will form the sides.
In addition to the internal apron, you can also use an external one, which is created from the upper abutment strips. Install it in almost the same way as the internal one, with the exception of chasing. The edges of the planks are simply fixed to the wall.
Some difficulties may arise when working on roof breaks. Such elements can be internal and external. In the first case, an abutment bar is used, which is installed together with the seal. In the event that we are talking about an external fracture, you will need to use a cornice bar.
Do-it-yourself installation of a drainage system and snow retainers
Rectangular sections should be used. Their gutters must be mounted below the edge of the roof by 2-3 cm.
Snow guards are installed on mounting plate with the help of self-tapping screws that reach the crate. They screw up every second wave.
The question of how to properly lay a metal tile is asked by most developers who decide to choose this practical, modern and durable material when building a house. This article will talk about how the installation of metal tiles is carried out - the instruction will tell you about all the subtleties and nuances of this work.
The article also talks about the construction of a roofing pie, the materials, tools and much more necessary for the construction of a roof.
The “metal tile - installation - instruction” scheme used in the article can be useful both for developers and for the builders themselves, both when building a house and when performing such work as erecting a canopy from metal tiles.
Mounting technology
Before proceeding with the installation of metal tiles, you can watch or download a video on the Internet - installation of metal tiles, but first of all, consider the scheme and basic principles of the so-called roofing pie for metal tiles.
This name is associated with a large number of layers, each of which performs a specific function.
Subject to the correct selection of materials, as well as the calculation and installation, it is this design that makes it possible to make a roof made of metal tiles the most reliable and durable.
Regardless of how the instruction will be applied - the installation of the metal tile is planned to be carried out with one's own hand or with the invitation of hired workers, one should be aware that the roof is quite complex design, during the construction of which it is important to strictly follow the recommendations of manufacturers for the installation of metal roofing, as well as all building regulations and regulations.
Let us remind you once again that it is recommended to watch the video - the installation of metal tiles, and the entire process of installation itself should be constantly monitored, since poor-quality work may not be detected immediately, but during operation.
For example, poor-quality installation of hydro- and vapor barriers can lead to the accumulation of condensate, a decrease in the quality of thermal insulation and rotting of wooden structural elements.
Important: a reliable and durable roof can only be built in full compliance with all the rules that the instruction includes: installation of metal tiles.

- rafter system;
- counter rails;
- Waterproofing film;
- Bars of vertical lathing;
- Starting beam of a horizontal crate;
- Bars of horizontal lathing;
- The crate is additional;
- wind board;
- Gutter bracket;
- Cornice plank;
- metal tile;
- Roofing ridge;
- Ridge seal;
- Dormer window;
- thermal insulation material;
- vapor barrier material;
- Attic lining.
The figure shows the installation scheme of the metal tile, in accordance with which the work described below is carried out.
But first you need to figure out what tools will be used to install the coating.
Tools and equipment
This instruction: metal tiles - installation describes the process of installing metal tiles using the example of the Monterrey brand and similar ones, installation of other brands is generally carried out according to the same principle, distinctive features will be discussed at the end of the article.
To perform the work, you will need the following tools and materials:
- Tool for cutting sheets of metal;
- Screwdriver, preferably on batteries;
- Medium-sized hammer;
- Rule or even long rail;
- Marker.

In order to cut sheets, manufacturers advise using the following tools:
- Scissors manual or electric for metal;
- Hacksaw or reciprocating electric saw with the necessary blades;
- Perforated electric scissors;
- Electric jigsaw;
- A circular saw with teeth from Pobeda.
After the cutting of the sheets is completed, various sawdust should be removed, which, when rusting, can damage the polymer coating of the metal tile.
Important: when cutting sheets of metal, do not use a tool with abrasive cutting wheels, such as a grinder.
In this case, exposure to high temperatures will lead to the destruction of the zinc and polymer coating of the material, which will subsequently cause a corrosion process, as a result of which rusty smudges will appear on the roof.
Installation instructions

Beneficial: Although laying long sheets reduces the number of joints, the installation process itself is much more difficult than laying shorter overlapping sheets.

- Roof freezing;
- Formation of ice on the metal tile;
- Rotting of the crate and rafters;
- Destruction of interior decoration.
In order to avoid the listed unpleasant consequences, the rules for installing metal tiles recommend using thermal insulation material required thickness.
In addition, when installing a metal tile, it is imperative to protect the insulation material from the side of the metal tile - using a waterproofing film, from the side of the interior - with a vapor barrier film.
The removal of wet vapors from the space under the roof is ensured by the creation of natural ventilation, which is the free movement of air masses from the eaves to the roof ridge.
For this, between waterproofing film and a metal tile with the help of a crate, a gap of approximately 40 mm should be left. When hemming the overhangs of the cornices, gaps should be left on them, as well as special holes should be freed in the rubber seal on the ridge.

Useful: in the case of Yutavek and Tyvek films, thermal insulation can be laid without a gap.

- On the rafters, bars are nailed over the waterproofing film, falling from the ridge to the eaves. Lathing boards are attached to these beams;
- The first board of the crate from the eaves should be approximately 10-15 mm thicker than the others. Next, you need to observe the correct distance between the boards;
- In the case of the Monterrey metal tile, the installation instructions: the metal tile prescribes to install the second board with an indent from the bottom edge of the first 300 mm (measured from the middle of the second nailed board), for the Maxi metal tile this distance is 350 mm;
- The distances between the axes of the boards of the lathing, nailed in the future, are for different brands of metal tiles: for "Monterrey" and "Supermonterrey" - 350 mm, for "Maxi" - 400 mm.
- Solid lathing is carried out in places such as valleys, chimneys, the perimeter of auditory and skylights. On both sides of the ridge, two additional edged boards are nailed, while end strips rise to the height of the profile of the metal tile above the ordinary crate.

The hermetic adjunction of the metal-tile roof to the walls on the slopes and chimneys is carried out using an internal apron, manufactured using the lower adjoining strips:
- The bar is applied to the pipe wall, after which its upper edge is marked on the brick;
- With the help of a grinder, a strobe is punched along the drawn line, after which dust should be removed and the area should be washed with water;
- The installation of the inner apron begins on the wall of the pipe, which is located in the lower part of the slope, that is, from the side of the eaves. The bar is cut in place, installed and fastened with self-tapping screws;
- Similarly, the installation of the apron is carried out on all remaining sides of the pipe;
- If it is necessary to join the planks, an overlap of approximately 150 mm is performed. The edge of the apron, wound into a strobe, should be processed silicone sealant, preferably colorless;
- Further, a tie is inserted into the space under the lower edge of the inner apron - a flat sheet that provides water flow. The tie can be directed either into the valley or down to the very eaves. Along the edges of the tie with a hammer and pliers, a side is made;
- Sheets of metal tiles are mounted over a tie and apron;
- After laying the roofing around the chimney pipe, the manufacture and installation of the outer apron, made using the upper abutment strips, begins;
- The upper strips are installed similarly to the lower ones, but the upper edge does not go into the strobe, but is attached directly to the wall.
Important: when moving on a metal roof, all necessary safety measures should be observed.
Metal tile: installation instructions prescribes to wear comfortable and soft non-slip shoes and step only into the wave deflections. In addition, the installer's belt and safety tether should be used.


- The first sheet is aligned along the end of the roof and fastened at the top with a single self-tapping screw.
At the same time, an extension (metal-tiled visor) of about 40 mm should be made near the eaves. The second sheet is laid with an overlap of the first when mounted from right to left, or its edge is brought under the first sheet in case of mounting from left to right. - The sheets are fastened together using self-tapping screws at the upper point of the overlap, while they should not be screwed to the crate under the metal tile - it should be possible to freely move the sheets relative to the self-tapping screw holding the first sheet in the ridge part.
- The laying of the third sheet is carried out similarly to the second, after which the sheets fastened together are aligned parallel to the eaves.
If it is necessary to join the sheets along the length, you should follow the order of their laying, shown in Figure B.
Important: if there is a protective film on the metal tile, it must be removed before installation.

Important: when purchasing a metal tile, you need to find out the terms of the guarantee for the material.
Many manufacturers provide a guarantee for metal tiles only with the condition of using a certain brand of self-tapping screws, so it is recommended to purchase self-tapping screws from the supplier along with the material itself.


When installing ventilation elements, the first thing to do in a metal tile is to draw and cut a hole according to the template.
Next, silicone is applied to the passage element, after which the structure is attached to the metal tile using self-tapping screws.
The ventilation outlet is inserted into the passage element, aligned vertically with a level and also fastened with self-tapping screws.
To connect the hood and the house air duct, a corrugated pipe is used, which is passed through the roof pie, after which the passage is sealed with adhesive tape.- For the installation of stairs, brackets are used in the amount of 4 pieces per 1 section.
They are put on the ladder racks and fixed with M8x40 bolts.
The brackets are fastened to the roof surface in wave deflections using Sh8x60 bolts, and their junctions are sealed.
Along the length of the roof slope, the ladder is assembled in sections, the uppermost of which is attached to the ridge beam with special brackets.

The vertical railing grill, which ensures safety during roof maintenance, is installed on a continuous crate at the level of the cornices.
Fencing supports are installed in the wave deflections of the metal tiles, the brackets are attached to the support beam using M8x60 galvanized screws using a rubber gasket.
The distance between supports should be approximately 900 mm. The supports are adjusted relative to the slope of the roof and fixed, after which the fence itself is hung on them.
At the junction points of the supports and sections of the fence, holes are drilled (in the lower crossbar 12 mm, in the upper - 12 mm).
Through these holes, the supports are connected to the sections using the appropriate bolts. After installation is complete, seal all connection points.
To maintain antennas, chimneys and other elements on the roof, transitional bridges are equipped, for the installation of which a continuous crate is also made in advance.
The support brackets of the bridge are fastened in the same way as the roof railing, the slope is adjusted by selecting holes in the fixing brackets.
Fixation is carried out with the help of M8x20 bolts, located two on each side of the platform.
Tubular snow retainers are mounted to protect against avalanche-like snow cover from the roof, while the crate is also solid.
The brackets are fastened in increments of about 100 cm, the installation of the end brackets is carried out approximately 50 cm from the end of the snow retainer.
The snow guard must also be removed 35 cm from the roof eaves. In the case of a slope length exceeding 8 m, an intermediate row of snow retainers is installed.Important: if there are skylights, snow guards must also be installed above them.

The crate is made of beams or edged boards, treated with antiseptic preparations. The recommended cross-section of the bars is 50x50 mm, the boards - 100x32 mm.
The installation of the crate is carried out in several stages:
Important: if the pitch of the rafters exceeds 1000 mm, boards of greater thickness should be used for the crate.

Installation of metal tiles. endova
Before the metal tile is laid, the instruction provides for fastening the bottom plank of the valley with self-tapping screws to a continuous crate along the inner junction of the slopes.
If it is necessary to join the planks, an overlap of 100-150 mm is made. Next, markup and, if necessary, cut sheets of metal tiles.
Installation of metal tiles is made from the bottom up (see. Fig.). The upper joint of the sheets rarely has an attractive appearance, so on top of it set decorative element, for example - the upper bar of the valley.
Important: the weakest point of the roof is the junction nodes. In order to avoid subsequently repairing the roof, their device is an instruction: metal tiles must be performed with special care.
Installation of other types of metal tiles
Above, the general procedure for the construction of a metal roof was considered, we will consider the main nuances during installation certain types material.

The figure shows that the step of the crate during the installation of the metal tile of the Cascade brand differs from the step for the Elite and Monterrey brands. These differences are due to differences in the dimensions of the material profile.

When installing metal tiles of the Andalusia brand, which has a Z-shaped lock, you should also take into account your own nuances. In the lock part of this brand there is a perforation that simplifies the positioning of the sheet on the roof and its fastening.
At the same time, the fasteners are hidden, which makes it possible to make the joints of the sheets almost invisible.
When purchasing a metal tile, you should find out various subtleties about a particular type of material, and when performing installation, it is important to follow the rules and requirements described in this manual. This will allow you to build a reliable and durable metal roofing.
Metal tile is a modern roofing material that successfully combines the attractive appearance of ceramic tiles with the light weight and inexpensive price of metal coatings. Its advantages are considered good performance, corrosion resistance and long service life. It is important that, knowing the features of this material and having basic building skills, you can easily cover the roof with metal tiles on your own. Do-it-yourself installation of a metal tile is reminiscent of the process of creating a multilayer cake, the components of which improve and complement each other. In this article, we will describe step by step a proven "recipe" for creating a reliable, high-quality roofing from a metal profile.
Laying metal tiles with your own hands is a proven way to quickly and inexpensively cover the roof of a garage, garden or small residential building. This roofing is a type of metal profile with a wavy relief that resembles the shape of a traditional tile. The metal tile is made of galvanized steel, which is applied during the production process. polymer coating from pural, plastisol or polyester. Roofing from this material has the following advantages:
- A light weight. One square meter roofing from metal tiles weighs 3.5-4.5 kg, which allows you to increase the step between the elements of the truss frame, reducing the cost of building a roof.
- Mechanical strength. The roof of this material has high strength and bearing capacity, so it can easily withstand snow and wind loads, even if the step between the rafters is large enough.
- Corrosion resistance. Roofing from a metal profile is not exposed to the destructive effects of corrosion, because it is reliably protected by a zinc layer and a polymer coating.
- Long service life. A do-it-yourself metal tile roof has been serving for more than 20 years, thanks to the high quality of the metal and the strength of the polymer protection.
Important! Knowing how to cover the roof with metal tiles yourself, you can save a lot, because installing a roofing costs as much as 50-70% of the cost of purchasing materials.
The composition of the roofing cake
Do-it-yourself installation of metal tiles consists in creating a multi-layer roofing pie, which consists of a vapor barrier, insulation, waterproofing and the coating itself. In order for a metal profile roof to last for a long time, it is worth choosing the right structural components that are suitable for each other and following the rules that the installation instructions prescribe. Roofing cake for metal tiles consists of the following parts:
- Vapor barrier. This is the name of a film that allows steam to pass through, but blocks water and condensate, protecting the insulation from getting wet. The vapor barrier must be laid on the lower surface of the rafters and fixed with a construction stapler.
- Rafter legs. To cover the roof with metal tiles with your own hands, you need to correctly calculate the step between the rafters and install them evenly on the ridge run and Mauerlat. The strength and load-bearing capacity of the roof depends on how many rafters the roofing material supports.
- Thermal insulation. The installation of thermal insulation is carried out between the rafter legs of the frame, so the step between them must correspond to the width of the insulation.
- Waterproofing. Waterproofing must be laid over the rafters so that it protects the wooden frame elements from condensation or atmospheric moisture.
- Crate. This truss frame element is used to distribute weight roofing material. Roofing material must be laid on the crate. The step between its slats is chosen in accordance with the weight of the coating and the angle of inclination of the slope.
- Roofing material. Do-it-yourself metal tiles are laid on the crate. For fixing use special roofing screws.
Please note that there are 2 types of metal roofing - warm and cold. cold roof differs from the warm one in the absence of a thermal insulation layer and vapor barrier in the composition of the roofing cake. This design is cheaper, but can only be used in cases where the attic or second floor is not heated.


Rafter frame and crate
Before covering the roof with metal tiles, it is necessary to assemble the truss frame. The frame is a kind of supporting skeleton of the structure, which supports its geometry, and also distributes and transfers the weight of the roof to the foundation of the structure. It is made from coniferous wood impregnated with an antiseptic and flame retardant, or metal. The metal truss system is more expensive, but can withstand heavy loads, so you can increase the step between the elements. The roof frame is assembled in the following sequence:
- First of all, the Mauerlat is installed. The support beam is laid on the upper trim of the house, secured with metal studs embedded in concrete or anchor bolts. Mauerlat is made from a bar with a section of 150x150 mm and is mounted on the walls on which the roof slopes will rest. How many slopes are at the roof - so many support bars are needed.
- Then puffs are installed that connect the Mauerlat in increments of 1-1.2 meters. Puffs are made from a bar 100x100 mm or 100x150 mm.
- Vertical racks are installed in the middle of each puff in increments of 1-1.2 m. In order for them to stand vertically, they are supported with temporary slopes.
- On top of the racks you need to lay the ridge run. This is the name of the timber that forms, the rafter legs will rest on it.
- Next, it is necessary to mount the rafter legs of the frame in increments of 0.6-1.2 m. The step between the rafters depends on how much the roofing weighs, the section of the element and the width of the insulation.
- The rafters must be covered with waterproofing to protect against condensation and atmospheric moisture. It is worth laying the film "in sag" so that it does not tear under the pressure of water.
- Lastly, you need to mount a crate of slats with a section of 30x30 mm or sheets of moisture-resistant plywood. The step between the elements of the crate is chosen in accordance with the weight of the roofing material and how many degrees the angle between the surface of the slope and the base of the roof is. The flatter the roof, the denser the crate should be, and the smaller the step between the rivers.


Important! It is possible to cover the roof with a metal tile, regardless of its design. The minimum recommended slope for this type of roofing material is 12-15 degrees. If the roof is flatter, then the installation is carried out with the obligatory processing of the joints with a sealant to prevent leaks.
Insulation
Before laying a metal tile, you should take care of protecting the wooden frame elements from steam, condensation and moisture. metal roof coverings they have high thermal conductivity, so they heat up quickly, but they also give off heat easily, so they need to be insulated. In the process of erecting a roof from a metal tile, 3 types of insulation are installed:
- Vapor barrier. The instructions for laying the metal profile prescribe the mandatory installation of a vapor barrier on the lower surface of the rafter legs. This role is played by special membranes that allow air to pass through, but block water, preventing the insulation from getting wet. After all, with an increase in the humidity of the thermal insulation material by only 5%, its effectiveness is halved and does not recover after drying.
- Thermal insulation. Insulation is laid between the rafters to keep the temperature in the house. It protects from cold air in winter and prevents heating of the under-roof space from the hot roof in summer. Mineral wool, ecowool, glass wool, polystyrene foam or polyurethane foam are used as insulation. How many layers of insulation are needed to protect the house from freezing is calculated in accordance with climatic conditions.
- Waterproofing. A waterproofing material that protects the rafter frame and insulation from moisture ingress is laid on top of the rafter legs. Film strips or diffuse membrane overlapped in strips to prevent water from flowing between them.
Experienced craftsmen say that it is impossible to cover the roof with metal tiles without using all three types of insulation in a complex way. Only by working in a complex, insulation, vapor barrier, and waterproofing become effective.


flooring cover
Instructions on how to properly lay a metal tile are popular with inexperienced craftsmen. To work with this unpretentious roofing material, special skills or complex tools are not required. The laying of the coating is carried out using roofing screws, a screwdriver, a building level and sealant and a circular saw with a metal disc. The process of laying a metal profile is as follows:
- Before laying the metal tile, the sheets are first cut. To simplify this task, you can purchase a metal tile, the length of the sheet of which corresponds to the size of the slope, then there will be no horizontal joints during laying, and you will not have to cut the material. In other cases, a circular saw or a jigsaw is used to cut the coating to size.
- Then the metal tile is laid. The bottom row is laid out first, starting from the edge of the slope. An overlap of 10-23 cm or 1-2 waves is made between the sheets. The flatter the roof, the greater the overlap.
- The joints between the sheets can be treated with a silicone-based sealant to prevent leaks.
- Each sheet of metal tile is fixed with galvanized self-tapping screws, equipped with a wide press washer, which closes the mounting hole from water penetration.
- After laying the coating, the ridge, ends, slope cornices are formed with the help of additional elements, and drainage elements are installed.
Important! Knowing how to properly lay metal tiles, without resorting to the services of a professional team of builders, you can significantly reduce construction costs. To cope with the roofing of this practical and lightweight material can be two in 3-5 days.

Video instruction
Metal roofing is becoming more and more popular every day. This is an excellent roofing material with an optimal ratio of performance and cost. The metal tile is suitable for finishing roofs of almost any complexity. At the same time, you can cope with the tasks of installing the material with your own hands.
The metal tile is made in the form of galvanized sheet material made on the basis of steel. The composition of the sheet includes several layers that perform important protective or decorative functions.

- zinc layer. It is the basis for applying the following layers. Additionally prevents the development of corrosion.
- passivation layer. Prevents the accumulation of static electricity.
- Priming layer. Provides the highest quality adhesion of the previous and next layers of the metal tile sheet.
- polymer layer. Protects the material from adverse external influences and gives it the desired appearance. The finish can be matte or glossy. Many color variations are available, which allows you to choose a roofing material that fully satisfies the needs of the owner.
The metal tile has many advantages over other popular roofing materials, namely:
- light weight. There are many excellent roofing materials available on the market today, but the possibility of using many of them is limited precisely because of the large weight. modern houses are increasingly being built from the "lungs" building materials And they don't need any extra work. The metal tile, on the other hand, weighs a little, so it can be safely used even for roofing the roofs of houses built on weak foundations;
- many color variations. It is hardly possible to find another roofing material presented in such a variety of colors as metal tiles;

- good specifications. The metal tile is steady against atmospheric and other adverse influences. Installation of sheets can be performed at any time of the year;

- relatively affordable cost. Metal tile significantly outperforms other coatings with similar parameters in price. natural tile it costs much more, although its properties practically do not differ from the characteristics of modern high-quality steel sheets.
The metal tile looks great on the roofs of almost any buildings. It is best suited for large and respectable houses and cottages, however, if desired, you can develop an excellent roofing project even for a small country house.
Video - Do-it-yourself metal tile installation instruction

Before starting the arrangement of the crate and fastening the sheets of metal tiles directly, it is necessary to think about reliable and high-quality waterproofing. Thanks to the moisture-proof material, the possibility of condensation on the internal surfaces of the elements will be excluded roofing system, which will contribute to a significant increase in their service life.

The most popular waterproofing option is polyethylene film. This affordable material perfectly copes with all the tasks assigned to it.
Waterproofing should be laid on the rafters under the counter beam. Individual pieces of film are laid with an overlap of about 15-17 cm. The sag of the film between the rafters can be no more than 1.5-2 cm. To fix the film, use galvanized nails or a construction stapler with metal staples. Glue the waterproofing joints with adhesive tape. It is desirable that it be metallized.

The technology of metal tile roofing requires the mandatory installation of insulation. It is most convenient to use mineral wool slabs. The material is laid between the rafter legs. For fixing the plates, the construction stapler already familiar to you is perfect.
Lathing device

The metal tile will be laid on top of a supporting structure known as a batten. The frame of the system is assembled from wooden planks about 100 mm wide and 25-30 mm thick. All wooden elements must be treated with an antiseptic. Otherwise, the wood will rot in a fairly short time.

The crate is attached in the interval between laying the waterproofing and installing the insulation. The task is reduced to attaching wooden boards or bars to the rafters. Start fastening from the ridge of the roof structure, gradually moving vertically down to the eaves. Fix the elements of the crate in a horizontal position. Use nails of the correct length. As a rule, boards are mounted in a continuous sheet.
Laying roofing material

Laying of metal tiles should begin from the bottom corner of the roof slope. It is best to start from the bottom left corner. In this case, each next sheet will overlap the previous one. If you start the installation of the coating from the right corner, the next sheet of metal tiles will have to be placed under the already laid material. It is undesirable to do so, because with such installation, there is a high probability of damage to the roofing.

Laying of metal tiles should be carried out parallel to the eaves. Do not forget to leave an overhang behind the eaves of about 4 cm. There is a technology according to which sheets of metal tiles can be laid vertically. But in the absence of proper experience in roofing, it is better to refuse this method, opting for a more traditional and simple horizontal installation.

When laying, you will need to rotate the corners slightly clockwise. This is done so that the right corners of the elements laid in the same row are located along a single straight line.
To fix adjacent sheets, 1 self-tapping screw is used. Such a preliminary fastening is placed at the top of the sheet. After that, you need to align the elements of the system and perform their final fixation.
Lay the longest sheets of metal tiles in the bottom row. With this option, installation is greatly facilitated, and the finished coating takes on a more solid and attractive appearance.

Approximately 7-8 self-tapping screws are used per 1 m2 of coating. Attach sheets to shear waves, screwing the screws in 35 cm increments. You can also install self-tapping screws in longitudinal waves. With this method, it is necessary to fasten through the wave, placing self-tapping screws in the upper ridges.
An electric screwdriver is best suited for tightening self-tapping screws. An electric drill will work too. The main thing is that it has the function of slow and smooth rotation of the cartridge. To achieve greater fastening accuracy, it is recommended to punch the hole in advance.

Cover sheets must be fixed in the lower crest of the wave, where the material is pressed against the crate. This will create the most reliable fastening and not deform the material.
The bottom sheets of the metal tile must be fastened to the first purlin in each wave, without gaps. This section will be subjected to the most powerful wind loads, so the fastening must be as reliable as possible so that the sheets are not torn off at the first strong gust of wind.

Fasten to other purlins at a minimum distance from below to the step. At this point, the sheet material has the highest rigidity. In addition, with this arrangement, the screws will be almost invisible.
In places of overlap, sheets of metal tiles must be fixed through a wave. If you wish, you can fix each wave. This will ensure the highest quality fit of the upper sheet elements.

For fixing roofing material, galvanized self-tapping screws made of alloy steel are best suited. Stainless steel self-tapping screws with a sealant also proved to be excellent. Such fasteners can have a wide variety of colors, which will allow you to create the optimal color combination of self-tapping screws and the main coating.

Self-tapping screws are screwed strictly perpendicular to the elements of the crate. Deviations are not allowed. Sheets of metal tiles should be attracted to the crate as tightly as possible. Any distortion of self-tapping screws can lead to the appearance through holes in sheets. If the roof will be exposed to prolonged exposure to an acidic or alkaline environment, self-tapping screws with plastic caps should be used to fix the metal tile.


3-4 months after the completion of the roofing work, check the self-tapping screws. Under the influence of wind loads, fasteners usually weaken. Tighten loose screws.

Thus, in self-assembly metal roofing is no big deal. Follow the instructions, stick to the recommendations received and everything will work out.
Successful work!
Video - Do-it-yourself metal tile installation instructions
 Hairpin interpretation of the dream book Why dream of buying a hairpin
 Win competitions Why dream of acrobatic competitions
 Dream interpretation sparrow looks out the window
 Divination by Tarot Etteila - Horoscope of Life Collection of free divinations
 The meaning of tarot cards in divination
 What does it mean to see yourself from the side in a dream?
 Social movements and their types