Proper installation of the indoor unit split system. How to install an air conditioner in an apartment: layout diagrams. Vacuum cleaning process
Installing an air conditioner is a very complex task that requires certain knowledge and sometimes special tools. In our article today, we will talk about how to install air conditioning at home yourself. There are various types of air conditioning systems, which include mobile and window models, as well as the so-called split systems. As part of our article, we will dwell in more detail on the sequence of actions when installing the last variety.

The process of installing a split system is quite complicated and is carried out in several steps. In this regard, all actions can be divided into three main stages, which include the following:
- Installation work indoor unit;
- Actions related to the installation of the outdoor unit;
- Vacuuming.
Each of the stages will be considered by us in detail.
Step one: install the indoor unit
If you decide to install a mobile air conditioner at home, then you don’t have to worry about the installation process, you just need to put it in the right place. But with a split system you will have to work hard, since it consists of two blocks, each of which needs a separate installation. If we talk about the indoor unit, then a number of requirements are imposed on its installation. So, for example, it should be at some distance from the ceiling, which should not be less than ten centimeters.
The importance of the above requirement should be understood, since if it is ignored, the following consequences may occur:
- his body will quickly become clogged with dust, and it will have to be cleaned almost every day;
- dust will also settle on the surface of the ceiling. As a result, not the most beautiful dust spot will be obtained;
- the system will not have enough air, and this will subsequently affect its efficiency.
Such an indentation from the wall is required so that it becomes possible to ensure a distance between the curtains and the device of at least ten centimeters. In conditions of a shorter distance, curtains or curtains will constantly flutter, which is also undesirable. Next, install the mounting plate, while it is necessary to adhere to the level. Previously, you should also equip the markup, which is performed using dowels and a puncher.
Further self-installation air conditioner involves doing through hole in the wall, which is required in order to lay a highway and drainage system there. For this purpose, it is required to take a drill, the diameter of which is forty-five millimeters, after which you can start making a hole. This tunnel should be designed in such a way that the slight slope required for condensate to flow through it is provided. Further actions will be related to the collection and connection of the route. First you need to measure the required length of the pipe and cut them. This will require the use of a pipe cutter. But it is better not to use a hacksaw for metal, since chips that have got inside will lead to compressor failure.

Next comes the connection of pipes - rolling is used. The quality of the connection that holds the refrigerant also depends on how well this operation is performed. Even before rolling, it is required to put the nut on the tube. This requirement is explained by the impossibility of such an action in the future. It is also important to tighten the nuts to the indoor unit as tightly as possible, this only improves the quality of the connection.
Connected pipes, electrical wiring, as well as the drainage system must be insulated and wrapped with tape. Next, the free trunk ends must be inserted into a previously made hole in the wall. As for the indoor unit itself, it is installed on a bar. At this stage, the installation stages of the air conditioner associated with its indoor unit can be considered completed. Now we move on to the next steps to install the outdoor unit.
Step two: install the outdoor unit
Solving the issue related to the competent installation of the air conditioning system, or rather its external unit, is associated with some risk. This is relevant in the case of high-altitude work. In such cases, insurance is mandatory.
As part of this stage, the first step is to install the brackets. The outdoor unit is in most cases mounted under the window. This decision about its location is explained by the fact that in this way it becomes possible to provide convenient maintenance and repair.
As for the location of the brackets, it is calculated in such a way that the external unit of the air conditioning system would be located below the level of the window sill.
After finishing the marking work, you can proceed to the stage of attaching the brackets to the wall. Due to the fact that the outdoor unit is characterized by a rather significant weight, the brackets must be fixed with maximum reliability. For this, long self-tapping screws are used, the diameter of which should not be less than twelve millimeters. After the installation of the brackets is completed, the unit itself should be lowered onto them directly. It is advisable to mount the block in tandem with an assistant, because due to the considerable mass there is a threat to drop the block.
Further, after installing the unit on the brackets, you will need to securely fasten it. But this must be done by securing all four screws. When these steps are completed, it will be possible to connect trunk elements to it. In this case, it is necessary to carry out all actions very carefully, since it is important not to confuse which of the tubes should be connected to where. In addition, even in the process of connecting them to the indoor unit, it is recommended to make appropriate marks. In all other respects, other actions are carried out similarly to the indoor unit of the air conditioning system.
Stage Three: Vacuuming

When deciding to install an air conditioner at home with your own hands, remember that vacuuming is mandatory. Such a process is a set of actions aimed at creating a vacuum in the tubes of the main line. Without these measures, it is impossible to ensure the operation of the air conditioner. Vacuuming is performed to remove dust and moisture from the pipes. This is done with a special pump connected to the system using a manometric manifold and flexible hoses.
Next, the pump is turned on and a port is opened on the outdoor unit. After the gauge needle goes into vacuum, close the port and turn off the pump. These steps will take no more than fifteen minutes to complete. It may take longer to carry out this operation, but this is not necessary. Do not rush to turn off the pump with a pressure gauge, as the arrow may change its position. So, for example, when it is raised, we can talk about the lack of tightness of the system. Therefore, check all connections in general and rolling in particular.
You can start the refrigerant only after making sure that everything is tight, and it does not matter where you decide to install the air conditioner. At the same time, it is better to leave the pressure gauges in their places. First of all, you need to open the tube responsible for the supply, then the suction tube, after which you can start fixing the freon pressure. It is also important not to confuse the above sequence of actions.
Next, the first launch of the system is performed, which will not happen immediately, you will have to wait for some time. Then you need to let it work for about fifteen minutes. This time is allotted for the complete distribution of freon through the tubes. Then control measurements of pressure are carried out, and the pump equipped with a pressure gauge is turned off. On this work on the installation of a split system can be considered completed.
Installation of a window air conditioner
In cases where you want to install a window air conditioner at home, the steps are somewhat different, since its design is significantly different from a split system. To do this, you will need to remove its front panel and remove the block located on the skid. After that, the housing should be installed with a slight slope towards the street. Then it is assembled in the reverse order and connected to the outlet, adjusting the required power.
Installing a split system is a difficult job, and sometimes, frankly, it’s even creepy to watch the process of installing an external air conditioner unit on the wall of some high-rise building. But there is nothing supernatural in this work, and below it will be told how to install the air conditioner yourself, however, you will probably need an assistant.
Tools and consumables
Installing an air conditioner yourself will require the use of expensive tools. This primarily applies to the vacuum pump, the simplest version of which costs a couple of hundred dollars. This equipment can be rented, asked from a friend of the master, etc., because it is very difficult to properly install the air conditioner without it. True, looking ahead, let's say that it is possible to do without a vacuum pump, there will be no guarantee of quality.
So, you will need the following materials for installation:
- The vacuum pump we just talked about.
- A professional SDS+ rotary hammer with a power of at least 750 W with a drill with a diameter of 22 mm, but it is better to use a special industrial rotary hammer with a 40 mm drill, then you do not have to drill two holes in the wall.
- The puncher will also require 6x60 mm drills for mounting the indoor unit and 12x200 mm for mounting the outdoor unit.
- Good rolling preferably with a polished cone. Otherwise, when rolling, you will definitely cut copper dust and shavings, which will disable the compressor.
- Pipe cutter. Pipes cannot be cut with a regular hacksaw. The reason is again in the large amount of chips formed and the uneven edges of the cut, which will make it impossible to perform high-quality flaring, and the installation of the air conditioner with your own hands will be performed poorly.
- A pair of brackets with a weight capacity of up to 60 kg for attaching the outdoor unit.
- Copper tubes for arranging the route with a diameter of 3/8 and 1/4 inches - this is for household air conditioners of small power 7 and 9 BTU / h (British thermal unit, the number is indicated on the package). More powerful devices use other diameters.
- Spongy special insulation for thick and thin copper pipes.
You will also need a plastic drainage tube, aluminum tape for winding pipes behind the wall, a 60x80 mm box for the track in the apartment, as well as a level and other installation materials, usually always in stock.
More about the air conditioner device
To understand how to install the air conditioner yourself, you need to understand some of the details of the device and the principle of operation of the air conditioner. The main element is the outdoor unit and, accordingly, the compressor. into it freon has already been pumped at the plant to fill a five-meter route, although self-respecting installers usually take a refrigerant bottle with them just in case. You can read about how to fill the air conditioner.
There are two fittings on one side of the outdoor unit.
On one you can see a couple of nuts:
- the first, with a copper or plastic plug - for connecting a thin copper tube of the route;
- the second, deaf, under which the control valve with a valve for a hexagon is hidden - by turning it, freon is launched into the system after the installation of the air conditioner is completed with your own hands.
The second fitting has three nuts:
- with a plug - for connecting a thick copper tube;
- a blind nut under which there is a valve;
- the third, located in the opposite direction of the highway, hides the filling port.
It is connected to the system until the control valve is turned and is used for topping up and measuring the pressure of the refrigerant. When installing the air conditioner with our own hands, we will use it - it will be needed to connect the vacuum pump.
Brass nuts with a cone connect ports to copper pipes without any gaskets - tightened with a force of 70-80 kg, it completely presses the copper to the cone hermetically. These nuts can be slightly loosened, but the plugs cannot be removed - nothing should get inside. Next, we will tell you how to install the air conditioner yourself.
Mounting the indoor unit

It is better to mount it closer to the outer wall, so that installing the air conditioner with your own hands is not accompanied by laying a long route. Thirty centimeters must be left from the ceiling for the indoor unit so that nothing interferes with the air intake.
The metal mounting frame of the device is mounted horizontally in level. Next, you need to decide where the box will be, for which you can attach the indoor unit to the frame. Drainage will go through the box to remove condensate, so it should be placed under a slope, but a small one - about 5 mm per 30 cm of length.
Difficult stage
After completing the installation of the indoor unit and marking where the box will go to the outer wall, you can start drilling the hole out. You can use a powerful professional puncher, but you will have to drill not one, but two, and in some cases even three holes.
Drainage will be output to the bottom, electrical wiring and copper pipes to the top. For obvious reasons, both holes should be drilled at an angle - the same or even steeper than that of the box. At the end of the work, communications should be stretched.
Outdoor unit installation
It is installed on outer wall. If there is an open balcony - great, installing an air conditioner in winter will even be safe. On the loggia, the air conditioner can be mounted on the front or side, which is usually in the shade. The rules for installing an air conditioner prohibit installation inside a glazed balcony, or the windows must be open during its operation.

First, the brackets are attached - holes are marked and drilled, the first bracket is set according to the level, then the second. The distance between the mounting tabs of the outdoor unit must be measured in advance in order to know at what distance from each other to mount the brackets.
A block is installed and twisted on them. The route should have been stretched by this time. Copper pipes in concrete do not need to be insulated, but in other areas they must be insulated - stretch the sponge insulation pipes, rewind the joints with electrical tape, ensuring the tightness of the connection, otherwise the installation of the air conditioner with your own hands will be carried out poorly.
Assembly of the track
Brass nuts are unscrewed from the short tubes of the indoor unit and plugs are removed, copper tubes are connected. At the beginning of the process, a hiss will be heard - this is an inert gas pumped into the block at the factory to prevent corrosion.
Before installing the air conditioner yourself, it makes sense to practice cutting and flaring copper pipes, as this is a very responsible process. After the indoor unit, the outdoor unit should be connected to the route in the same way. At the same time, you do not need to be afraid of freon leakage - you have not yet opened the ports.
Vacuum system
Although the air conditioner is installed independently, a vacuum pump is still needed. It connects to the filling port and turns on for 15-30 minutes.
The main thing in this process is not the removal of air from the system (which happens literally in a minute), but the removal of moisture from the system, which is detrimental to the compressor.
Within a quarter of an hour, watch the pressure gauge needle, which should not “creep” back to zero. If the arrow is stationary, you can proceed to the next step, if not, then the tightness of the connections has not been achieved. In this case, before installing the air conditioner with your own hands, you need to find and fix the leak.
System start
- Insert a hexagon into the control valve of the lower port (near the thick copper tube) and carefully turn it until it stops. Until this moment, the pump hose must not be disconnected!
- After filling the route with freon, the filling port will be locked - the vacuum pump hose can be unscrewed.
- In the same way, open the second port next to the thin tube on the top fitting.

When you mount the electrical part, start the air conditioner in cooling mode. After a few minutes, cold air will come out of the indoor unit.
Installation Secrets
By the way, installing an air conditioner in winter is also quite possible. True, the installation of an air conditioner in winter is carried out in less comfortable conditions, but you need to be more careful that snow or water does not get into the line during work. But it is better to open the valves and let freon into the system at a positive temperature - the rubber seal of the valve “dubs” and may fail.
In conclusion, we will tell you how to install the air conditioner yourself without a vacuum process and, accordingly, without a pump. This is possible on a hot summer day when the air is very dry. To do this, the nut on the thin copper pipe must not be completely tightened, and then very slowly open the control valve near the thick pipe.
Freon will displace air with its pressure, but you need to accurately catch the moment when cold freon comes out from under the nut on a thin tube and quickly tighten it. This method, we repeat, is wrong, especially if the air conditioner is installed in winter, you will not be able to check the tightness of the connections, but in certain situations such an independent installation of the air conditioner is possible.
Video instruction
Below we present a video in which in five minutes the process of installing an air conditioner is described in some detail - installing an external unit, an internal one, connecting a route and filling the system with freon.
In contact with
Reading time ≈ 13 minutes
The microclimate in the house is not only convenient, but also good for your health - you can maintain different temperatures. But installing a split system with your own hands is of interest to many - it is cheaper to do the installation yourself than to invite masters, although this is not always correct. First of all, experts will do the installation according to the instructions, but if you are confident, you can do it yourself.
What is a split system
Split system before installation
To begin with, let's define what a split system is, so as not to get confused in the definitions - for some reason it is distinguished from a conventional air conditioner, and rightly so. There are several types of SLE:
- On the wall 1.5-9.0 kW.
- On the floor 4.0-13.0 kW.
- On the ceiling 4.0-13.0 kW.
- With channels 5.0-18.0 kW.
- Cassette systems 5.0-14.0 kW.
How it works
The SCR consists of two parts - a compressor, which is usually placed outside under a window, and an indoor unit that supplies cold air to the room. The compressor contains freon, which cools this air - this air comes from the street ( supply system). In addition to cooling, there is a solenoid in the indoor unit, which can also blow hot air.
outdoor unit

The outdoor unit is mounted on brackets
The outdoor unit is located in an open space - the facade of the house, an open balcony, a roof. In office buildings, the outdoor unit can be mounted on flight of stairs, in the lobby or in the hallway. These two units are interconnected by a freon pipe, as well as a condensate drain pipe. There is also a compressor, a four-way valve, a receiver, a fan and a winter collector control system, which is driven by a capacitor motor. The four-way valve is connected from the indoor unit through the power cable coming from the unit in the apartment. There is also a compressor on the outdoor unit, which removes the noise in the room. The indoor unit is slightly noisy - it is 24-25 dB and this bothers some people.
Block in the apartment

Block in the apartment, fixed to the wall
The indoor unit can be located in any part of the room - ceiling, walls, floor (depending on the type of ACS). The system is controlled remotely (remote control) is required. Modern air conditioners are equipped with a filter to clean the air from smoke and / or dust. Heating and cooling of the room varies from 10 to 30⁰C. The remote control display contains information on which you can adjust the system in the desired mode - this is air temperature, three degrees of discharge force and turbo mode. For domestic use wall-mounted options are used, and floor and ceiling ones in offices, enterprises, and public places.
The electronics of this unit controls all parameters:
- Allows you to control using the remote control, fixes the desired temperature and air flow.
- Records the temperature of the air that enters the evaporator and measures the temperature of the air in the room.
- When the set temperature in the room is reached, the compressor turns off, and turns on when the maximum allowable conditions change by 3-5⁰C.
- The temperature is maintained by adjusting the rotation of the fan in the indoor unit, as well as the rotation of the compressor. If the evaporator is turned off, a large number of condensate in those nodes that are not designed for this. This may cause water to leak through the indoor unit into the room.
- The remote control provides tongue control (blinds), which gives direction to the air flow.
- Prevents premature start.
- Controls the temperature of the block outside.
- Follows a timer that can be set to a specific time.
Space heating
Modern air conditioners can heat the air that enters the room. This happens when the four-way valve is switched, which changes the direction of the air supply. It is controlled by a solenoid at a voltage of 220 V, which comes from the inside. During the heating function on the outdoor unit, it is formed, which must be discharged. You should not heat the SLE house at a negative temperature outside - this can lead to freezing and defrosting, which is tantamount to a breakdown. It is better to use heating at temperatures above 0⁰С.
Cooling in the cold season
SLE has a winter kit that allows you to air-condition indoors closed type, where there is intense heat generation - server rooms, workshops and the like. During cold air blowing, the outdoor unit heats up, so it cannot freeze. This kit includes a fan control controller - it turns it on in condenser mode during heating, and also heats the condensate drain pipe.
High temperatures
For R10A freon, there is a critical heat point - this is 72⁰C, therefore, the maximum outdoor temperature should be no more than 45-50⁰C. For freon R22, the maximum temperature of the block is 96⁰C, therefore, the allowable temperature environment 65-70⁰C - this allows you to install such units in hot shops, attics and garages. Such high temperatures can be found in metal attics, MAAFs and other metal premises.
When the temperature outside is very high, the unit works with pressure drops and more freon is required. This factor makes the compressor work more intensively and pump the maximum amount of freon, which leads to its electronics turning off. Conventional SCRs are designed for temperatures no higher than 40⁰C. If the air conditioner in the house or apartment is located on the sunny side, then it is recommended to install a visor on top when installing split systems with your own hands, which will protect the unit from the sun.
For non-standard operating modes, the capacity of the capillary channel is reduced, and this provides a significant pressure drop at the inlet and outlet with a smaller amount of freon pumped. Since there is less gas in the system, it is not liquid that passes through the capillary channel, but gas with liquid - it turns out that the circulation is significantly reduced and the air conditioner retains its ability to work in non-standard conditions. Under normal temperature conditions such drops are harmful to the air conditioner, and it quickly fails.
Multi systems

Multi split system
If the ACS is equipped with several units, then it will already be a multi system - it means one unit outdoors and several units in the building. Such equipment is very convenient for offices, shops or a large residential building. It is noteworthy that in such a situation, the outdoor unit can be combined with several different systems, on the floor, not on the wall and on the ceiling. Of course, such units are more expensive - there is an additional controller to control the desired modes and compressors with fans.
Such systems come with one or more compressors. In the case of a single compressor, the SCR indoor unit transmits information to the outdoor part of the unit, which determines the operation mode of the compressor. Systems with several compressors usually have two or three units. In such a situation, a separate compressor, a separate four-way valve and a separate capillary tube are installed on each unit. The compressor of the outdoor unit detects the signals of all indoor units and sets the operation of the fan and compressor. Such air conditioners are both inverter and non-inverter.
Air conditioner care
Due to condensate, both the indoor and outdoor units become clogged within two to three years, so they need to be cleaned - inside this is done with hot steam, and outside they are washed with water. Thus, fungal mold is removed along with dust. Without cleaning the unit, its efficiency can drop by half, and sometimes even more. Especially a lot of dust accumulates on the outdoor unit due to cars and trees. The filters on top are of little help and serve more for advertising than cleaning.
air conditioner requirements
Video: Installation work
Do-it-yourself installation of a split system is, in fact, not difficult and you can watch the process on the video, but several factors should be taken into account:
- In no case should the air conditioner be located near heating devices, for example, above a radiator - this greatly increases the consumption of electricity, which you have to pay for.
- There should be no debris in the system, as it can damage the vacuum pump.
- Boiling freon can evaporate even through a micro-slit, therefore, during installation, the unit should be checked for tightness.
- The outdoor unit must be located lower than the indoor unit. Otherwise, it is fraught with an overexpenditure of electricity and a thermosyphon effect.
- Heating the outer part of the SCR also causes an extra waste of electricity.
- The drainage tube can only go down, without loops bent up. Such bends serve as a collection of debris and fungal mold.
- Do-it-yourself installation of split systems without a vacuum pump does not lead to anything good - the compressor will drive freon, which will cause air overheating and oil deterioration, which will damage the compressor. Too much expensive pleasure It's often easier to buy a new one.
air split
There are two separate blocks: evaporative (in the apartment) and compressor-condensing (outside). Although modern units work not only to cool the air, but also to heat it, it turns out that freon condenses in the inside of the unit, and evaporation occurs in the outside, which is why they are called so - internal and external.
Toolbox

Installation of the air conditioner is best done during repair work in the House
It is most convenient to carry out installation work during repairs in the apartment, since you have to drill holes in the wall, and this is a lot of dust. To install the unit, you will need tools such as:
- with standard set of drills and hole cutter ø 50 mm. With this cutter, you will have to drill the main (bearing) wall for the output of tubes.
- Magnet for detecting the presence of reinforcement. And in concrete walls she is a must.
- Bulgarian, but a pipe cutter is better for cutting pipes - be sure to blow the pipe after that so that there is no copper chips left.
- To expand the pipes, you will need a scraper, since tightness cannot be achieved with improvised means. In addition, it is impossible to clean the ends with a file or needle file so that sawdust does not get into the middle.
- Bicycle or car pump for leak control.
- Vacuum pump - needed for evacuation before refueling the unit.
- Ammeter-voltmeter (possibly a phase indicator) for connection to a network of ≈220 V.
- Manometer for checking pressure.
Installation work

Bracket outdoors fastened with anchor dowels
The most difficult thing is to fix the brackets on the wall from the outside of the house - this is usually done below the window so that there is access to the outdoor unit. It should be fastened with anchor plastic dowels ø 14-16 mm - two pieces for each bracket. Some are mistaken and buy metal mollies, but there is an umbrella-type dowel and it will not hold in a solid wall. Such an installation can be done from a telescopic tower, but it will be expensive, so it's easier to bend over the window and drill holes, but first you need to make marks with a pencil. To prevent the hole from going astray, first drill with a thin drill ø 5-6 mm, and then take ø 14-16 mm

The outdoor block must be below the indoor
As a rule, it is not recommended to install the outdoor unit yourself without proper experience - it is dangerous not only for health, but also for life.
But if you have construction experience in high-altitude work, then you can mount it. You can, of course, install it on a balcony or loggia, if they are not glazed - if the unit is indoors, it will overheat. The most important thing is to fasten the brackets well, but if you are afraid of heights, then it’s better not to take on such work, but to invite a specialist - they have experience working at heights, so it’s better to pay, but not risk it.
But first you need to determine the place where the indoor unit will be located, in order to then install the outdoor unit relative to it. It is most convenient when they are nearby - you do not have to add copper pipes - they are expensive. Then you make a hole in the wall with a cutter, but if the walls are concrete, then it is best to punch the hole with a chisel so as not to break the crown on the wire.

Installation mounting plate for indoor unit
The mounting plate for fixing the air conditioner should be inserted strictly according to the level and fixed with plastic dowels. Here, anchors are no longer needed - you can get by with dowels ø 6 mm and self-tapping screws 90 mm long. I was not mistaken - it is 6 mm dowels that are needed for fastening so that the screw does not tear out of the wall. If the walls are soft, then you can drive two screws into one dowel - this is much stronger. Of course, it will be difficult to tighten two screws with a screwdriver, so it is better to use a screwdriver or an electric drill.

Assembly of pipelines
The tubes are cut with a meter excess so that there are reserves for bends. The tube must be bent very carefully so that it does not crack anywhere. Although wrinkles should also not be allowed - such a deformation will impede the flow of refrigerant, and this in turn will cause an overrun of electricity. The most best thermal insulation, this is a pipe made of foamed polyurethane - it will last a very long time, but foam rubber will not last even one season. Flanges are put on the ends and only after that do the flaring. The threads on the flanges must be turned towards the end of the tube in order to screw them to the fittings. New air conditioners have fittings of different diameters, so it will be impossible to mix up the ends. But there are assembly instructions in the passport, so you can constantly peep.
For drainage, it is best to use metal-plastic ø 16 mm, since corrugated plastic quickly crumbles under the influence of precipitation and temperature changes. If a thread is not provided for drainage, then it can be connected with heat shrink by heating it with a soldering iron or over an open fire - with matches or a lighter.
In order to connect the indoor and outdoor units, a multi-core cable with a core cross section of not 1.5 mm is used - there are terminals with names. The names of the terminals may not match, and then you have to understand according to the instructions that are in the passport. The wire is also packed in a pipe made of foamed polyurethane, and then all communications can be wrapped with tape. This pipe is pushed into a 50 mm hole, which is pre-made in the wall.
To check the sealing, use distilled water heated to evaporation and with a solution of laundry soap (it can be grated). To continue, remove the nipple from the outlet and pump water from the pump - if bubbles appear on the thread, then tighten the nut slightly. After completion, the soap is wiped with a wet cloth or sponge. The nipple is put in place and air is pumped out with a vacuum pump, which will remove dust and moisture. This must be done for a long time of 40-60 minutes - the moisture will be removed along with the air. The system is pumped with freon from a cylinder through a pressure gauge - the required pressure is indicated in the passport.
Video: Installation work on installing a split system
Now it remains only to test the unit - this can be done with remote control or start button on the indoor unit. If testing does not start, you will have to call a specialist, since the guarantees will no longer be valid. When starting the test, the shutters should open and cold air should come out. Blinds are adjustable to the desired position from the remote control remote control.
Conclusion
If something does not work out with the installation of a split system with your own hands, and this is usually an outdoor unit, then you will have to call the master or hire a telescopic tower. But this applies to multi-storey buildings - on the first floors and in the private sector, problems usually do not arise.
In the hot summer, the room where the air conditioner works becomes a blissful oasis that you don’t want to leave. Realizing all the advantages of cooled air, while the city is melting from the heat, people begin in advance, even in winter, to take care of installing this wonderful device in their home. After reading the forums with reviews, choosing and buying the right model, you are faced with the following installation dilemma: do it yourself and for free or call a private master. If you chose the first option, then read the article, where we will show you how to install an air conditioner in an apartment on your own, and also provide photo and video materials as visual instructions.
There are many types of air conditioners for an apartment, the most famous is called a “split system”, the installation of which will be discussed later. It consists of 2 blocks: internal - evaporator, and external - condenser, which are connected thanks to electrical cables and 2 copper tubes through which freon flows. A plastic tube branches off from the inside, designed to drain condensate.
Video tutorial where you will learn about the right tools and most common mistakes allowed during installation:
Step-by-step instruction
First you need to install the outdoor unit. Well, if you have an open balcony in your apartment. This will provide unlimited access to the air conditioner. If you decide to install the air conditioner on a glazed balcony, then the condenser is mounted on the outer wall of the house, in which you first make holes. Anchor bolts and reliable brackets will help to fix the outer part of the system to the surface. To protect the device from precipitation, build a visor over it.
Before you install an air conditioner in your apartment with your own hands, read the following tips:
- the surface for fastening must be flat and strong;
- living on the ground floor, mount the unit at a height of at least two meters so that it does not become a target for thieves;
- when choosing brackets, keep in mind that they must withstand a weight that is 2-3 times the weight of the equipment;
- living on the upper floors, but not having a balcony (loggia), you will have to use the services of climbers (pictured below) or a car with a special ladder in order to install air conditioning in the apartment from the facade.

Having installed the outdoor unit, we drill a hole in the wall necessary to connect the cables and refrigerant pipes that connect the disparate parts of the split system. Next, a "waterproofing glass" is mounted, where we lay the wires and tubes. The next step is to install the indoor unit of the air conditioner in the apartment on your own. Before you designate the place where you place it, read the following recommendations:
- the footage between the indoor and outdoor units should be no more than seven to thirty meters (the specific figure depends on the model of the system itself);
- the body located in the apartment must be located from other things (in relation to furniture) at a distance of not less than three meters;
- to avoid wind and sickness, refrain from installing air conditioning over the bed and the place where you work, as well as over radiators, heaters, fireplaces, etc.
Classification of indoor units:
- Ceiling
- floor standing
- wall
When installing wall and ceiling air conditioners, we fix sufficiently strong brackets on which we will fix the device. With a floor device, everything is much simpler: it does not need to be fixed at all, but only put in a specially designated place in the apartment.
Important! If the floor unit is not level, then all the drops of condensate will be on the floor. Place it properly right away, because once the air conditioner is installed, the case cannot be moved anywhere!
Next comes the process of gating special holes for wires and tubes that connect the indoor and outdoor units. In many cases, the walls, ceiling, and occasionally the floor are shredded. If this process is difficult for you, then just put the communications in a plastic box that will not disturb the interior of the apartment.

When connecting blocks with wires and tubes, use fittings. Tubes with freon are forbidden to unwind at the joints and bend 2, 3 or more times. Be sure to drill your own line for the drain hose in order to drain condensate from the indoor unit, for example, to the street. Having connected the system, we carry out vacuuming of communications to eliminate unnecessary moisture and air from them. This process is carried out only with the help of specialized equipment. Next, you yourself need to think about a separate power supply for the air conditioner in the apartment. To do this, you need to the device (in strobes), and you need to install a separate machine in the switchboard. Cables are placed in strobes. 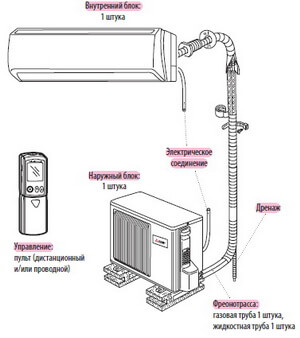
Check if you managed to install the air conditioner with your own hands at home. To do this, use a specific test program that is activated when the device is turned on for the first time. A positive result will be when the technique will function well, without vibrating the case.
Now more and more people want to buy and install a split system in their apartment. And it's not just air conditioning. Split system allows you to better freshen the air in the premises. What is its advantage? First of all, it does not block natural light, as it does not cut into window frame. The second advantage is that it does not depend on the general air conditioning system of the house as a whole. And the last - it consists of only two blocks: internal and external. The only reason why a large number of consumers do not dare to purchase a split system is ignorance of the rules for its installation. Consider all the steps in order and tell you how to install a split system yourself.
Compound
First of all, you need to know what this air conditioning system consists of. It is equipped with two separate units: the outer one - the condenser, and the inner one - the evaporator. They communicate with each other by means of electrical wires and two tubes made of copper through which the refrigerant circulates. In addition, the indoor unit is equipped with a thin plastic tube that performs a drainage function, i.e. removes condensed moisture from the system. According to the rules, it must be connected to a special drain tank or to sewer pipe, but for some reason, most often it turns out to be brought out, and the water from it drips directly on the heads or under the feet of passers-by.
Principle of operation
It is quite simple and lies in the fact that if the room needs to be cooled, then freon flows through a copper tube from the heat exchanger of the external unit to the heat exchanger of the internal one. Thus, the refrigerant is processed by the fan, and already cold air comes out from the inside of the air conditioner.
If, on the contrary, the room needs to be heated, then the external condenser heat pump starts to work as an evaporator, and the evaporator, in turn, acts as a condenser. The split system is also equipped with a compressor located in the outdoor unit. Its main function is to compress freon, which contributes to a significant increase in the efficiency of the air conditioner.
Mounting methods
Indoor units of split systems can be either wall-mounted or floor-to-ceiling. The latter can be successfully attached to both the ceiling and the floor. Most often in apartments multi-storey buildings use wall blocks. They are equipped with movable blinds, with which you can change the direction of the flow of air masses.

The power of the wall units is limited by the manufacturers themselves on purpose, since if the jet of cooled air is too strong in small room it can literally blow away everything that is there. In the event that the room is quite spacious, for example, it is an office or a workshop, then a more powerful split system with a floor-to-ceiling indoor unit is installed in it.
Mounting tools
In order to install a split system with your own hands, you will need a number of devices that you will have to purchase or rent. The quality of the work performed and the durability of your air conditioner directly depend on what tool you will use during the installation process. You will need:
● Perforator with a set of chisels. It is useful in order to make holes in the main wall.
● Armature detector. It may be needed if the walls in the house are made of concrete. If during drilling the tool gets on the reinforcement, you will have to make another hole.
● Tube flaring kit. It will not be possible to do this work with improvised means, since it will be impossible to achieve complete tightness.
● Pipe cutter. Under no circumstances should you saw off the pipes through which the refrigerant circulates with an ordinary hacksaw. Copper chips always remain in the gap, which can subsequently lead to compressor failure.
● Scraping. This tool is used for stripping the cut ends of pipes. Ordinary files or needle files are not suitable for this purpose precisely because of the sawdust.
● Manometer. It will be needed to measure the pressure of the refrigerant in the system.
● Vacuum pump. It is necessary to process the system before filling it. Quite often you can hear the advice that it can be flushed with coolant. This is fundamentally wrong, since it does not remove moisture and spoils the compressor, just like metal chips.
● Manual bicycle pump. It is used to test the system for leaks.
● Tester and phase indicator. These devices are necessary for electrical work.
Tubes and work with them
Experts recommend buying a copper tube in a store in a whole bay at once, and it does not matter if there is an extra one. It can be applied elsewhere. But if iron filings remain in the cut tube, you risk ruining your air conditioner compressor. Also, when buying it, you need to make sure that there are no visible cracks and dents on the surface, and its ends are rolled by the manufacturer.

Before you install the split system yourself, you need to practice flaring the tubes. It is worth noting that this procedure is done only with a special tool and nothing else.
To practice working with flaring, you need to take the same small piece with the pipe in the store, but do not touch the bay itself. At the same time, it will be possible to try to cut the tube in a circular motion, as well as to scrape the product, holding it with the end down.
Installation
In order to produce quality installation split systems with your own hands, you need to know the sequence of actions. Professionals recommend installing air conditioners only before or during repairs, since you still have to hammer walls, lay electrical wiring and attach brackets. If the repair has already been made, then all communications can be hidden with the help of external boxes, but this, as you yourself understand, will not improve the interior. How to install the split system yourself correctly will help you understand the phased implementation of this work.
Stage one: wiring
If we take even the most low-power modern air conditioner, which consumes 1.5 kW of electricity, then it also needs to lay a separate wiring with a cross section of at least 1.5 square meters. mm. In addition, you will need an automatic shutdown.
When connecting the wires to the input shield, it is necessary to find where the phase and zero are located with a special indicator, and after determining, mark them from both ends.

Stage two: outdoor unit
It is strongly not recommended to install the outdoor unit of a split system on your own if your apartment is not located on the first floor, as there is a risk of falling from a height. But on the other hand, due to the presence of loggias and balconies on the upper floors, this problem practically does not exist. In addition, maintenance and repair of air conditioners in such cases become more convenient.
Typically, a split system is installed on the east or north side of the house. But even if you had to attach the outdoor unit from the south, the balcony canopy will still protect it from direct exposure to sunlight.
Stage three: indoor unit
In order for the installation of a split system with your own hands to be successful, you must strictly follow the sequence of actions. First, with the help of screws, special brackets are attached to the ceiling (if it is a floor-to-ceiling air conditioner) or to the wall (wall-mounted system). Having finished this work, it is necessary to check the strength of the fastening, namely, install the indoor unit and connect it. If the structure does not stagger or vibrate, then the brackets are securely fixed.
It is easiest to install a split system with a floor unit, since it usually does not need fasteners. But all the same, it is necessary to finally decide on its location, because after laying communications it will be impossible to rearrange it.
Stage four: punching gutters
If you doubt your knowledge or are not sure about something, you can always get advice from a specialist who will tell you how to install a split system yourself and connect freon tubes and electrical wires, thereby connecting the two units to each other. For this, special gutters are usually punched on the ceiling or in the walls, but only if you need to lay a hidden highway.
If you do not want to hammer, then there is another option. All wires can be closed with skirting boards or decorative plastic boxes.
If a multi-storey building consists of blocks, then before starting to punch a hole in the wall, it is necessary to determine in advance with the help of an armature detector the places where the iron core lies. In no case can you cut off the reinforcement, since it is located in the outer bearing wall. According to the standard, the hole diameter should be at least 80 mm. Sometimes you can hear recommendations about 50-60 cm, but here the thickness of the thermal insulation was clearly not taken into account.
In addition, you will definitely need an assistant to stand below and warn people passing nearby, as a piece of brick or concrete that accidentally falls from a height can injure someone. Such an incident can cost the owner too much.
Stage five: connecting pipelines
In order not to make a mistake and connect all the tubes correctly, you need to study the instructions well on how to properly install a split system. First you need to measure the desired length of the tube and cut it off with a margin of at least 1 m. All the excess will go to the bends.
Professionals warn that tubes must be bent with great care, as they can break, and sometimes wrinkles form on their surface. They create obstacles to the free flow of refrigerant, which leads to a significant increase in energy consumption. The minimum allowable bending radius is 100 mm.

Then, polyurethane foam hoses or flex thermal insulation are put on the tubes. The use of foam rubber is highly undesirable. After that, threaded flanges are put on them, and the ends are flared. Next, the pipelines are connected to fittings. In this work, the main thing is not to confuse the connection. Most air conditioner manufacturers have made cold and hot fittings different in diameter.
For the drainage system, you will need a piece of reinforced plastic tube. It is connected to the drain pipe using a heat-shrinkable tube or a threaded flange. Drainage should be installed at a slope of at least 5-10 mm. This is necessary for the natural flow of water.
Sometimes, for some reason, such an inclination cannot be made. In this case, you will have to additionally install a special pump for pumping moisture. I must say that its purchase can cost about 70-200 dollars. The price depends on the pump model.
Step Six: Sealing and Vacuuming
The simplest and reliable way sealing tests - soapy water. To prepare it, you need to buy half a liter of distilled water at the pharmacy and heat it, then throw shavings of laundry soap into it.

By using the rubber hose of a bicycle hand pump connected to the outlet nipple, you can easily check the sealing quality. This is done as follows: one worker pumps air, and the other brush smears soapy water on the threaded connection and monitors the appearance of bubbles. When they stop puffing up, tighten another 1/8 turn. After completion of work, the soap coating is removed with a damp cloth.
After completing the sealing test, the system must be evacuated, i.e., remove moisture from it, dust and air that have got there. To do this, return the nipple to its place and tighten. Next, connect the vacuum pump and pump for about an hour. During this time, the moisture from the system should evaporate along with the remaining air.
Final stage: testing
For testing, the split system is filled with refrigerant from a cylinder through a special adapter on which a pressure gauge is installed. Wait until the pressure gauge shows the pressure indicated in the instructions. It is worth noting here that air conditioners operating on freon cannot be filled with freon, and vice versa.

During testing, the disconnector is turned on, and the air conditioner should enter the mode itself. If this does not happen, you need to try running the test using the remote control. If this does not help, you will still have to call specialists, but be aware that all installation warranties have already been lost.
In the event that the test is passed successfully, the cold air has gone and the blinds have been set to the desired position, you can safely tell yourself and others that you now know how to install a split system yourself. And the final touch - you need to close up a hole in the wall. And not with foam, but capitally.
 Substances and their physical properties
 Classification, structure, nutrition and the role of bacteria in nature
 Bacteria - the most ancient organisms on Earth Bacteria - the oldest group of living organisms
 Epithets, metaphors, personifications, comparisons: definitions, examples
 Bronchial asthma Bronchial asthma
 Roman Empire Ancient History
 Flexible removable dentures: design, features and benefits Varieties of soft dentures with photos