Extendable table - saving space and stylish interior solution. We make a spacious sliding table with our own hands Assembling a kitchen table with a swivel
Making a sliding table with your own hands is more difficult than a regular one, but sometimes it is necessary. Yes, for an average family, a small table with up to four seats is usually enough, but the problem arises when guests arrive, who, of course, should be seated at the table. It is in such a situation that a sliding design is useful.
A similar product can be purchased at any furniture store, but it is much more fun to make a table with your own hands. Where to start work, which table to choose for manufacturing, step-by-step instructions - you will find all this in our today's text.
What are sliding tables?
It should be noted that there are both dining and working tables of a sliding or folding type. However, most often they are installed in the kitchen or in the dining room.
According to the method of increasing the area, tables for small rooms are:
- folding;
- sliding.
The first option is quite simple - the countertop is fixed here using ordinary furniture hinges. When you need to increase the area, it moves away and is fixed on the leg.
Sliding tables are a design, the area of \u200b\u200bwhich is increased due to the built-in mechanism or guides.
Table 1. Varieties of transforming tables.
| View, illustration | Description |
|---|---|
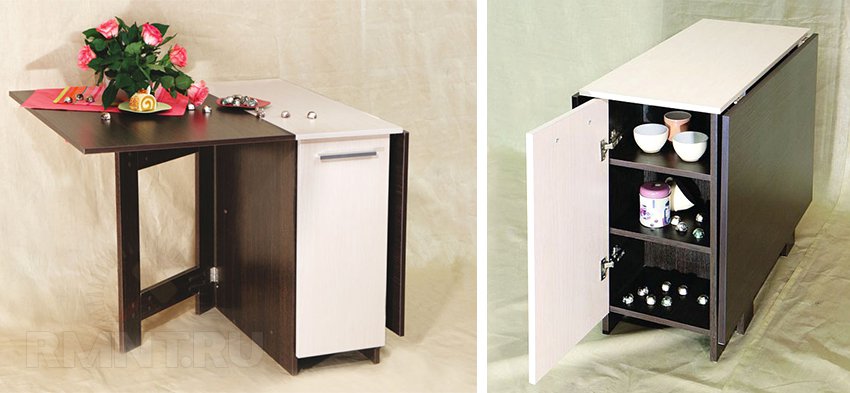
| This is the most famous folding table, which was popular back in Soviet times. When assembled, it looks like a cabinet, and if necessary, you can quickly expand the table top and leg. Modern models can already have a different appearance, many of them are distinguished by the presence of small folding parts on both sides, so that the table becomes more functional both when folded and disassembled. |
| This is another unusual folding table model. When it becomes necessary to expand it, the tabletop rotates 90 degrees. This is a very simple mechanism that will function for many years - there is simply nothing to break here. |
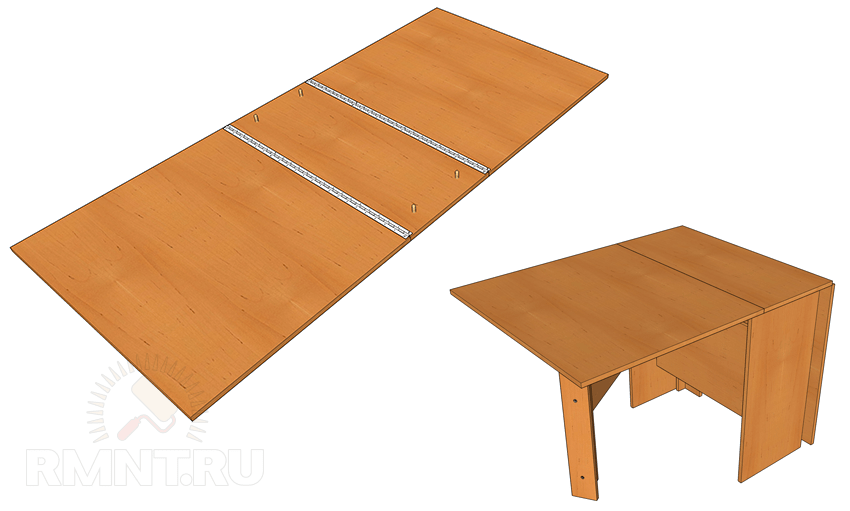
| The tabletop in this case is divided into two equal parts in the middle with the help of telescopic guides. In the usual position, these parts are fixed, and when it becomes necessary to increase the area of \u200b\u200bthe structure, it will be enough to pull the table by the edges on both sides. The guides move apart very quickly without any extra effort. In Soviet models, there was only one additional board, thanks to which it was possible to increase the dimensions of the table, modern products suggest the presence of two central tabletops. |
| There are various sliding mechanisms for tables. They are usually made of aluminum or galvanized steel. In the case of choosing the second option, the possibility of rust is not excluded, because liquid can get on the mechanism from the table. The principle of the mechanism is that you only need to pull it, and it will push the table apart. The main disadvantage of this option is the too high cost of construction. |


How to assemble a table-book yourself? See diagrams and step-by-step instructions at
Prices for popular models of sliding dining tables
Extendable dining table
What kind of tabletop to choose?
It is important even at the design stage of the table to decide on the shape of the table top, which is suitable for a specific type of room. We will take a closer look at the most common options.
Table 2. Forms of tabletops for a sliding table.
| Form, illustration | Description |
|---|---|
| When assembled, such products can be miniature or large - this will depend on the size of the kitchen, dining room. The extendable table can accommodate 6 to 8 people. Of the minuses, one can only single out that, due to the presence of all four legs at the end, only one person can be seated, and this is not always convenient. | |
| A table of this type can be installed both in a small and large-sized room, it can accommodate up to 12 people. Such a countertop should be chosen by large families, or by those owners who often invite a large company to visit. | |
| This is a rather unusual shape for an extendable table. This design is also suitable for rooms of various sizes - due to the lack of corners, the table will not take up too much free space, and thanks to this feature, it can be moved around the room if necessary. In addition, such a model is ideal for an apartment in which small children live, because the risk of injury is minimized by hitting a sharp corner. When assembled, the diameter of such a countertop is about 90-110 centimeters. When unfolded, the design becomes oval. | |
| This is an unusual version of the sliding table top. It is more difficult to make such a design, so it is better for beginners not to choose it. However, the finished table will turn out to be very functional. When assembled, it accommodates six to eight people, when disassembled - twice as many. This is a great option for a large family in which it is customary to have breakfast in different time, and have dinner - all together, at a large table. |
Video - Non-standard sliding table
What material is best to make a table?
Most craftsmen who are engaged in the manufacture of various furniture designs at home tend to choose the most durable, but at the same time budget material. Consider the most common options in the form of a table.
Table 3. Materials for the manufacture of a sliding table.
| Material | Description |
|---|---|
| Perhaps this is the most suitable option for the manufacture of such structures - wooden table any shape will look very noble and expensive. However, it should be borne in mind that solid wood products are heavy, and it will not always be convenient to move and lay out such a table. In addition, not every person can afford a natural tree - a solid array has a rather high cost. Furniture panels are a budget option. If they are tightly connected to each other and painted, then no one will be able to distinguish them from a single canvas. When choosing wood, you should be careful - there is a high probability of acquiring material affected by the fungus. It is necessary to carefully examine the cut, make sure that there are no cracks, all kinds of spots on it. However, any structure made from a natural array will have to be additionally treated with an antiseptic. |
| This group includes chipboard, MDF, plywood. This is also not the worst option for the manufacture of structures, because most modern furniture It is made from laminated chipboard or MDF. Of course, compared to natural wood, such materials will be less durable, but this will be quite enough for a simple dining table. If you choose chipboard, you should be careful, because such a material contains a dangerous synthetic resin. When making a countertop, it is better to abandon such material in favor of a more environmentally friendly option. So, you can combine MDF and chipboard to get reliable furniture. The main advantage of materials of this type is good resistance to humidity, temperature extremes. |
| This is also a fairly popular material used in the manufacture of structures of varying complexity. The main advantage of plastic is considered low cost, in addition, plastic surfaces are not demanding in care. However, at home it will be difficult to make a large table from this material, but small country or children's options are quite realistic. | |
| Glass is often used in the manufacture of various pieces of furniture, but it is important to remember that it must be very durable. The finished design will be airy and very beautiful. The main disadvantage is the complexity of working with such material, so it is definitely not recommended for beginners to choose it. In addition, the table will turn out to be quite fragile and not at all suitable for a family with small children. |


Important point! The sliding table must have reliable legs. They can be purchased at a furniture store ready-made or you can make it yourself. Most often, the legs are made of wood or metal.
Prices for various types of solid boards
massive board
Advantages and disadvantages of sliding tables
Tables with a sliding mechanism have the following advantages:
- unusual appearance - you can create a product of any shape;
- when assembled, the table will not take up extra space, which is especially important for owners of one-room apartments;
- the design has good stability, subject to high-quality assembly, so that the table can withstand quite a lot of weight;
- it is possible to provide additional functional elements in the form of drawers in such a table;
- if desired, you can make several transformation options at once;
- these are universal products that are installed not only in the kitchen or in the dining room, because the sliding table will perfectly fit into the interior of the children's room, office and even the hallway.
Of the minuses, one can only single out that such a design will cost more - if we are talking about a purchased table. Under the condition of self-manufacturing of the sliding table, the cost is significantly reduced. In addition, some people refer to the disadvantages that the table is too heavy, so it is not convenient to use it in all cases.
Making a sliding table with your own hands
Today we will consider a simple option for making a structure with our own hands. This is a simple job, even a beginner can handle such a process. This table can seat eight people when fully extended.
The finished table must meet the following criteria:
- good tabletop strength even when fully extended;
- optimal capacity and ease of use;
- the ability to disassemble and assemble the structure without any obstacles;
- attractive appearance;
- the ability to use the entire surface of the tabletop.

Prices for chipboard laminated panel
Chipboard laminated panel
In addition, when allocating seats, it must be taken into account that there should be a space of about 60-65 centimeters for each person.
In the process of work, we will need the following:
- Chipboard sheets with a finished edge 25 millimeters thick (70 centimeters wide and 60 centimeters long). Two parts will make up the countertop itself, and one of them fits in the middle. It is not necessary to buy new sheets, in our case parts of the old design will be used.
- Aluminum corner with a section of 50 × 50 millimeters. It is necessary to take a corner 2 meters long and prepare from it four parts 50 centimeters long.
- Telescopic guides - 2 pieces (length should be 50 centimeters).
- Metal legs - 4 pieces (the length of each is 71 centimeters).
- Furniture locks - 4 pieces.
- Screws 10 mm long and nuts.
- Self-tapping screws.
- Drill.
- Drill with a diameter of 4.2 centimeters.
- Screwdriver with a set of nozzles.
- Hacksaw.
- Roulette.
- Hammer.

Prices for the range of drills
Step-by-step instruction
Step one: First, we should measure the chipboard parts. All three parts should have the same length, the width of one part will be slightly different. To begin with, the parts should be laid out on the workbench in the correct order. The length of our table when assembled will be 120 centimeters, and when fully extended, about 170 centimeters.

Step two: now we should place a telescopic guide between two metal corners. Need to cut sharp corners from metal corners, then they should be well sanded so that no burrs remain. This is done for safety reasons, to protect those sitting at the table, especially young children, from possible injuries.

Step four: then it is necessary to separate the guide and attach one of the parts (wide) to the metal corner. Through the holes you can see the line we drew. Here you should make markings for future fasteners.
Now, with the help of a nail and a hammer, it is necessary to mark the attachment points, and then drill them - in this way we have prepared holes for fastening the wide part of the guide. By the same principle, you should mark the location of the holes for the narrow part of the guide. It is better to pre-grind the holes from burrs using a drill.

Step five: now most of the guide and the corner must be connected using screws and nuts. It is not difficult to do this, because all the prepared holes are already there - all that remains is to tighten our fasteners tightly.
Next, you have to screw the narrow part of the guide to the other part of the corner. It is important to be careful here to attach it with the correct side (otherwise the mechanism will not function at all). Otherwise, it should be fixed in the same way with screws and nuts.

Step six: now you need to make holes in the guides for fastening to the table. It is necessary to expand them in such a way that the sides with a wide guide are on the outside, so they will be fixed to the table. In this case, holes must be made on both sides.
Step seven: then you should fix the corners with guides on the sheets of chipboard. First of all, you need to use a tape measure to find the middle of our corner, and then install it at the junction of the two parts of the countertop. From the edge you will need to retreat about 8 centimeters.

Step eight: now the corners must be screwed to the parts of the countertop using self-tapping screws. By the same principle, you should fix the corner on the other side of the table.
Step nine: checking the construction. The table should move easily, so it is necessary to check the operation of the sliding parts several times and make sure that the mechanism functions without obstacles.
Step Eleven: it is necessary to separate the parts of the lock and push the parts of the table on the rails. Next, in the center, insert an additional part of the table. Then the table should be moved, leveled and one more lock should be installed on each side. Finally, we need to fasten all four legs around the edges.

The degree of load on the legs should be taken into account, and for a large sliding table it is recommended to choose iron ones. Of course, it is almost impossible to make them at home, but finished products are sold in hardware stores. You can choose the optimal height and thickness of the legs. Experienced craftsmen do not recommend choosing thin legs for a large table, so it is better to take those that are more massive.
If you decide to make the legs yourself, it is recommended to take thick wooden bars for their manufacture. Then they will need to be trimmed and sanded, then painted in the desired shade and fixed to the table.
Further finished structure should be placed on the floor and make sure that the table is level, without distortions. Before placing dishes on the countertop, you should make sure that the table is strong - you should put something heavy on it and watch for a while. If necessary, it will be necessary to strengthen the structure.
The last step is to decorate the table. Of course, this step is optional and if you are satisfied with the look of laminated chipboard, then you can skip it. If you want to paint the table, then you first need to sand it with sandpaper, after which the surface can be covered acrylic paint. In this case, you can show your creative abilities, especially if you know how to draw beautifully - then the table can not only be painted, but also painted.
Video - DIY sliding table
Video - Sliding round oak table
Self-made furniture: advantages
Not everyone can decide to independent production various pieces of furniture, but such actions have several main advantages:
- Saving. This is a good opportunity to save the budget, because you do not have to pay furniture makers for services.
- The most accurate measurements. You can not only pre-measure the place where the table will be installed, but also correct some details during work.
- Creation of a unique design. Only on your own you can create an exclusive table that is not found on sale.
- Possibility to buy materials only good quality. Not always a master furniture workshops they act in good faith, and in order to earn more, they acquire low-quality materials and accessories. That is why it is recommended to engage in procurement on your own - you cannot deceive yourself.
Of course, in the absence of any skills in making furniture, making it yourself is a certain risk, because a beginner can simply ruin the materials due to inexperience. But, if you do everything slowly and thoughtfully, then even the first time you can get a very worthy result that you can be proud of.
Summing up
Despite some concerns, even a person without special skills can cope with the manufacture of a sliding table. We have considered very simple design, the creation of which will take only a couple of days - you just need to carefully follow all the points step by step instructions, check the correct location of the parts and not confuse the dimensions. Good luck!
Many novice craftsmen are wondering how to assemble a kitchen table without instructions, spending the minimum amount of time on all the work. The easiest and fastest option is to use a finished countertop and legs. Such a design for correct installation can last long enough. There are other options for kitchen tables: completely wooden, corner, folding. All of them are assembled according to the same principle. 
Similar articles:
Required tools and materials
Most often when assembling kitchen table furniture board and laminated chipboard (laminated chipboard) are used. The main advantage of the first option is ease of use. On sale there is a shield made of pine, which is easily drilled and polished. To work with it, you do not need a workshop - you can assemble the table right at home. Shield furniture also has disadvantages. It has to be sanded to a flat surface and additionally treated with protective coatings - impregnation and varnish.
Special attention worth paying attention to. The larger this parameter, the stronger the furniture will turn out. A thin tabletop without additional reinforcement can bend under the weight of objects. For the table, it is not recommended to buy a furniture board with a thickness of less than 3 cm.
Chipboard is a more difficult material to work with: chips can form during sawing, and an edge will need to be glued to all open cuts. It is easier for novice craftsmen to buy a finished chipboard tabletop of the right size or order sawing and gluing the edges when buying material at a hardware store. LDSP also has its advantages. These include a wide range of colors and a variety of textures.
To create a kitchen table, you will need furniture fittings - fasteners and finished supports. Sometimes a bar is additionally used. With its help, the deflection of furniture made from a shield is prevented. To do this, make a rectangular frame from a bar. This design is called the underframe. Its task is to distribute the tension that affects the corners of the furniture most of all. Then the tabletop is placed on the frame. The beam is also used as table legs.
Of the tools you may need a drill, screwdriver or screwdriver. The legs are often attached to the top of the table with self-tapping screws. Sometimes metal corners are used as fasteners.
Assembly preparation
The assembly instructions for the kitchen table are simple. The first stage is preparatory. It starts with . First you need to decide how many people the table will be designed for. One seat is about 60 cm. Thus, the length of a table for 4 people will be about 1.2 m. The width depends on the area of \u200b\u200bthe kitchen. For small rooms, it can be 75-80 cm.
For professional assemblers, including tables, will depend on the type of construction. It is easier and faster to work with ready-made furniture supports. In this case, all work will consist of affixing marks for fasteners and installation. It is best to use adjustable legs. Such supports can be set to the desired height after leveling the countertop. These legs are suitable for those who have an uneven floor. In addition, you can make a table on two supports. They are sold in furniture fittings stores.
Assembly steps
Consider how to assemble a kitchen table with chrome legs. This option is simple and applicable to any countertop. To begin with, we will put marks for the subsequent screwing of the legs. Lean the mount against the countertop and mark the points for the screws with a pencil. After that, you need to screw the mount. To do this, you need a screwdriver or a screwdriver. Then, in the place of attachment, you need to mount the leg. It is easily screwed into a special hole in the center. Similar actions must be done with the rest of the supports.
A more difficult question is how to screw the legs to a wooden kitchen table. Such a design is going to be much more difficult, because you need to think about the types of connections.
The classic is strengthened with the help of a special underframe, which is a frame made of timber. The minimum height of each plank is 12 cm and the thickness is 3 cm.
If the legs are made of timber, then their cross section should not be less than 6x6 cm. Traditionally, the entire structure is assembled on a tenon-groove connection. Then, a metal corner is used to fasten the slats and legs. After that, proceed to the installation of countertops. It can be connected to the underframe with screws.
Features of the assembly of the corner structure
Corner table is suitable for a small kitchen. This model saves space and looks quite unusual. To construct a corner table, you will need a table top and 2 or 3 legs.
How to assemble a corner kitchen table (instruction and step by step guide):
- Mark the length and width of the future countertop on the furniture board (both parameters are measured from the corner). Connect the two resulting points with a straight line or arc. The cut of the table can also be made curvilinear.
- Cut out the resulting figure with a jigsaw. Sand all edges with sandpaper.
- Attach the leg to the tabletop and mark the attachment points.
- Screw the legs to the top of the table with self-tapping screws.
- If the corner table has only 2 legs, then for greater stability it can be additionally attached to the wall.
Another option to save space is to do, which will be a continuation corner kitchen. This design is multifunctional and easy to implement. The table can be used as an additional working surface or take food for him.
Do-it-yourself round sliding solves the problem of lack of space in the kitchen or living room.
Of course, such furniture can be purchased ready-made, choosing from a wide range. However, this is expensive, and does not always fit perfectly into a cramped room.
You can make a table of different sizes yourself. Moreover, depending on the existing carpentry skills, you can choose a drawing of varying degrees of design complexity.
 For small spaces where a dining table is installed (kitchen, living room or separate dining room), round design looks practical and attractive. She takes less space and allows you to comfortably fit around.
Problems begin when a significant number of family members and guests gather at the dinner table. Oversized furniture simply does not fit in a cramped room.
Sliding design eliminates the problem. Its essence is as follows. In its normal state, it looks like a small round table for 3-4 people. It is easy to move and install in a new place.
If necessary, a transformation is made - it moves apart, acquiring the shape of an oval. Inserts help to form a significantly larger surface area.
reference: 8-10 people can already be accommodated at such a table.
 The simplest system has a tabletop divided in half, the halves of which can move along the guide elements in opposite directions.
The gap at the divergence of the halves is filled with special inserts that allow you to maintain the integrity of the countertop. In the assembled state, the inserts are located inside and are invisible to others.
Important: The final capacity of an extended table depends on the distance that the elements can be moved without disturbing its stability.
In order for the design under consideration to work reliably, the following must be fulfilled: requirements:
- sufficient strength of the table top at maximum extension;
- providing the necessary capacity and ease of use;
- assembly and disassembly without undue effort by one person;
- the possibility of practical use of the entire surface of the extended tabletop;
- mobility;
- ease of manufacture with your own hands;
- low cost;
- outward attraction.
Wood or plastic?
The choice of materials for a homemade table is due to their availability and appearance. Particular attention is paid to the countertop. It can be made from the following materials:
The table, in addition to the countertop, must stand securely on. For their manufacture, a wooden beam is most often used.
Advice: you can also use a metal profile for them, in particular, an aluminum flat pipe, a corner or a U-shaped profile looks modern.
Drawings and assembly diagram
Work on the manufacture of the table begins with the development or selection of the project. Required Assembly drawing and detailing.
 circuit diagram extendable table
  General drawing of a sliding table
 Unlike a conventional table, in a sliding design, the base of the table top is firmly fixed to the legs, and the main tabletop is mounted movably on it and consists of two halves. The base is made in the form of a frame connecting the legs to each other with collets.
To ensure the movement of the tabletop, guides are permanently installed on it. It is recommended to use typical guide rails for the full drawout of drawers as their recommended. Additional elements are attached to the main tabletop from below, sliding along the guides. Depending on the length of the maximum rollout the number of additional elements is 1-3 pieces.
Important: the length of the slats must be at least 35 cm.
After fixing the halves of the tabletop in the extreme position, the resulting gap is filled with rectangular inserts. In the simplest design, they are simply removed from storage and installed by hand. Furniture pins are used to eliminate displacement. In more complex structures established lifting mechanisms, which automatically raise the inserts to the level of the tabletop surface.
Tools
When making a wooden table with your own hands, you should prepare the following tool:

When using plywood, you will need electric jigsaw . For surface treatment, grinding and emery skins are used. Measurements and quality control are provided with a tape measure, a metal ruler, a caliper, a plumb line and a building level.
How to make and collect?
The dimensions of the finished table are determined by the number of people planned to be placed. Standard height is 72-75cm.
 Assembly diagram
 The size of the tabletop is selected based on the condition - 60-65 cm per "eater". Manufacturing and assembly is carried out in the following order:

The final assembly consists in inserting the table top guides into the grooves of the base guides. Further, extension limiters are installed, if necessary.
Finishing
 The table should have an attractive appearance, which is provided by the finish. First of all, the end face is processed. To avoid scratching on a sharp edge, it is recommended to remove a small chamfer.
The butt itself is polished to eliminate the risk of splinters. The entire surface of the countertop is also processed. It should be perfectly even, horizontal and smooth.
Important: The most common finishing methods are painting and varnishing.
After sanding the surface, the wood can be impregnated with tinting compounds that will create a certain shade and emphasize the wood structure. A layer of varnish will secure the finish. With the help of alkyd paints, almost any color of furniture can be provided for combination with other interior elements.
Another common option is self-adhesive film. It is often used to finish chipboard worktops. With its help, you can imitate various natural materials - wood, a natural stone, marble, metal, etc. Inlay or veneering gives a special sophistication to the table.
Photo
Depending on the materials used and imagination, you can get completely different results:


Useful video
The main stages of production with detailed description sliding mechanism can be seen in the following video:
Conclusion
Round extendable table is good for small kitchens. When assembled, it does not take up much space, and when extended, it allows you to accommodate all family members and guests. With a little carpentry skills, you can make such furniture with your own hands. This will avoid significant costs and optimally fit the table into a cramped room.
In contact with
A folding table is a great solution for a large family or a friendly company.
In the folded version, it takes up a minimum of space, and if necessary, the tabletop area is significantly increased due to additional inserts.
This design is suitable for use during the holidays to seat all guests.
A folding table can be bought at the store or made independently.
Folding table options
Folding tables can be made in various variations and different sizes: both small or and large - or
Folding tables differ in complexity designs - from very simple like folding to equipped special mechanism
materials for the manufacture of tables are also used a variety of. Table tops are made from glass, plastic, chipboard, MDF, tree.
Indispensable for some models and very practical and reliable metal folding legs for the table (with your own hands they can be made from chrome plated pipes).
How to make a table from a metal profile with your own hands:
The purpose of folding tables can be very different. Here are just a few examples:

Folding table for trade

Folding massage table

Extendable dining table
 Even a beginner can make such a table home master. Despite the lightweight design, it is very strong.
When assembled, the width of the tabletop is 700 mm, the length is 1200 mm. Its area is increased due to an additional, central insert. The total length of the extended table is 1670 mm.
At such a table, eight adults can easily accommodate: one from each end and three from both long sides.
Materials and tools
In order to make a folding table with our own hands, we need the following materials:
- LDSP 25 mm thick;
- PVC edge with hot melt glue applied to it (thickness no more than 2 mm);
- aluminum corner 50 x 50 mm (500 mm) - 4 pcs.;
- telescopic guides (500 mm) - 2 pcs.;
- thick metal leg (710 mm) - 4 pcs.;
- furniture lock - 6 pcs.;
- screw M4 10 mm;
- self-tapping screws 20 x 4 mm and 16 x 3 mm;
- household gloves.
 Necessary tools for work:
- tape measure, pencil, long ruler, marker;
- clamps (for sawing chipboard sheets);
- building level;
- milling cutter;
- building hair dryer (thermal gun);
- screwdriver;
- drill and drill with a diameter of 4.2 mm;
- a circular saw.
- electric jigsaw and file with fine teeth (so as not to chip the laminated chipboard edge)
Drawing and cutting material
Before starting work, you need to decide on the dimensions of the future product and make a drawing of a folding table. In our example, the dimensions of the sliding tabletop, folded (left) and with insert (right), are as follows:

Stages of work
Step 1. To begin with, we mark out and cut out three parts from chipboard that will serve as a countertop: two identical parts 700 x 600 mm and one for insertion - 700 x 470 mm. In order to without chips make cuts on chipboard, a regular electric one will do jigsaw.
Important: if in the future the part will be processed by a milling cutter, it is worth adding a couple of millimeters to each side.
Then, with clamps, the chipboard sheet is attached to any flat surface. We set the edge of the cut with a level, we guide the jigsaw calmly and accurately.
Step 2 Finishing the edges of parts milling cutter gives a perfectly straight cut. The cutter should also be driven slowly and carefully, working through each section of the cut.
Step 3 We glue the ends of the parts edge from PVC. To do this, we fix the part with a clamp vertically on a stool or table. Cut off the necessary piece of the edge and apply it to the cut, warming up building hair dryer. All work is carried out in economic gloves. After the glue has completely dried, you can continue .

Step 4 For safety, you can cut sharp corners on all aluminum corners and round off their.

Step 5 Now we take two corners and guide. On the outer side of one corner, mark 25 mm from the rounded edges and draw a line that will divide the side of the corner in half. We perform the same procedure with each from the rest of the corners.
Step 6 We apply parts of the guides to the corners and plan bolt holes. We knock them out a little with a nail (so that the drill does not come off) and we drill. We fasten them with bolts.


Step 7 We got two designs from the corners. I put them on even surface in this way: corners with thin guides (movable) - inside, corners with thick guides (fixed) - outside. We drill four holes in the fixed corners and four in the movable ones.

Note: all holes in the movable guides are made from the outside, in the fixed ones - from the inside (i.e., the holes should be on opposite sides of the product).
Step 8 We put two identical parts from chipboard on a flat surface, turn it over facial side down. Put both on top telescope(moving side in and fixed side out) at a distance 8 cm from each end. The middle of the telescope should coincide with a junction of parts.

Step 9 moving side fasten self-tapping screws (20 x 4 mm) to the right side of the tabletop, motionless - to the left.

Step 10 Attached to each side of the table padlock using self-tapping screws 16 x 3 mm.


Step 11 We open locks and pushing apart countertop. Insert between them middle piece face down. We shift tightly countertop, to form a flat surface.
Collecting cabinet furniture is a pleasure. All costs pale in front of the ease of use of items made "for themselves." We invite you to study the common designs of folding dining tables, as well as the technique of assembling them, and you will be able to make a folding dining table with your own hands.
What are we going to make
The main advantage of folding tables is their mobility, and for this they must be light. Exactly to the extent that the housewife will cope with their transformation and movement. It is unlikely that a table made of solid wood will be easy to lift, and with small dimensions such material is completely inappropriate.
It is supposed to use light and thin laths of factory-cut chipboard or self-cut to create the base of the table.
For countertops, the choice is almost unlimited. Perhaps you prefer the usual particle boards, but look also at MDF panels, furniture boards or 40 mm chipboard kitchen worktops with acrylic or vinyl coating. However, keep in mind that for most of these materials, the wrong side is different from the front, it simply does not withstand normal operating loads. This moment can be decisive in some table designs.
Swivel, sliding or classic "book"
There are truly many ways to transform the countertop. The simplest and most familiar of them is used in a table-cabinet, which has two lifting tabletops on piano hinges and swivel legs as a support for them. The table is not always convenient: the person sitting at the central section simply has nowhere to put his knees, moreover, when unfolding it, he often has to move and turn. The aesthetic value of such furniture is almost zero, but the "book" is the most budgetary version of the table.

Sliding tables have a rigid frame with fixed legs. Only the tabletop undergoes transformation: it moves to the side to the middle of the frame, while the open part is covered by the second half, stored separately. Such tables are good in spacious dining rooms, the transformation is carried out in a few simple movements.

By the way, there are several layout options, for example, the edges of the table top can be moved with the insertion of the central segment. Or, for example, the tabletop can be folded in half on hidden mortise hinges and lean back onto the open part of the frame after shifting. Do not bypass the rotary structures, in which the tabletop does not move to the side, but rotates perpendicularly, after which it is complemented by the second half.

Making table legs
The legs for the "book" are assembled from three strips of chipboard. Two of them are fastened with the letter G on 60 mm confirmations. At the end of 100 mm rails, for this you need to drill through hole 4 mm, expand it with a 6 mm drill to a depth of 70 mm, and then with a 10 mm drill to a depth of 60 mm. In other words, manually and gradually perform milling for a recessed confirmation.
To prevent the tabletop from swinging around, the leg is covered from the end with a bar 100 mm wide and fastened with 45 mm confirmations in three arbitrary places, hiding the traces of the previous fastening. This method of fastening is the least noticeable and most durable, but you can also use overlay corners, dowels or ties.

For a sliding table, legs from two chipboard strips folded perpendicularly are suitable. A rectangular frame is assembled between the legs of the same material, which fastens the base of the table. Another, more complicated option is to assemble square boxes from planks 84 mm wide and tighten them with confirmations. Such strict and discreet legs will suit most interior solutions, while providing good stability and allowing you to comfortably stretch your legs.


You can also use chrome pipes or turned products as legs for all types of tables.
The main frame is very simple
For sliding and rotary tables, the main frame is made of chipboard strips 120-200 mm wide. In general, the frame encircles the legs in a circle and hides the traces of the table top. Square legs can also be fastened not with an external belt, but with intermediate inserts. The upper ends of the parts must be brought flush; to give diagonal strength, it is possible to add jumpers inside the frame. The elements are fastened with furniture corners on the inside.

The total length of the base should be 40-50% less than the length of the tabletop when unfolded. The width is chosen so that the overhang of the tabletop along the edges is at least 100-150 mm.
When assembling the base for a “book”, the main dimensions have a stricter relationship. The central segment of the table top determines the overall width of the table, which should be 20-25 cm less than the length of the side wings. That, in turn, should be less than the height of the table by about 50 mm. Since the legs are hidden inside the base when the table is assembled, its minimum width when folded is at least 300 mm.

The base itself is assembled in the shape of the letter P and reinforced with one crossbar 400 mm wide in the center on the edge. It is possible to fasten from the inside with furniture corners, but in this case it is better to prefer confirmations. The leg loops are attached no closer than 50 mm to the edge of the side walls.
Hidden storage sections
Often the inner space of the base of the table is used to store dishes or household chemicals. The easiest way to organize a storage space is inside a folding "book". The width of the central segment must be increased by 200-250 mm and several horizontal shelves should be used instead of one vertical crossbar. It is also possible with a blind lining of the inner box and the installation of doors on the ends of the base.

Due to the complex shape of the legs, the door will be 100 mm wider than the box on both sides, so it is important to remember one thing: the handle on the door is installed on the side where the table leg is in the folded state. Accordingly, under different wings, the direction of opening the doors and the location of the legs should be opposite.
In sliding tables for arranging a niche, it is enough to knock out the frame from below with a solid sheet of MDF and add a few cross bars to secure the bottom more firmly. Another option is to use frame strips up to 400 mm wide and fasten the base along the center. Drawers can be installed in the formed niches on full extension rails.

Countertop options
The tabletop for the “book” must be assembled upside down, laying out the sheets of chipboard on the floor and carefully aligning them. The wings are connected to the central section with piano hinges, then drilling is performed for dowels for fixing to the ends of the base. Additionally, it is necessary to provide limiters in the center of each wing so that the leg does not develop from accidental movement of the foot.
The most versatile option for mounting the table top of sliding tables is on drawer rails. To do this, the table top or its halves are complemented by a pair of longitudinal ribs, the distance between which is 20 mm greater than the width of the base body. The guides can be used as regular or full extension, their length must be comparable to the overhang of the tabletop in the unfolded state. This installation allows you to maximize the size of the unfolded table, at the same time, strength and stability do not deteriorate.

If the tabletop is assembled from two halves, they can be folded with their front surfaces to each other and embedded hidden loops into the ends. With this option, the front surface of the unfolded tabletop always remains intact, that is, its individual parts will not have varying degrees of wear.

Metal dowels at the ends of different segments of the tabletops are also very useful, which ensures greater solidity and eliminates the formation of bumpers and drops.
- Device type
- Materials and fixings
- The size of the parts of the sliding table
- Frame and leg design
- Preparation of countertop components
- Assembling a sliding dining item
The dining table is considered one of the most necessary attributes in a kitchen or dining room. The size of the table is calculated based on the number of people using it and the total area of \u200b\u200bthe room in which it will be placed.
Today, the modern furniture industry offers a variety of various options dining tables, but the most common model is the type of table with a sliding top. This is primarily due to the fact that such a table fits almost any small room. Its versatility allows you to save a significant amount of usable space in the kitchen or dining room. The sliding table is quite convenient in operation, it can be installed in any part of the room.
Despite the technological features, the sliding table type has a simple design. Therefore, if you do not have the opportunity to purchase ready-made dining furniture, you can make a sliding type of table with your own hands. To do this, it is not necessary to have professional skills, it is enough to understand a little carpentry.
Device type

At the moment, the furniture market offers tables with special devices that require only the rotation of the desired handle for instant and independent transformation. Such designs are considered advanced, most often they have a high cost. Therefore, the average consumer cannot always afford high-tech furniture.
It is not possible to assemble an attribute of furniture with such a mechanism at home, but on the other hand, you can independently design a sliding-type dining table of a simpler type. The main factor in the discomfort during the operation of such tables is the absence of any mechanism that is responsible for shifting parts of the table top. In Soviet times, they did not pay much attention to this, therefore, almost all elements of the furniture of the last century were put forward and retracted by human effort.
To simplify the design, while adding convenience to it when using it, you will need to equip the sliding table with a special mechanism.
Back to index
Materials and fixings

The production of the dining table will be carried out on the basis of a classic design, which involves its combination with some modern elements.
For manufacturing, you will need the following materials, accessories and tools:
- A small bar for table legs with a section of 4 × 4 cm (the height of the dining table is about 73 cm, so you will need to make 4 legs 71 cm long).
- For the base, high-quality plywood with a layer thickness of 2 cm is used.
- The tabletop and frame are made of laminated boards of the chipboard type, the thickness of which must be at least 1.8 cm.
- Self-tapping wood screws 4×50 mm.
- Self-tapping screws 4×16 mm.
- Carpentry dowels 8 × 40 mm in size.
- Joiner's corners made of iron for self-tapping screws measuring 3 × 3 cm.
- Adhesive type edge in the color of the laminated worktop.
- Sandpaper or grinder.
- Construction adhesive for gluing dowels.
- Electric drill with drills with a diameter of 8-10 mm.
- Household iron.
- Extended set of carpentry tools.
- Scissors or construction knife.
- Roulette for measuring constituent elements.
- High-quality wood paint and varnish to cover the outer parts of the table.
The main innovative idea in the Soviet-type sliding table is the presence of a roll-out mechanism, which is most often used in the manufacture of drawers.

Synchronous mechanism with stopper for frameless tables with fastening to the tabletop.
For a particular table, two guides will be enough, the length of which should be about 30 cm. In any case, the mount is hidden under the tabletop, so the color and condition of the hardware do not matter.
Sawing components from laminated chipboard and plywood must be uniform, accurate and highly accurate. Therefore, it is best to entrust this work to a skilled worker with a special saw used in furniture production.
The total size of the dining table, excluding height, is 90×70 cm in the assembled position and 130×70 cm in the extended position. This size will be enough to seat 8-12 people at the table in free seating.
Back to index
The size of the parts of the sliding table

The components of the table in question will have the following dimensions:
- the tabletop consists of two parts, the size of each is 45 × 70 cm;
- the dismantled tabletop element has a size of 40 × 70 cm;
- side parts for boxes under the table should be 42 × 12 cm each (4 pieces in total);
- the end elements of the boxes under the table have a size of 60 × 12 cm (2 pieces in total).
The value of the components on a plywood base:
- the end elements of the frame and the crossbar, on which the dismantled part of the table is placed in the assembled form, have a size of 50 × 12 cm each (4 pieces in total);
- the side parts of the frame have a size of 83 × 12 cm each (2 pieces in total).
It is necessary to pay special attention to the finish of each element, as they will always be in sight. If the table will be placed indoors, then it will not require a special moisture-resistant coating. But splinters still need to be removed, so best solution will make high-quality grinding before varnishing the parts. After identifying roughness, you need to process the surface with emery and varnish it again.
Back to index
Frame and leg design

The end elements and the crossbar are placed in the middle of the side parts of the frame. The first 2 parts should be fixed parallel to the edges of the side parts, the second 2 parts are located almost in the very center of the formed frame parallel to the bottom edge. The interval between the parts should be approximately 10-12 cm. The dismantled part of the countertop will be conveniently located on the formed structure, but to pull it out, you will need to slightly tilt one of the sides. For this reason, it is necessary to make the interval between the crossbars as small as possible.
The legs are inserted into the corner of the frame and twist right through it from the outside. This is done using self-tapping screws measuring 4x50 mm. In addition, you need to place iron corners on the surface of the frame and legs. At this stage, it is important to check the reliability of the design and the uniformity of the location of each of the legs, otherwise the table will swing. If you find any deviations, you can immediately correct their height.
The appearance of sliding furniture used to be associated with small area apartments. And today, more and more often, a rational approach is used in the arrangement of premises: it is not necessary to have a large table in the house or office, you can get by with a smaller product. But capacious tables become necessary during the reception of delegations and guests. What to do? The answer to such a request are tables of different styles made of wood, plastic, metal, glass, equipped with various transformation mechanisms. Such furniture is able to double or even triple the usable area of the countertop.
In spite of a large number of suggestions, there is a desire to make a round, oval or rectangular sliding table with your own hands. This is due to objective advantages:
- You can choose the dimensions of the product yourself.
- The layout mechanism depends on the desire of the owner.
- Independent choice of material, color, design.
- Saving money.
Drawings, photographs and a description of the work from the masters will simplify the process.
Technical solutions refute stereotypes. Coffee table in the living room thanks to the installation of a special mechanism will provide comfortable spot for hanging out with friends. The useful area of the countertop will increase by 2 times.

In our version, the folded table has the following dimensions:
- width - 75 cm,
- length - 90 cm,
- height - 46 cm;
unfolded:
- width - 150 cm,
- length - 90 cm,
- height - 78 cm.
Individual production allows you to change the size of the product, and, accordingly, its parts at the request of the master. A sliding table can be made of wood, but making it yourself will be time-consuming. Application of chipboard will greatly simplify the task.

The sliding mechanism is available in two versions:
- two single for symmetrical installation;

- double.
Keep in mind that a round table cannot be made foldable with this type of fixture.

If you like to create such structures with your own hands, purchase parts from which you can make two layout mechanisms.
- tube 20x20 cm - 4 linear meters;
- tube 50x25 cm - 1.2 p. m;
- metal strip. - 1 p. m;
- 6 bolts M8x120;
- 2 bolts M8x60;
- 2 bolts M8x50;
- 8 bolts M4x20;
- 26 nuts M8;
- 24 washers 30x8;
- 12 intersection screeds;
- 4 gas shock absorbers 120-140N.
The device and the connection points of the mechanisms can be understood by considering the diagram below.

Stock up on furniture fittings:
- eccentric coupler in the amount of 16 pieces;
- 32 confirmations;
- 32 self-tapping screws 30x4;
- 4 plastic double corners;
- 8 self-tapping screws 4x16;
- futorki D8 М6х13, 12 pieces in total;
- 2 bolts M6x30;
- 8 bolts M6x20;
- 4 bolts M6x15;
- 3 hinges;
- 4 furniture corners;
- edge tape.
You will also need tools: a jigsaw, an electric drill, a screwdriver, a key for confirmations.
From chipboard (25 mm) it is necessary to cut:
- 2 worktop panel blanks, 750x900 mm each;
- 2 panels 730x460 mm - the ends of the base of the table;
- 2 panels 730x150 mm - sidewalls of the box hiding the mechanism;
- 2 panels 680x730 mm - the bottom of the box;
- detail 730x730 mm - internal shelf (optional).
Cutting parts with your own hands must be done as accurately as possible, this will help to assemble the product easier, faster and better. If you have never made tables or cut wood-based materials before, contact a specialist who works with professional carpentry equipment.
Work description
- Paste the ends of the blanks with melamine edging. This will give them a neat look and protect them from damage. The edge must be selected in the color of the base material.
- We proceed to the connection of the sides and the bottom of the box with confirmations to accommodate the transformation mechanism.
- Make symmetrical marks on opposite sides of the base cabinet to install an additional shelf. We fasten the shelf with confirmations: 2-3 pieces on each side. Try to ensure that the confirmations enter slowly into the middle of the chipboard, in this case the risk of damage to the integrity of the material is reduced.
- Attach the drawer to the end legs using furniture corners. Reinforce with 1-2 confirmations by screwing them into the junction of the end of the table and the bottom of the box.
- Connect the parts of the countertop with card loops.
- Install the transformation mechanism in the prepared drawer.
- Fasten the platforms of the mechanism with confirmations to the tabletop.
If you decide to make a table with your own hands with a single mechanism, then connect the first pair to the bottom of the tabletop, and fasten the other with a connecting panel (from the bottom side).
A large table is the dream of every hospitable hostess. After all, all his friends will fit behind him without any problems. The most popular is the traditional rectangular design, although round and oval tables have always been considered symbols of comfort and well-being.

Today, there are many transformation mechanisms for both rectangular and round tables. We offer to make a full-fledged dining table with your own hands with a tabletop size of 116x92 cm. After moving apart and installing an additional tab 42 cm wide, it will be transformed into a large place for a feast 158 cm long.
What you need to create an oval table
- Pine boards of good quality (for countertops) meter length.
- 4 bars with a section of 75 × 75 mm, length 770 mm for legs. Their color should be similar to the boards.
- Joiner's glue.
- Lathe.
- Grinding machine with nozzles of different grain sizes.
- Electric drill.
- Clamps.
- Dowels.
- Self-tapping screws.
- Joiner's glue.
- Stain, varnish for wood.
- Roulette, level, pencil.
We collect the countertop with our own hands. Please refer to the detail drawings. If you want to make a rectangular or round table instead of an oval table, make your own changes.

- To correctly mark the shape of the legs, make markings using a template.
- The bars should be turned at low machine speeds (1500 rpm). Be extra careful when making balls. To avoid breakage, it is better to give the legs an oval shape in this place. You can also order this work from an experienced craftsman or buy finished products of the required parameters.


An oval-shaped folding kitchen table is perfect for those who like to dine with the whole family and receive guests from time to time. It's pretty easy to do it yourself. Self-made furniture is distinguished by original design and the ability to take into account individual needs, due to the characteristics of the room and the taste of the owners of the house.
Why an oval table
An oval-shaped folding dining table is good because it has rounded corners. This avoids "unpleasant collisions" and is especially appreciated by those who have small children at home. The oval shape suggests the location of the table in the center of the room. However, if necessary, you can put such a table at the kitchen corner.
Preparation for work
Before starting work, you must:
- Determine the dimensions of the future table.
- Make sketches and drawings of the design of the product and its individual parts.
- The choice of material for countertops and supports.
- Calculate the required amount of materials.
- Purchase materials, fasteners and accessories.
Determining the size and shape of the table
The size of the product depends on the area of \u200b\u200bthe kitchen and the number of people that need to be placed at the table. The optimal solution for a medium-sized kitchen would be a folding dining table measuring 120 × 80 cm (folded), consisting of two parts with dimensions of 60 × 80 cm each.
It will be correct to draw a sketch of the future product on a scale, in order to understand what ratio of the width and length of the table will allow you to maintain a beautiful rounded shape even when unfolded, as well as a size suitable for a particular kitchen.
For a kitchen of this size, a folding oval dining table measuring 120 × 80 cm is suitable if you put it with a kitchenette. If you place the table in the center of the room, access to kitchen cabinets and household appliances will be difficult. When receiving guests, you can put it in the middle of the kitchen.
The optimal length of the dining table top section, for the convenient location of one person, is 60 cm. The sketch shows that a 120 × 80 cm sliding table is perfect for four to six people (six will fit behind it if you push the table to the center of the kitchen). In the unfolded form at such a table it will be possible to seat up to 8 people. If you need a folding dining table for more guests, you can increase the size of the insert or make two of the same.
Execution of drawings
It is necessary to complete the following drawings and sketches (option with a two-piece table top 60 × 80 cm and one insert 40 × 80 cm):
- drawing of the details of the main table top, to determine the desired shape of the table and the corresponding rounding radius;

Two-piece table top 60×80 cm, rounding radius 20 cm

Two-piece table top 60×80 cm, rounding radius 30 cm

Two-piece table top 60×80 cm, rounding radius 40 cm
- insert drawing 80x40 cm;
- sketch of the tabletop in extended form;
- for tables with a tsarga (underframe) a drawing of the details of the tsarga.

The specified dimensions of the drawer parts are suitable for a folding dining table measuring 120 × 80 cm in a shifted position. It is necessary to make two parts with dimensions of 80 × 12 cm and 40 × 12 cm.
Material selection
Folding kitchen table details:
- countertop and inserts to it;
- supports (legs);
- tsarga;
- edge (for tables made of chipboard and MDF);
- extension mechanism;
- countertop clamps;
- fasteners.
For the manufacture of a folding table top, you can use wood, chipboard, MDF, natural stone and glass. Chipboard and MDF can be either laminated or plastic coated. The thickness of the tabletop can be from 18 to 48 mm (sometimes more).
Natural stone is the most durable, moisture and heat resistant material. But this material has a significant disadvantage, this is a rather high cost. Alternatively, you can use a chipboard or MDF countertop, decorated with ceramic tiles.
When choosing the color and thickness of the countertop, it is imperative to take into account the design of the rest of the furnishings in the kitchen, especially the thickness and texture of the countertop of the kitchen set.
The legs can be made from the same material as the tabletop, or you can purchase ready-made metal supports. They are of two types: for tables with a frame and for frameless designs.
The drawer side can also be made from the same material as the countertop, or from any other material that is suitable in thickness and texture.
For processing slices of chipboard and MDF, edges are used:

The most budget and least practical option- melamine edge, it is the thinnest and is a tape of paper with a density of 120-130 g per square meter. m. Its thickness is 0.1 mm.
The PVC edge differs from it in greater thickness and wear resistance.
The ABS edge is made of plastic and is characterized by increased impact resistance and resistance to external influences.
Acrylic edging is often referred to as 3D edging due to its "bulky" effect. This is the most advantageous, in terms of appearance, option.
PVC, ABS and acrylic edges have a thickness of 0.4 to 2 mm. Depending on the thickness of the countertop and other details of the product, a suitable edge width is selected, which ranges from 18 to 55 mm. On sale there are types of edges with an already applied adhesive layer.
 There are three types of sliding mechanisms for folding tables according to the method of fastening:
- for barless tables;
- for internal fastening to the side;
- for external fastening to the king.
According to the method of expansion, there are two types of mechanisms: synchronous and non-synchronous. In the first case, the details of the tabletop are moved apart at the same time, in the second case, separately.
When buying, you need to take into account the length of the mechanism not extended and the maximum size of the inserts (these parameters should be indicated in the characteristics of the mechanism).
For a folding table without a frame measuring 120 × 80 cm in a shifted state with two inserts of 40 or 50 cm, a mechanism 98 cm long with a maximum insert size of 50 cm (48/980 / T2S) is suitable.
To fix the countertop, you will additionally need special locks-clamps. Their number depends on how many inserts the table will have.
Calculation of the necessary materials
Based on the completed drawings, you need to calculate:
- the total area of all table parts made of wood, chipboard or MDF;
- edge footage, for tables made of chipboard and MDF.
For a table without a frame with a table top made of two pieces of chipboard measuring 60 × 80 cm and one insert 40 cm wide, you will need: 1.3 sq. m. Chipboard, 9 m edges (with a margin), 4 metal supports, sliding mechanism, 4 tabletop clamps, dowels and self-tapping screws.
Table making process
- Cut out the details of the table according to the drawings and cut them out.
- Glue the cut edges.
- Assemble the table.
- Finish finishing.
 Tools:
- large ruler or tape measure;
- pencil;
- electric jigsaw;
- milling cutter;
- belt grinder;
- drill;
- iron or building hair dryer.
cutting
Chipboard and MDF can be purchased in the form of sheets (boards) of a certain size. The minimum dimensions of a chipboard or MDF sheet are 244 x 120 cm. From the above calculation, it can be seen that for the manufacture of an oval sliding kitchen table measuring 120 x 80 cm (160 x 80 when extended), one such sheet will be needed.
Examples of cutting a chipboard sheet for an oval sliding kitchen table

![]()
The main tabletop will consist of two pieces 60x80 cm in size. In addition to it, there will be one piece 40x80 cm in size. The rest of the material can be used to make stools and as a result you will get a wonderful kitchen set.
You can cut out parts using a jigsaw, rounding is done with a milling machine.
edge banding
First you need to carefully treat all the sections with a sealant (silicone), let it dry, and then you can start gluing the edge. For this, an iron or a building hair dryer is used.
 It is necessary to pre-clean the sections from wood dust. Then attach the edge so that it completely covers the cut (the width of the edge must be greater than the thickness of the countertop). Turn on the iron and set the "synthetics" mode. Lay newspaper between the iron and the cut and start heating the edge. After it starts to stick, smooth the finished area with a cloth and continue to iron with the iron. You need to smooth it until the edge cools down.
If the edge does not have its own adhesive layer, then any universal adhesive can be used. The cut surface must be smooth and dust-free. Glue must be applied to both the edge and the end and glued together, while smoothing with a roller or cloth. Instead of fabric and roller, you can use wooden block covered with felt.
After completion of work, it is required to carefully check for fragments with a loose fit. Then you need to chip off the edge protruding beyond the edges, remove the remaining glue and sand the edges with sandpaper.
Better bonding can be achieved with a building hair dryer. A jet of air with a temperature of 200 degrees should be directed only to the adhesive layer. Well-heated glue should protrude from under the edge. Remove excess glue only after complete drying.
Table assembly
Assembly is performed in the following sequence:
- Fold the halves of the main countertop together.
- Attach a sliding mechanism to them.


- Install table brackets.

- Move the halves of the main tabletop and insert the removable part.
- Fasten the latches on the insert so that, when extended, their parts coincide with the corresponding parts of the main tabletop.

- Screw the legs to the table top.
To do this, on the reverse side of the countertop we apply markings with a pencil to determine the place of attachment of the legs. The optimal distance from the edge of the tabletop to the leg is 10 cm. On the beam connecting the center of the circle along which the tabletop was rounded with its edge, we retreat from the edge of the tabletop 13 cm (10 cm + 3 cm radius of the leg) and put a point. This point will coincide with the center of the support.
The sliding table is convenient and compact. But not everyone has the opportunity to buy it, since the price of a sliding table is quite high. But all craftsmen who are ready to create household items with their own hands have the opportunity to make it on their own. Tabletops can be made with your own hands, using a glass coating or wood. Glass tables or natural ones look very nice. tree species. But since natural materials are not cheap, it is better to entrust the legs and tabletop to be cut by specialists so as not to spoil the tree. Very beautiful sliding tables - on one leg.
The sliding table is very convenient and compact, it can also be made by hand using a glass or wooden cover.
The design can be chosen at will, for example, to make the legs chiseled or figured. The sliding table will have the following dimensions (in millimeters):
- table height - 775;
- countertop width - 885;
- countertop length - 1245;
- insert - 375.
Materials and tools that will be needed for modeling

In order to make such a sliding table, not so many materials are required, so the piece of furniture will turn out to be inexpensive, but practical and beautiful. The most important thing is that all the details have right size and were symmetrical. From the materials you will need:
- wooden bars (legs) - section 85 \ 85 mm, length 745 mm;
- frames connecting the legs (width - 105 mm, thickness 30 mm): 2 pcs. 925 mm long (+ 2 spikes - their length is 40-55 mm), 2 pieces 485 mm each (+ 2 spikes, 40-55 mm long);
- 2 wooden worktop surfaces of the same size - 805 mm wide, 625 mm long;
- worktop insert - width 375 mm;
- for countertops, it is better to choose a carpentry shield (thickness 35-45 mm);
- sliding mechanism;
- wooden spikes for connecting frames (diameter 9-11 mm);
- a drill to create nests into which spikes will then be inserted;
- self-tapping screws for installing a sliding mechanism;
- glue for wooden surfaces (you can use PVA);
- machine for grinding wooden surfaces;
- sandpaper is loose;
- varnish for coating wooden surfaces;
- brush;
- ruler.
DIY sliding table - assembly

When the parts are assembled, the modeling process can begin. First of all, it is necessary to mark the nests on the wooden blanks for the legs. In the future, the spikes of the frames will be inserted into these sockets to connect the legs. In accordance with the diameter of the spike, you need to make holes. It is better to “plant” the spikes on the glue, in which case the structure will be much stronger.
First you need to assemble the underframe and only then proceed with the assembly of the main parts. A prerequisite is that the docking at the ends should be as accurate as possible. After placing the spikes in the nests, assemble the structure. It is not recommended to glue the parts right away, it is better to assemble the entire table first, see with your own eyes whether the sizes and joints match, and only then glue the parts.
After all the above steps, you need to start installing the insert. Some differences in the level of one or more parts may occur, which can be easily eliminated with a grinder. The sliding table mechanism is mainly made of aluminum. Installation is carried out either with self-tapping screws or by gluing.

The next step is the installation of the sliding mechanism. It is not difficult to attach it, it is enough to fasten the guides to the long frames, and each of the sliders to its own part of the tabletop. It is better to mount the sliding mechanism by turning the table on the countertop. It is imperative that after installing the mechanism, you need to check how the center insert will be installed.
Under the tabletop, you need to install two slats the same length as the wooden center insert. This should be done for ease of use - when the insert board is not needed, it will be under the table top and held by slats. After the assembly process, the finished product can be stained.
A round table is considered a real chic and luxury. To date, they are the most expensive on the market, especially those made from natural wood. It is also possible to make a sliding table with your own hands in a round shape, the main thing is to have a desire.
Sliding table do it yourself round shape
In principle, the technique for assembling a round table does not differ from the technique described above. The only thing is that the edges of the countertop will have a rounded shape. For its manufacture you will need:
- whatman;
- scissors;
- any glue for a wooden surface;
- bar for legs;
- simple pencil;
- ruler;
- boards;
- plywood 8 mm;
- self-tapping screws;
- screwdriver;
- hacksaw.
Using a large compass, you need to cut out the shape of the future tabletop from whatman paper. Only after that cut it out of wood. What kind of tabletop will be - glass or wood, depends on the desire of the owner of the future sliding table.
Glass and wooden sliding tables look much more beautiful if they have one curly leg.
What you need to know about assembling a sliding table with your own hands
All about countertop

First of all, it is necessary to decide what material and what shape the table will be made of. Pine or chipboard is perfect. Naturally, a pine board is preferable, as it is much stronger, in addition, pine boards are environmentally friendly. Boards are cut and processed according to the size of the future countertop. In the event that the table is nevertheless made of chipboard, the sheets must be drawn into 3 parts, 2 of which will be the same size, and the 3rd part will serve as an insert in the center of the tabletop. Before assembling this piece of furniture, it is better to draw a drawing or use ready-made drawings. In order for it to be strong and last for a long time, it is necessary to observe accuracy in the calculations. Only in this case it will not “float” and will be durable.
The legs are mainly made from bars, which can be purchased at the store. The color scheme of the tabletop and legs should be either the same or differ in color by 1-2 tones. And the countertop should be darker. A prerequisite for the manufacture of a sliding table is the proportionality of the dimensions of the table top and legs. Too thin legs will not be able to hold a large tabletop. The length of the legs must match general view- small coffee table won't look good with long legs. But if the idea is an unusual sliding table, then special attention is paid to marking the center of the bar. Legs can be curly. It is also possible to make a figured leg on your own. To do this, it is enough to study the technique of carving figures from wood.
Tsarga - these are strips that connect two parts with ends. To mark the drawers, you need to put the tabletop on a comfortable surface “face down”, but before that it is better to lay it soft tissue so as not to damage the surface. It is better to make each of the blanks of the tsargi a little larger than the intended size. The excess can always be removed, but the shortcomings of the length - no. The drawer is processed by a lathe and a milling cutter.
All about Assembly
The most important step is assembly. Particular attention must be paid to the connection of the side frames to the leg or legs. To do this, each spike must correspond to a pre-prepared groove. Do not forget about the grooves - they provide a strong connection. When applying glue for structural strength, after drying, all its excess must be removed with sandpaper. In any work, inconsistencies can occur, for example, mismatched edges of the table top. This is easy to fix with a grinder. Then clean with sandpaper and varnish the surface.
Advantages of sliding tables
The main and clear advantage of a do-it-yourself sliding table is its versatility. A special mechanism helps to make a large dining table out of a small compact table. That is why it is convenient for small apartment rooms. It does not take up much space, but allows you to seat about 9-10 people.
Due to the fact that there is a huge amount of material on the trade market for creating a sliding table at home, it can be made not only multifunctional and convenient, but also beautiful and stylish.
You can classify tables that are moved apart as follows:
Transformers.
Sliding tables got this name due to their unique ability to transform. From a seemingly small table, you can get a quite roomy dining room. The tables are round or oval in shape. Home hallmark of these tables is to increase not only their size, but also their height. You can make such a table with your own hands. To do this, it is enough to have a drawing. In addition, transformers have recently become very popular not only because of their convenience, but also because of their design excellence. Basically, transforming tables are made of wood or glass. Mirrored ones look very nice and save a lot of space in an apartment or house.
Standard sliding tables.
Tables of this type are no less popular. They are made of natural wood, fiberboard or chipboard. The advantage lies in their compactness. In addition, making a sliding table with your own hands will not be difficult. It is enough to follow the instructions for their construction.
Any sliding table is comfort and versatility. All of them are practical and economical. You can make a table not only for eating, but also for drawing, games. A do-it-yourself extendable table is a great way to make a child's room comfortable and stylish. In addition to all the advantages, transporting sliding tables is much easier than conventional ones.
A do-it-yourself extendable table for a children's room is an ideal solution, especially if there are several children in the family. In addition, it can be combined with a bed. Well, the most important positive side of the do-it-yourself sliding table is its economical cost.
 Substances and their physical properties
 Classification, structure, nutrition and the role of bacteria in nature
 Bacteria - the most ancient organisms on Earth Bacteria - the oldest group of living organisms
 Epithets, metaphors, personifications, comparisons: definitions, examples
 Bronchial asthma Bronchial asthma
 Roman Empire Ancient History
 Flexible removable dentures: design, features and benefits Varieties of soft dentures with photos