Do-it-yourself wooden garden table drawings. How to make a table from boards with your own hands - drawings and photos. How to make a wooden kitchen table
Wood is the most traditional material from which a table can be made. Moreover, both high-quality raw materials and various boards, trimmings, cuts, even stumps are suitable for work. A little imagination, work, and with your own hands turn flaws into virtues. After all, tables can be very different: for home, summer cottage, garden, magazine, large dining, very tiny - for the gazebo, others. Drawings, diagrams, photos, detailed descriptions make it easy to deal with.
Place for family lunch
It is not necessary to spend a lot of money to do something necessary, useful. If there are boards, slats of different sizes from previous works, you can try to make a decent dining table or a small decorative table out of them with your own hands. They will find a place in the country, in a city apartment.

Materials and tools for making a dining table
- 9 boards or bars made of poplar wood 0.35x0.35x90 cm;
- a piece of plywood 20 mm thick with parameters 140x260 cm;
- 2 poplar boards 1.8x3.5x250 cm;
- 4 beams of 70 cm (table legs);
- 3 beams of 90 cm (fractional parts of the frame);
- 4 beams of 45 cm each (transverse frame parts);
- cuttings of 20 mm boards of different parameters and plywood of the same density;
- self-tapping screws;
- nails;
- glue;
- stain (optional), furniture varnish.
This list can be adjusted depending on what you have.
You should also prepare:
- table circular saw;
- miter saw;
- electric drill;
- device for countersunk screwing;
- machine for grinding wooden surfaces;
- roulette, square;
- pencil.
The drawings simply and clearly show how the parts are connected. Please review the image carefully. 

In the country house or in the garden you can not do without special furniture. It should be simple, reliable, stable. When making a table of boards with your own hands, do not forget to leave free space between the parts that form the table top. This will allow outdoor furniture to serve you longer - water during rain will not collect and stagnate on the surface, but will quickly drain. 
Get ready for work
You should prepare materials and tools:
- 2 boards of 85x10x2.5 cm;
- 4 boards of 168x10x2.5 cm;
- 17 boards of 95x10x2.5 cm;
- 2 boards of 1530x10x2.5 cm;
- 4 boards of 75x10x2.5 cm;
- screws, bolts, nails;
- glue for wood;
- level, tape measure;
- screwdriver or drill;
- saw;
- protective gloves, goggles;
- pencil;
- stain, paint.
Consider the proposed drawings, the manufacturing sequence, the methods of fastening the elements of a wooden table.


- The table will be assembled by hand after you screw the legs to it. This can be done with self-tapping screws.
- Finishing is done at the discretion of the master. Processing the finished product with stain, varnish, paint will make the wood more resistant to destructive external factors: sun, rain, wind, etc.
A small but very original table will not leave indifferent either the owners or their guests. During the day it will become a place for a cozy feast, and in the evening it will amaze with a bizarre glow. To make it, you will not need complex drawings, but only original idea and desire. 
What do you need?
- 3 boards with cracks of swamp cypress (or any other wood similar in texture);
- finished metal legs for the table;
- epoxy resin;
- photoluminescent paint or dry powder;
- polyurethane paint;
- adhesive tape;
- wood glue;
- grinding machine;
- glazing beads;
- clamps;
- wood glue.


A new, hand-made table will delight you with its exotic beauty.
Even if furniture production is far from your area, making a country table with your own hands to gather with family and friends on warm summer evenings is quite a feasible task.
Its main advantage, in contrast to the purchased one, is undoubted savings. It is not necessary to make a table from scratch: simply by assembling purchased parts, you will save 30-50% of the cost. If it is possible to use materials left over from construction or repair, the costs will be limited to the purchase of fittings.
To choose a design, you need to decide where the product will be used.
Using cheap non-standard boards for a country or kitchen table - substandard - you will get advantages that are not available for mass production. Sounds doubtful? But this is true: knots, due to which the boards are rejected, have interesting decorative properties. If you succeed in emphasizing them successfully, you will become the author of a completely unique design product, which is a pity to leave in the garden in the rain.

Making a country table with your own hands to gather with family and friends on warm summer evenings is quite a feasible task.
To choose a design, you need to decide where the product will be used: on a grassy lawn under a tree, to complement an arbor, to stand in a workshop or in a house.
The simplest country table can be assembled in a few hours with a minimum of materials, but it will not last long either. To get a product that will be really pleasant to use, you need to carefully prepare the boards and perform all technical operations at each stage with high quality.

Its main advantage, in contrast to the purchased one, is undoubted savings.
If you find a large stump in the forest, it can be easy to make garden table. It is only required to remove the bark from the stump, make an even cut along the top, sand it, treat it with an antiseptic and varnish it. It is enough to nail or screw a finished furniture board to the "leg" from the stump - and you're done.
Worktops made of boards fastened at the bottom with transverse slats look good. If you prefer a glued worktop, you can do it yourself, but this will require a lot of effort.

If you succeed in emphasizing them successfully, you will become the author of a completely unique design product, which is a pity to leave in the garden in the rain.
It is difficult for a novice master to fix the legs securely, so try to choose a design by correctly evaluating your skills and taking into account the cost of labor and time. The easiest way to make cruciform and L-shaped legs. To attach straight legs - you need to carefully connect the parts.
One of the coziest options for a garden is a collapsible table with benches that can be installed in a gazebo or on a veranda. It is not difficult to perform it, the main thing is to choose high-quality materials and properly prepare them for work.

The simplest country table can be assembled in a few hours with a minimum of materials, but it will not last long either.
How to choose a tree?
For a garden or kitchen table, wood of many species is suitable, both soft (pine, spruce, cedar, fir) and hard (oak, birch, ash, walnut, maple, apple, pear, acacia, etc.). The exception is too soft woods wood (poplar, alder, aspen, willow).
One of the main parameters of the suitability of wood for making furniture is resistance to decay: the species listed above meet this requirement.
If you do not plan to engage in furniture work all the time or are just starting to practice, give preference to the most common types of wood - pine and birch.

Worktops made of boards fastened at the bottom with transverse slats look good.
It is possible to use wood of different species for the table top, frame and legs. At the assembly stage, you will need dowels: they are usually made from acacia or boxwood. Birch wood has an inexpressive pattern and can be significantly warped due to spilled liquid - it is better not to use it as a countertop material, but due to the hardness of this breed, legs can be made from it.
The countertop is best made of oak or pine. If you know how to brush wood, the surface of the kitchen table can become a real work of art. Wood lends itself to brushing soft species: wood is fired gas burner, and soft fibers are removed with an iron brush. Work is best done in the yard due to a large number dust. If you managed to burn the wood evenly, the result will please you. The brush can be tinted with stains, stains, diluted artistic water acrylic paint. Of course, wood brushing is not required: it is only a finishing option.

If you prefer a glued worktop, you can do it yourself, but this will require a lot of effort.
The choice of paints and varnishes and glue
Before proceeding with the installation, the boards must be protected from decay. The tree must be impregnated with a water-polymer emulsion (WPE): the treatment is carried out twice with an interval of 3-5 days. This is enough for the product to last a long time.
Some models require glue. Along with special carpentry adhesives (BF-2, etc.), building PVA can be used: it is applied to both surfaces to be glued, dried to a “tack”, then the parts are connected and kept under pressure for up to three days.

It is difficult for a novice master to fix the legs securely, so try to choose a design by correctly evaluating your skills and taking into account the cost of labor and time.
The choice of paint and varnish materials is determined by where the product is planned to be used: in the yard or indoors. For a garden table that is inevitably exposed to precipitation, alkyd, alkyd-urethane, nitrocellulose varnishes and oil paints are suitable. For the kitchen table, as well as for any furniture that is constantly in the room, it is better to use acrylic paints and varnishes: they are more environmentally friendly and do not have a strong smell. Lacquers marked with the "blue angel" mark are recommended for children's furniture and toys.
If you decide to cover the wood with stain, paint or just tinted varnish, this must be done before assembly. Material compatibility must be considered. The lacquer is tinted with a paint of a suitable composition: if the lacquer is alkyd, the paint should be oily, if you use acrylic lacquer, it can only be tinted with acrylic paint. First, a small amount of varnish is thoroughly mixed in a separate container with paint, and then the resulting mixture is added to a larger volume of varnish.

One of the coziest options for a garden is a collapsible table with benches that can be installed in a gazebo or on a veranda.
What tools are needed
For work you will need:
- hacksaw,
- circular saw or jigsaw;
- drill;
- screwdriver;
- hammer (if you decide to use nails).

For a garden or kitchen table, wood of many species is suitable.
This list includes only the most necessary tools, but in order to make the work more comfortable and the finished product look aesthetically pleasing, it is advisable to buy or rent a rotary miter box, an eccentric grinder and milling machine.
The rotary miter box makes it possible to make cuts exactly at the right angle. An eccentric sander will allow you to prepare parts simply, quickly and efficiently: you will sand the boards in an hour, instead of doing it all day manually with sandpaper. For high-quality processing of the ends, a belt grinder is useful, and a milling machine allows you to select a tree for the necessary grooves and process the edges.

If you do not plan to engage in furniture work all the time or are just starting to practice.
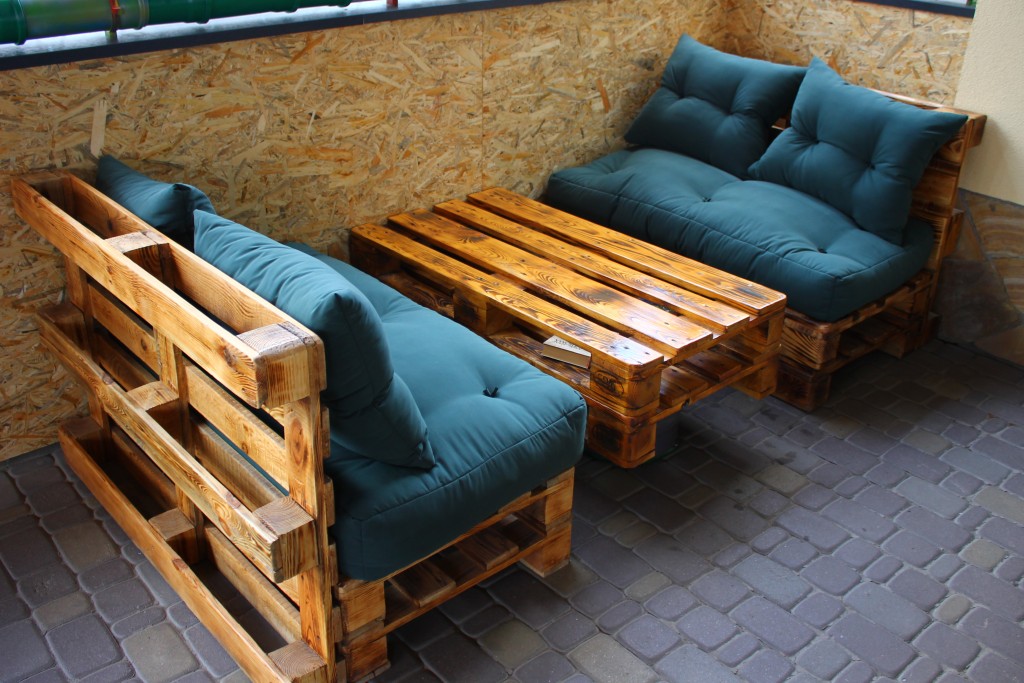
Homemade pallet table
A spectacular rustic table can be constructed from pallets (wooden pallets). If you are a happy owner of such a container, especially a double-deck pallet, just disassemble it: there is no problem in purchasing boards!
Think it's always better to buy new boards? You probably have not worked with wood before: raw wood cannot be used (the product deforms after a few months), and dry boards are much more expensive. To dry raw wood boards, they are stacked in a well-ventilated area: this necessary process will delay your project by 4-6 months! A good option for the kitchen table can be the already mentioned rejected boards, also dry.

It is possible to use wood of different species for the table top, frame and legs.
Let's go back to the pallets: they are dismantled. Now at your disposal are strong boards with different patterns and colors, it is possible that from trees of different species. These features should not be considered as disadvantages: they will give the product a zest: you just need to create an interesting composition from them, alternating boards of a similar shade.
The sides of the pallet will make an excellent frame, and the remaining planks will be used to assemble the countertop.

Work is best done in the yard due to the large amount of dust.
To make the legs, you will need a bar with a thickness of at least 5 cm. All the details must be prepared: sanding strictly along the fibers with sandpaper, first coarse (No120-150), then finer grit (No400-600), carefully removing dust.
Some boards can be painted with acrylic or oil paint. Loft style fans can use stencils in the form of numbers or simple graphic symbols. Boards with a beautiful natural pattern “morim” or simply varnished. After staining or the first layer of acrylic lacquer, the soft fibers rise; they need to be sanded with medium grit sandpaper and a new coat of varnish applied.

A spectacular rustic table can be constructed from pallets (wooden pallets).
If a non-aqueous varnish is used, it is enough to apply 2-3 layers, and if acrylic, the number of layers can reach up to ten.
A good option for the kitchen table can be rejected boards, also dry.
We fasten the tabletop boards with planks, which we place at the joints of the boards. Using a drill, a screwdriver and self-tapping screws, we fasten the boards to the planks (at the joints we use two self-tapping screws, on solid boards - one). The use of a drill is necessary so that when screwing in the screws, the wood does not crack. We assemble the frame from the prepared sidewalls of the pallets. Using a drill bit suitable for self-tapping screws, we drill holes at the joints. We coat the joints with glue and fix with self-tapping screws. We install the legs: simply fasten the boards to the frame, screwing in the screws diagonally. To strengthen the structure, we make jumpers at the bottom in a similar way.

To make the legs, you need a bar with a thickness of at least 5 cm.
Wooden table with glued top
For a glued worktop, you need to choose boards of the same width. If the table is intended for a workshop and its appearance does not have of great importance, you can use old floorboards: there are already grooves there. To make the grooves yourself, you need a milling machine.
To assemble the countertop, a flat surface is required. We simply coat the sidewalls with glue, join the boards without gaps and tighten the resulting structure with clamps. Depending on the glue used, the countertop should dry from 1 to 3 days. If everything is done correctly, you will get a countertop with a completely flat surface without cracks. It remains to work out the ends - first trim with a jigsaw, and then sand. In the absence of a belt grinder, this must be done manually - with sandpaper, first large, then medium grit.

After varnishing the parts, you can proceed to the installation, which consists of several stages.
If you don’t want to mess around with glue and clamps, you can use a ready-made furniture board from a hardware store. Then the countertop remains covered with a transparent or tinted varnish.
For a good result, you need to apply 5-7 (for acrylic varnish up to 10) layers. After every third layer work surface countertops should be sanded with fine-grained sandpaper, carefully removing dust with a damp cloth. At the varnishing stage, it is important not to rush: each layer of varnish should dry well.
It remains to make the legs of a garden or kitchen table: let's focus on the option with L-shaped legs. You will need boards with a thickness of at least 22-25 mm.

For a glued worktop, you need to choose boards of the same width.
L-shaped legs consist of two parts connected at an angle of 90. On the boards to be joined, it is necessary to make a selection, coat the joint with wood glue, and then install self-tapping screws.
When the glue dries, cover the legs with varnish and after drying, simply fasten them to the countertop with screws.

The connection of the legs with the tabletop has several options.
Table with straight legs
To make straight legs, just file thick timber into pieces of the same length. The connection of such legs with the tabletop has several options.
In order for the straight legs to be installed securely, at home, you can use the connection on the dowels. You can make them yourself from acacia wood or buy ready-made ones. To assemble dowel joints, you need quick-drying wood glue (BF-2).

To make straight legs, it is enough to file a thick beam into pieces of the same length.
Table with X-shaped legs
Sequence of work.
- On the inside of the tabletop, we fasten two strips on each side with self-tapping screws.
- To make the table look good, the edges of the planks must first be cut at an angle of 52.
- We fasten the paired planks so that the legs fit, we make laps of 2-3 mm on each side.
- We lay the boards on a flat surface, crossing them at the right angle. We measure the distance between the ends of the boards: it should correspond to the width of the table.
- We circle the intersection with chalk: here it is necessary to choose half the thickness of the boards so that after assembly they lie in the same plane.
- We coat the recesses with glue and place the parts under the press for 1-3 days. For greater reliability, the connection can be strengthened with self-tapping screws.
- We varnish the legs.
- It remains to attach them to the table top, placing them in the grooves formed by the slats - and the table for giving with your own hands is ready.

X-shaped legs are made of bars or boards with a thickness of at least 50 mm.
Table with benches
The best solution for a gazebo is a dining table with benches attached to it. It is better to make such a design collapsible in order to clean it indoors for the winter.
The table will require thick boards (from 32 mm), which must be cut into pieces according to the drawing. In this version, two benches are attached to the table. When all the parts are cut, they must be sanded, paying Special attention ends. We varnish each board separately.

The best solution for a gazebo is a dining table with benches attached to it.
To connect the parts of the structure, we will prepare the studs (length 160 mm), nuts and washers - 24 pcs each. For other connections, use self-tapping screws or nails of a suitable length. Using a drill, it is necessary to prepare all the holes for the fasteners.
According to the drawing, we assemble the countertop and the upper parts of the benches. We cut the cross rails along the edges, the angle should be 45. This is convenient to do with the help of a rotary miter box.
We make and fasten all the legs to the screws. We fasten the parts cut at an angle.

We varnish each board separately.
We tighten the product with studs with bolts. The holes for the studs must be pre-drilled with a drill. When installing the stud, you need to put washers on both sides and tighten the nuts using a wrench.

We tighten the product with studs with bolts.
Seat boards are fixed with gaps of 5 mm. When the seats are connected to the sawn supports, we attach them to the assembled base with 160 cm boards: you will need 4 boards.
We install the remaining studs and enjoy the result.

Using a drill, it is necessary to prepare all the holes for the fasteners.
VIDEO: Do-it-yourself wooden table in the gazebo
50 photo ideas: how to make this table with your own hands


Of the abundance of furniture offered, wooden tables and chairs remain popular everywhere. Natural materials ensure environmental friendliness, safety and durability of models. Solid wood furniture can be found in any country house, apartment or office.
In addition, wooden furniture can be made independently.

Wooden kitchen tables
Before you buy a table, you should consider a few nuances. It is on them that the comfort and mood of the household in the kitchen depends.
Ergonomics
Due to the fact that small apartments usually have kitchens small sizes, do not forget about ergonomics. First of all, when choosing a dining wooden table, you should take into account the comfort of staying near kitchen items furniture.

It is not comfortable when you rest your elbows or legs on a neighbor or on the legs of a table. In addition, there should be an optimal distance from the table to other pieces of furniture. The table should be approximately 80 cm away from walls and other items in the kitchen.

The height of the table also plays an important role. It should be selected depending on the height of the persons sitting behind it. Low (70-74 cm) tables are recommended for short people. Those who are between 1.6 m and 1.7 m tall should buy tables with standard sizes(75-76 cm).

Appearance of the tabletop
Before choosing a countertop design, you need to calculate how many people you usually need to place behind it. Forms are found: oval, round and rectangular and square.
Tables that do not have corners should be placed in spacious kitchens. Tables with a square or rectangle shape fit perfectly into small spaces. You should see if the appearance of the table fits the overall interior.

Practicality
There are many models that carry additional functionality, namely, they replace the cabinet, can be folded and unfolded if necessary.

A wooden extendable table is a great solution for those owners who suffer from a lack of space in the dining room.
Like any furniture, these products have a number of positive and negative qualities. Wooden tables in the kitchen have the following advantages:
- the uniqueness and originality of the wood texture, which cannot be recreated;
- the ability to withstand shock and everyday use for a long time;
- environmental safety, thanks to natural material that does not contain glue and does not emit harmful substances into the atmosphere.

Negative characteristics include: high cost, vulnerability to moisture and dampness. At elevated temperatures, the material can dry out, thereby forming cracks and loosening of the table. Over time, the surface may darken or be attacked by pests.

Wood table in the living room
Recently, it has become fashionable to decorate a living space in white tones. A combination of white furniture and light decoration of walls and windows is actively used. dark and White color can also be combined in furniture.

For example, the table top can be white, while the legs and edging of the table are dark. Such furniture is often used when decorating a room in a minimalist style. In a spacious living room or studio, a white wooden table is a great solution.

The glass and wood table is often placed in front of the sofa, is small in size and is used as a fashionable piece of furniture in the hall. It is intended: for drinking tea in front of the TV, storing books and magazines, as well as for working in front of a laptop.
Table made of solid wood in the country
On the personal plot The most important gathering place for loved ones and guests is the gazebo or outdoor space.

In nature, one is drawn to everything natural, so a wooden table for a summer residence is a combination of beauty and practicality in one item. In addition, this piece of furniture goes well with the overall rustic style.


Wooden tables for a summer cottage should be not only durable, but also moisture resistant. If the table is often exposed to moisture, you should choose a larch product.

Country tables should have the property not to deteriorate under the scorching sun. Due to its density, best material for country table considered walnut or oak. This wood is considered hard and expressive. To resist pests, the oak is seared, that is, it is kept in water for a while. Such material is more expensive than its counterparts.

You can save if you choose a table made of coniferous wood. They have lightness, pleasant color, smell and moisture resistance. The increased resin content resists water absorption.

How to make a wooden table yourself?
Some summer residents make tables themselves. Creativity and diligence will allow you to save money and create a unique thing on your suburban area. Making a wooden table with your own hands is not at all difficult. Enough to have in your arsenal necessary materials, tools and some time.
Tools and materials needed for manufacturing:
- plane;
- grinder or paper;
- screwdriver with a set of bits;
- jigsaw or saw;
- chisel;
- means for staining and varnishing;
- metal corners;
- yardstick;
- building level;
- fittings for fastening (screws, bolts, self-tapping screws);
- boards 40 or 50 mm thick;
- 4 bars for wooden table legs measuring 50x50 mm;
- auxiliary boards 40 mm thick for attaching the tabletop.
Procedure (step by step instructions)
- Decide on the dimensions of the future homemade product. For table lengths greater than standard, at least four posts must be installed.
- Boards for the countertops are pre-cut and sawn to the desired size.
- Place five boards in parallel, fasten them from below with self-tapping screws to the auxiliary transverse boards. Leave room for table legs.
- Install the leg bars with metal corners and fasten them to the table top.
- To prevent distortions and stability of the legs, skip the planks along the perimeter under the table top. If the table has more than four legs, an additional cross bar must be strengthened in the middle.
- Clean the edges of the tabletop with sandpaper from all sides.
- Cover the product with pest control (stain) and, if desired, apply a layer of varnish.

There are many ways to create a table with your own hands. The final version of the home-made wooden table proposed by us can be seen in the photo.

Wooden tables for kids
When a young child grows up and begins to sit on his own, the time comes for him to feed him with various complementary foods.

A wooden table for feeding is the most successful version of furniture designed for a comfortable meal. Tables are usually made together with chairs and have a common design.

There are several types of children's chairs:
- transforming chairs
- chairs with adjustable back.

In the first case, the seat height is adjusted according to the purpose. The child can not only eat at the table, but also play if you remove folding table out of wood and lower the seat.

In the second case, the adjustable seat height allows you to raise the baby higher or lower it to a safe distance from the floor. Even in the event of an unsuccessful maneuver, the child will not be able to harm himself and will allow the mother to do her daily chores in the kitchen.


Buying wooden tables for feeding, parents can not worry about the health of the child - allergic reactions he will not appear. Therefore, natural wood material is most often used for the manufacture of children's furniture.
When buying a table, pay attention to sharp corners which may cause unwanted damage to its little owner.

Finally, I would like to say that thanks to wooden furniture There are many possibilities to equip your home with different designs. Especially popular is the rustic style with the use of natural materials and copying the antique interior.
Safety and personal health directly depends on the type of materials that are in your home.

Another important fact is that wood is such a material that you can work with without using complex tools and equipment. Thus, any man is able to create beautiful things on his own for reasonable money.

Photo of a wooden table


You should start working, of course, after a specific model of this item has been selected. If there are no skills in carpentry as such, then it is not worth aiming at a whole work of art. But even the simplest option in terms of manufacturing can look quite decent and even more beautiful from the fact that it will be made on its own.
A list of required tools or how to make a wooden table with your own hands using what is in every pantry
Having examined and sorted out with your own hands a lot of drawings of wooden tables, you can come to the conclusion that you will need the entire carpentry tool kit. Indeed, for comfortable and fast work, you will need to acquire the following:
1. Electric jigsaw.
2. .
3. Grinder.
4. Screwdriver.
5. A set of drills of various diameters.
6. Brushes.
7. Sandpaper with zero grit parameter.
8. Materials for processing (stains, varnishes or paints).
9. Materials for eliminating defects (wood putty and similar).
10. Carpentry vise and glue.


The list is rather big and you can think about whether it’s easier to buy a ready-made piece of furniture than to puzzle over how to make a wooden table with your own hands with a minimum of available tools. But there are no hopeless situations, so we will contrive and find new ways to achieve the goal.
- The electric jigsaw is replaced by an ordinary saw (however, there will be an order of magnitude more work to eliminate irregularities).
- There is no need for a router if the countertop is made from a single sheet, and not individual segments.
- For the same reason, wood glue along with a vise can also be removed from the list.
- You can also cross out the grinder, but it is worth clarifying that manually polishing the surface to the desired state is almost impossible. Therefore, we choose more a budget option- nozzle for grinding on a screwdriver.
- It is unlikely that you can do without a screwdriver, but this tool is available in almost every home.
Other details and materials, even if they are not in the house, then buying them is not so expensive.
Do-it-yourself assembly of a wooden table according to the drawings of a simple and waste-free design
To assemble a table with your own hands from wood this drawing no need to be a trained specialist. The design is simple and clear, the main thing is to do everything carefully and slowly. This option is also attractive because it can be made in two forms: both a coffee table and a dining table. The only condition is that in the manufacture of the latter, support racks will be needed (they can be easily purchased at a hardware store).
Wooden table drawing of a wooden table diagram No. 1
So, the instruction on how to make a wooden table with your own hands is as follows (see diagram No. 1):
1. The preparation of the canvas is carried out (sanding, cleaning, antiseptic treatment, sealing of microcracks, etc.).
2. We transfer the separation lines from the drawing to the canvas.
3. If you move from the left edge of a horizontally laid sheet to the right, then the markup will look like this:
40 mm - line (this cut will serve as a support bar).
250 mm - curved line (this cut will play the role of legs, in the case of coffee table, and if the dining option is selected - as a support stand for high legs).
900 mm - curved line (the largest segment, of course, will be used as a countertop in the future).
250 mm - the last straight line (divides the remainder into the leg and the support bar).
4. The elements that will be supporting (legs and slats) must be shortened on the sides by 30 mm. This is done so that their edges are not visible from under the countertop.
5. Putting the leg with an arc down, we see that it rests on sharp edges. In this case, we will not get the stability of the product. Therefore, we measure 30 mm from the top of the corner and make a horizontal cut on both sides.
6. We attach a bar to the top of the legs with self-tapping screws. The step between them is 150 mm.
7. We step back from the edge of the tabletop 250 mm and put the legs in this place. The self-tapping screws (4 pcs) will be screwed into the countertop through the lath, so make sure that they do not get into the transverse fasteners.
Our article on how to do it yourself for a summer residence will be useful.
Completely assembled product is painted or varnished. To obtain a high-quality mirror-smooth surface, grinding on pure wood is not enough. After coating with the same varnish, one way or another, small villi will “stand on end”. Therefore, after each applied layer, it is necessary to sand the surface with fine sandpaper. And the applied layers should be at least three. The end result is a beautiful piece of furniture at no extra cost.
This piece of furniture is one of the most versatile in use. The table can be a dining table, household table, installed in a living room, on a veranda, territory, in a workshop, and so on. In a word, it is impossible to do without it. But purchased products do not suit many in terms of a number of parameters - sizes, design features, form or for any other reason.
Given that the tree is relatively easy to cut, grind, make a table out of it according to your own drawing, with your own hands for a good owner is not a problem. Yes, and it will be much cheaper. Plus - satisfaction from such work.
room
This is ideally an extension, a barn, an empty garage, although a small area under a canopy is also suitable. To work with a tree on a site, in the open air, means to be completely dependent on the vagaries of the weather. If there are suitable for making furniture " square meters”, then you should worry about high-quality ventilation in advance. Natural is sometimes not enough (besides, it depends on the change in wind direction and pressure), and an exhaust hood is installed.

Arguments that if you use protective equipment, then you can work in a closed space, do not stand up to scrutiny. Wood dust will immediately settle on everything, including the sample with which some actions are performed. No precise cut along the line, no high-quality surface treatment of wood (not to mention the impregnation and finish paint and varnish composition) cannot be obtained.
It is impossible not to take into account the fact that many preparations used for wood processing contain toxic components. For example, varnishes, paints, impregnations, if they are not natural, then harmful fumes are guaranteed.
Tools
Their set depends on the extent to which it is planned to "ennoble" simple design from wood, what shape to give it and a number of other nuances. If the master does not claim the elegance of a wooden table, does not aim to achieve its originality, then the usual carpentry set will be enough.

For more “fine” work in the process of making a table of unusual shapes, external design, special devices will be needed.
El / jigsaw. With a conventional saw, it will not work to make an inclined vertical cut, accurately maintaining the angle. The canvas will “play”, and therefore the quality of the work will be extremely low. The electric jigsaw is universal in use, besides it gives high accuracy in cutting wood or cuts in it.


Many of the listed fixtures can be rented if furniture making is not a hobby, but a necessity.
Impregnation and other compounds
Rotting protection:
- Working off engine oil is an effective, moreover, free tool. But not for dinner tables.
- Linseed oil. A natural and effective product that penetrates deep into the wood structure and protects it from mold and mildew. Minus - high cost. But if the table is intended for eating - a great option. The drug has no color, therefore, after processing the lumber, it does not leave any traces in the form of darkening, stains, streaks, unlike mining.
- The emulsion is water-polymer. It is characterized by duration of action and safety for health.
- Acrylic varnishes. They practically supplanted their predecessors of the "NC" category, as they are harmless and in many respects better lineups which are diluted with solvents.
- PVA, bone glue and a number of others. More detailed information about carpentry compositions -.

To decorate a tree:
- Colorless varnishes are used not only to protect the material from moisture. With their help, you can save the texture of the tree, shade it.
- Wood stains.
- Varnishes with a coloring effect (toning).
- Paints (but only for wood!).
- Putties.
Using colorless varnish and pigments, you can make coloring composition, and any shade. It is enough just to correctly determine the proportion of components. This is easy to do by experimenting with mixing and applying a sample to a rejected board. This will allow you to choose an acceptable tone. More than expedient, since it is not always possible to buy exactly what you need on the market.
Fasteners
All tips for assembling a wooden table with nails (the argument is simple, fast and cheap) are best ignored. The reasons are as follows:
- The nail pricks easily dry wood(and this is exactly what is taken; more on that below).
- Correctly directing his leg (strictly vertically) is quite difficult. In some cases, it is even more difficult to redo your oversight.
- A tree, even the most protected from rot, eventually succumbs to it. The maintainability of a table knocked down with nails is extremely low. Practice shows that it is rarely possible to remove such fasteners without damaging adjacent structural parts. As a result, instead of the planned replacement of one element, 2 - 3 will have to be changed.
- When assembling a wooden table, if one glue is not enough, you should use only self-tapping screws.
- Sometimes its individual parts (at the joints) require reinforcement. It is not advisable to strengthen the strength with a hardware with a thicker and longer leg. The reason is the same - the probability of splitting the tree. For these purposes, metal strips, brackets, corners are used.

Features of the choice of wood
Someone focuses on the cost of lumber, another is important for the resistance of the tree to decay, for the third - its texture. What can you recommend to a novice furniture maker? Do not use for the table, unless it is intended to be installed somewhere in the back room or garage, the same type of wood. This is exactly what many novice "craftsmen" do, picking up the same type of boards and bars from what is left of the construction or repair and gathering dust in the barn.
When making a wooden table for living quarters, verandas, and so on, you need to take into account the properties of individual species. Naturally, if there is not enough experience in assembling furniture, you should pay attention to cheaper wood. The first table (chair, stool) in life is just a kind of training in manufacturing, gaining experience.
Tabletop. Here in the first place - strength and minimal absorption of moisture. It is on this part of the table that something is constantly spilled. Optimal choice- pine, larch, oak (although the latter is more expensive). Thickness - at least 3 cm.If the dimensions of the countertop are small, then wood-based slab products (OSV and the like) can be used. But only with lamination to prevent swelling of the material when liquid enters the surface of the table. For example, LDSP.

In the furniture industry, low-grade lumber is not used. This is not economically feasible, since pre-treatment of wood increases the duration of the production cycle. But in the manufacture of something, wood of lower grades, substandard - just right. The same pallets left after using stacks of foam blocks or bricks.
And not just because it's free or relatively cheap. Many of the disadvantages of such wood with a competent approach can be turned into pluses. For example, after coating with a colorless varnish, the countertop acquires a unique original look.

The main thing is that the boards do not have obvious defects in the form of rot, cracks, falling knots and wormholes.
If pine is chosen for the countertop (this also applies to many other conifers), then you need to pay attention to the location of the annual rings. These arcs are called humpbacks. The cuts of the boards show how they are oriented, and this is taken into account in the process of laying them in a row. Samples obtained by the tangential sawing method are arranged in alternation (pink down, the next one up); radial cutting - the same way (with arcs in the same direction). The nuance is insignificant, but it is the observance of this recommendation that eliminates the risk of warping and splitting of the boards.

For furniture, if you think about its durability, you should take only dry lumber. During the drying of the wood, it will deform; this is a natural process, and its consequences in the form of twisting, warping, bending are inevitable. Such a table will quickly begin to warp, and you will have to deal with its repair. And here you need to decide whether to purchase high-dry wood or rid it of moisture yourself. The first option is simpler, but such a tree is more expensive. The second will cost less, but there are a number of purely technical difficulties.
- First, it is necessary to ensure stable temperature regime in the storage area. Changes in its value will lead to uneven evaporation of moisture, which will negatively affect the strength of the tree.
- Secondly, good ventilation must be organized.
- Thirdly, and, perhaps, this is the most unpleasant moment - you will have to wait, up to about six months, depending on the initial moisture content of the tree. But this is not a guarantee that the result will be expected; Even this takes practice.
This once again confirms the idea that when starting to make wood furniture for the first time, you should focus on the simplest table for household needs from cheap lumber, without pretensions to its sophistication and originality of design. For example, for a barn, garage and the like.
Variants and schemes of wooden tables
It should be immediately noted that any work related to the design and self assembly is a creative process. There are no stereotypes in this business, so you can only take the model you like as a basis, and everything else - linear parameters, shape, manufacturing specifics - depends on the purpose of the product and your own imagination. Here are just a few examples of what wooden tables can be. For example, for summer cottages, small utility rooms, it is worth choosing structures whose geometry can be easily changed - folding, hiking, hanging, garden, level, and so on.

Tables that are supposed to be used for eating, playing games, as coffee tables for installation in living rooms for a specific purpose, are made stationary, that is, of unchanging size. These assemblies are more “solid”, since all articulated parts are fixed rigidly; no articulated joints.


Features of the assembly of wooden tables
If a person undertakes to make something, then he knows how to use the tool, read the drawings and work with lumber. Such home master learning the basics of carpentry is not necessary. But a number of nuances in the manufacture of a wooden table will be useful to note. These notes will only help in the process of work.
Let's start with the types of connections. There are quite a few of them, but for a table that is assembled with your own hands, the following are quite enough.
On dowels
In this case, the parts are fastened by landing on the adhesive composition (Fig. 1 - 3).

The nuance is that for the manufacture of "cylinders" that are inserted into pre-drilled "channels", a tree of a denser structure is taken than the elements of the table. This is what ensures the strength of the connections. Before installing them, chamfers are removed from the edges of the dowels and holes.
These round sticks are commercially available, in any furniture store, in several sizes. To grind them, even with a carpentry machine, is a waste of time. It is not recommended to purchase plastic dowels for the table; they are used for collapsible connections. For example, frame furniture (walls, multi-level racks, etc.).
Nails should not be used to fix table elements (Fig. 4). Metal and wood differ in the degree of thermal expansion. Such a connection will not last long - a “shat” will begin, especially if the table is intended for installation on the territory or in an unheated room.
On the tsargs
It is advisable to make such connections if the table has to be either periodically disassembled, or without it it cannot be moved through the doorway. Although not all kings involve the dismantling of the structure. The most practiced options are shown in the figures.


Bolted
Such connections are mainly used for garden or outbuilding furniture; for utility tables. An example is shown in the figure.

The nuance of working with fasteners
In order for the self-tapping screw to be easily screwed in and “go” in the right direction, a hole is first made at the point of its installation with a drill, with a diameter slightly smaller than the fastener leg. The main thing is to maintain the coincidence of the center lines, that is, to prevent skew. In this case, for the "landing" of the self-tapping screw, you can do without a screwdriver.

Features of wood processing
Everyone knows that a planer is used first, an abrasive with a large grain, and then a fine one. But sometimes it turns out that the last stage, grinding, has to be done repeatedly. Here much depends on the type of wood and the degree of its drying. After applying the first layer of varnish, the villi may “stand up”. Nothing wrong with that. You should wait for the workpiece to dry and repeat its processing with an abrasive. The work is painstaking and takes time. But it is by this technique that you can bring the "problem" wood to the ideal "smoothness".
To eliminate the risk of injury to a person, all edges and corners of the table should be slightly rounded.
Features of the exterior
- Minor defects in the form of cracks, chips are eliminated with a putty composition.
- After sanding, all wood dust must be removed. In this case, an ordinary household vacuum cleaner with an appropriate nozzle will help out. After such cleaning, it is recommended to wipe the entire table with a slightly damp cloth, let it dry and repeat the cleaning of the remaining dust. After that, you can safely proceed to applying stain or varnish - there will be no “pellets” on the tree.
- You can give originality to the table not only with curly cutouts, an unusual shape of the tabletop or legs, a combination of textures of different species, and so on. One of the good options is art painting.
And finally. Work on self-manufacturing something made of wood (of the same table) - just First stage mastering the skill of "designer-assembler". Having worked out the technologies and techniques on wood, having acquired the necessary skills, it is enough just to switch to other materials - metal, plastic, glass. So the benefits of a wooden table made according to even the simplest drawing (apart from the pleasure of working and saving money) are obvious - not wasted time.
 Substances and their physical properties
 Classification, structure, nutrition and the role of bacteria in nature
 Bacteria - the most ancient organisms on Earth Bacteria - the oldest group of living organisms
 Epithets, metaphors, personifications, comparisons: definitions, examples
 Bronchial asthma Bronchial asthma
 Roman Empire Ancient History
 Flexible removable dentures: design, features and benefits Varieties of soft dentures with photos