How many square meters in 1 sheet of metal. Choice of metal tile thickness. Varieties of hip design
Metal roofing has more advantages than disadvantages. Nowadays, such material is in high demand in all countries. Sheets of a metal tile are easily mounted, this process takes a minimum of working time. The service life of the material is several decades, it looks aesthetically pleasing and attractive.
Peculiarities
The metal tile is roofing material made of galvanized steel, which is treated with a special PVC compound. The latter reliably protects the structure from the harmful effects environment and at the same time gives the original color. For three decades, metal tiles have gained recognition on all five continents. Up to 85% of objects in our time are built using this material. There are many nuances that every homeowner needs to know.
Material characteristics
The thickness of the sheets is differentiated within 0.46–0.56 mm. When buying sheets, it should be borne in mind that the calculated data indicated on the package and the actual state of affairs may differ markedly. This applies not only to the thickness of the sheet, but often to the length and width.
When planning the purchase of material, it is very important to correctly calculate how much stock is needed. Usually it is 10-15% of the amount needed for repair work. Much depends on the complexity of the roof. For example, if there are too many joints and refractions, then additional centimeters of metal tiles will be needed for trimming and fitting.
Roofing products are represented on the market by various brands. The most popular of them in Russia include:
- Monterey;
- Supermonterey;
- Maxi.
The advantages of metal tiles have long been appreciated by both ordinary homeowners and professional builders. Clear advantages include:
- the temperature range at which the material can be operated is quite wide: from -55 to +125 degrees;
- compliance with fire safety rules;
- ease of installation: per 1 sq. m requires only 8 screws;
- You can install such a roof all year round;
- The material is very durable and does not deform.
Much depends on the thickness of the polymer layer, the thicker and better it is, the more durable the roof will be. The price also grows in direct proportion to the specified parameters.
Different polymer coatings can protect against various factors. There is a metal tile, where the focus is on protection from sunlight, there is also - from the influence of moisture and temperature changes, there is - from mechanical damage.
Benefits of Standard Sheets
A metal tile is a material that varies markedly in size, especially in length and width. Length can vary from 35 to 820 cm. Width - from 115 to 120 cm.
When using metal tiles, it is not recommended to use too large sheets. The best option is to purchase a medium format metal tile, thus, there will be a golden mean in terms of costs Money for procurement, logistics issues and installation difficulties. Medium sheets are easier to calculate, correctly, the number of units needed to cover the usable area, for trimming becomes obvious, knowing the basic parameters of the object.

Standard middle sheets are good for the following criteria:
- they are easy to transport and store;
- during installation it is not necessary to use special equipment;
- no special storage space is required;
- the risk of damage to the material during operation is minimized.
Counting steps
First of all, the roof slopes are measured, you should also pay attention to the texture of the metal tile, which differs markedly, for example, from slate.
As an illustration, we can say about the materials of Monterey and Takota. The length of both materials is the same, the width differs 1.17 and 1.18 m, respectively. It should be calculated in this way: the usable area for both types of materials will be the same - 1.1 meters. The explanation is simple: the "extra" centimeters will go into overlaps.
It is important to analyze the number of rows on the slopes.
As an example, the following can be mentioned: on a slope six meters long and a useful width of 1.1, six sheets of similar material will be required. The calculation is as follows: 6: 1.1 = 5.36. Rounding is always upwards. In this case, the number six is obtained.
Often a problem arises when excess material remains, whole sheets or half of them. It is necessary to know the technology for calculating metal tiles on a roof. Before starting the calculation, the following factors should be considered:
- the length of all slopes;
- overhang area;
- canvas parameters;
- skate options.

Roofs are often broken, so each section should be calculated separately. Then it is recommended to calculate the amount of material that goes into overlaps and plumb lines. Often provided by manufacturers service for cutting sheets the right sizes, in this case it is recommended to contact professionals, you will need a properly drawn up "pattern" of the roof.

Modern computers allow you to make a roof plan and calculate the amount of metal tiles using a program. It is not difficult to do this work by hand, you just need to use graph paper in order to correctly maintain proportions and scale.
Some customers manage to place an order with sheets even 6-8 meters long, thus saving a significant amount of materials, which is spent on trimming and overlapping. Tangible savings under such circumstances occur only when the roof area exceeds much more than 100 square meters. m and there are special devices to lift such overall products to a height. In addition, the installation of such sheets requires highly skilled craftsmen, so the cost of work can be high.
Tilt angle: what to consider?
The vertical overlap of metal tiles is about 20 cm, it should be understood that this parameter depends on the angle of the roof. If the angle of inclination of a four-pitched or gable roof is small, then more material is required for waterproofing and the size of the "overlap" is required more.
When calculating the number of sheets at the stage of drafting the project, it provides an opportunity to calculate the parameters of the slopes, if necessary, you can consider increasing the size of the crate that extends beyond the gables.
When working with hip roofs you should find the desired angle of inclination of the triangular hips. You can make a similar installation with your own hands.

truss system
The size of the overhang is usually about 45 cm, a lot depends on the thickness of the material and the level of rigidity of the sheet. A plumb line is necessary, it effectively prevents rain moisture from flowing under the roof, protects the top of the object's wall. When making a calculation, it is very important to take into account the width of the ridge element, the ridge of which has blades, for example, 16 cm will make it possible to tightly close the gap between the roofing sheet and the ridge. This is necessary if the sheet size is not enough.
The slopes are corrected due to the adjustment of the fillies. If the weight of the roof is too large and the angle of inclination is small, then in this case it is necessary to strengthen truss system, that is, take a step between the guides not 50 cm, but, for example, 40 cm.

Quantity
The best option is to mount sheets about four meters long. It usually takes up to 20 cm of metal tiles for plumb lines, about 10 cm for overlaps.
The material varies markedly in "waves", which can be completely different. It is impossible to start work until there is a clear picture with the amount of material needed. To get the required number of sheets, you should:
- Add up the area data by overhangs.
- Divide the resulting amount by the value of the area used.

As an example, take 100 sq. m of the roof and add to them the area that goes to the overhangs, for example, 6 sq. m. The hypothetical area of one sheet is 6 square meters. m. We divide 106 meters of the total area by 6, we get the required amount - 18 sheets. If the number of sheets turned out to be fractional, then it is necessary to round the received data up.
Elements and accessories
When installing a metal tile, it is impossible to do without various fittings, which play a significant role. Such components are also called additional elements. First of all, you will need the following "spare parts":
- skate;
- end strips;
- adjoining strips;
- snow barrier;
- cornice plank.

The first element protects effectively from various precipitation, protects from wind. Planks effectively protect the joints from moisture ingress. Snow barriers effectively protect gutters from falling snow. The eaves bar prevents microparticles from penetrating under the ridge.
The first step is to find out the length of the skate, it takes about 8 cm to the joints. The standard skate is 2 meters. If the length of the skate is 8 m, then you will need to buy 5 slats. End strips can be of different formats, but they can be calculated using the same technology. Do not forget about the screws, they will also need a certain amount.

- There is a term in the professional environment - the forbidden length of a sheet of metal. That is, it is categorically not recommended to cut the material in length along the wave. If you need to make cuts, then they should be made strictly according to the instructions.
- When choosing a material for the roof of a house, it is recommended to consider the thickness of the steel minus the PVC coating. This need arose because manufacturers often manipulate the thickness polymer coating and at the same time save on metal.
- Modular metal tile compares favorably with the standard one in that there is no overspending of material, overlaps are minimal and standard. The modules are snapped onto a special mount, which completely eliminates the ingress of moisture under the sheet.
- It is difficult to raise such products to a height, moreover, the risk of damage to both the material itself and the walls of the object increases significantly. Therefore, it is important to take this fact into account in advance and think over the process of transporting raw materials directly to the place of repair work.
- When working, it is recommended to use a special table, which reflects all the data regarding the format of the sheets.
- When cutting material, be sure to use metal shears. You can not use a grinder or a hacksaw, where there are small cloves.
- It is necessary to mount the metal tile independently at an angle of inclination of 20 degrees. Otherwise, you will have to make extra overlaps.
For more details on the intricacies of calculating metal tiles, see below.
Metal tile is the most popular roofing material, which successfully combines not only reliability and durability, but also the aesthetic perception of the structure. The installation of a roof made of metal tiles requires strict adherence to the technology of work.
When the installation of the metal roof is completed, remove construction debris with a soft brush and treat the cuts and scratches with spray paint.
From overalls you will need:
- gloves;
- protective glasses;
- shoes with soft soles.
From the tools you need to prepare:
- screwdriver;
- construction stapler;
- hammer;
- tape measure with a rag tape;
- jigsaw;
- hacksaw with fine teeth;
- scissors for metal, manual or electric nibblers;
- manual circular electric saw with carbide cutting elements.
Attention: when working with metal tiles, it is forbidden to use a grinder and any cutting devices with abrasive cutting elements, as this leads to burnout and peeling of the protective polymer layer of the sheet!
Otherwise, you not only reduce the operational properties of the roof, but also automatically lose the warranty of the manufacturer of the metal tile.
Taking measurements and calculating materials

From metal tiles
The metal tile sheet has an upper and lower cut, that is, the distance from the corresponding edge of the sheet to the crest of the wave, usually equal to 50 mm. The area of the waves, excluding the top and bottom cut, is the usable area of the sheet. To calculate the number of rows of required sheets horizontally, it is necessary to divide the maximum length of the slope along the ridge or along the eaves by the useful width of the sheet, taking into account the overlap in one wave. The number of sheets in a row can be calculated by dividing the total length of the sheets in the row by the usable length of the sheet. The total length of the sheets is equal to the length of the slope from the ridge to the eaves, taking into account the overhang by 40-50mm. At the junctions of slopes, valleys, an inclined ridge, the length should completely cover all bevels.
When choosing the length of the sheet, keep in mind that at short lengths, the expansion coefficient of the metal is less, respectively, the tension of the metal is less and the likelihood of self-tapping screws breaking, loosening of holes and destruction of the metal in these places. The length of a metal tile sheet recommended by experts is 4-4.5 m.
To minimize waste, before buying a metal tile, make a drawing of the roof, lay out the sheets according to the resulting scheme, taking into account the joints, so that the waves form a single sheet over the entire roof area.
When calculating the number of waterproofing rolls, the total roof area is divided by the covered area of the roll, taking into account overlaps of 15-20 cm.
When calculating the amount of insulation, the total roof area is multiplied by 0.2 m (recommended insulation thickness).
When calculating the additional elements, it is necessary to take into account the horizontal overlap of 10 cm (for the lower valley - 30 cm).
The number of self-tapping screws is planned based on the consumption rate of 8 pieces per 1 m2 of metal tiles / 1 m of additional elements.
All calculations are made with rounding up.
Rules for the construction of the truss system

Scheme of a hanging truss system of a gable roof.
When planning the truss system, the features of the shape of the roof, wind and snow load are taken into account. For a roof made of metal, experts recommend a distance between the rafters of 600-900mm. Suitable as material for rafters tree species with humidity not more than 18-22%. Pre-all wooden elements roof structure, including the crate and additional reinforcing strips, must be treated with fire-fighting and antiseptic compounds.
If roof insulation is planned, holes up to 2.5 cm in diameter are drilled in the upper side of the rafters in increments of 30 cm to create additional inter-rafter ventilation.
The old truss structure can also be the basis for a metal roof.
Before the construction of the truss system (including if it will be carried out on old roof) make sure the roof is square by comparing the lengths of the slopes diagonally, check the horizontalness of the cornice, ridge, kinks. Installation of rafters is carried out taking into account the identified errors.
According to building codes - 14 °. In conditions of snowy winters and rainy climate, the recommended angle of inclination is 20-30°.
Installation of cornice and frontal boards, filing the cornice
Usually, the installation of a roof involves the presence of either a cornice or a frontal board.

Variants of knots of a tiled roof.
The cornice board enhances the rigidity of the structure and is fixed in special grooves cut in the rafters to avoid increasing the height of the truss structure. If the installation of the drain involves the use of long hooks, it is necessary to cut out the corresponding grooves on the cornice board for them. Installation of long hooks is carried out before the installation of metal tiles. Short hooks are usually used if the installation of the metal tile is completed. They are attached to the frontal board, which is nailed to the end of the rafters. This element performs amplifying and protective functions.
For filing the cornice on the wall at the level of the lower edge of the frontal board, a bar is horizontally stuffed. Then, between it and the frontal board, a crate is made in the form of transverse bars, on which the hemming material is then attached (corrugated board, siding or spotlights that match in color and material with the metal tile).
The basic rule when filing a cornice is to ensure a free flow of air into roof space through ventilation gaps. The recommended ratio of the total areas of ventilation gaps and the roof is 1/100, the distribution of gaps over the roof is proportional to the areas of its individual elements.
Ventilation gaps are provided either between the lining panels (with the exception of perforated soffits), or one continuous gap is left between the wall and the last lining panel. To prevent birds and insects from entering the under-roof space, the gaps are closed with a grate with small cells.

When laying waterproofing, it is necessary to ensure unhindered through passage of air flows.
The waterproofing film protects the under-roof space from the penetration of moisture and dirt, while possessing vapor permeability. It is forbidden to use a bitumen-based waterproofing material when constructing a roof made of metal!
If it is necessary to ensure unhindered through passage of air flows from the eaves to the ventilated roof ridge seal due to ventilation gaps between the metal tile and the waterproofing, as well as between the waterproofing and the insulation (two-circuit ventilation).
The waterproofing film is rolled out without turning over from the eaves to the ridge with an overlap (at least 150 mm, and at the junction of the slopes - at least 200 mm) and fastened with a construction stapler. Places of overlap must be isolated with a special tape on an adhesive basis. Please note that the places of overlaps fall on the wooden elements of the truss structure and the crate.
To exclude tension and breakage of the film due to a decrease in its size from the cold and the "play" of the rafters, it is necessary to lay it with a sag of 10-20 mm along the edge of the legs of the rafters. If you are using anti-condensate or classic waterproofing, double-circuit ventilation is required with a gap of 30-50 mm in each circuit. When using superdiffusion membranes, single-circuit ventilation is sufficient - between the membrane and the metal tile.
The waterproofing layer should protrude 200mm beyond the wall line, and cover the end boards at the ends. The overlap on the walls of such roof elements as chimneys and ventilation pipes must be at least 50 mm with an additional layer laid around.
Lathing device, installation of the lower valley

For a roof with an interrafter pitch of 900 mm, boards with a section of 30x100 mm are suitable for the lathing, and with a section of 25x100 mm with a pitch of 600 mm. In the case of increasing the distance between the rafters, when installing the crate, transverse boards of a larger section are used - 50x100mm or 50x150mm. The height of the section of the lowest (initial) lath of the crate should be greater than the height of the other laths by the height of the wave of the sheet, since the top of the metal tile step lies on it. It is attached strictly parallel to the eaves. The second purlin is fastened with a step of 280mm, and all subsequent ones - with a step of 350mm.
The fastening point of the ridge rail must be reinforced with two additional rails in 50mm increments. The thickness of the ridge board should be 10-15 mm more than the thickness of the other boards of the crate to create a ventilation gap.
Around the protruding elements of the roof, a continuous crate is made. At the junction of the slopes (valleys), the crate must also be continuous at a distance of 300 mm from the axis in both directions and coincide in level with the rest of the crate. A waterproofing is laid along the gutter formed by the boards, on top of which the valley is fixed with self-tapping screws at a distance of 300 mm from each other. The overlap at the junction of the valleys should not be less than 100mm. The lower valley should go to the cornice board.
Installation of sheets of metal

The scheme of installation of sheets of metal.
The lifting of sheets of metal tiles to the roof is carried out with the help of ropes along two guide lags fastened with transverse boards. During the installation process, walking on a metal tile is allowed only in places where the wave is deflected and only along the contour of the crate.
Each metal tile sheet has a capillary groove for water drainage, which is covered with the next sheet during installation. Usually start laying on the side where you do not need to cut the sheet. Sheets can be mounted both from left to right, and vice versa with an overlap in one wave, closing the capillary groove on the left side of the sheet.
Basic rules for laying metal tiles
- Docking "along the waves" to protect the roof from side wind. Self-tapping screws at the docking point are screwed into the crest of the joined wave just below the stamping line. First of all, tighten the longitudinal joints.
- Docking "in rows" with fastening with self-tapping screws in each wave.
- Regardless of how geometrically complex the roof is, all sheets of metal tiles are aligned strictly along the cornice line with an overhang of 45-50mm. The sheets to be joined should first be connected to each other, only slightly “grabbing” the upper edge of each to the crate with one self-tapping screw. Only after making sure that the rectangle is correctly applied to the slope, you should screw in the remaining screws and finally fix the docked row.

To use roofing screws with an EPDM gasket and a protective layer to match the roof standard sizes 4.8x28mm. Screwing is carried out at the places where the sheet is attached to the crate into the base of the wave perpendicular to the crate to the state of a slightly compressed gasket, the steel chips are removed with a brush with soft bristles.
To the initial plank of the crate, the sheets are attached above the step through the wave, and to the subsequent purlins - through longitudinal wave in every second transverse as close as possible to the stamping line. Sheets from the side of the end board are attached to each wave. The ridge strip is attached to the metal tile in the crest of the wave with self-tapping screws with a pitch of 800 mm.
The thickening point formed when four sheets are joined is removed either by cutting off part of the corner, or by slightly straightening the capillary groove.
Installation of the end plate, upper valley and junction bars

The waterproofing layer is laid on the end board, and its edge is closed with an end plank, which is attached to the end board with self-tapping screws from the cornice to the ridge with a step of 350 mm and with an overlap of 100 mm.
The end bar is attached in such a way as to overlap the upper crest of the wave. If during the installation process it turned out that the bottom ridge fell on the pediment, you can bend the edges of the sheet up.
When mounting the upper valley, follow the basic rule - the screws are screwed in in such a way as to exclude their passage through the middle of the lower valley. Otherwise, the waterproofing layer will be broken. A self-expanding sealant is laid between the valley (adjacency strips) and the metal tile.
Installation of the ridge bar and snow retainer
The waterproofing layer along the entire ridge space must have a gap of at least 50 mm for unimpeded evaporation of moisture. In places of point ventilation holes, a sealant must be applied. The ridge strip should be mounted with an overlap of 100 mm from the end on end strips with a protrusion of the edge by 20-30mm by attaching it to the upper ridge and the crate through the wave. In order to avoid blowing snow under the ridge, an aero roller is installed between the sheets of metal tiles and the ridge strip, and the ends are closed with plugs.
To prevent an avalanche from the roof of snow is necessary. Even at the stage of the crate installation, provide for the intended attachment points of this support element by placing special bars under the crest of the wave. carried out parallel to the cornice with fastening under the second transverse step of the metal tile sheet.
Metal roofing also needs to be grounded in order to ensure the safety of the entire building as a whole.
When the metal tile is completed, remove construction debris with a soft brush and treat the cuts and scratches with spray paint. After 3 months of operation of the roof, check the condition of the screws, if necessary, tighten loose ones.
After choosing a roof, everyone wants to estimate the budget needed to purchase roofing material. To do this, you need to know the dimensions of the roof and be able to correctly calculate the optimal number of sheets of metal tiles. For a simple design, this can easily be done by yourself.
Standard or custom tile sheets?
Many people do not know that sheets can be ordered in almost any length (usually from 0.5 to 6m), and not just standard sizes.
Standard sizes of sheets of a metal tile of the most popular profile "Monterrey": 0,5m; 1.15m; 2.25m and 3.65m. The lengths correspond to one-, three-, six- and ten-wave sheets.
Fig. 1: difference between standard and custom-made metal tiles
This fact allows you to purchase a roof with the maximum amount of usable area and, of course, save on the purchase. Suppose (Fig. 1), we have a slope length of 6.5 m and want to cover it vertically with two sheets. Custom sheets in this case will be 3.65m and 3m long (where 15cm is the overlap of the sheets). In the case of standard sheets, we will get two modules of 3.65 meters, i.e. extra 65 cm from each sheet of metal tile.
When ordering sheets of metal tiles for the size of the roof, consider a vertical overlap of approximately 15 cm.
Calculation of additional finishing elements
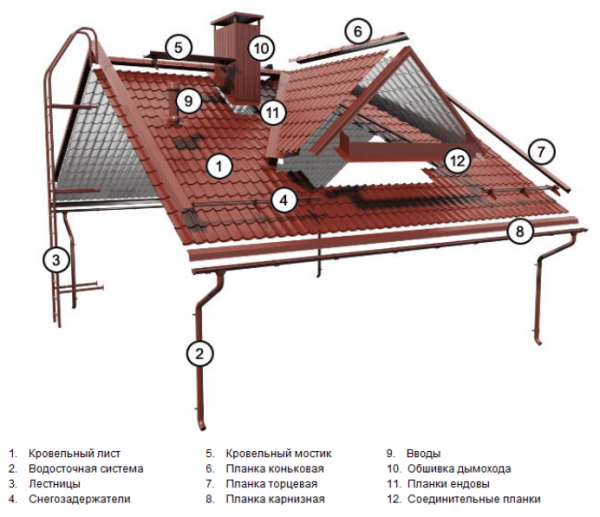
Let's immediately give an example of an image that shows all the necessary elements for finishing a metal tile:
 Accessories for metal tiles
 The presented elements are used not only as components for metal tiles, but are also used in other roofing materials, having slight differences in shape.
The elements have a standard factory length - 2 meters. Since for greater tightness they are stacked on top of each other by about 10 cm, we will use the general formula to calculate them.
The number of a certain additional element for the roof = L / 1.9. Where L is the total length to be closed, 1.9m is the useful length of the standard element. The result is rounded up.
Example. Suppose the length of the roof along the ridge is 7 meters. Then the number of ridge slats will be 7 / 1.9 = 4. In a similar way, we independently calculate other elements of the metal tile finish.
The number of self-tapping screws for fixing metal tiles
A necessary element of any metal profiled roof is fasteners, thanks to which the material is securely held on the crate. For metal tiles, special self-tapping screws with a special rubberized washer are used. The most commonly used sizes are 4.8x28 and 4.8x35 mm, where the first value is the diameter, and the second is the length of the fastener. The average consumption of such self-tapping screws is from 6 to 8 pieces per square meter. roofing. Usually fasteners are released in multiples of packaging. The average number of such screws in a package is 250 pcs.
 Scheme of fastening self-tapping screws for metal tiles
 Between themselves, the sheets of metal tiles are fastened with self-tapping screws 4.8x19 mm in the upper part of the wave after about 20-25 cm. Packed in multiples of a package of 250 pcs.
For fastening additional elements (ridge, wind bar, upper valley and abutment bar) a self-tapping screw 4.8x50 or 4.8x70mm is used, it is also installed after 20-25 cm. Quantity in a package - 100 pcs.
Calculation of metal tiles for rectangular slopes
There are many online services for calculating sheets of metal, but they, as a rule, do not take into account the dimensions of the sheet and, as a result, give out the total area of the roof, which can differ significantly from the correct one. We also need to know the exact number of sheets and their length. To calculate the material, it is necessary to "decompose" the roof into separate slopes, representing various geometric figures. In most cases, the roof consists of slopes shaped like rectangles, triangles and trapeziums. Let's start with the calculation of a rectangular slope.
To begin with, we specify the full and useful width (including the castle floor) of the metal tile sheet. The Monterrey profile has a total width of 1.18 or 1.19m. Useful is almost always equal to 1.1 m.
 Fig. 2: calculation of metal tiles for a rectangular roof slope
 In the case of a gable roof, we have two rectangular slopes. Suppose each of them has dimensions of 9.5x6.5m (see Fig.). Based on the calculation of the useful and full width of the metal tile, 1.1 and 1.18 m, respectively, we get 8 full sheets of 3.65 m each and the same number of 3 m long. The overlap width will be 8.88m. We perform similar calculations for another slope. The uncovered area of the roof can be covered by cutting sheets (3.65 and 3m) lengthwise into 2 equal parts. As a result, for a given roof size, 16 sheets of metal tile 3.65 m long and the same number of three-meter sheets will be required. The area of the roofing material will be: (3.65m + 3m) x 1.18m x 16 = 125.55m² (the formula for calculating the area is a rectangle S=a*b). Rectangular slopes have the least amount of metal tile waste!
Please note that the area of the metal tile will always be greater than the area of the roof due to the longitudinal and transverse overlapping of the roof sheets.
In a similar way, you can find out the number of sheets not only for a gable, but also mansard roof(broken line) having 4 rectangular slopes.
Calculations of metal tiles for a complex roof
With a gable roof, everything is quite simple. But what if you have to count on a hip or hipped roof? The first consists of two triangles and two trapezoids. In the second option - only triangles (see the article "roof shapes"). For such complex roofs more roofing material will be required, since the corners of the metal tile will need to be cut. For a more accurate calculation, specialized programs are needed, for example, "Roofing Profi".
 An example of the calculation of metal tiles in the program "Roof Profi"
 The program allows you to determine the number and length of roofing sheets for a roof of any complexity, as well as add the necessary cutouts in the slopes.
Metal shingles have a reputation for being modern, sophisticated and easy to install roofing. Before fixing this material, they must make calculations, taking into account the size of one sheet, the shape of the roofs, the step of the crate and some other nuances.
Calculation of metal tiles on the roof
There will be no doubts about the quality of the installation of a metal tile roof if you determine in advance the optimal size of the sheet and calculate how many self-tapping screws are required. When calculating the number of metal tiles, pay attention to the shape of the roof, which can be not only single-pitched or gable, but also complex, for example, hip.
Sheet metal dimensions
Width and length, and hence the area of a sheet of metal tiles is conditionally divided into two types: full and useful. The first type refers to the value that is measured from one to the other edge of the product, and the second - the size without taking into account those centimeters that are lost when creating overlaps.
When purchasing material, it is the useful width and length that are taken into account. In other words, the calculated amount of building materials is rounded up.
The useful width is the width without overlaps.
The length of a sheet of metal tiles varies from 40 cm to 8 m, and the width is between 116 and 119 cm. For the length of the product in the transverse direction special attention do not pay. Much more important is the length of the tile sheet. Optimal size- 4.5 m.
A smart builder will prefer to use sheets whose length matches the distance from the ridge to the roof eaves. He will refuse this idea only if the ridge board is located too far from the upper edge of the walls. Still, lifting sheets 6–8 m long upstairs at home is a very difficult task. In addition, huge pieces of material during the ascent to the roof can severely scratch the walls.
When the dimensions of the roof do not allow covering it with one sheet of metal tile from the eaves to the ridge, they buy material longer than necessary, and simply cut off the extra centimeters. Short sheets are not taken: they will have to be mounted with an overlap, which will lead to a significant waste of material and stupid waste.
Calculation of self-tapping screws for fixing metal tiles
When installing metal tiles, self-tapping screws of different sizes are used:
- 4.8x35 mm or 4.8x20 mm (for fixing the material on a wooden crate);
- 4.8x20 mm (for connecting the edges of sheets in geometrically complex areas of the roof);
- 4.8x50 mm or 4.8x70 mm (for places where the material needs to be fixed especially strongly).
What will be the consumption of self-tapping screws, it is necessary to determine in advance, taking into account several nuances:
- fasteners are inserted into all places where the lower part of the material wave is in contact with the crate;
- near the ridge beam, self-tapping screws are immersed in each wave of material;
- at intermediate stages, fasteners are twisted into sheets through a wave;
- when creating an overlap, self-tapping screws are placed at a distance of a meter from each other along the crate.
Fasteners are inserted into the metal tile often only in the area of \u200b\u200bthe eaves and ridge
Fasteners inserted into the material at short intervals will soon cause the roof to leak. And self-tapping screws, rarely used, will not be able to hold the metal sheets in place, which will lead to serious deformation of the roof.
Usually, 7 self-tapping screws are enough to fasten 1 m² of metal tiles, under which a crate is installed with an average pitch of 50 cm. True, this rule only works with a roof of a simple configuration. With the complexity of the shape of the roof, the required number of fasteners increases.
To determine exactly how many self-tapping screws 4.8x35 mm, 4.8x20 mm and 4.8x50 mm will be needed to install a metal roof, you should know the following parameters:
- approximate consumption of self-tapping screws per 1 m²;
- roof area;
- section of the board of the crate;
- slope length;
- slope width;
- required number of sheets of material.
It looks like a scheme for fixing 4 sheets of material with screws, laid out in two rows
Using a self-drawn scheme for attaching metal tiles to self-tapping screws, let's try to perform the calculations. Imagine that we need to fix the material on a roof with an area of 150 m², boards with a section of 30x150 m are used as lathing, the length of the slope is 7.75 m, the width is 10.2 m, and 40 sheets of metal tiles were purchased for the roof device. Now let's do the following tasks:
- Find the required number of fasteners with a size of 4.8x20 mm. As the diagram shows, 21 self-tapping screws are required for each side joint. It turns out that for all 18 seams that will appear when the sheets are joined, 378 fasteners 20 mm long will be needed.
- Let's determine how much you need to buy self-tapping screws with a size of 4.8x35 mm - fasteners for inter-row joints. According to the rules, each seam formed as a result of combining two rows of material is fixed with 6 self-tapping screws. On a roof with an area of 150 m², there are 20 such joints, which means that for installation work at the inter-row joint, it is necessary to purchase 120 fasteners 3.5 cm long.
- Let's calculate how many fasteners with a size of 4.8x35 mm will go to work in the ridge area and on the eaves. In these areas, one sheet of metal tiles is fixed with three self-tapping screws. Therefore, on the roof, where it is planned to place 40 sheets, 120 fasteners will have to be used in the area of \u200b\u200bthe ridge and eaves.
- Find the number of fasteners 4.8x35 mm required for mounting metal tiles on the sides of the roof. At one end, 22 screws are usually used. It turns out that in the process of working on 4 ends of a gable roof, 88 fasteners will be needed.
- We will find out how many self-tapping screws 3.5 cm long will need to be screwed into the central part of the sheets of metal tiles. Once in the middle of one piece of material, according to the rules, 5 fasteners are inserted, it turns out that 200 screws will have to be used for all 40 sheets. If we take into account all the previous cases of using fasteners with a size of 4.8x35 mm, then it turns out the following: before installing metal tiles, you need to purchase about 550 self-tapping screws (with a margin).
- We determine how much fasteners with a diameter of 4.8 mm and a length of 5 cm should be bought. Taking into account the wavelength of the roofing material and the degree of reliability of fastening in the area of \u200b\u200bthe ends, ridge and cornice, we decide to purchase not about 360 self-tapping screws.
If we add up all the results obtained, it turns out that for the installation of metal tiles on the roof, we need to prepare about 1300 self-tapping screws.
The number of sheets of metal tiles for roofing in one and two slopes
To find out how many sheets of metal tiles will have to close the roof in one slope, use certain data:
- nominal and useful width and length of one sheet of material;
- length and width of the roof slope;
- overlap dimensions in width and length.
The overlap of sheets along the length is usually equal to 10, 15 or 20 cm. And the size of the overlapping of the edges of the material on top of each other in width is determined by the useful width of the product. If the nominal sheet parameter is 1.1 m, and the useful parameter is 1.1 m, then the overlap in width will be the difference between these values (0.08 m).
The largest overlap of sheets in length is 20 cm
- We multiply the width of the slope by the length and find out that the roof area is 90 m².
- We divide the width of the slope by the useful width of a sheet of metal tiles and get the number of rows along the width of the roof (9 / 1.1 = 8).
- To the length of the roof slope, we add the dimensions of the overlaps and the distance by which the rafters extend beyond the walls, as a result of which we find the total length of the slope (10 + 0.3 (2 overlaps of 0.15) + 0.1 \u003d 10.4).
- We divide the total length of the slope by the useful length of the sheet in order to determine how many pieces of material one row along the length of the roof will consist of (10.4 / 3.5 \u003d 3).
- We multiply the number of rows along the length of the roof by the number of rows along the width, that is, we find out how many sheets of material will be used during the construction of the roof (3x8 = 24).
According to our calculations, 24 sheets will need to be fixed on a roof of 90 m².
If you need to determine the amount of metal tiles for the construction of a gable roof, then the calculations will be exactly the same. True, one more action will be added to them - multiplication by 2.
Exceptions can only be in the situation when the roof slopes are not the same. In this scenario, for each slope, the amount of material is calculated separately.
Calculation of metal tiles for a hip roof
When the roof is hipped, that is, it has four slopes, in order to find out the required amount of metal tiles, the structure is conditionally divided into sections (into two isosceles triangles and two trapezoids). Next, the calculation is carried out in several stages:

Video: how to calculate the number of metal tiles on the roof
Calculator for calculating metal tiles
- Choose the type of roof.
- Note if the roof will be insulated.
- Specify the width and length of the slopes.
- Mark whether it is necessary to calculate the soffit.
- Specify the type of soffit.
- Write down the width of the cornice in the cell.
- Specify the width of the front board.
- Select material.
Calculation of the crate under the metal tile
Before calculating the amount of material for the construction of the crate, do the following:
- tape measure the width and length of the slopes;
- determine how much the crate will go beyond the eaves;
- take into account the consumption of frontal boards;
- decide what will be the base for the roofing material - solid or sparse.
On the left is a sparse crate for a metal tile, and on the right is a solid one.
Consumption edged boards on the construction of a continuous crate can be determined without any hassle. Suppose that the roof area is 80 m², and for the construction of the base for the finishing coat, boards 0.15x6 m in size and 25 mm thick were purchased. In this situation, the calculation will look like this:
- 0.15 m x 6 m = 0.9 m² (one board area).
- 80 m² / 0.9 m² = 89 pcs. (required number of boards).
- 0.15 m x 0.025 m x 6 m = 0.0225 m³ (volume of 1 board).
- 89 pcs. x 0.0225 m³ = 2.0025 m³ (cubic capacity of all necessary boards).
When the crate is sparse, the calculations are carried out taking into account the selected distance between the boards. Suppose the material is to be laid out every 35 cm on a roof with an area of 80 m², in which the width of the slopes is 8 m and the length is 5 m. Then the calculation will consist of 5 steps:
- 5 / 0.35 \u003d 14 pcs. (number of boards on one slope).
- 14 * 8 \u003d 112 m. p. (Total molding of boards on one slope).
- 112 m.p. * 2 = 224 m.p. (total molding of boards on two slopes).
- 224 m. p. / 6 = 37 pcs. (number of six-meter boards).
- 37 * 0.0225 \u003d 0.8325 cubic meters (total volume of lumber for battens).
Calculating what will be the consumption of metal tiles on the roof and the boards of the sheathing under it will be easy if such data as the area of \u200b\u200bthe roof and the dimensions of the materials used are known. By the way, so that independent calculations make it possible to build a roof without problems, the numbers obtained during the calculations should be rounded up.
Metal tile is a beautiful roofing material. Manufactured from galvanized iron sheet 0.5 mm thick by stamping. Then the sheet is covered with a layer of phosphate and a layer of polymer. Apply on the reverse side layer of varnish.
This gives the sheet more strength. The best tiles are Finnish and Swedish. About the device of a metal tile.

Designation of calculator fields
Specify roofing material:
Select a material from the list -- Slate (corrugated asbestos-cement sheets): Medium profile (11 kg/m2) Slate (corrugated asbestos-cement sheets): Reinforced profile (13 kg/m2) Corrugated cellulose-bitumen sheets (6 kg/m2) Bituminous (soft , flexible) tiles (15 kg/m2) Galvanized sheet (6.5 kg/m2) Sheet steel (8 kg/m2) Ceramic tiles (50 kg/m2) Cement-sand tiles(70 kg/m2) Metal tile, corrugated board (5 kg/m2) Keramoplast (5.5 kg/m2) Seam roof (6 kg/m2) Polymer-sand tile (25 kg/m2) Ondulin (euro slate) (4 kg/ m2) Composite tiles (7 kg/m2) Natural slate (40 kg/m2) Specify the weight of 1 square meter of coating (? kg/m2)
kg/m2
Enter the roof parameters (photo above):
Base Width A (cm)
Base length D (cm)
Lift height B (cm)
Length of side overhangs C (cm)
Front and rear overhang length E (cm)
Rafter:
Rafter step (cm)
Type of wood for rafters (cm)
Working section of the side rafter (optional) (cm)
Lathing calculation:
Purlin board width (cm)
Lathing board thickness (cm)
Distance between decking boards
F(cm)
Snow load calculation (pictured below):
Choose your region
1 (80/56 kg/m2) 2 (120/84 kg/m2) 3 (180/126 kg/m2) 4 (240/168 kg/m2) 5 (320/224 kg/m2) 6 (400/280 kg/m2) 7 (480/336 kg/m2) 8 (560/392 kg/m2)
Wind load calculation:
Ia I II III IV V VI VII
Height to building ridge
5 m from 5 m to 10 m from 10 m
Terrain type
Open area Closed area Urban areas
Calculation results
Roof pitch: 0 degrees.
The angle of inclination is suitable for this material.
The angle of inclination for this material is desirable to increase!
It is desirable to reduce the angle of inclination for this material!
Roof surface area: 0 m2.
Approximate weight of roofing material: 0 kg.
Number of rolls insulating material with 10% overlap (1x15 m): 0 rolls.
Rafter:
Load on the truss system: 0 kg/m2.
Rafter Length: 0 cm
Number of rafters: 0 pcs
Lathing:
Number of rows of lathing (for the entire roof): 0 rows.
Uniform distance between the boards of the crate: 0 cm
The number of boards of the crate with a standard length of 6 meters: 0 pcs
Volume of boards of an obreshetka: 0 m 3 .
Approximate weight of the boards of the crate: 0 kg.

Choose a snow load area

Metal roofing calculator online
Technical characteristics of the main types of metal tiles
It is made from metal sheets. Here the truth becomes obvious - not only the aesthetic appearance is important for the roof, but also metal characteristics, its dimensions. This . After all, not all roofs are the same: when installing a roof with incorrectly selected dimensions, unexpected expenses may occur.
In this article we will talk about the characteristics of this material, its weight, dimensions, and so on.
So, profile sheet, such characteristics, how:
Dimensions
One of the advantages of sheet metal is small mass compared to simple tiles. Yes, and mounting large and relatively light sheets is much easier than small and weighty ones. But with the size, everything is not so simple.
The size of the sheet depends on the complexity of the roof to be covered. These parameters have a wide range, which makes it possible to select best options to cut down on unnecessary spending. Thickness is the parameter that determines the strength of the sheet. She can fluctuate borders 0.45-0.55 mm for steel profile. After all, a thin sheet will not be strong enough.
The standard thickness is able to withstand weight up to 250 kg/sq. m. Only copper and aluminum sheets are thicker, because they have less strength than cold rolled steel, and in order for them to be strong enough, they must be made thicker.
Length. She must always be multiple of 5. This is done to ensure that the profile lays flat and correctly.  The length value has a wide variation - from 80 cm to 8 m. So the buyer has something to build on. The length of the profile is selected depending on the length of the roof. More precisely, from the addition of two lengths - the roof and the cornice.
Width. This value is provided by the manufacturer. It can be completely different. The average value lies in the range from 1 to 2 m. However, it should be remembered that there is a useful width and length, but there is a full one. Full - profile size produced by production. Usable width and length - the size of the sheet without overlap. Since the laying is carried out precisely in a way without overlap, it means that the calculation is made taking into account the useful width and length, and not the full one.
profile height. The fluctuations of this parameter lie within the limits 28-75 mm. A sheet with a profile height of 50 to 75 mm is an elite one, and therefore the price is appropriate.
It's all about profile height. The higher its height, the stronger and more reliable the roof. There are no clear standards for metal roofing. They depend on the shape of the roof, where each type - hip, tent, gable or four-slope - requires a different profile height and the size of the cover material itself.
Weight
The weight of a sheet usually depends on its dimensions and the metal from which this profile is made. The data range from 3.75 to 5.5 kg based on 1 square. m. Ceramic tiles have a fairly large specific gravity - up to 500 kg per square meter. m. The mass of a galvanized sheet of steel with a thickness of 0.5 mm is only 3.84 kg. Other kilograms adds coverage. This means that the mass of a sheet whose thickness is 0.7 mm will be 5.4 kg. Aluminum is lighter.
But this parameter also depends on the brand of metal, coating, which means that the weight ranges from 1.34 to 1.36 kg per square meter. m. So, the mass of the aluminum sheet will be much lower than the steel, and the roof will be much easier. But a copper sheet 0.5 mm thick weighs 4.45 kg per square meter. m.

Specifications
Strength
For the production of a profile, they usually take cold rolled steel. The strength of the coating is determined not so much by the constant load, but by the tensile strength. It depends on the climate and the weather: wind, snow and rain. At the same time, copper and aluminum are less resistant than steel, but an alloy of zinc and titanium is 2 times stronger than galvanized steel sheet.
Service life
Galvanized metal sheet will last up to 50 years depending on thickness. Sheets of aluminum and copper - up to 75 years, or even up to 100, provided that the roof does not experience large mechanical loads. Anodized aluminum sheet is more resistant and durable. Its service life is guaranteed to be 100 years. But the record holder for longevity is an alloy of titanium with zinc - 150 years.
Other characteristics
- Frost resistance. All metals from which profile sheets are made are frost-resistant and can be used throughout Russia.
- Heat and sound insulation. Metal is metal, so such a roof must be additionally and carefully insulated. Moreover, this should be done not only in areas with cold temperatures, but in areas where the climate is quite warm and mild. Also, do not forget about soundproofing, otherwise the smallest rain will make itself felt quite loudly. Pro .
- Accumulation of electric charge. metal roof has the ability to accumulate an electrostatic charge. This is especially felt during thunderstorms. To avoid this phenomenon, a lightning rod is required. This is a prerequisite for the installation of the roof.
- Fire safety. Fairly fire resistant. Steel melts only at a temperature of 1450-1520ᴼ C. Aluminum sheet melts at a temperature of 658ᴼ C, and copper, depending on the additives, from 590ᴼ C to 1084ᴼC.
- Chemical resistance. Almost all metals are resistant to chemical reactions. But still, galvanized steel sheet has the worst performance in this area. But it all depends on polymer coatings.
- Environmental friendliness. All metals are quite environmentally friendly. But there is one "but". Since all profiles are produced using high-energy industrial cycles, there is still no need to talk about perfect purity.
And now we present you a metal tile calculator , with which you can calculate the metal roofing on the roof online!
Correct calculation of roofing material in steps
 Today metal rolling is the most popular roofing material. Many home owners wish to see their roof covered with iron sheet. But the main difficulty is to accurately calculate the metal tile for the roof. Then, taking this calculation as a basis, calculate how much the work of installing the roof will result in.
At first glance, this seems to be quite simple. Take the area and add it to the area of \u200b\u200bthe slopes. But do not be surprised when the company where you will purchase the desired profile will give you 10-15% more calculations. Why such a difference?
But where. The fact is that when calculating the volume of profile sheets, professionals use rather complex formulas. At the same time, do not forget that "roofing size" and "roofing size" are two completely different numbers.
Since the roofing material is sold in sheets, there will certainly be leftovers: the last sheet will be used up by a third or a quarter, and balances can add up to 5 to 7%.
It is necessary to remember about additional elements - overhangs on the cornices. It means that in addition to the ridge and slopes, the calculation of the roof from the metal tile also includes the overhang.
NOTE!
Sheets are mounted in a certain direction, turn them over anyhow as impossible. The profile wave implies a significant overlap of sheets on top of each other. This creates certain difficulties for the exact calculation of the material.
The roof area is taken as the basis, and the total area serves directly for approximate calculations. To obtain accurate data, the area of separately taken slopes is used.
A very necessary parameter is the width of the sheet with a standard profile pitch - 350 mm.
Another necessary parameter was the length of the sheet. It is used to correctly calculate the number of sheets and their length. Often, the rental has factory dimensions, but many manufacturers give the consumer the opportunity determine the length yourself (up to 8 m). After all, the longer the sheet, the less waste there will be. But there are also inconveniences - long sheets are more difficult to process and transport. Most often, the most popular size is the length of 4-5 m.

Roof calculation involves counting rows on all available slopes, including counting sheets in rows. This calculation is relatively easy to make. The total area is divided by the leaf area. In private, the number of necessary parts (C) is obtained. For example, D (slope length) equals 5 meters G (width)- 10 m. There are two slopes. From here:
S=DxGx2, that is, the roof area (S) is 100 m².
The area of one sheet (H) is usually taken equal to 5 m² 9 1 m wide and 5 m long. Then S / H \u003d C, which corresponds to 20 sheets of rolled metal, having bought 1-2 more sheets in reserve. Since the sheet is cut at specific points, there is a limit to the lengths called "forbidden". Ordering such sheets means throwing money away. Thus, a person who does not have sufficient professionalism in this area, can only make rough estimates.
For gable roof
The main error in calculating the roof is the fact that the amount of material is equal to its size of its area. Not at all. Consider the example of a roof that has two slopes. Such a roof and it is quite simple. So the initial parameters are:
Slope length- 5 m (linear); 
Skate length- 8.5 m (linear);
So the area will be 5*8.5*2 = 85 sq.m. Further, the length and width of rolled metal will be taken into account.
This data is dependent on the type of profile.
A profile with one wave has the following dimensions: length - 0.35 m, width - 1.1 m.
With three waves - 1.05 and 1.1 m, with six waves - 2.1 and 1.1 m, with ten - 3.5 and 1.1 m.
The calculation of the number of sheets required for the width of the slopes will be as follows: 8.5 m / 1.1 m and 8.5 m - the length of the ridge, and 1.1 m - the width of the profile with one wave.
It turns out 7.73 sheets. Then you need to calculate the required number of sheets for the length of the slopes. To do this, divide 5 m by 0.35 m. As a result, we get 14.29 sheets. The value should be rounded down to the smallest number, which means 14 sheets. The rest will be covered with extreme overlap. The total length of the sheet will be:
0,35*14,29=1,42. The resulting figure is multiplied by two, because the roof has two slopes.
For pitched roof
For calculation hipped roof geometry is needed. Such a roof is 2 trapezoids and 2 triangles if this roof is hipped. If hipped, then 4 triangles. The roof, consisting of 4 slopes, looks good on rectangular buildings.
NOTE!
Square it is calculated by applying the formula for a triangle with equal sides: S=0.5a*h, where S is the area of the triangle, a is its base, and h is the height. That is, a is the base of the roof, h is the height of the rafters.
Thus, there is an area of one side of the roof. Since all sides of a hipped roof are the same, simply multiply the area found by 4. However, very rarely all sides are absolutely identical. This means that you need to do separate calculations for each slope, and then add the results and get the total area.
For complex roofs
S=h*(a+b)/2, where a is the top of the trapezoid, its length, b is the length of the base, h is the height. We already know how to count triangles. Thus, having calculated all the areas and adding them up, we get the total area of \u200b\u200bthe roof.
We calculate the number of additional elements
To make the roof look finished, you need. They are purchased separately or together with tiles. They are needed to strengthen the roof, and only then for beauty. The cost of one element is about 200 rubles per linear meter. But first, decide what you need, the cost, then run to the store.
So, you need:
- Skate;
- End strips - protection from snow, rain, wind;
- Adjacency bar - (chimneys, dormers, attic windows);
- Snow barrier - protection of the drain from sliding snow;
- Cornice strip - protection from dust and dirt of the ridge;
- Skate length. The dimensions of the slats depend on this, because 10 cm goes to the joints. The length of the standard ridge is 2 m, and the length of the roof ridge itself is 6 m, then you will need to buy 4 slats, which will amount to 800 rubles.
- end strips have different length. They are calculated in the same way, taking into account joints of 10 cm.
- Adjoining strips calculated in the same way.
- Self-tapping screws, the price of which ranges from 3 to 7 rubles per unit.
Useful video
Specifications and calculation in video format:
Conclusion
All the above calculations are a mandatory detail included in the design of the roof. Before starting it, you need to decide on the amount that you are willing to spend on its arrangement. For this, ordinary geometry will suffice. The roof is divided into geometric shapes and their area is calculated. The area is considered along the cornice overhangs, and not along the edges. Also, do not forget about the slope of the roof. should not exceed 60ᴼ, as this gives additional problems in the arrangement.
 Substances and their physical properties
 Classification, structure, nutrition and the role of bacteria in nature
 Bacteria - the most ancient organisms on Earth Bacteria - the oldest group of living organisms
 Epithets, metaphors, personifications, comparisons: definitions, examples
 Bronchial asthma Bronchial asthma
 Roman Empire Ancient History
 Flexible removable dentures: design, features and benefits Varieties of soft dentures with photos