How to make a house in the country with your own hands. Do-it-yourself frame country house: photo, video, project schemes. List of consumables and tools
The dream of many citizens is a beautiful small house outside the city, where you can escape from the hustle and bustle of the city, hide from the heat, feel the pleasant freshness of the earth under your feet instead of hot asphalt. But just not for everyone these dreams get a real embodiment, it seems that country house- it is difficult, and expensive, and long. In fact, building a country house with your own hands is quite simple.
We plan space
Choosing a place for the future country house- not the time for hasty decisions, because there is not so much space. A well-thought-out competent layout will help to use every piece of land as efficiently as possible. Even though this is your land, you will have to fulfill a number of requirements, maintaining a minimum distance:
- from the street - 5 m
- from the road - 3 m
- from the neighboring site - 3 m
We do not consider the option with a lowland - water will accumulate there. Optimally - the highest place on the site in its northern (north-western) part.
Projects of small country houses
Considering typical projects of country houses, it is easy to see that the undisputed favorite is a one-story building with an attic. This is a time-tested version of a country house, while you can refuse a utility block, because inventory and household supplies can be stored in the attic.
A terrace can be attached to the house - in summer it can be used as a dining room. Two-storey country houses often obtained without actually erecting a “clean” second floor, instead of it attic. Then on the first floor you can plan the kitchen and living room, and the second floor - under the personal space (bedrooms) of the owners.
Advice! You can save a lot on the heating system - even at the most modest prices for the installation of a classic (boiler, pipes and radiators) accounts for 15-20% of the total budget. If you are building a small country house with your own hands, where you intend to live only in the "season" (late spring - early autumn), then you can use electric or infrared heaters to heat it in bad weather.
Prefabricated country houses are becoming very popular - unpretentious, outwardly monotonous parallelepipeds with roof changed architecturally interesting buildings, with an improved layout, one / two floors.
You buy a kind of building kit, such a country house is easy to build, having only basic knowledge about construction. The main thing is that it already provides for all systems - electrical wiring, ventilation, air conditioning, plumbing. This will help to avoid many mistakes that beginners make when they decide to build a country house with their own hands.
A collapsible country house is designed for a long vacation with family or friends, it is larger in area, it can be one or two floors, with an improved layout. Such a house is equipped with a technical room, a kitchen, rest rooms and a bathroom, equipped with a heating, ventilation, air conditioning system, supplied with electricity.
The house can be equipped with a water heater, sink, countertop, hanging shelves, shower cabin necessary plumbing. After installing such a country house, no additional repair work, it is completely ready for operation.
Laying the foundation
The choice of the type of foundation is directly related to the choice of material from which the house will be built, as well as the number of storeys. Light houses (from rounded wood, beam, frame houses and modular) can be erected on a columnar or screw foundation, heavy (brick, aerated concrete, stone, concrete blocks) and two-story houses will require the laying of a strip foundation (as an option - prefabricated, from reinforced concrete blocks) around the entire perimeter and under the load-bearing walls of the house.
It is important to know the depth of soil freezing - the foundation should be laid below this level, taking into account the level at which groundwater occurs.
In the basement, it is required to equip waterproofing at a level of 0.2-0.5 m from the ground. If the soil is dry enough (sand), a cement-sand screed 2-4 cm thick can be made as a screed. For wet soil, roofing material will need to be laid on top of such a screed - in two layers. Alternatively, roofing material can be glued onto a dry screed using hot mastic. Waterproofing is arranged below the expected level of laying beams for the floor.
Advice! In the basement, to ensure ventilation of the subfloor, small holes are made, which are covered with a protective mesh.
A blind area is created around the basement, its width is at least 70 cm (it should protrude further than the overhang of the eaves), which has a slight slope directed from the walls of the house. To do this, the top layer of the earth is removed, clay (sand) is poured, on top of it - a layer of gravel (gravel, broken brick) and poured with concrete (rolled up with asphalt).
Floor and walls
Flooring begins with laying the log. To insulate the floor between the lags, a heater is laid, on top of which a vapor barrier is laid out. It is attached to the lags with a stapler, the joints are glued with adhesive tape. Then a subfloor is laid, for which an unedged, cheapest board is used, having previously treated it with a remedy for dampness and decay. And then they spread the finishing floor. V two-story house the ceiling beams of the first floor serve as a frame for the floor on the second floor.
Buying a summer cottage is a joyful event in the life of every person. And it’s good if a solid house is already present on the site. However, even in the absence of a residential building, you can easily solve this problem by doing the work of building a house with your own hands. It doesn't have to cost a lot of money. Exists interesting projects country houses, allowing you to build full-fledged residential buildings with your own hands from available materials.
The simplest country house can be built from logs, cement and sawdust. Even these elementary materials make it possible to build a beautiful, reliable and warm structure. At the same time, such a house will be completely environmentally friendly and safe for human health. Instead of cement, you can use a mixture of clay, straw and sand.

First step
Make a foundation. The design will weigh quite a bit, so the simplest strip or columnar foundation, which is more preferable in such situations, will do.
Second step


Prepare the base for the house. For the lower strapping, it is recommended to use the highest quality timber as possible. Before laying the beam must be laid on the foundation reliable waterproofing. Also, the beam of the lower trim must be waterproofed from above.
For additional rigidity, the strapping beam should be braided with wire. The load-bearing walls of the house are made up of wooden poles. At the end, you should get a stable frame structure.
Third step
On top of the waterproofing of the lower trim, lay out the rollers of cement or clay-sand mortar. Fill the gaps between such rollers with sawdust and proceed to laying out the firewood. Before laying firewood, it is recommended to impregnate it with an antiseptic composition.

Fourth step
Take a rounded knife and use it to spread the mortar between the stacked firewood. Over time, the wood will dry out, and you will need to fill the gaps with mortar as they appear.
Fifth step
Lay out the walls of firewood in layers. They laid a layer - filled up all the gaps with sawdust - laid a new layer and so on until the end. As a result, you will get already insulated walls.
sixth step
Sand the edges of the wood with sandpaper. Any kind of burrs will additionally retain moisture, so you need to get rid of them especially carefully.


In the end, you just have to fold the simplest truss system and install the selected roofing material. Give preference to lightweight materials. For example, bitumen is well suited for the roof of such a house.

From the inside, the walls can be plastered, sheathed with clapboard or trimmed at your discretion. Outside walls are usually left unchanged. In any case, finishing is recommended not earlier than after 1-2 years, because. during this time the wood will shrink. You will have to fill all the gaps that appear with the materials mentioned earlier.


The simplest house-hut can be built with minimal financial investment.
First stage. Make a standard pile foundation and tie it with prefabricated beams.


Second phase. Install the floor beams of the house. The basis of such a structure is represented by rafters in the form of the letter "A". Rafters are installed on a pre-insulated floor. If the house will have a large height, the elements are spliced truss system in height.

Third stage. Sheathe the outer side of the walls of the house with OSB boards.

Fourth stage. Pull on the sheathed walls a wind-moisture-proof material such as isospan.

Fifth stage. Sheathe roof slopes with the OBS boards you already know. Such sheathing will be a good basis for rolled roofing material. If desired, you can equip a standard crate on the roof and use other finishing materials - profiled sheet, metal tile, etc.

Before laying the finishing roofing material, the roof must be insulated. Usually mineral wool is used for insulation. In the process of performing these works, do not forget about the need to create ventilation gaps. To organize them, a counter-lattice is equipped - it is enough to nail the transverse strips to the elements of the crate to make a small gap.


From the bottom of the roof, install ventilation grilles that will allow air to circulate normally in the under-roof space.
Excellent earthen house with your own hands

A house made of earth is one of the most ancient variants of residential buildings known to mankind. With the observance of technology from ordinary land, you can get a solid, fire-resistant and fairly warm building that does not require practically any financial investments for its construction.
First stage
Prepare the foundation for the future home. In parallel with this, prepare the main building material for the construction of the house in question - bags filled with rammed earth. For the foundation, dig trenches with a depth of about 50-60 cm. Choose the width individually - it should correspond to the width of the bags of earth.
Fill the prepared trenches with gravel. The backfill must be carefully compacted. Cover the entire area under the future earthen house with an approximately 20-centimeter layer of gravel.
Second phase
Lay waterproofing material over the backfill.
Third stage
Draw the circles of the future walls with a building compass. It is desirable that the house has a round shape. Of course, it is possible to build an ordinary rectangular building from bags of earth, but it is the round walls that are characterized by the highest strength.
Fourth stage
Lay the first layer of pre-prepared bags on top of the previously laid waterproofing material. The mixture in these bags should include soil, sand, cement powder and gravel.

Fill the bags to about 80-85% of the volume and tamp as carefully as possible. Each bag used should be in the shape of a rectangle, like a brick. For better tamping, the mixture in the bag should be slightly moistened with water. Sew up the valves of the bags with ordinary wire.
Be especially careful when laying the first row of bags. Everything must be done in strict accordance with the previously applied markup. Tamp the bags and lightly dampen them with water.
Fifth stage

Lay 2 rows of barbed wire on the first layer of masonry. In this case, the barbed wire will take over the functions of the reinforcing layer. Seal all punctures and ruptures of the bags immediately with gray adhesive tape. This is waterproof tape.
Sixth stage
Start laying out the walls. door frames and window frames install immediately. Lay each row of bags with earth with a double layer of barbed wire. Additionally, you can secure the wire with staples.


seventh stage
Fill the seams between the individual bags with a mixture of sand, cement, chopped straw and lime.
The bags need to be laid out with some offset seams, approximately the same as with traditional brickwork.
Having reached the height of a person, you can begin to shift each row of laid material to increase the strength of the walls being erected.
The laid walls are plastered. Before applying the plaster, the bags should be treated with cement laitance and allowed to dry. Plastering is carried out on a steel painting grid.

At the junction of the walls, perform additional reinforcement with the same barbed wire.
The interior decoration of an earthen house is usually limited to simple plastering.
In the end, it remains to equip the roof of the earthen house. First install the beam supports - they must be securely clamped between the bags. Sheathe the floors with OSB boards, and lay the finishing material on top. The best option coating for such a case is bitumen.


After completing all the basic work, you can cover the walls of your earthen house with finishing plaster or paint.

If desired, even an ordinary change house can be converted into a quite comfortable country house.

First stage. Prepare strip concrete foundation. It is also allowed to use a columnar foundation, but first you need to make sure that the soil on the ground is not subject to severe frost heaving.
Second phase. Let the concrete of the base gain at least half of the branded strength, and then install the change house on the foundation. A crane will help you with this. Adjust the position of the change house with the boards. Pre-treat the boards with an antiseptic and place them under the skids of the building.

Third stage. Assemble the frame of the extension to the change house. To do this, use a 10x5 cm beam. Install the supports on the veranda and triple the horizontal runs under the rafters.
Fourth stage. Sew on the outer side of the walls of the change house a crate for siding or other selected material. For additional insulation, put mineral wool into the crate and cover it with plastic wrap.
Insulate the floor and walls of the extension. From the inside, the insulation must be covered with vapor barrier material.

Fifth stage. Complete the exterior cladding of the house. It is most convenient and rational to use vinyl siding for this.
Sixth stage. Lay out the roof. Metal tile is best combined with siding. Otherwise, when choosing a finish coating, be guided by your preferences and financial capabilities.
Seventh stage. Attach snow guards to roof slopes. Insulate the attic as desired.

Eighth stage. Complete interior decoration house. For example, walls can be sheathed with drywall, covered with a couple of layers of putty and painted. Level the floors and install your preferred floor covering.
As a result, the old change house after the addition of an additional room and simple finishing works turns into a very comfortable house with a separate bedroom and a large living room-kitchen.

Thus, for the construction of country houses, you can use a wide variety of materials. Craftsmen adapted almost everything that occurs in nature, and even straw, for such work!
Now you know how to build from affordable and inexpensive materials, and you can build a reliable, safe and comfortable house in your summer cottage.
Successful work!
Video - Do-it-yourself country house projects
As you know, the comfort of staying in a suburban area largely depends on how cozy and comfortable the house will be. Often the question arises, which house is better to build in the country, so that the cost of the project is democratic, and the result obtained is as good as possible. We will consider several basic options, but we will dwell in detail on the version of the frame house, since it is easiest to build it with your own hands.
The main types of country houses
To decide which option is best for you, you should consider the features of each of them:
| Modular option | This includes country houses from block containers, which are the easiest to build. You only need to build a strip or column foundation, and put a finished module on it with a crane. The disadvantages include the monotony of buildings and their small size in addition, the price of the finished version is much higher than that of the one assembled independently. |
| Frame house | One of the most popular solutions due to a number of advantages, the main of which are: a very affordable cost of the project, ease of work, assembly instructions may seem complicated, but if you understand it, then all questions will disappear by themselves. In addition, using this option, you can build a structure of any size and configuration. |
| Timber structure | Another widespread option, which is distinguished by its attractive appearance and environmental friendliness, so that it fits into the country environment as well as possible. Assembling a building requires a certain qualification, so it is better to involve specialists, especially since the cost of the structure is quite high, and any mistakes are fraught with considerable costs. |
| Buildings made of bricks and blocks | These materials are most often used in the construction of capital buildings. The advantages include strength and durability, the disadvantages are the need to build a massive base, the laboriousness of construction (at least the skills of a bricklayer are needed) and the rather high cost of the project. In addition, many people associate country houses with a tree, so such options are not even considered initially. |

Features of building a house using frame technology
Consider how to build an inexpensive country house with your own hands.
It is very important to prepare well for the work, the following activities can be attributed to this stage:
- To begin with, a specific project is selected to clearly represent the scope of work and the required amount of materials.
- Further, all required materials are purchased, while you should purchase everything with a small margin, since the actual consumption most often exceeds the planned one.
- Another important question- buying everything necessary tool : from shovels and hammers to concrete mixers and chainsaws. If there is no electricity on the site, then renting a diesel generator for a summer residence will help solve the problem.

Foundation
Without a doubt, a very important part of the work, since the strength and durability of the entire structure directly depends on the foundation, any subsidence leads to cracks and even the destruction of walls and ceilings.
You can build one of the following options:
- Pillar foundation.
- Tape base.
- Slab foundation.

Each of these options has its pros and cons, we will consider the tape type of the base:
- First of all, a trench is dug, the depth and width of which depends on the type of soil and the weight of the future structure. Usually the width is 30-40 centimeters.
- It is better to pour a gravel pillow at the bottom, which will also carry a drainage function, the walls of the pit should be even and not crumble.
- Formwork is placed on top, but if the outer part of the base is laid out from dembler blocks, then the formwork can be minimal, the main thing is that the level of the foundation is even, this will facilitate masonry work later.
- After the foundation has solidified (at least a week should pass), you can proceed to further work. The upper end of the foundation is closed with glass isol or two layers of roofing material, this will prevent the penetration of moisture into the building through the capillaries in the concrete.
Advice!
Do not forget about the ventilation holes in, the entire space must be ventilated, otherwise mold will begin to form on the structures over time.

Basement
Consideration of the question of how to build a country house continues with such a stage as the installation of the basement, this stage of work is carried out as follows:
- For the overlapping device, a beam with a section of at least 100x150 mm is used, and more can be, it all depends on the design features.
- The elements are interconnected either with threaded studs or special screws with a diameter of 10-12 mm and a length of 25-30 cm.
Advice!
Along the bottom edge of the strapping, you can attach a subfloor in any convenient way and lay foam or mineral wool on it, so you can.

Walls
We are considering how to build a country house ourselves, but in fact, you can’t do without a few helpers, especially at the stage of installing the frame of future walls, because you need to hold each element and carefully adjust its position before fastening.
The work is carried out as follows:
- Fastening elements is best done using modern fasteners: corners of perforated tapes, brackets and mounting plates. In addition to convenience and high speed of work, these elements guarantee the reliability of all connections, the main thing is to choose the right fasteners.
- Racks are set to the width of the insulation, so you simplify further work. Particular attention should be paid to the perfectly precise position of the corner elements.
- From below, the elements are attached to the harness, another beam is laid on top and the system is fastened, and crossbars are also used to increase strength.
- Next, you should take care of strengthening the structure, most often this is achieved using struts and braces. With their help, rigidity increases significantly.

truss system
Another milestone, on which the future roof is being erected, the following work is carried out as part of this stage:
- First of all, a detailed system design is drawn up so that you can imagine what work will have to be done.

- Based on the scheme, materials and fasteners are purchased, boards can be used for small roofs, and timber for more massive ones.
- The assembly is carried out carefully, each element is carefully fastened, at the end the whole system is interconnected.
Sheathing and roofing
Outside, the walls are sheathed as follows:
- A board 25mm thick can be used and is best fixed at a 45 degree angle for best strength.
- You can also use a simpler option - moisture resistant plates, so the work will be carried out much faster.
- For laying the roof, a lathing device will be required, while its type depends on which coating will be used. For slate and ondulin, a crate is required, and for soft roof, metal tiles and other similar options - solid flooring made of moisture-resistant materials.

- Mounting is carried out in accordance with the manufacturer's instructions, usually this process is simple.
Inner lining
Lastly, a heater is laid, which is closed with a vapor barrier material.
Sheathing can be different:
- Can be used wooden lining or decorative panels of various kinds.
- Another option is to attach moisture-resistant drywall or other durable materials that can later be puttied and painted or finished in any other way.
We hope you have decided which house to build in the country, and what technologies to use. This is only a brief plan of work, since the description of any of the stages will take an entire article (all works are described separately in other articles on the portal).
Conclusion
A house in the country should be not only attractive from the outside, but also practical from the inside. Therefore, do not be lazy and find a really high-quality and thoughtful project. The video in this article will clearly show the features of some work.

Even in a small country house there should be at least a kitchen and a rest room. If you plan to spend the whole summer outside the city, in addition to often receive guests, it makes sense to build a full-fledged building with all the amenities. We invite you to consider photos of projects of country houses.
Basic requirements of SNiP
For a building located on a garden plot, the requirements are less stringent than for residential building. However, if during the construction process you create discomfort for your neighbors, you may be forced to demolish an already finished building.
Therefore, before choosing a project, you should familiarize yourself with the basic requirements of SNiP:
- even in a small area, the building can only be located at a distance of 3 m from the neighboring fence
- the minimum distance from the public area (road) is also 3 m, and if there is a passage, 5 m
- if there are other buildings on your site, in order to reduce the risk of their ignition, the distance between block or stone buildings is left at least 6 m, between the stone and wooden buildings 10 m, if both buildings are wooden - 15 m; when using wood only as a ceiling - 8 m
- in the presence of a nearby power line, the distance from it is from 10 m; from the high-voltage line it is even more up to 40 m
- a certain distance (up to 4 m) must also be retreated from tree trunks, 2 m is enough from undersized trees.
Don't forget about building density. With the standard size of a summer cottage of 6-10 acres, you have the right to occupy no more than 30% of the area with buildings.
The territory must necessarily have a mesh or lattice fence 1.5 m high. Deaf fences are allowed only if this is agreed by the meeting of gardening members or both neighbors have agreed to this.
Is any permission needed?
According to Art. 51, paragraph 1, part 17 of the Civil Code of the Russian Federation, if the building is not intended for permanent residence, a special building permit is not required. But in order to obtain ownership of an already built garden house, as well as other outbuildings, you will need to issue a cadastral passport and register with the Registration Chamber (according to a simplified scheme).
If it is planned to erect a residential building on the garden plot with the right to register in it, then it will be necessary to obtain a special permit signed by the executive authorities and a building passport. As well as permission from the fire department. In the future, you will also need to register ownership of the building.
Even a small building should last long enough
To make the country house as comfortable as possible, you should listen to the opinion of experts:
- no matter how much you would like to build something unusual on your site, with little construction experience it is better to stop at a universal project that has already been tested over the years
- when planning, you should immediately determine the size of the rooms and their location; this will immediately determine the supply of communications (sewerage and water supply), which are laid even at the stage of foundation construction
- in order to save your own money, the design of even a temporary building must be thought out so that in the future it can be used as a bathhouse, barn or summer kitchen
- be sure to consider the possibility of further extension to the building of additional premises: verandas, terraces, baths and other buildings
- even in a small house it is worth providing not only a rest room, but also a kitchen area
- in the absence of other buildings, a separate place should be allocated for placing garden tools
- the building must be durable enough to last at least 25-30 years
How much will construction cost?
Regardless of the size of the future garden house, before starting construction, you will need to calculate the cost of its construction. To do this, you need to consider:
- Main settings: length, width and height of the building
- type of foundation and its height
- type of materials used for the construction of walls, and their thickness
- roof type
- materials used for flooring
- dimensions of each room
- heating methods (if it is planned)
- types of finishing materials
- communication methods: electricity, sewerage, etc.
There are enough programs on the net that can calculate the approximate cost of building any type of building. Most of them have a free trial period. You can also use online calculators for calculations. Please note that the cost of materials in them may differ from those applicable in your area of residence.
Since prices in the process of building a country house can rise if the construction is planned for a long time, in the estimate it is better to lay a margin of at least 10-20% of the total cost. When calculating the cost, do not forget that such “little things” as roofing bolts, self-tapping screws, primer, plaster will also require considerable expenses.
It is better to purchase materials in one place - bulk purchase will be much cheaper.
Site selection
Choosing the best location on the site
First you need to draw up a plan of the estate on a scale and mark the cardinal points on it. We immediately mark on it existing buildings and large plants that are not subject to demolition. We shade all restricted areas on the plan (distances from the fence, power lines, etc.).
You should also not place the building near compost pits and a toilet - at the slightest breath of a breeze, unpleasant odors will enter the house. We mark favorable zones with dotted lines. Try to plan the site in such a way that even after construction there is room for outbuildings (if required), recreation areas, for example, a pool, gazebos, playgrounds, etc.
In addition to the distances from neighboring buildings and the road established by SNiP, one should also focus on other factors:
- it is better to place a country house closer to access roads and sources of communications: loading and unloading crops and household items will not become a big problem in this case, and connecting to electricity and other communications will cost less
- wind direction: so that the building does not dry out quickly, do not place windows and doors from the side of the prevailing winds
- when the windows go south or east, the room will quickly overheat in the summer, it is better if the sun hits them in the afternoon
- so that groundwater does not destroy the foundation of the building, the house is located on the highest place; in wetlands, if there is no alternative, you will need to consider reliable system foundation drainage and waterproofing
- pay attention to appearance from the window, because comfort always consists of such trifles.
Don't rush into choosing a project. Start development at least six months before construction starts so that you have the opportunity to think it through thoroughly and take your time to make calculations.
We draw up a project
Of course, a country house project can be ordered from a specialized organization, but the prices for such services are considerable. When building a small house, it is much easier to use ready-made schemes, which abound on the network, and supplement them with your own calculations.
Building plan
You will need several drawings. The first with the designation of the location of all rooms, the entrance and window openings, as well as the thickness of the walls and partitions. The second figure shows the layout of the foundation and the roofing scheme.
small building project
On 3-6 acres of land, it is not advisable to build too large a structure- it will take up most of the site. A grandiose building is not required even if you spend a little time in the country. In some cases, a small building that does not have a foundation and is assembled from boards or even plywood is sufficient. However, such a house will not last long.
Inexpensive panel or foam block buildings on pile foundation will cost a minimum amount, and even grandchildren will get it. A small country house can have a standard size of 3x3 or 4x4 m, and even a separate small walk-through kitchen-dining room can be provided in it. The second room is equipped with one or two beds.
A small house may have a single room with a place for kitchen cabinets, dining table and sleeping area. But even for a small country house, it makes sense to attach a winter glazed veranda or terrace along the long side of the building 2 m long. The veranda is erected on a common foundation or the base is poured for it separately.
Such a house can be made with a summer or winter attic. A medium-sized building will occupy a minimum of free space on the land, while the living area will increase. If there is an attic, bedrooms are placed in it, and on the ground floor there is a kitchen and a bathroom.
It is better to supplement such a building with a veranda or terrace, where you can comfortably settle down to relax in the evening. For better heat preservation, a vestibule can be provided in front of the entrance. Small Summer shower fits perfectly on the veranda.
If a light beam is used for the construction of walls, and there are no problems with the soil (it is not too wet and not loose, and the groundwater does not rise too high), it is enough to erect a strip foundation. The base for the stove is being prepared simultaneously with the foundation of the house. For the veranda, a columnar base will suffice.
For a log house from a 150x150 bar, a tape is prepared from a foundation 25 cm wide. The terrace is installed separately on poles with a section of 25 cm, buried in the ground at a distance of 60 cm. When building in swampy areas or building brick walls, you will need a full-fledged deep-buried foundation.
To save money, the foundation for the veranda can be made separate lightweight (columnar or pile). You can attach it even after the end of construction. But the option with a separate foundation is only suitable if there is soil that is not prone to movement, otherwise the foundation will lead.
large house project
If the family is large, and the country house is planned to be used as a residential house, including in winter, it makes sense to build capital building from rounded logs, timber or even bricks already finished projects size 5.3x8.4 m, 7x8.4 m, 10x8 m and more. You can also order the development of your own non-standard project.
For such houses, a full-fledged lath foundation is required. It is laid below the freezing of the soil, so that when seasonal temperatures change, there is no movement and deformation of the structure.
A large country house can be two-story or consist of one floor and an insulated attic. It will have enough space not only for residents, but also for guests. On the first floor there is a kitchen, a bathroom and a living room, and on the second floor there are bedrooms, children's rooms, if necessary, an office and other rooms.
To avoid unnecessary problems with the supply of water, gas and sewerage, it is not worth moving the bathroom and the cooking room to the second floor. It is also customary to equip the living room on the ground floor, near the kitchen and away from the bedrooms.
If the building is to be used all year round, it is better to build not an attic, but a full-fledged second floor. Otherwise, almost as much money will be spent on its insulation, wind and vapor barrier as on the construction of the second floor. It is also necessary to take into account the cost of heating - in the winter cold, the main walls will store heat much better than even well-insulated thin attic walls.
House with an attic
A country house with an attic will cost less than building a full-fledged two-story building only if it is operated only in the summer. But even with its arrangement, a heater will be needed. Otherwise, on sunny days it will be too hot. The heat insulator layer is made slightly thinner than for winter operation.
If only the first floor is heated, only the walls of the building and the ceiling are insulated, leaving the attic cold. The door / cover, intended for passage to the upper floor, is made as tight as possible and additionally insulated.
When constructing a conventional gable roof living space in the attic will not be enough. To increase the free space, the roof is made broken. However, its construction is more complicated, and more materials will be needed.
Another way to expand the space in the attic is to raise the walls just above the ground floor. Such houses are called "half-story". By raising the walls, the area of \u200b\u200bthe premises will slightly increase.
Project of a house with a glazed veranda
The veranda can be attached to only one of the sides of the houses or run along two or even three walls. On heaving soils, it is better to build a foundation for it simultaneously with the foundation of the house. After all, when making a separate shallow foundation, you will win only 1-2 m.
Most often, the veranda is completely glazed or the lower half of the wall is closed, and double-glazed windows or single frames are inserted on top. You will receive a full-fledged room in which you can equip a dining room, living room or kitchen. In the warm season, the windows can be thrown wide open.
The veranda can also serve as a continuation of the living room. It can also be equipped with a small sports area, a children's game room or even an office.
Terrace house
On the covered terrace it will be possible not only to settle down for tea drinking on a warm summer evening. On it, on hot or rainy days, it will be possible to do some current affairs without littering the house. Often it is attached already at the end of the main construction on a separate columnar foundation.
The garage is made as an extension to the house or is located on the basement floor. Walls and foundations can be made of brick or concrete blocks. If the soil is wet or loose, the house is installed on a reinforced concrete pad.
Two-storey house
If the family is large enough, and the size of the plot does not allow building a country house of a large area, it makes sense to build a two-story building. In this case, you can squeeze the maximum benefit out of even a small piece of land. The size of such a structure can be anything from 4x4 m to 10x10 m or more.
The construction of the second floor will not cost much more. The load on the foundation increases by only 60%. Flooring and roofing costs do not increase at all. Only the cost of materials for walls and floors will be added. In this way, square meter area will cost less than in the case of a one-story building.
Experts do not advise overloading a house from a bar with an additional floor. It has enough advantages, but its strength has limits.
Country house combined with a bathhouse or sauna
If the land plot does not allow allocating a separate place for the construction of a bathhouse, it is quite possible to attach it to a country house. Such a project is also economically beneficial - after all, building materials a separate building will take much more. It will not be necessary to supply separate communications - light and water supply.
Very often, a bath or sauna is attached to the house after the construction is completed. The foundation for it is selected depending on the type of soil and total weight building. To protect against moisture, the walls are carefully waterproofed.
Even if the bathhouse is being built simultaneously with a residential building, the foundation for it is made separate so that cracks do not appear due to the difference in humidity and it does not move away from general structure. The foundation must be built separately from the foundation of the house.
Indeed, due to high humidity, cracks may appear in it, and the base of the bath will begin to move away from the foundation of the entire structure. It contains sewer pipes and water pipes. At a distance of at least 3-5 m from the foundation, a separate drain pit is being prepared.
To prevent moisture from entering the room, the entrances to the bath or sauna and the house are made separate. Between them, you can build a covered corridor-transition, veranda, gazebo, or at least a canopy - in this case, when moving from a bathhouse to a house in winter, the likelihood of catching a cold decreases. Since the bath and sauna are the source high humidity, you should carefully consider the system of its ventilation and waterproofing of the room.
In addition to ventilation holes, it is desirable to provide a window or a small window for ventilation. The most acceptable option is to connect the steam room to the wall with a stove located in the house. Dry bath or sauna in this case will be much faster.
house with bay window
A bay window is called a small part of the room protruding beyond the facade. Such structures against the background of a building of a conventional form will look ridiculous. The bay window will look harmonious only if there is a complex architecture, an unusual shape of windows, a roof or an entrance group.
It can be built into only one of the floors or pass through two floors at once. The shape of the bay window can be any: from semicircular to trapezoidal or pentagonal. With it, it is possible to expand the area of \u200b\u200bthe building - in such extensions there are dining areas, winter gardens or work rooms.
In the absence of experience in construction, it is hardly realistic to create such a structure, and the project will need to be ordered from specialists. However, such a house looks very unusual.
It is possible to attach a bay window even after the construction of a country house. In this case, cantilever slabs are used as a foundation, which are built into bearing wall. Deepen such a foundation to the same level as the foundation of the whole house. For laying out curly protrusions, brick or profiled timber with a special locking system is most often used.
The protruding elements of the bay window lead to a weakening of the rigidity of the entire structure, so the house box must be strengthened.
How much will it cost to buy a finished building?
In the absence of experience in construction, it makes sense to purchase a ready-made building on a turnkey basis. Depending on the allocated amount, you can buy either a simple panel structure or a full-fledged structure made of timber or logs. Since the cost of materials in each region may vary, it is better to find out the prices for such houses on the relevant sites.
- For example, a small house made of timber 3x3 m with clapboard lining will cost 60 thousand rubles.
- A medium-sized building 5x3 m will cost about 10 thousand rubles.
- A full-fledged log house with a veranda can be bought for 270 thousand rubles.
Materials used for construction
The choice of foundation type depends on the type of soil and the total weight of the structure:
- columnar or pile foundations made of concrete blocks, bricks, reinforced concrete, rubble stone with a step of 1-2.5 m; to combine them into one structure that serves as a support for the house, a grillage made of wood or metal is used; the most economical option, more suitable for light timber or frame buildings, log cabins; in summer cottage construction, screw piles are mainly used, driven, stuffed and drilling are used less often;
- strip foundation: a stronger support made of reinforced concrete, brick or buta, such a tape runs around the entire perimeter of the house and internal partitions; subdivided into two types: shallowly buried in the ground by 40-70 cm and deep-buried (used for heaving soils) 1.5-1.8 m below the freezing level; tape bases can be used for any type of houses from cast, block to brick;
- slab base in the form of a monolithic reinforced slab located on a sand and gravel cushion; when the soil is heaving, such a foundation is able to lower and rise without any deformation; such a base simultaneously serves as a subfloor; suitable for all types of buildings, including large masses.
Column foundation on loose soils or with close passage ground water invalid. In these cases, strip foundations are used.
Most types of foundations are built on a 20-30 cm sand and gravel pad, which protects the foundation from groundwater and capillary moisture. It is especially important in the presence of heaving (peaty and clay) soil, which, when frozen, changes its volume and rises. In the absence of a sand and gravel substrate, this can lead to warping of the foundation and cracking of the walls.
Such a pillow helps to perfectly level the base before pouring the foundation. With it, the pressure of the building on the ground is distributed more evenly. In its absence and uneven subsidence of the structure, it can simply be jarred. Do not make such a pillow only for sandy soils or heavily wetlands.
When laying the foundation, sewerage and water supply pipes are immediately laid. The depth of their laying is 0.5 m lower than the freezing point of the soil. If this is not possible, the pipes are additionally insulated. To ensure the gravity flow of the liquid, they are laid at a slight slope of 4-7 °.
Wall materials
The choice of materials for the walls of a country house depends on many factors: personal preferences, the region of construction, the length of stay (year-round or only in the summer), project requirements and, of course, the allocated amount:
- frame or panel buildings: their main advantages are low cost and ease of construction; the disadvantages include high flammability, low wind resistance and poor thermal insulation - a few years after the shrinkage of the mineral wool or polystyrene laid between the frame racks, it will be difficult to heat the house; service life of 30-40 years;
- slag-cast: inexpensive buildings, for the arrangement of walls, formwork is prepared, into which a mixture of cement and coal slag is poured; this method was used several decades ago even in the construction of residential buildings; the main disadvantage of such a material is its low moisture resistance: inside such premises, due to dampness, a fungus quickly starts up; service life up to 50-70 years;
- light houses from gas or foam blocks: these inexpensive materials are 8 times larger than ordinary bricks, so the construction of the building will be fast, in addition, the blocks are easy to saw or drill; due to high porosity, they have high heat and sound insulation; the service life of aerated concrete is up to 50-80 years, foam blocks are slightly lower;
- sandwich panel houses: unlike frame and panel boards, the strength element in them is not racks and crossbars, but the panel itself, filled with polyurethane foam, expanded polystyrene or mineral wool filler. Such structures do not require assembly - fragments of the future building are brought ready-made, they only need to be assembled; although such products are more expensive than panel and frame products, the disadvantages are the same - high flammability and short service life; although manufacturers claim that such a house can last up to a hundred years, in practice, it will be problematic to live in the house permanently after a couple of decades after the insulation shrinks;
- houses made of timber or log cabins: durable eco-friendly building; excellent heat retention; service life of 100 years or more; garden houses from a bar can be purchased and ready-made, "turnkey";
- brick or stone buildings: their construction will cost much more, but they will last 100-150 years or more.
Roof
For an inexpensive country house, it would be optimal to use a roof made of metal or profiled sheet. Such a roof is strong enough and is not afraid of bad weather and can last up to 40 years. Rolled metal covered with a colored protective film looks quite aesthetically pleasing. The metal tile is more convenient when arranging roofs of complex shape.
The disadvantages of these two materials include a high level of noise during rain or wind - the impact of each drop will be heard in the room. That is why it is worth considering the soundproofing of the ceiling.
Inexpensive foam plastic is a good heat insulator, but it makes no sense to use it as a sound insulator - it conducts sounds well. In addition, this material is combustible.
When using roofing material as a roof, it is better to choose a material with an additional protective coating in the form of abrasive chips - it will last longer. However, the service life of inexpensive materials based on bitumen is short and is only 12-15 years. For euroroofing material based on fiberglass, it is slightly longer - 20-30 years.
The most optimal material for the roof of a building, which is operated not only in summer, but also in winter, is slate. At a relatively low cost, it has excellent characteristics - it is not afraid of temperature changes, chemically resistant, and its real service life is up to 30-40 years. However, slate weighs a lot and increases the load on the foundation, so this fact must be taken into account when laying the foundation.
Arrangement of partitions
There is a rule in construction: partitions should not exceed the weight of load-bearing walls. The simplest inexpensive structures are frame, panel or plank. It is better not to use drywall in an unheated building - it quickly absorbs moisture, and over time it will warp.
In such a house, it is better to use ordinary partitions made of boards, later upholstered with shingles and plastered with lime. Any types of partitions are installed only on the subfloor. After installing the frame, fixed on the strapping to the floor and ceiling, heat insulators are laid inside, with the help of which heat is more evenly distributed inside the premises.
When erecting walls from a bar or log, the partitions are started to be arranged only after the tree shrinks. The timber will settle for at least 6 months, but it will take at least a year for the logs to dry out. Glued timber almost does not shrink, so the installation of partitions can be started immediately after construction is completed.
Facade decoration
Facade plaster
Cinder block houses or cinder-cast structures can simply be plastered and then painted facade paint. Frame houses are sewn up with wood, trimmed with siding, block-house (log-like panels) or tempo panels. It is allowed to plaster them.
If you have free funds, you can veneer the country house with a ventilated facade with porcelain tiles or bricks. However, the cost of these materials cannot be called democratic.
Warming
If the heated building is not sufficiently insulated, this will not only increase the cost of coal or gas, but also the appearance of condensate in the premises due to the high temperature difference. Protecting the building from temperature extremes and excessive moisture with the help of insulation pads will significantly extend its service life.
It is better to insulate the building only from the side of the facade so that the dew point (the temperature at which water vapor turns into water) does not shift into the building. It will be necessary to insulate both the foundation, the ceiling above the basement (between the lags or under the screed), the attic floor, and the walls themselves.
As a heat insulator, you can use inexpensive foam, expanded polystyrene, mineral wool, sawdust or expanded clay. The last two are used as a foundation insulation and attic backfill. Extruded polystyrene foam, resistant to decay, can be used both for thermal insulation of walls and for warming the base of the house.
For the thermal insulation of the walls, a frame is prepared, between which waterproofing and a layer of insulation are laid. On top of the heat insulator, it is recommended to mount a film that serves as a windshield. Further, the frame is closed with any finishing material.
Dacha is an outlet, a favorite hobby for people living in the city. Construction of garden houses not only technological process, but also special ritual for which they are carefully prepared.
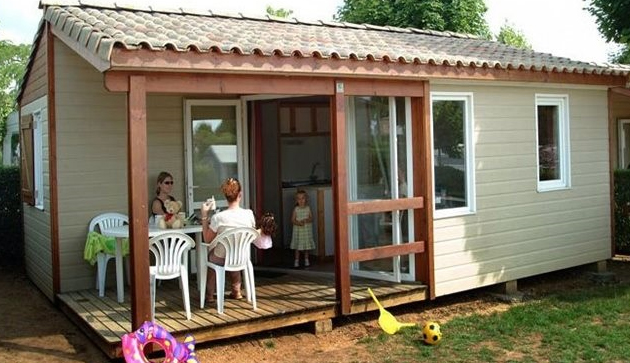
 The project of a finished frame garden house with a veranda
 More often, a house needs to be placed on a limited one, so compactness, convenience, a thoughtful approach to all details plays a significant role when choosing a project.
Based on the analysis of the wishes of customers for summer cottages, designers have developed many standard projects. The line includes inexpensive options for a very type of change houses. , for placement on small, frame, panel buildings.
 Project and layout of the first floor and attic of a typical wooden structure for a summer cottage
 For suburban homestead territories with a larger area, projects of cottages from 100 to 200 sq.m., including attic type.
But before choosing a project, adapting it to the site, you need to take into account the legal norms for the construction of country houses. Formally, a permit for the construction of a garden house in partnership with the intended use is not required. But if you need to register a building, get an address, that is, transfer it to the status of individual housing construction, difficulties will arise.
 Sample application form for obtaining a building permit for a garden building
 Read also
Projects of private houses from SIP panels
 An example of the conversion of a summer residential building into a gazebo
 The choice of material is significantly influenced by the style of the future home. National Russian ethnic motifs attract wood, timber. Skeletons, by external finishing, are given a different stylistic coloring. Using savage stone tiles, timber soaked in dark stain brings country style motifs.
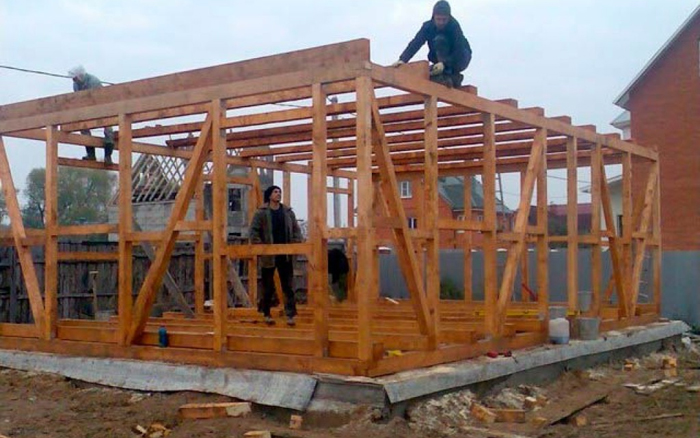
Construction of a frame-panel house
The high speed of construction, the good performance of frame structures made them popular.
Their main advantages:
The supporting structure of the frame garden structure is made of wood.
Construction sequence
Start with site preparation. It is leveled, cleaned of debris, uprooted plants. Then they make a bedding out of sand, crushed stone, tamp it down.
Install the foundation, the lower close-fitting of the house. , suitable roofing material. Install vertical racks, starting from the corners of the building.
They are fixed with an upper strapping belt. The design is reinforced with slopes.
 The process of assembling the frame for panel garden housing
 Then install step by step:

The last step is assembly and .
All wooden elements frame structure made only from dry wood (within 12% humidity). 
They are impregnated with agents that prevent the penetration of moisture, antiseptics.
Construction of a house from a bar
Somewhat more expensive. Their advantage is that they do not require additional external finishing. The bar is an environmentally friendly material.
There are three types of timber:

Installation scheme, the sequence is similar. Wall mounting is different. The numbered timber is the elements of a wooden house constructor. Wall crowns are successively laid out of them. They are connected to each other with wooden fasteners (dowels). In parallel with the assembly of the outer walls, the inner ones are assembled by inserting the elements of the partitions into the grooves of the outer structures.
 Scheme of connecting the beam with dowels
 Educational institutions (All types)
 Conditions for admission to the Yuryev-Polsky industrial-humanitarian college
 Graduates of the Kazan Technical School of Information Technologies and Communications solve the most complex tasks Kazan College of Information Technologies and Communications specialty
 Clean hands are a guarantee of health Who goes in for sports gains strength
 Presentation for the lesson of literary reading "Russian folk tale" sister Alyonushka and brother Ivanushka "
 Lakes, groundwater, swamps, permafrost, glaciers What are permafrost lakes
 Presentation: Leadership in social groups