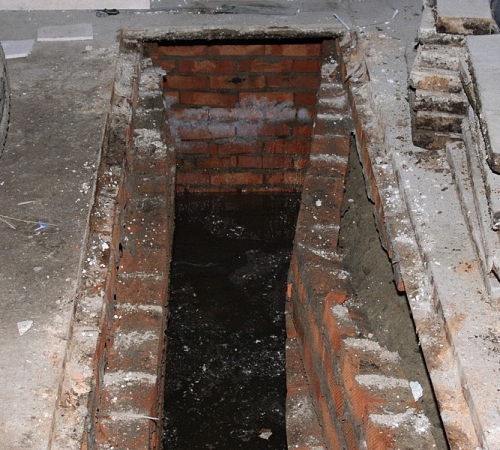
Masonry pit in the garage with bricks. Do-it-yourself inspection hole in the garage: not easy, but possible. Manufacture technology of a viewing hole
Arranging a viewing hole in the garage helps to carry out independent car repairs much faster and cheaper, without the involvement of specialists. In addition, with its help, periodic technical inspections of various types of equipment are carried out. Proper arrangement of a viewing hole has a lot of advantages, but for its implementation it is required to follow a certain technology, which we will talk about later.
Advantages and disadvantages of arranging a viewing hole in the garage
The arrangement of a viewing hole in the garage has both positive and negative sides. At a time when the network of service stations was poorly developed, inspection pits were in almost every garage. When a large number Service stations, many motorists refuse to build an inspection pit, primarily due to factors such as lack of time to repair a car, accumulation of excess moisture in the pit, additional time and material costs for building a pit.
Moreover, high humidity in the pit, contributes to faster damage to the car, since moisture evaporating from the pit gets on the lower part of the body, thereby accelerating its corrosion.
Despite this, the viewing hole has a number of advantages in favor of its arrangement in the garage. First, the ability to self-repair or test the vehicle. This fact allows you to save on a trip to the service station. In addition, for some men, checking the car is a kind of hobby. Periodic oil change, in the garage with viewing hole becomes quite possible at home.
Arrangement of the correct viewing hole in the garage
If you still decide to build a viewing hole in the garage, this is not always possible, primarily because of the height ground water. If the water is located at a distance of about 200 cm from the garage, then the construction of a pit is unacceptable, since you will have to constantly pump water out of it.
Although with proper waterproofing and installation of a drainage system, this problem is quite solvable.
The arrangement and installation of drainage requires the advice of specialists, since even the smallest mistake will lead to the malfunction of the entire system. If the drainage system is laid during the construction of the house, then it is quite possible to build a viewing hole. Otherwise, this procedure would be too costly and troublesome.
If the groundwater is too high, then the only option would be to equip a viewing hole of a recumbent direction.
To check the level of groundwater, you will need to consult specialists, although it is quite possible to cope without them. To do this, you should dig a small pit at the location of the inspection hole and measure the level at which the water begins to rise. The water will begin to rise during heavy rains, so the pit is not concreted until this period.

The dimensions of the inspection hole in the garage: features of the calculations
In relation to design features inspection hole is:
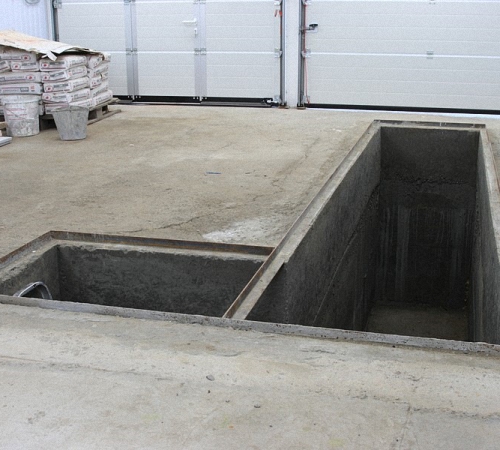
- complex, consisting of a pit and a cellar;
- narrow, in this case, in order to descend into it a fairly small staircase;
- the recumbent option involves staying in the pit, exclusively in the supine position.
In addition, these options differ in various modifications of the pits. The size of a standard inspection pit in a garage depends, first of all, on the number of people who will be in it, on the size of the garage itself, on the type of car or other equipment that will be in the garage.
If you have several cars, it is better to use the classic version, which involves the following dimensions:
- the width of the inspection hole in the garage - from 80 to 100 cm;
- the depth of the inspection hole in the garage is about 170-200 cm;
- the length of the inspection hole depends on the length of the garage and is at least 160-200 cm.
Before planning a viewing pit, individual structural features should be taken into account, which will affect the determination of the size and configuration of the pit. The pit is dug with allowances, which are about forty centimeters in length and width, and about twenty in height. If it is necessary to carry out wall insulation, the size of the pit should be increased by the size of the material from which the insulation will be made.

How to make a viewing hole in the garage: the initial stage
After arranging the necessary pit and after setting it up before the first rain, an important process follows - the construction of the floor of the inspection pit. If you adhere to all the technological points associated with holding this process, then problems with the accumulation of excess moisture will not appear.
First of all, the inspection pit needs natural ventilation, so when arranging the floor, you should take care of the presence of a hole through which the hose will pass in the form of an air duct.
This hose is closed with a cap, and is inserted at least twenty centimeters. Next, the concrete pad is prepared, which consists of two layers. First, gravel is poured, at least ten centimeters thick, and then sand, about six centimeters thick. Thanks to this, a drainage system is equipped, which is responsible for removing moisture from the pit.
Each of the previously covered layers requires careful tamping and leveling. For these purposes, a special tool and water are used.
After that, metal reinforcement is laid on it, and the surface is poured with concrete mortar. When the concrete dries, another waterproofing layer is laid, and only after that, the pit is finished or treated with heat-insulating materials.
If the groundwater is too deep, it is possible to lay the floor in the inspection hole with bricks.
Waterproofing a viewing hole in the garage: features
The modern building materials market offers a huge amount of waterproofing materials. different shapes, size and purpose. The main requirements for the material for waterproofing inspection pits are efficiency and high quality work at a moderate cost.
Therefore, based on these criteria, we suggest that you familiarize yourself with the main options that help to waterproof the inspection pit:
- polymer single-layer membrane - the thickness of this material is about two millimeters, it is durable and highly resistant, but at the same time, this option has the highest cost, in addition, the installation of the membrane will require special equipment and tools to work with it;
- materials based on bitumen in the form of roofing material or bituminous lubricant - they are distinguished by affordable cost and ease of installation, the duration of operation of this waterproofing option is at least 15 years, but at the same time, you do not need to hire specialists, the material has a roll shape, it is easy to fit and cut, for gluing joints it is heated or a bituminous solvent is used;
- grease for waterproofing the inspection pit is notable for its low cost, ease of application, for its installation, the surface must first be moistened with water.

The choice of insulation for a viewing hole in the garage
The procedure for insulating the inspection pit is an uncommon option that needs to be carried out only if additional material resources are available, and when working in a heated garage room.
Insulation will reduce the amount of electricity required to heat the garage. The material in the form of insulation is glued to the wall and floor of the pit. After its installation, the walls are finished.
Among a large number of heaters, it is best to give preference to expanded polystyrene, which has the following advantages:
- duration of operation;
- high resistance to thermal losses;
- moisture resistance;
- affordable cost;
- Fire safety.
Please note that the material for floor insulation is chosen more dense than for the walls of the inspection pit.
How to build a viewing hole in the garage: wall technology
In the process of erecting the walls of the inspection pit, there are two options for further action:
- concreting;
- brick.
After that, tiles or other finishing materials are laid on the walls.
Before laying bricks or pouring concrete, a series of preparatory work, which consist in applying clay to the surface of the walls, laying a dense film in the form of waterproofing, installing formwork, the thickness of which is about 12 cm.
Please note the technological nuances associated with the implementation of these works:
- so that the car wheel does not accidentally fall into the inspection hole, you should take care of the presence of an insurance rail in it, in addition, it will prevent the ingress of moisture and dirt from car wheels;
- the viewing rail has a T-shape, its manufacture requires metal, which is fixed on the surface of the formwork, and is a supporting element on which the cover is put on;
- in addition, it will not be superfluous to arrange ledges and niches in the wall, on which various kinds of accessories will be conveniently located.
Do-it-yourself inspection pit in the garage - arrangement of lighting and covers
Lighting in the viewing hole is not necessary, as the use of a portable lantern or light bulb is sufficient. However, if the viewing hole is used too often, then it is better to foresee this moment in advance.
The maximum voltage of the outlet, which is installed in the inspection hole, should be 35V. In addition, due to high humidity, it must be of high quality and moisture resistant. The use of standard two hundred and twenty volt lamps in a viewing hole is prohibited, as they pose a threat to the life of a person who works in a hole.
When choosing a lighting device, one should proceed from the power of the outlet for which special types of lamps are designed.
The installation of a cover, which is most often made of wood, completes the work on arranging the inspection pit. Minimum Thickness material is 3 cm, as too massive boards will be difficult to lift.
There are several options for making a cover for a viewing hole:
- when using a metal corner, for the manufacture of the lid, several shields on small rollers will be required, it is with their help that the shields are shifted among themselves. A wooden plank is designed for each shield, the width of which is about 25 mm;
- if there are only two corners fixed along the contour, two shields are used to make the cover, which are located in different areas, rollers are installed on the movable shield, and limiters are installed on the extreme parts of the slats, thus, when the shield is shifted, the pit opens halfway;
- covers that open according to the roller shutter principle are made of wood, about 4 cm thick, and long, depending on the width of the pit, each board is processed in such a way as to build a groove hole on it, a metal cable is installed in them, between which installation is carried out springs, with light pressure on the handle, the pit opens, this cover is convenient, but in the process of its manufacture it should not be treated with an anti-corrosion compound and a waterproofing solution.

How to fill a viewing hole in the garage
As mentioned earlier, the walls of the inspection pit are made of concrete or brick. The first option is less expensive financially, but requires higher time investments. Concrete walls are distinguished by higher strength, durability, and reliability.
Inspection hole in the garage photo:

After compacting the rubble, the arrangement of the concrete floor begins, its height is about six centimeters. Previously, the floor needs to be reinforced. For these purposes, a wire mesh with a mesh size of 15x15 cm is used.
To prepare one cubic meter of concrete, you will need:
- three hundred kilograms of cement, more than 400 brands;
- 700 kg of sand;
- 200 liters of water;
- 1200 kg of crushed stone.
If kneading concrete mix is done by hand, then more water should be put. When using a concrete mixer, the proportions are preserved.
When increasing the water in the concrete mix, add a little cement. This type of concrete is characterized by good strength and durability.
The optimal thickness of the walls is about fifteen centimeters. To prepare the solution, you will need:
- 350 kg of cement;
- 660 kg of sand;
- 1200 kg of crushed stone;
- 210 liters of water.
For concreting walls, the technology of layering should be observed. That is, the concrete composition is applied in layers. The height of each tier should not exceed thirty centimeters. To compact the composition, use a bayonet shovel or a deep concrete vibrator.

The arrangement of the walls of the inspection pit requires reinforcement, using the same mesh as on the floor. The mesh is installed in strips, just like concrete is laid. After the work, the concrete is left for three days, and then the formwork is removed.
Inspection hole in the garage video:
Own garage with a viewing hole is the dream of any car owner. So why not bring it to life with your own hands? After all, a garage pit will provide access to important parts of the car, which will allow you to perform inspection and repair work without contacting the car service masters.
Why do we need a viewing hole and what should it be?
Garage pit - the main assistant of a motorist. It allows you to perform diagnostics, maintenance and small, and even overhaul car on your own.
It is worth remembering that the viewing hole is an increased source of moisture. So, the most important task in its construction is waterproofing.
A damp inspection pit will quickly nullify the microclimate in the garage, which will inevitably lead to the appearance of rust and mold.
The dampness coming from the inspection hole drastically reduces the comfort of being in the garage, especially in the cold season. And this is already dangerous to health, so the pit must be kept perfectly dry: oil drips or puddles of water are not allowed.
Before carrying out any major activities in the garage, you must:
- study the features of the soil under the garage structure and establish the depth of groundwater;
- assess the condition of the foundation.
Based on reliable geodetic data, as well as the requirements building codes, it will be possible to make a technically competent and economically sound decision.
Attention: when planning a viewing hole, it is imperative to provide material for closing during downtime. This will eliminate the effect of excessive moisture on the bottom and lower part of the car body.
Dimensions
It is reasonable to place an inspection hole not in the middle, but closer to one of the side walls and in the depths of the garage. And without that small area Of course, it is not worth reducing a cramped or narrow room. But it would hardly be advisable to build an inspection pit less than 2 m long.
The optimal depth is taken equal to the average human height (170-180 cm) in total with a small margin of 15-20 cm to increase the viewing angle of the bottom of the car.
The main requirements for entering the inspection pit are safety and ergonomics. If the garage is short, but wide enough, the entrance to the viewing hole can be made side.
The width of the garage pit directly depends on the size of the room and, of course, the dimensions of the car. In private garages, this value is assumed to be 70–80 cm for cars and 110–120 cm for trucks and minibuses.
Attention: it is better to take the depth of the inspection hole with some margin. At the bottom of the structure, it is always possible to equip an elevation, which will ensure the convenience of performing certain technical operations, while the passage under the machine placed on the pit will not be embarrassed by anything. In addition, special niches and recesses should be provided on the walls of the pit, in which it will be possible to fold tools or car parts.
Features of waterproofing and thermal insulation of the garage pit
It is necessary to choose materials for waterproofing and insulation of a viewing hole at the planning stage. This will allow you to correctly calculate the parameters of the structure and make a decision on its interior decoration.
Waterproofing materials
As a waterproofing for a garage viewing hole, you can use:
- bituminous materials (roofing material and its varieties, bituminous resin; service life 10–15 years);
- polymeric geotextiles (single and multilayer polymeric membranes on a self-adhesive basis; service life is at least 50 years);
- penetrating compositions (dry mineral or mineral-organic mixtures diluted with water immediately before use; the service life is equal to the service life of the treated surfaces);
- oily clay in combination with refined products (in combination with modern materials oily clay will increase the operational period of the main waterproofing);
- liquid rubber (emulsion, which includes latex, polymers and stabilizing agents; service life is about 25 years);
Waterproofing the garage pit must be carried out in conjunction with thermal insulation measures. The latter allow to reduce heat leakage through the floor and walls of the structure, as well as to minimize the amount of condensate formed due to temperature differences.
Thermal insulation measures
Extruded foam and expanded clay are excellent for thermal insulation of the inspection pit. The first is laid on the waterproofing of the walls of the structure and covered with a vapor barrier film, after which a concrete screed is poured.
Expanded clay is filled with sand and gravel cushion, equipped at the bottom of the pit. A vapor barrier is installed on the rammed pillow, after which the floor is poured or laid.
Attention: if the groundwater level is less than 2.5 m, it is necessary to organize a drainage system with drainage outside the garage.
Pit lighting and ventilation
The presence of a lighting system in the inspection pit is a prerequisite for comfortable and safe work. Lighting equipment should have low power and it needs reliable protection from moisture and mechanical damage.
In the garage pit you can install:
- lamps with voltage up to 36 V (fluorescent lamps);
- low-voltage lamps with a voltage of 12 V (LED lamps);
- lamps with a voltage of 220 V in a waterproof design (not lower than IP54);
- accumulator lamps with the tight case.
One of the most popular solutions is 36 V fluorescent lamps in a protected waterproof housing. They consume a small amount of electricity, which is beneficial for long lighting periods. The same can be said about LEDs, the use of which provides a high level of electrical safety.
When lighting an inspection pit with equipment operating under a voltage of 220 V, it is necessary to carry out a hidden laying of electrical wiring with mandatory waterproofing of the latter, and close the lamps with shades with a grill; all metal elements of the system should be grounded from a single circuit led outside the garage.
Battery-powered lamps are rarely used to illuminate inspection pits due to the high cost, as well as the difficulty of repairing or replacing damaged elements. However, if it is impossible to equip stationary lighting, such equipment is the most suitable solution.
Attention: sockets and switches cannot be installed in the inspection hole. For ease of implementation certain types For work, it is recommended to equip a garage pit with a portable lamp with a special housing (with a carrying handle, a stand for stationary installation and a hook or clip for hanging) on a protected electric cord with a length of at least 4 m.
As for the ventilation of the garage pit, in most cases it is left natural.
Forced air exchange is advisable to organize in tight spaces where exhaust gases quickly accumulate, as well as in garages installed in areas with a high level of groundwater.
Ventilation in the garage is equipped in the following way:
- An exhaust outlet with protection against wind blowing and rainwater ingress is arranged under the ceiling of the garage on the leeward side.
- The supply hole is made at a distance of no more than 50 cm from the floor, preferably closer to the inspection hole, on the windward side.
- The exhaust and supply ventilation openings are closed with a metal or plastic grate.
Attention: to increase the intensity of air exchange, the exhaust outlet of the garage ventilation can be equipped with a fan of small or medium power, powered by a switchboard or battery.
We build a viewing hole in the garage with our own hands (with drawings)
The garage pit should be located in such a way that it is possible to park the car on it at a certain angle. This will facilitate access to certain parts of the machine, as well as simplify the performance of many technical operations. The length of the structure depends on the length of the machine (including a margin of 1 m).
Project
A thorough approach to the matter during the construction of a garage pit will help nothing more than a preliminary calculation of its parameters. And it is performed based on the size of the machine, but with some margin in case the latter is changed in the future. For example, if the length of the Opel Kadett is almost 4 m, then the length of the Scoda Octavia is 4.6 m.
Let's take an average value of 4.5 m and get that, taking into account a margin of 1 m, the length of the inspection pit will be 5.5 m.
The depth of the structure should be taken in accordance with the growth of the garage owner. With an average of 175–185 cm, the normal depth of the inspection hole for work will be at least 195 cm, and the width sufficient for free movement and performance of technical operations will be at least 0.8 m. viewing hole parameters:
- length 5.5 m;
- width 1 m;
- height 1.95 m.
You can transfer the obtained dimensions to paper using an axonometric projection or a flat image.
In the second case, two drawings will be needed - for the projections of the structure on the vertical and horizontal planes.
When creating a drawing of an inspection pit, it is necessary to take into account the thickness of the hydro-, heat- and vapor barrier, as well as the concrete screed. This will allow you to more accurately determine the volume earthworks.
Attention: if the garage is used only for storing the car, it is more convenient to place the viewing hole in the center of the room. In the event that, in combination, the room is used as a mini-workshop or storage room, it is better to move the central axis of the structure closer to one of the walls. With the car put on the pit in such a garage, there will be enough space for passage and work at the workbench.
Instrument preparation and material collection
Having approved construction project, you can start purchasing materials. In order not to waste time, it is worth preparing in parallel the tool that will be needed in the process. It doesn't hurt to include in the list of necessary:
- construction tape measure, marker, knife;
- pickaxe, crowbar, shovels and bayonet shovels;
- building level;
- concrete mixer;
- welding machine;
- powerful puncher or chipper;
- concrete cutter;
- hammer, pliers and a set of screwdrivers;
- circular saw with cutting circles for metal;
- construction trowel;
- electric drill with a mixer for mixing the solution;
- buckets and containers for water, building mixtures and mortar.
- bitumen heating tank;
- burner for gluing roofing material;
- shaft for laying bitumen;
- grater for leveling concrete surfaces.
In search of forces and means to implement the project, one should not forget about the impressive list of building materials. It includes:
- cement, sand and crushed stone or gravel (for the production of cement mortar, concrete and sealing pad);
- expanded clay and / or gravel (as a stabilizing and heat-insulating pad under the floor screed);
- insulation (extruded foam);
- surface waterproofing (penetrating composition for the treatment of concrete surfaces);
- drainage pipe;
- reinforcement with a diameter of 10–12 cm (for reinforcing the floor of the inspection pit);
- boards, wooden blocks, nails and wire (for the construction of formwork);
- brick (in the case of building walls using brickwork)
- vapor barrier film (to prevent the accumulation of condensate on the walls and floor of the inspection pit);
- steel corner 20 * 20 mm (for framing the upper perimeter of the viewing hole);
- boards and beams treated with an antiseptic and waterproof paint (for the manufacture of a viewing hole cover);
- rolled roofing felt;
- bituminous resin (mastic).
Attention: the amount of building materials is accepted depending on the size of the pit with a 2–10% margin.
Garage floor demolition and excavation
To implement the construction plan, the first step is to free the territory. Everything superfluous from the garage will have to be removed for a while, as well as prepare a site outside the premises for storing land.
The next steps will be:
- On the floor of the garage, with the help of chalk, a corner and a rule, the outlines of a viewing hole are drawn.
- The resulting rectangle is increased by 10–15 cm on each side, which is necessary for the convenience of earthworks.
- Along the lines that turned out this time, the floor is being disassembled.
- If the garage floor is made of concrete, you will first have to work with a concrete cutter, and also get acquainted with the capabilities of the chipper found on this occasion (in extreme cases, a high-power puncher armed with a chisel).
- When working with reinforced concrete, you need to remember about reinforcement. In a standard reinforced concrete slab, it is located at a depth of 5 to 10 cm. The metal skeleton of a concrete screed must be carefully cut with a circular saw, for which you first need to expand the cut with a puncher or a chipper.
- After removing the layer of concrete with reinforcement, it remains to remove the remains of the screed.
- The dismantled concrete floor opened up access to the ground under the garage, in which it is necessary to dig a foundation pit 195–200 cm deep, 115 cm wide and 5.5–5.6 m long.
- When performing earthworks, you should regularly monitor the vertical level of the walls of the pit and the depth of the latter, and also make sure that there is no water in the pit, and that its walls do not crumble as they deepen.
Attention: if necessary, the walls of the excavation can be temporarily reinforced with wooden beams. It is advisable to take the earth obtained in the process of digging a trench outside the premises so as not to clutter it up. In the process of preparing the pit, you need to work in warm clothes, because as the pit deepens, the humidity level will increase, and the temperature in the garage will also decrease.
Waterproofing a garage pit: important points
No tricks will save the viewing hole from flooding in the event of groundwater rising or heavy rainfall, and the garage itself from dampness, fungus and mold, if you do not pay due attention to water drainage. This can be done only with the help of a drainage system: it will provide protection against the penetration of rainwater and soil moisture under the inner perimeter of the room.
Self-installation of drainage
To install the drainage system, you will need drainage pipes wrapped with geotextile, as well as a piece of PVC pipe with a diameter of 100 mm and connecting elements.
The length of the drainage will correspond to the outer perimeter of a separate garage building. The output of the system is arranged at a distance of at least 5 m from the garage. It is highly desirable that the drain be carried out into a nearby ravine or other natural depression in the soil.
If there is none on the site, the drainage outlet will need to be brought into a special container, which must be buried at least 20 cm below the drainage level and equipped with a pump for pumping water with a float.
The drainage must be equipped with a manhole, in the role of which you can use a vertically installed and connected to the drainage perimeter pvc pipe. The upper end of the latter is closed with a protective cover.
Installation of the drainage system is carried out in several stages:
- Around the garage building, at a distance of up to 0.5 m, a trench is dug with a depth equal to the depth of the garage foundation and up to 0.5 cm wide.
- A 10 cm cushion of sand and gravel is laid at the bottom of the drainage ditch (to protect the system from destruction under the influence of soil pressure).
- The sand cushion is covered with a geotextile film.
- Drainage pipes are laid in the trench and connected into a closed system with an outlet to a tank or a natural depression on the ground.
- The drainage is covered with a pillow of a mixture of sand and crushed stone (gravel), which in the process must be carefully, but carefully (so as not to damage the pipe) tamped.
With the installation of drainage, the weakest point in the garage waterproofing system - the sole of its foundation - will be reliably protected from water penetration from outside the structure. As a result, the requirements for moisture protection of the inspection pit will decrease.
Attention: from above, the drainage can be covered with soil, turf or concrete screed (the choice is at the discretion of the garage owner). It is better to install a plastic water drainage tank, since it will last much longer than a metal one, and use the drainage drain to water the garden, provided that chemicals used in car care do not get into it.
Protection against moisture and dampness
With the waterproofing of the pit, the main construction begins. This problem is solved in several steps:
- A pillow of gravel 10–15 cm thick is laid and compacted at the bottom of the pit, which is covered with 5 cm of sand on top.
- The walls of the inspection pit are laid with a layer of greasy (red) clay.
- A ruberoid is spread on the surface of the floor. This must be done with an overlap of 10–15 cm and with the same margin protruding onto the surface of the walls.
- The overlap lines of the roofing material laid on the bottom of the pit are soldered with a burner or glued with molten bitumen mastic. The latter is laid using a special shaft.
- Similarly, the roofing material is laid on the walls. The vertical and horizontal corners of the pit are additionally glued with bitumen or soldered using a special burner.
- On top of the roofing material with mandatory gluing of all corners and joints, a vapor barrier made of a thick polyethylene film is laid.
Do-it-yourself floor and walls of a viewing hole
If the hydro and vapor barrier of the pit is ready, it's time to proceed directly to the construction. To do this, you need to prepare in advance the construction site, tools and materials necessary for the preparation of concrete, insulation and reinforcement of the screed.
Filling the floor
Construction begins with floor screed. Its filling is carried out according to the following method:
- At the bottom of the pit, covered with waterproofing, it is necessary to lay 10–15 cm of rough concrete (grade not lower than M200). The latter is prepared on a concrete mixer in proportions from 1: 3: 4.5 (cement: sand: crushed stone).
- After partial drying, the surface of the rough screed is leveled with a special grater made of wood or hard foam.
- If necessary, the rough screed is covered with a layer of insulation (extruded foam 5 cm thick).
- On top of the thermal insulation pad or, in the absence of such in the project, the rough screed, the reinforcing cage of the floor screed is mounted. To do this, you will need steel reinforcement with a diameter of 10 mm and wire or welding, with which the mesh will be fixed before pouring the screed.
- On a concrete mixer or using a mixer, a cement-sand mortar is prepared in a ratio of approximately 1: 4, which is poured onto the reinforcing frame so that the thickness of the screed is at least 5 cm.
- 2-3 hours after pouring the concrete, its surface is leveled with a grater, after which you can begin to build the walls of the inspection pit.
Attention: pouring rough concrete and reinforced screed must be done in 1 step. Therefore, for work you will need at least 2, and preferably 3 pairs of hands. Draft concrete before warming must be allowed to dry completely, which will take at least 3 days. The same period is necessary for the upper reinforced screed in order to be able to walk freely on it during the construction of the walls of the inspection pit.
Wall construction
The walls of the inspection pit can be made of both brick and concrete. In the second case, before starting work, you will have to install the formwork. A cutting board or plywood is suitable for this and wooden bars. In addition, it is desirable to reinforce the walls of the inspection pit with a mesh of steel wire or reinforcement.
At this stage, it is necessary to deal with the laying of electrical wiring, which, according to electrical safety requirements, must be hidden. To do this, you need to hide the wire in the corrugation, stretch it along the surface of the walls and bring it to the installation points of the lamps, and then fix it on the reinforcing mesh, for example, using plastic ties.
The walls are poured in tiers of 30–40 cm in height. In the process of pouring the walls, the mortar should be carefully tamped with a crowbar or a bayonet shovel - this will remove air from the concrete. Before pouring each subsequent tier, it is necessary to let the previous one dry, for which you will need to wait about 2-3 days.
When building brick walls, the thickness of the masonry is taken equal to the width of the latter. Masonry is carried out in a checkerboard pattern with the obligatory binding of corners and careful grouting. At the final stage of the construction of the walls, care must be taken to ensure that the latter protrude above the floor screed in the garage room by at least 5 cm. This will eliminate the possibility of slipping into the pit foreign objects or accidental arrival by the wheel of a car when placing on a pit.
After installation brick walls it is necessary to wrap the hydro and vapor barrier inside the structure and backfill the soil from the outside of the walls. In this case, the soil should be carefully compacted.
Attention: when laying brick walls or pouring them out of concrete, one must not forget about auxiliary niches. In order to make them concrete walls oh, you will definitely need to build formwork liners of the appropriate size from the boards. When working with bricks, there is no need for such liners, but with them it will be much more convenient to lay bricks around a niche. Upon completion of pouring the concrete walls of the inspection pit, the formwork can be removed no earlier than after 6-7 days. brickwork can be considered ready for further work in 4-5 days.
How and with what to close the viewing hole?
Even before the start of pouring or laying the walls of the inspection pit, it is necessary to prepare a mortgage frame. She will crown the side of the structure - the latter is set up a little higher than the garage floor or flush with the latter.
For the manufacture of the frame, you will need a pre-stocked steel corner, a circular saw with cutting discs for metal and a welding machine with electrodes.
The size of the frame is selected according to the inner or outer perimeter of the walls - the corner must stand as required by the cover sheet. By the way, if it is planned to equip the inspection hole with one, the frame must be turned downward at an angle.
fixation metal structure best done with anchors or dowels, for which you will have to make appropriate holes in concrete or brick, as well as in metal. Finally, so that the frame does not rust during the operation of the garage pit, it must be sanded, primed and painted before installation.
For the manufacture of a cover for a viewing hole, you can use various materials. For example, you can make it sectional from metal frames covered with steel mesh, or in the form of a wooden shield from edged board thickness from 35 mm.
It should be remembered that the thinner the canvas, the easier it is to lift it, so you should not take too thick a tree or shields with a heavy frame.
You can make a cover for a viewing hole in the following way:
Attention: when closing the pit, the outer edge of the lid sheet is in contact with the mortgage frame. Therefore, often the structure is additionally sheathed along the edges with steel or plastic tape. The thickness of such a sheathing will have to be taken into account even before cutting the canvas, and to fix it in advance, buy special fasteners. By the way, the lid can be equipped with special mechanisms that will allow partial opening of the inspection hole.
Video: step-by-step independent construction of a garage pit
Building a viewing hole in the garage is not an easy task. Therefore, their solution should be started, thoroughly prepared and, preferably, in consultation with those who have experience in such work. Competent planning, as well as attention to the issues of thermal and waterproofing of the premises, antiseptic finishes and electrification will ensure comfortable operation of the cellar and will expand the amount of home food stock. With proper organization of work, the construction of a viewing pit should take no more than 10 days, while it may take about a month to build a cellar with an average density schedule.
Do-it-yourself arrangement of a viewing hole in the garage will allow the car enthusiast to get an indispensable attribute that will make it possible to inspect the car on their own, as well as carry out repairs and, often, save a lot on this.
Before starting work, you should familiarize yourself with all milestones, since digging trenches is the smallest part in creating a repair pit.
A repair pit will be an excellent assistant to the owner of the car, and its construction in accordance with all the rules will not create problems in the future. A special recess has many advantages, the main ones being inspection without the need to contact specialists, minor repairs and maintenance such as oil changes and other minor procedures.
Of the shortcomings, it is important to note excess moisture due to the proximity of groundwater. Moreover high-quality arrangement do-it-yourself inspection pit in the garage will ensure the safety of its user.
There are several types of inspection pits in the garage, they are divided according to the type of material and depth. As for materials, concrete or metal is most often used. The structure will be more practical if you choose the first type, since the concrete is not exposed to chemical substances and more resistant to external influences.
A metal garage pit is simpler and cheaper to perform, but the service life can be much shorter. The depth depends on the size of the room - it will be easier to work in a deeper one.

Pit design.
It is important not only to choose the type of pit, but also to know how to make it correctly. It will not be enough to dig a ditch, you also need:
- strengthen the walls and floor;
- choose the right lighting;
- install electric lights;
- cover it to protect it from accidental falling;
- come up with a way to descend;
- take care of waterproofing and thermal insulation;
- install ventilation.
Tools and materials that may be needed when creating a pit
Depending on the complexity of the installation, different tools may be needed, basic set includes:
- measurement tools: tape measure, plumb line or building level;
- chalk or other marking instruments;
- shovel and bayonet shovels;
- electric drill;
- hammer;
- apparatus for welding;
- hacksaw;
- a bucket or other devices for removing dug earth and diluting the concrete mixture;
- surface treatment tools: sandpaper, grater and more.
In addition to tools, you should also prepare materials that you cannot do without when building a viewing hole in the garage with your own hands. You may need:
- materials for concrete mix: cement and sand or cement, sand plus crushed stone;
- crushed stone and gravel - used in the arrangement of the pillow at the bottom;
- slurry;
- wooden beams and boards;
- rods or finished reinforced grating;
- metal corner or channel;
- nails;
- plastic pipes - will be needed in ventilation work;
- heat-insulating and waterproofing materials;
- brick or foam block, if walls are built with their help.
In addition, other additional materials may be needed, such as wall tiles or other decorative trim. You should also prepare a ladder if the entrance to the pit will be provided with it.
We start construction work

The dimensions of the viewing hole.
When equipping a viewing hole with your own hands, first of all, you will need to choose a place for it in the garage and determine the size. Typically, a recess is made in the middle of the room, but this item depends on the size of the room.
It is much more convenient to dig a hole a little closer to the wall, which is only possible with a large garage. This solution will prevent the influence of condensate on the bottom of the machine.
The calculation of the parameters of the pit depends on the dimensions of the car, plus it is recommended to make a small margin in case a new larger car appears in the future. In addition, it will be much more convenient for the car owner to work when they do not have to crowd into too narrow a space.
The optimal width of the inspection pit is 70 cm, the length should be based on the length of a standard car plus 1 meter. Thus, if the length of the vehicle is 4.5 m, then it is better to make the length of the pit 5.5 m. However, it is not always possible to make a structure of this size, but less than 2 meters does not make sense.
Determining the depth of the pit, one should build on the growth of the motorist with the addition of 15-20 cm.
When choosing sizes, it is important to consider several factors:
- place for descent;
- wall and floor thickness after all finishing works concrete, brick or other materials.
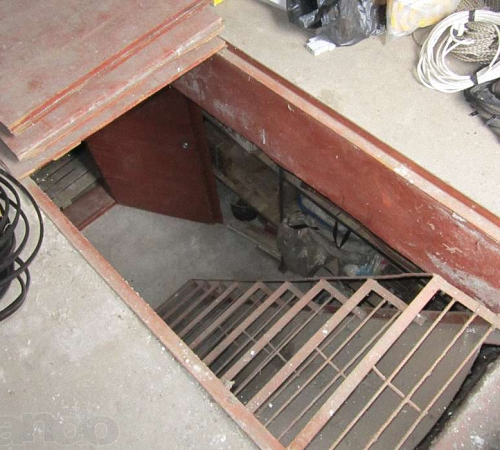
Entrance to the SA can be done with a portable ladder, but in a large garage it will be convenient to make a side entrance by making steps. The above parameters apply to passenger cars, being the owner of a truck, you need to build on its dimensions.
If the pit in the garage is intended for the purpose of inspecting both cars and truck- stick to average parameters.
How to make a floor in a hole?
After determining the location, you can start digging a hole in the garage. If a concrete floor has already been laid in the room, then you will need to cut out part of it in the place where the future recess will be.
For this purpose, a circular saw, a jackhammer or a puncher with a chisel are used, but the latter is best used as a last resort.
Marking is carried out with chalk or other marking tool using a corner, it will help in creating clear lines. In the process of digging a niche right size a plumb line should be used, since it is important to get even walls. When the recess is ready, proceed to the floor.
At the bottom, you need to create a pillow support, for this:
- crushed stone is laid out in an even layer;
- after tamping, a layer of sand is poured;
- the third layer is clay;
- waterproofing material is laid, for example roofing material;
- fittings are placed;
- concrete mortar is poured.

The scheme of the inspection hole in the garage.
After the structure has been concreted, it is necessary to wait for complete drying. Then a waterproofing layer is applied on top of it, thermal insulation work is carried out and then everything is poured with concrete again.
Laying out the walls
The formation of walls in the inspection pit will be performed in several stages. First, clay is applied, then you need to fix the plastic film and spread the roofing material. At the next stage, it is important to take care of waterproofing and thermal insulation, carefully processing each section.
Only after that should you start laying out the walls. Most often side surfaces finished with brick or concrete.
Brick walls
Having chosen the option of brick, the material is placed in a checkerboard pattern in one layer along the width of the brick. In this case, it is necessary to carefully overwrite the seams, and securely tie the corners. The topmost row should protrude slightly above the floor screed, at least 5 cm.
This is done in order to prevent accidental arrival of the wheel of the car on the structure, and also so that foreign objects do not accidentally get inside.
concrete walls
To lay out the walls of concrete, you will need to build a formwork from wooden blocks or boards. Then it is recommended to reinforce the walls with steel wire or reinforcement.
At the same stage, electrical wiring is laid, for safety reasons it is made hidden and hidden under the corrugation, stretching along the walls and leading to the installation points of the lamps. After that, it is fixed on a reinforcing mesh using plastic ties.
The next step will be directly pouring concrete. The process should be gradual, not poured all at once, but in layers of 30-40 cm, while careful tamping with a crowbar or a bayonet shovel is required to remove air from the concrete. Then you need to wait for each layer to dry, which will take 2-3 days.
Regardless of the chosen type of walls, it is important not to forget about niches. If you finish with bricks, it will be more convenient to make formwork inserts of the right size from the boards and lay the material around the niches. In the case of a concrete surface, liners are required.
After laying out the walls, a metal corner should be laid, turned down at an angle, if it is planned to manufacture a cover in the future. In addition, it will protect the car from accidentally falling into a pit.
Pit arrangement

Lighting in the viewing hole.
In addition to carrying out the main work, including digging a pit, strengthening the bottom and walls of the pit, other equally important work will be required.
These include:
- carrying out waterproofing;
- laying thermal insulation;
- providing ventilation inside the trench;
- lighting installation;
- production of a cover for closing a repair pit.
How is the waterproofing of the pit done?
Since the main drawback of the inspection pit is high humidity, it is important to take care of waterproofing. You can protect the repair pit with the help of external or internal waterproofing, the best option will be a combination of the two.
In the first case, actions are carried out even at the stage of building a garage. Theoretically, if the groundwater is deep enough, below 2.5 meters, even during the rainy season, then it is possible not to carry out internal waterproofing work. However, there is a small risk here, so, if possible, this fact is best not to be ignored.
To prevent moisture inside the pit, special films or membranes are used. They are overlapped in whole pieces, covering the pit from one end to the other, with a release of 10-15 cm on the garage floor from all sides of the pit. To ensure a tight joint, they should be glued with double-sided tape in all places.
The film should fit snugly against the pit, for this purpose it is straightened and in the future you should try to avoid damage to it.
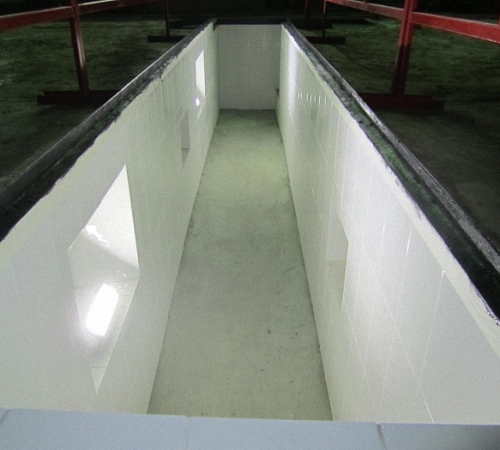
If the pit is built, it will no longer be possible to make external waterproofing, it remains only to apply deep penetration impregnations in order to reduce the hydroscopicity of the walls. The impregnation of the walls is carried out with coating waterproofing; you can also use a composition for pools that resembles rubber.
It will provide a dense film that reliably protects against water. It is recommended to carry out the treatment with the composition at least twice, after which it will dry and it can be washed without problems.
Alternatively, a cement-based deep penetration primer is used. It contains polymer particles that protect against capillary moisture. As in the previous method, processing should be carried out at least twice, and preferably more.
How to insulate a hole?
Thermal insulation of the pit in the garage will reduce heating costs and maintain a comfortable temperature, which is important when carrying out repair work. Polystyrene, extruded polystyrene foam or expanded clay pillow are suitable as a heat insulator.
The first option is considered an excellent option because it can withstand heavy loads, is resistant to precipitation, fungi and bacteria.

Drawing of a garage with a viewing hole.
The material is laid between the soil and the wall, it can also be laid under the screed on the floor of the pit. A reinforcing mesh is laid on top and concrete is poured. Styrofoam is also laid, and expanded clay is most often laid on the bottom of the repair pit, where it also acts as a floor stabilizer for the structure, and not just a heater.
Ensuring ventilation
Ventilation must be provided in the repair trench. Even in a well-heated garage, high humidity can occur and, as a result, condensation can form, which will negatively affect the bottom of the car.
The type of ventilation will depend on the size of the room, in a large one it is quite possible to get by with natural ventilation, but in a small one you will need to create additional ventilation.
The easiest way is to remove the exhaust duct from plastic from one side of the trench. sewer pipe approximately 30 cm above ground level. At the same time, the supply pipe must be embedded in the ground, and its lower edge is drawn with a branch pipe through the wall of the lower part.
The removed end of the ventilation must be covered with a special cover, mesh or grate, which will provide protection from the ingress of various objects or debris.
The ventilation system can be both general and separate. The option of separate ventilation is described above, a common pipe for two holes will be the most effective option. In some cases, pipes are not led out through the roof of the room, but under the garage wall, through the foundation.
holding lighting
For the purpose of comfortable and safe work, one cannot do without lighting inside the pit. In principle, it is possible to use portable lighting devices or a headlamp, but they will not replace full-fledged general lighting.
For this purpose, electricity is provided in the SA. Wiring is carried out by a specialist, so if you do not have the skills, you should not do the work related to electricity yourself.
For lighting, low-voltage lamps of 12 and 35 volts are used; it will be possible to provide a reduced voltage after installing the appropriate transformer in the shield or next to it. Perfectly fit fluorescent lamps, made in a sealed case, ensuring safety during operation.
It is recommended to install devices in niches so that they do not interfere with the work process. If niches were not provided, it is better to choose fixtures with the most flat and impact-resistant body. It will be possible to provide high-quality lighting after uniform installation of light bulbs.
How to close the hole?
To ensure safety in the garage, it is advisable to close the repair pit. Then the car will not accidentally fall inside, no one will fall down, moreover, the cover will additionally protect against negative impact moisture. Are used different materials, most often it is:
- wood;
- sheets of metal;
- metal frames;
- plastic.
The most important thing is that the structure must withstand the weight of a person. Of these materials, relatively cheap and simple option there will be a cover made of wood, it is recommended to select hardwoods. The bars are cut according to the distance between the end walls of the SA. The recommended thickness is at least 40 mm.
Before use, the wood should be impregnated with antiseptic and antifungal agents, as well as varnished, which will significantly increase its service life.
Metal also needs to be sanded and painted. The material has fewer advantages, the metal cover has more weight, is not resistant to corrosion and will not be the cheapest option. If desired, the owner of the garage can make any convenient type of cover for the viewing hole, make it sectional, folding or in the form of a shield.
Outcome
The inspection hole will become an indispensable tool for the owner of the car. With its help, it will be possible to inspect the bottom of the car or perform minor repairs, which will eliminate the need to contact specialists and sometimes help save a lot.
It is not enough to dig a pit and take care of the descent into the trench. The arrangement of the pit should be carried out in accordance with all the rules, which will ensure comfortable use of the repair pit and safety.
And what finish did you use when arranging the pit?
Love for cars is in the blood of men. Whatever his financial situation, to look under the hood in the evening is a matter of honor. Changing oil, candles and other minor repairs can be done on your own without asking for help from a service center. To solve more serious problems, a viewing hole is needed. It is not difficult to build it, it is only important to properly organize the process and calculate the dimensions.
An embarrassing moment that can be prevented
In addition to the obvious advantages, which it makes no sense to list, an inspection hole can harm your car. In the lowland, the humidity is excessively high, and if the machine is constantly standing over an uncovered pit, this can cause corrosion of the bottom. The problem of high humidity and condensation is found everywhere, and this does not depend on the size of the inspection hole in the garage.
This problem can be solved with the help of high-quality waterproofing, which must be taken care of during the construction process. Initially, it is necessary to find out the level of groundwater occurrence. If it does not exceed a depth of 2.5 meters, then you will have to equip it, which will drain water into a specially provided well. When pouring walls, be sure to add a waterproofing compound to the concrete, which will prevent condensation from forming. It is also possible to isolate the outer side of the walls with a waterproofing membrane, but this must be done at the stage of formwork installation.
 inspection hole drawing
  scheme of a viewing hole with niches
How to calculate the size of the viewing hole in the garage
The determining criterion in determining the size of the inspection hole is the car, or rather its dimensions. But what if you often change cars? Not to remake the hole after each new purchase? Of course not, you just need to immediately calculate the optimal width. It directly depends on the size of the wheelbase of the car and the size of the owner himself. A width of 70-80 cm is as close as possible to universal meaning. With depth, things are even easier. It all depends on the growth of the owner, while he should reach the bottom without any problems. It is also worth paying attention to the comfort of the position, because if you have to stretch out in the pit or, on the contrary, bend down, then productive work will not work. To make it easier to count, add 10-15 cm to your height and you will get the optimal depth. These dimensions of the inspection hole in the garage are basic, but you can make small changes to them.
 inspection pit plan with niches for tools
  pit for a hole
Construction of a viewing hole
The process of building a viewing pit will not stretch for a long time, but will be very time consuming. First of all, this concerns earthworks, that is, digging a foundation pit. It is calculated taking into account the depth of the pit itself, the thickness of the floor, walls and waterproofing. You will have to add another 50 cm to the width, which will go to the walls.
 waterproofing, formwork and reinforcement
  vibrating concrete pouring
Now that the pit is dug, we proceed to the floor. At the bottom it is necessary to pour a 10 cm layer of crushed stone and compact it well. On top of it we pour half the smaller layer of sand and also tamp. This "pie" needs to be covered waterproofing film, on which the reinforcing frame will then rely. Everything is ready, you can safely pour concrete. At the stage of its preparation, you need to add special agent, which will give the dried floor a waterproofing property. The solution is poured into the formwork with a layer of 10 cm, leveled, and left to dry completely. As a rule, under favorable weather conditions, it takes about 3 days.


After the floor was completely dry, it was the turn of the walls. Formwork is also constructed for them, a waterproofing membrane is laid and a reinforcing frame is installed, which will add strength to the walls. At this stage, you can adjust the thickness of the walls under finished sizes inspection hole in the garage.
Finishing is carried out on the dried walls. They can be plastered, finished with tiles or gypsum fiber boards. A frame welded from metal corners is installed on the edges of the pit and fixed. Subsequently, it will serve as a support for boards or other panels covering the pit. They can be covered with a film, which will serve as additional protection against condensate.
A properly equipped garage pit allows you to carry out an independent inspection or minor car repairs without contacting a service station. Creating comfortable working conditions, we must not forget about the safety standards of the design and equipment of the pit.
What size should the inspection holes be?
First of all, at the site of the arrangement of the inspection hole, it is necessary to find out the level of groundwater. If it is at around 2.5 m from the soil level, then it is better to forget about the idea of arranging a pit. Water will constantly accumulate at the bottom and no measures will help save the bottom of the car from corrosion. It is better to install a flyover structure on the street near the garage to inspect the car.
Before marking for digging, trenches are determined with the size of the pit.
In this case, they are usually guided by the following data:
- The depth of the inspection hole is usually laid based on the growth of the car owner. The optimal height from the bottom of the pit is 10–15 cm greater than the height of a person. Only in this case, the most comfortable working conditions are provided, when you do not have to squat, bend down or stretch high.
- The width should be linked to the dimensions of the car. However, the calculations should take into account all possible modifications. Optimal sizes 70–80 cm are considered, but with a larger wheelset width, the pit can also be as much wider.
- The optimal length is at least 1 m larger than the size of the car. This provides an unhindered comfortable descent into the pit. Usually, in the design process, the arrangement of a small staircase or steps is envisaged.
When constructing inspection pits at service stations, they are primarily guided by the principle of the universality of this object, and therefore the dimensions there are somewhat different. So, for example, for the post of STO RUUK, where passenger cars are produced, the dimensions of the pit are 1000x5500x1800 mm (width, length, height). Moreover, for service stations, the height is indicated not to the floor level, but to the surface on which they must stand during the repair. In workshops, these work surfaces are not always flush with the floor.
If a pit is being built for servicing trucks, then its dimensions change somewhat. For large cars various models very different distance between the wheels. Therefore, the width of the base of their own transport is taken as the basis. The pit must be made narrower than this characteristic by 30–40 cm. If the width of the inspection pit turns out to be less, then it will be problematic or impossible to get to all the necessary truck components.
When a pit is needed for inspection of both cargo and passenger car, its width is averaged. With a width of 120 cm for one car and 80 cm for the other, the desired size is 1 m.
Marking and digging a trench for a viewing hole
Before you correctly mark the boundaries of the trench being dug under the pit, you must first decide on building material her future walls. If it is planned to build bricks with a width of ½ brick, then the thickness of these walls will be about 12 cm (dimensions differ for this material of different grades) and in this case 24 cm are added to the dimensions of the pit. The values obtained will be the length and width of the trench. When laying in 1 brick is supposed, then, accordingly, the thickness of the walls will be approximately 24 cm, and 40 cm are added to the length and width of the pit. If it is planned to concrete the walls, then their thickness is assumed to be 20 cm (this is quite enough), and to the dimensions add 40 cm.
On the floor of the garage, we mark it with pegs or draw a trench rectangle. Then, based on the quality of the stability of the soil being dug, we make an approximate indent from the intended perimeter to form the slope of the trench walls without losing the size of the future pit.
They dig a trench with their own hands, because its proportions are rather small. At the same time, an allowance is made to a depth of 20–25 cm. The floor and walls are carefully leveled - this will greatly simplify further operations.
Before digging a trench, it is imperative to choose a place for storing soil, because part of the earth will later be needed when filling the gap between the walls of the trench and the viewing hole. The standard volume of such earthworks is usually 9 m 3. When calling transport for the removal of soil, it must be taken into account that loosened soil has a volume of 20-25% more than that of a trench.
Construction and arrangement of a viewing hole
Do-it-yourself waterproofing of the inspection pit should be provided. A budget option- the use of oily clay, which is mixed with waste from processed petroleum oils. Modern options:
- polymer membranes - the most reliable and expensive material, there are single and multilayer;
- penetrating - such waterproofing of the inspection hole is often used at service stations, it is convenient to use;
- bituminous in rolls - easy to install and inexpensive material: rubemast, ruberoid, euroroofing material, special lubricants.
Immediately before concreting the floor, its base must be prepared:
- we pour gravel with our own hands on the bottom of the trench with a 10-centimeter layer, carefully tamp it down and level it;
- we fall asleep dry sand with a layer of 5 cm;
- we make waterproofing - you can use greasy clay, and lay a film of polyethylene on top of it;
- do-it-yourself reinforcement with 4-5 mm reinforcement and steel wire mesh with a mesh size of 150 × 150 mm.
After that, concreting is performed. After the floor has completely hardened, it is necessary to lay another 1 layer of waterproofing and finish the finish (after the erection and finishing of the walls).
If you plan to make walls of concrete or brick, then you can make it yourself or order a special frame to prevent dangerous rides into the pit:
- we weld the embedded part (volumetric frame) from steel channel or corners;
- we make anchors (“mustache”) from reinforcement along the contour of the frame 50 cm long;
- we plant the frame in a trench at the level of the garage floor;
- we fix the anchor (you can bend it if the part is not fully included in height).
Such a "clip" will additionally strengthen the corners of the walls. If it is supposed to be poured with concrete, then the part is installed inside the formwork. After waterproofing the walls with your own hands, they can be strengthened with a chain-link mesh. We make a formwork for concreting and install it 3 cm from the wall. At the same time, we provide for the device of niches for tools and cylindrical ones for lamps. We reinforce their ceiling with reinforcement rods with a diameter of 8–10 mm. After concreting, work is suspended for 1 week. Then we backfill the soil with our own hands, and after another 2 weeks we remove the formwork.
According to safety regulations, only low-voltage portable and stationary lamps can be used to illuminate the pit. Workshops typically use 36V fixtures with a built-in transformer to step down the 220/36V voltage. You can also use fixtures or carriers with 12V and 24V lamps connected to step-down transformers or a battery.
The lid for the pit is assembled from boards (can be composite). It will protect the car owner from falling, and the car body from moisture condensing in the inspection hole.
 Where are the boundaries between these categories of consumers?
 What is an asset directory
 Free programs for Windows free download
 Realtek Audio Driver (Realtek HD Audio)
 Realtek Audio Driver (Realtek HD Audio)
 RK account not found what to do
 Does ureaplasma pass by itself (can it pass on its own)?